Modern VS Code extension development tutorial: Building a secure extension
October 2, 2023
0 mins readThe widespread success and influence of Microsoft Visual Studio (VS) Code can be largely credited to its extensibility. While it's often categorized as a code editor, with the right knowledge and extensions, it can be so much more. For instance, it can also be used as a web browser, word processor, or file-management system. Microsoft also encourages developers to take advantage of VS Code's extensibility by making the VS Code API as accessible as possible.
VS Code's extension development has come a long way since the tool was first released in 2016. It's more streamlined and developer-friendly. However, there are still some special considerations and practices you must be aware of before you start building your own extension.
In our first modern VS Code extension development blog post, we covered the basics of VS Code development, including the architecture and the various types you can create. This article will help you apply that knowledge by showing you how to create and code your very own VS Code extension.
Building a VS Code extension
In this tutorial, you'll learn how to build a multifunctional extension for VS Code that will teach you how to implement different types of extensions. The completed project can be found in this GitHub repository.
Scaffold your VS Code extension project
There are a few things you need to successfully follow this tutorial. In addition to VS Code, VS Codium, or VS Code Insiders, make sure you have the following tools installed:
You use them to install Yeoman and the VS Code Extension Generator. This generator creates a frame (scaffold) for your extension so you don't have to write everything from scratch. If you elect to build your project using TypeScript (recommended for this blog), it's recommended that you install the TypeScript + Webpack Problem Matcher to make it easier to find and match coding errors.
Once you have Node.js and Git installed, open the system command line interpreter of your choice (command prompt, PowerShell, Terminal, etc.) and then run the following command:
npm install -g yo generator-codeIt takes a few moments to install Yeoman and its VS Code Extension Generator:

Once the installation is finished, use your terminal to navigate to your project folder (where you plan to keep your project) and run the following command:
yo codeThis launches the Yeoman CLI, which requires you to choose the type of project you'd like to scaffold. It's recommended that you choose the New Extension (TypeScript) option. However, if you're more comfortable using JavaScript, select the second option:
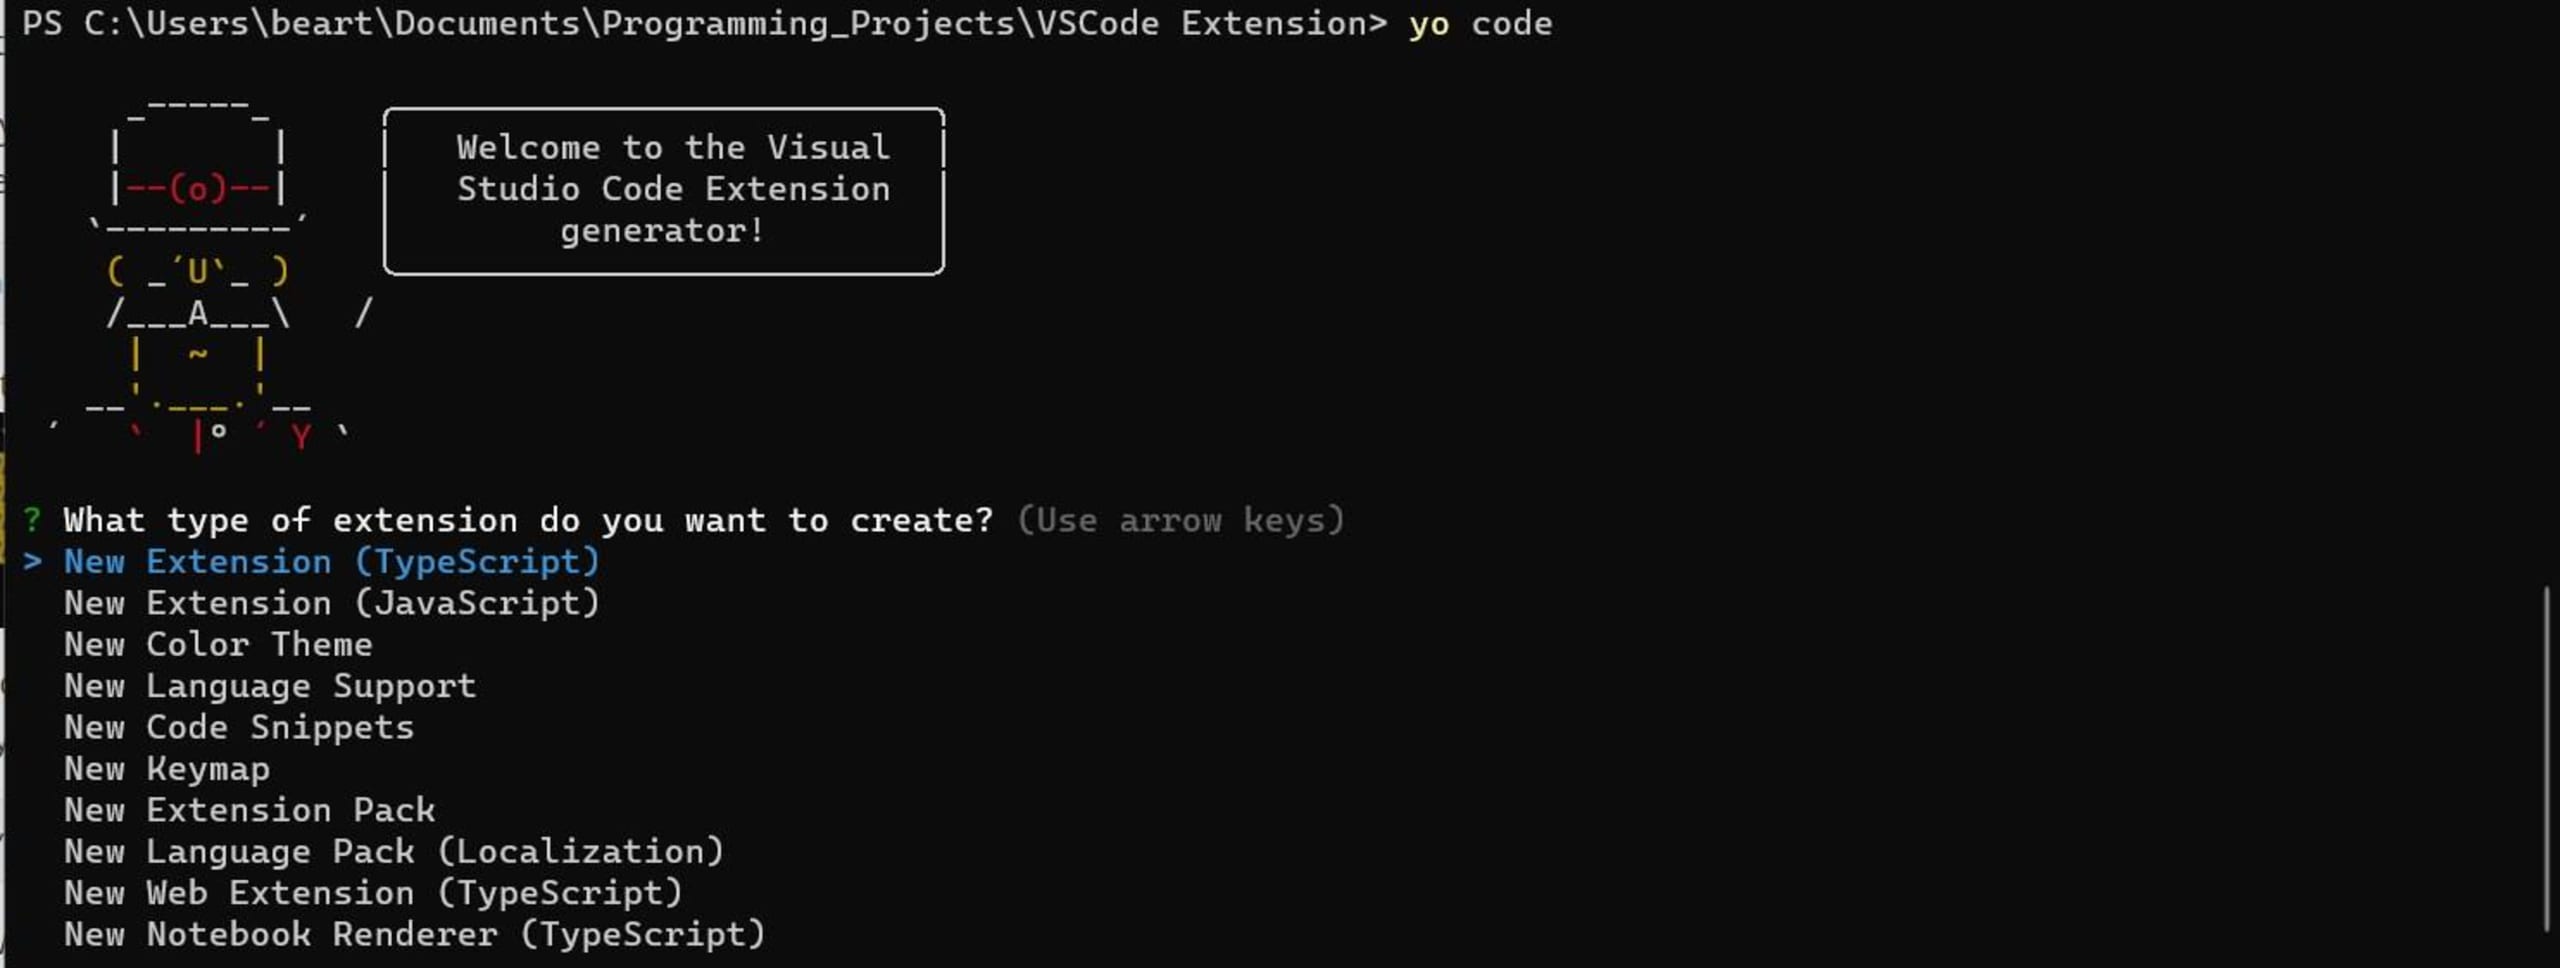
The generator then asks you to give your extension a name. Name it something simple like "My Editor Tools". Additionally, you need to enter an identifier for your extension, such as editor-tools.
Use the following to describe your extension: "A collection of simple editing tools for VS Code." And then decide if you want to initialize a Git repository for your project. You can also choose to initialize manually later.
At this point, you are asked if you'd like to bundle your source code with webpack. Confirm that you do and then select npm as your package manager:
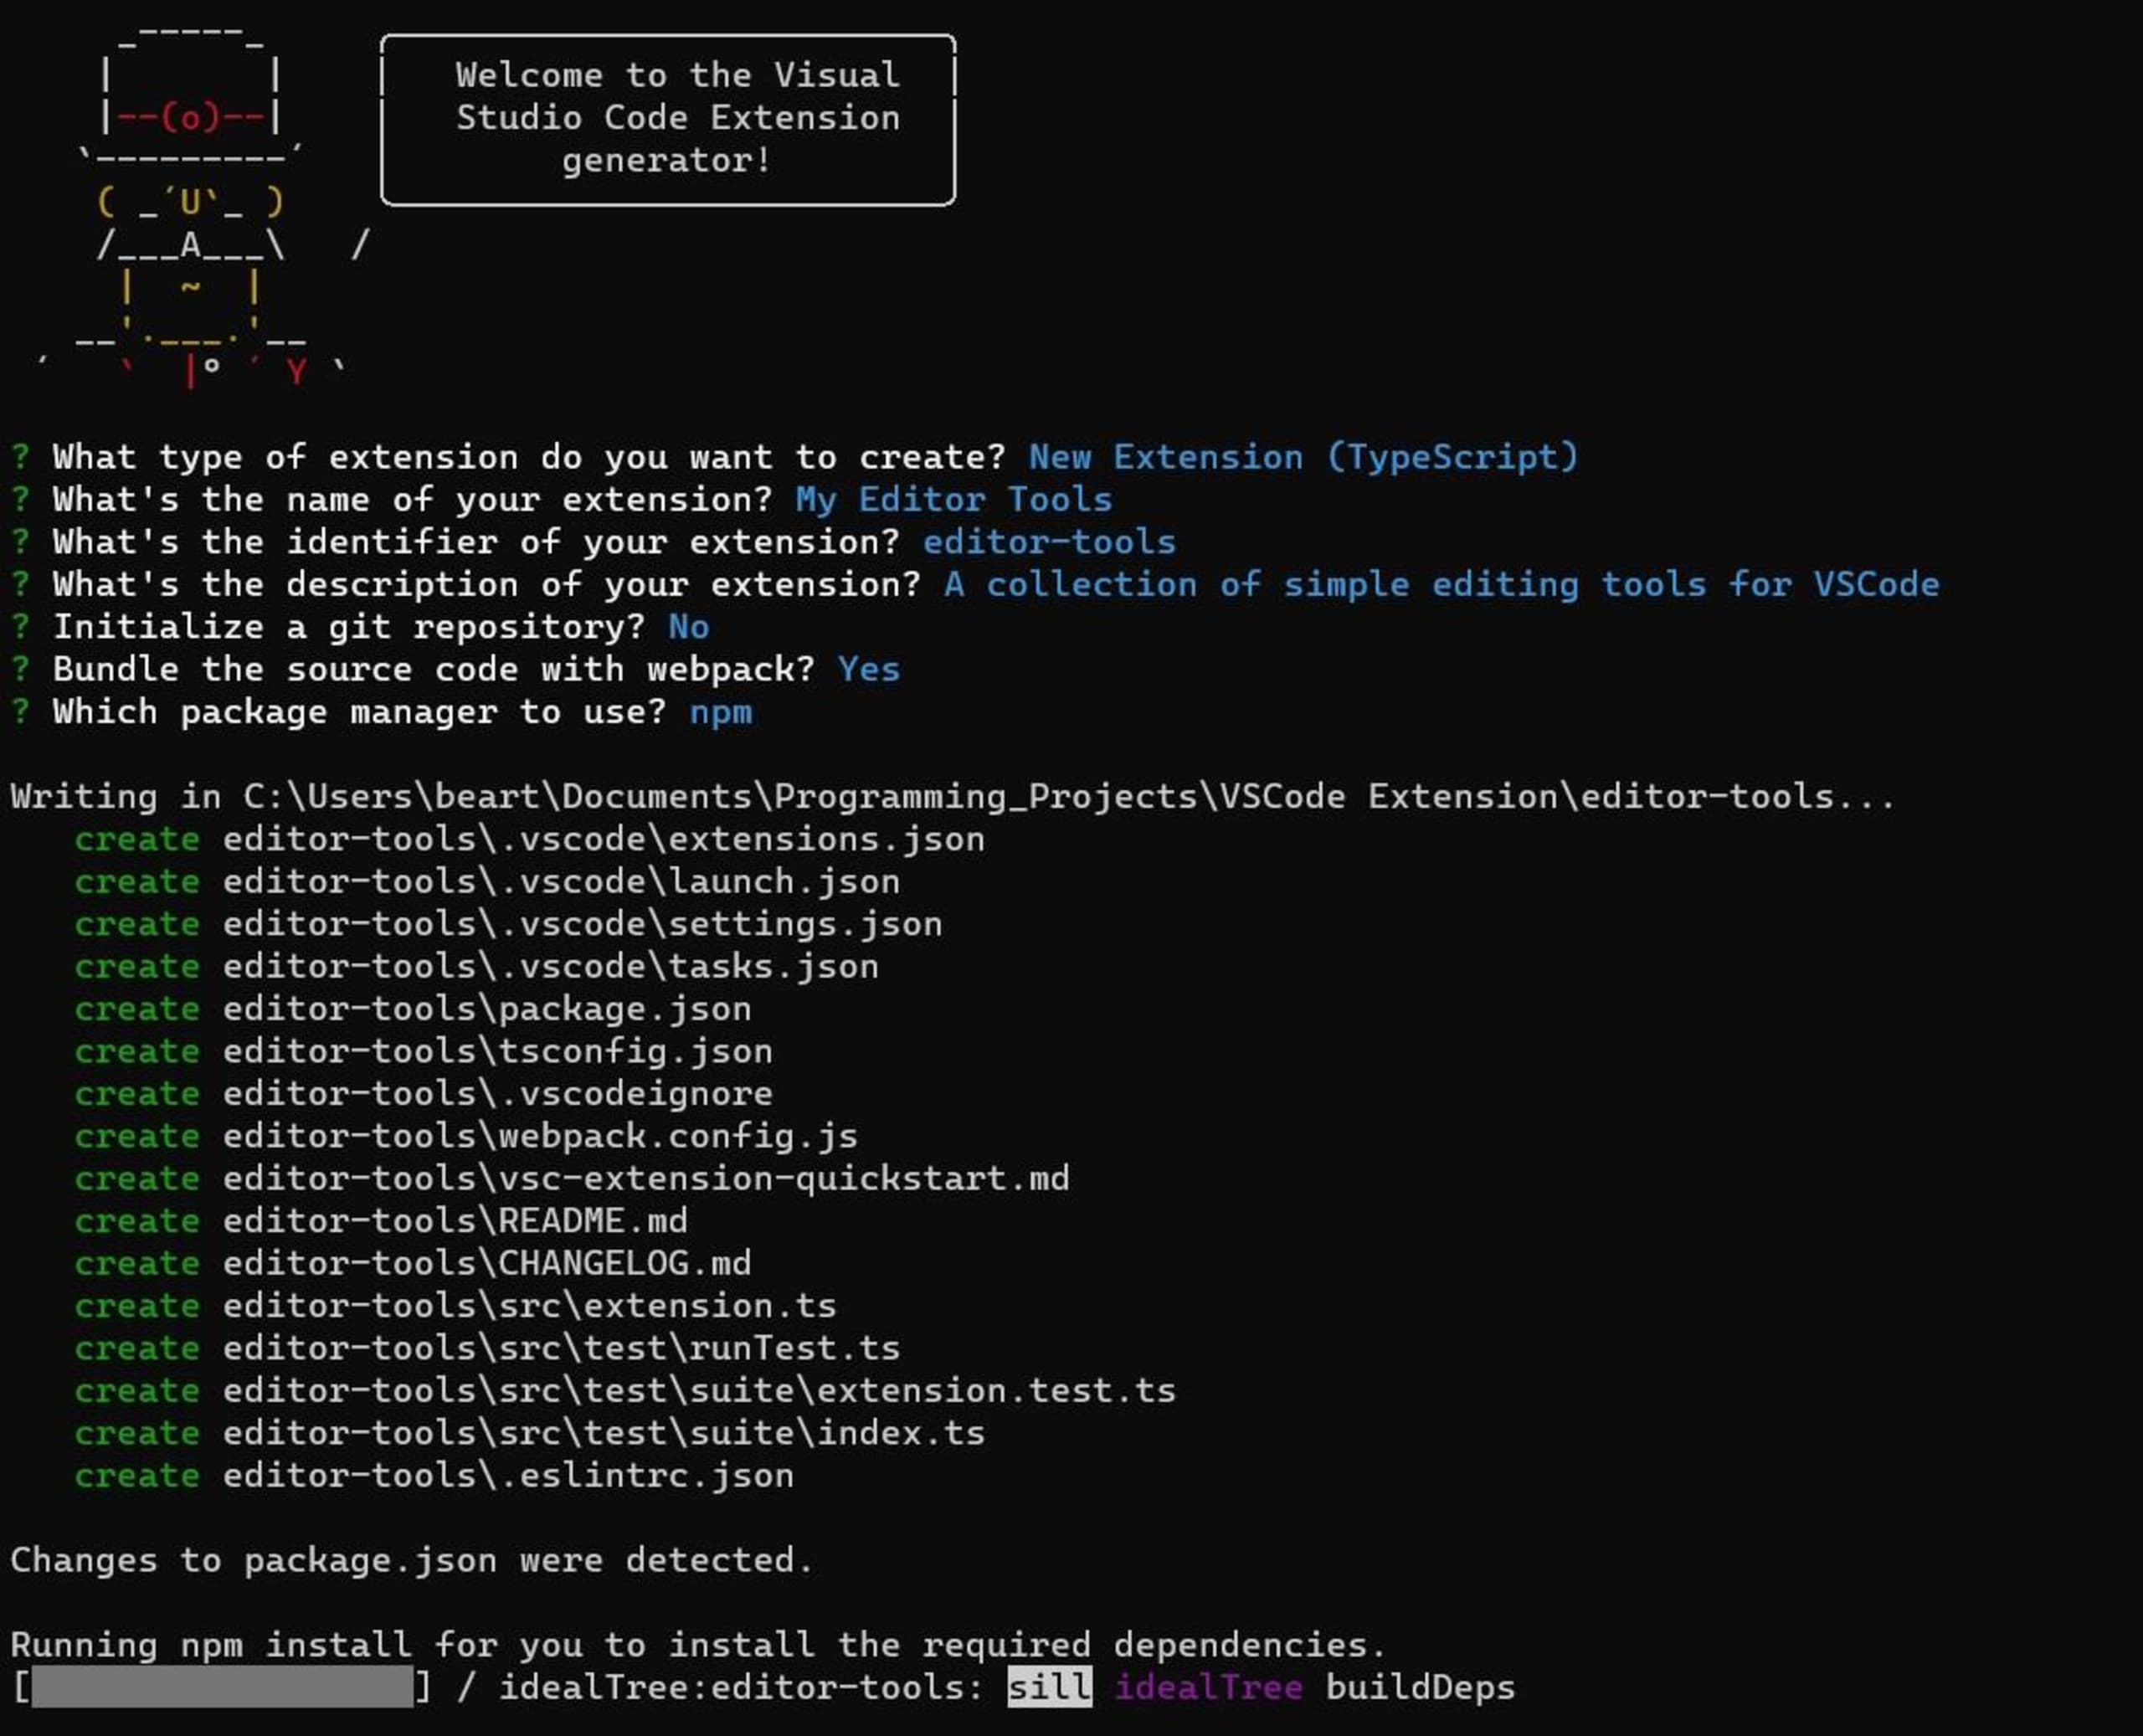
It takes the extension generator a few moments to scaffold your project. Once complete, it asks you if you would like to open the project in whatever edition of VS Code is available on your system. Confirm this by clicking Enter. This opens the project's source code in a new VS Code window:
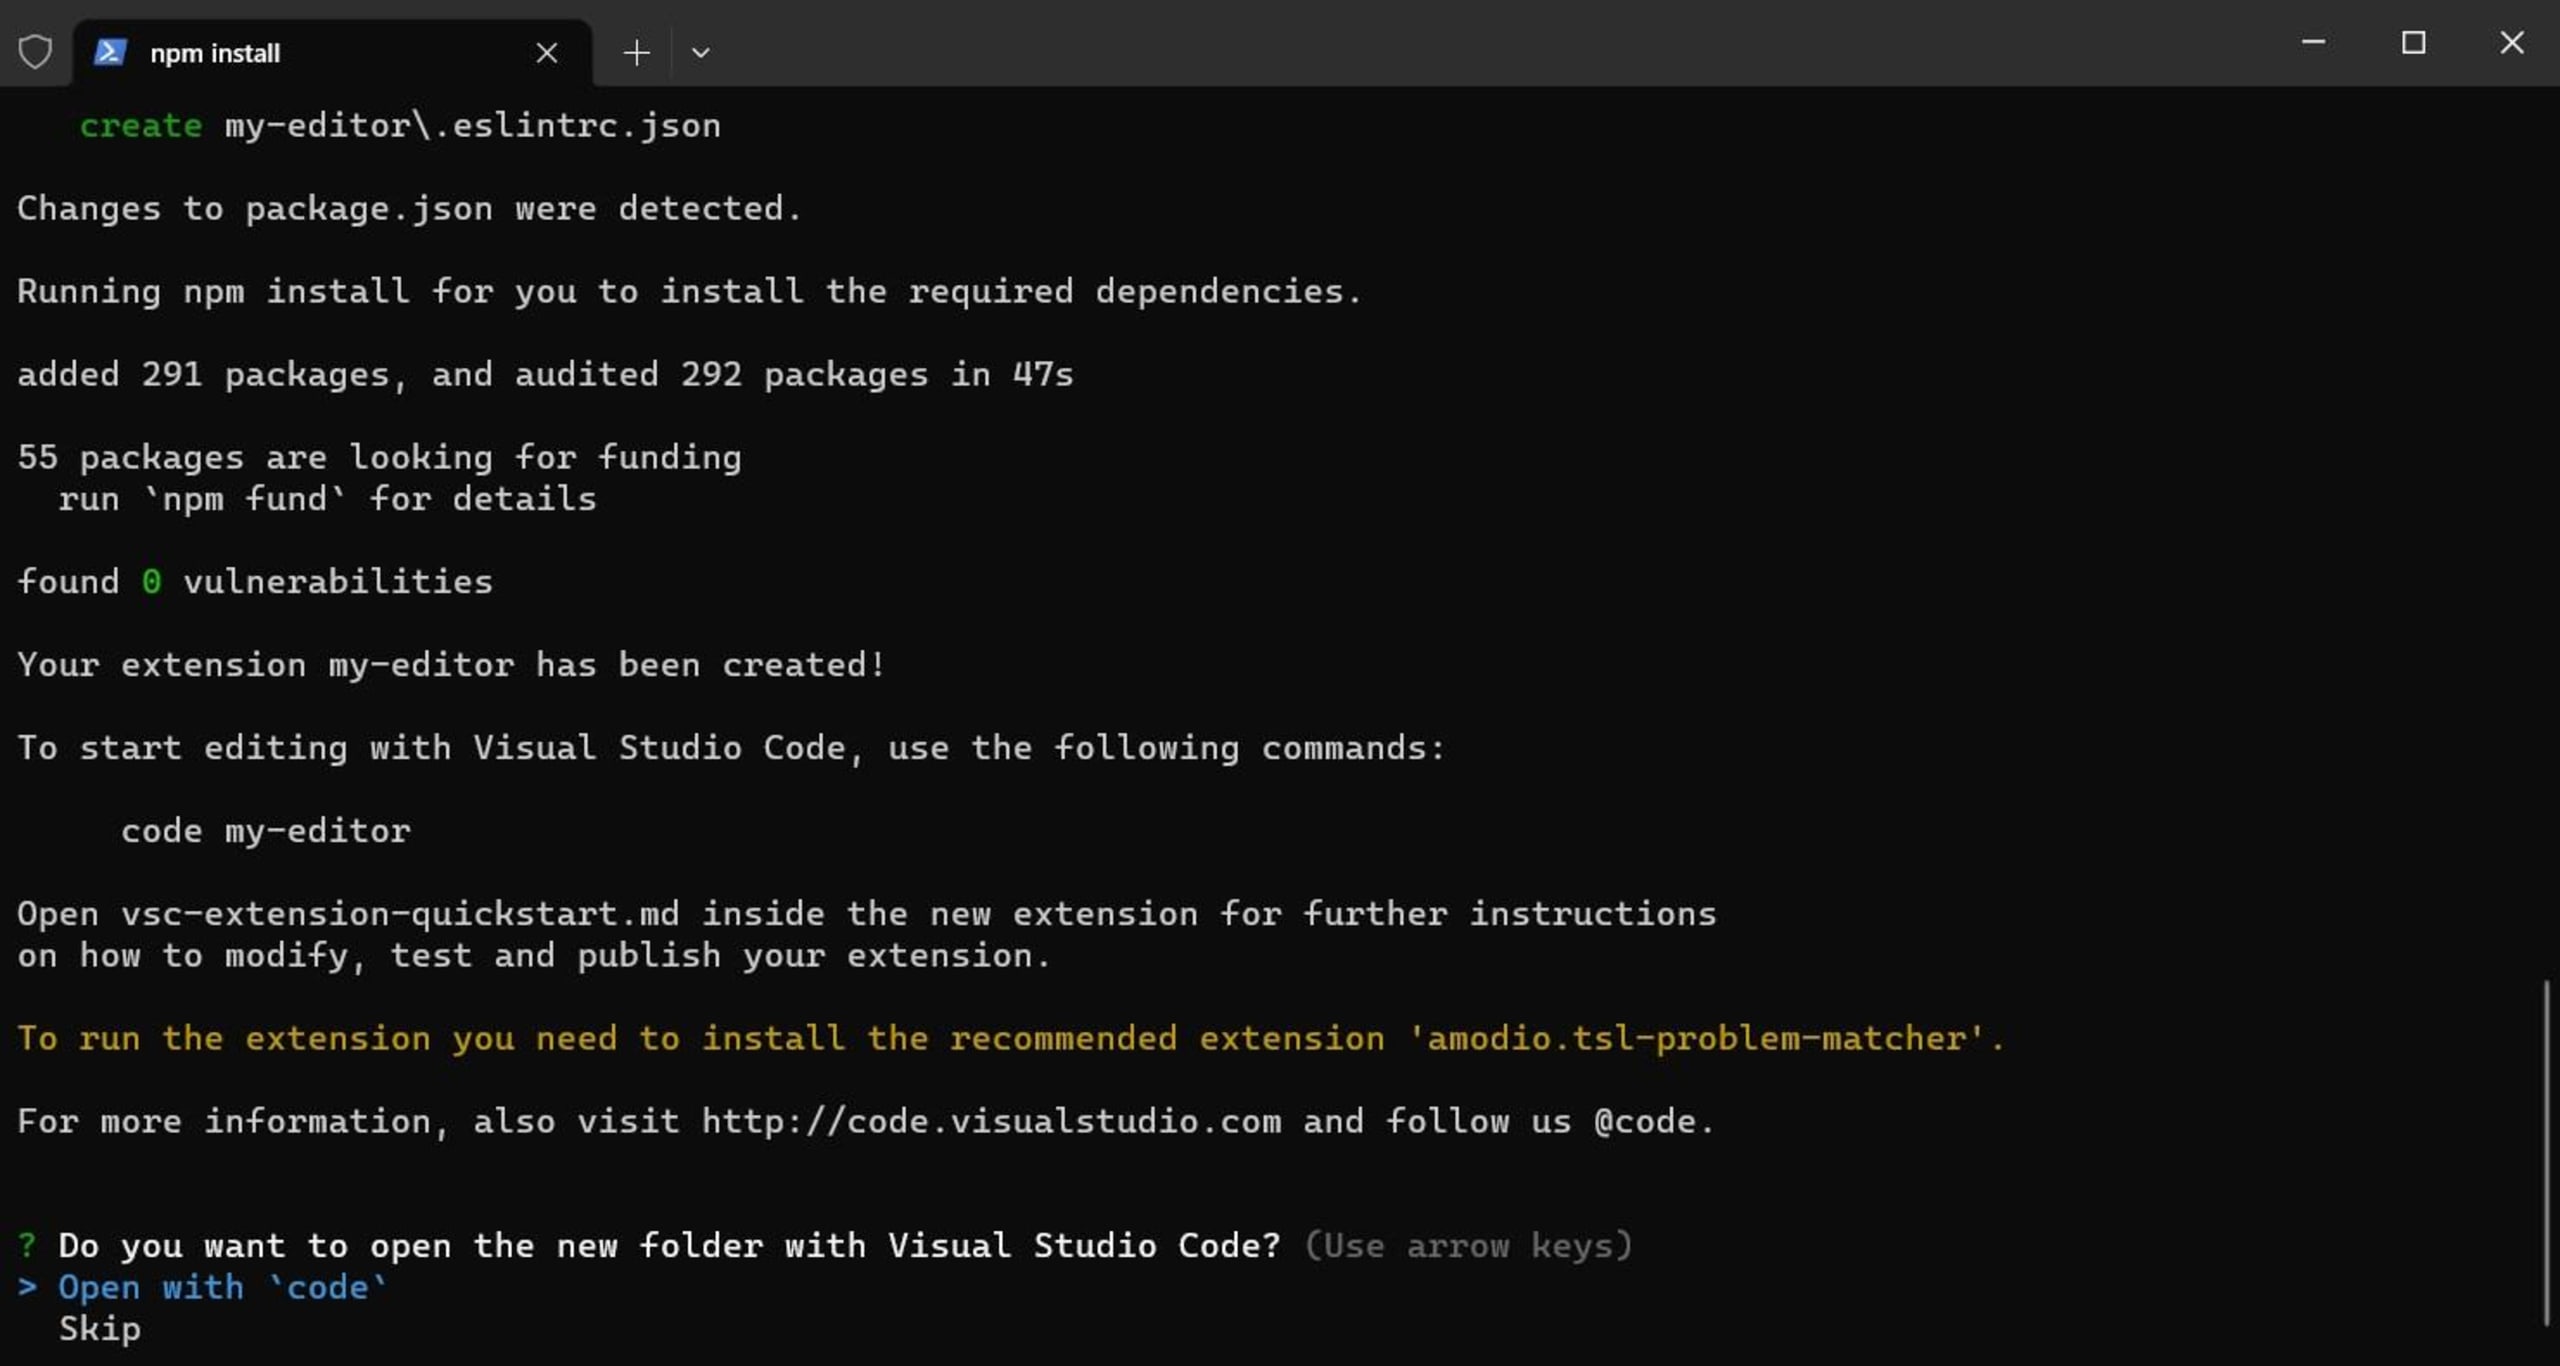
Please note: In this tutorial, Visual Studio Code 1.79, npm 9.5.1, and Yeoman 4.3.1 are used. As such, the project initialization process may differ slightly depending on what versions you're using. Please adapt the steps as needed. If you don't like using CLIs and prefer to use a graphical setup, you should install the Yeoman Application Wizard for future projects.
Prepare the project
Your version of Yeoman may have scaffolded the project with reference to the vscode module in the package.json file. While this module is still widely used, it's been deprecated for security reasons. If you fall into this category, make sure you update your project.
To prepare the project, you need to start by ensuring that the @types/vscode package is installed and declared as a development dependency in your project. Use the VS Code Explorer to open your project's package.json file, which contains all your project's dependencies.
Once you've opened the package.json file, scroll down until you reach the `"devDependencies"` object. Make sure that the "@types/vscode": [version], key and value are defined within it:
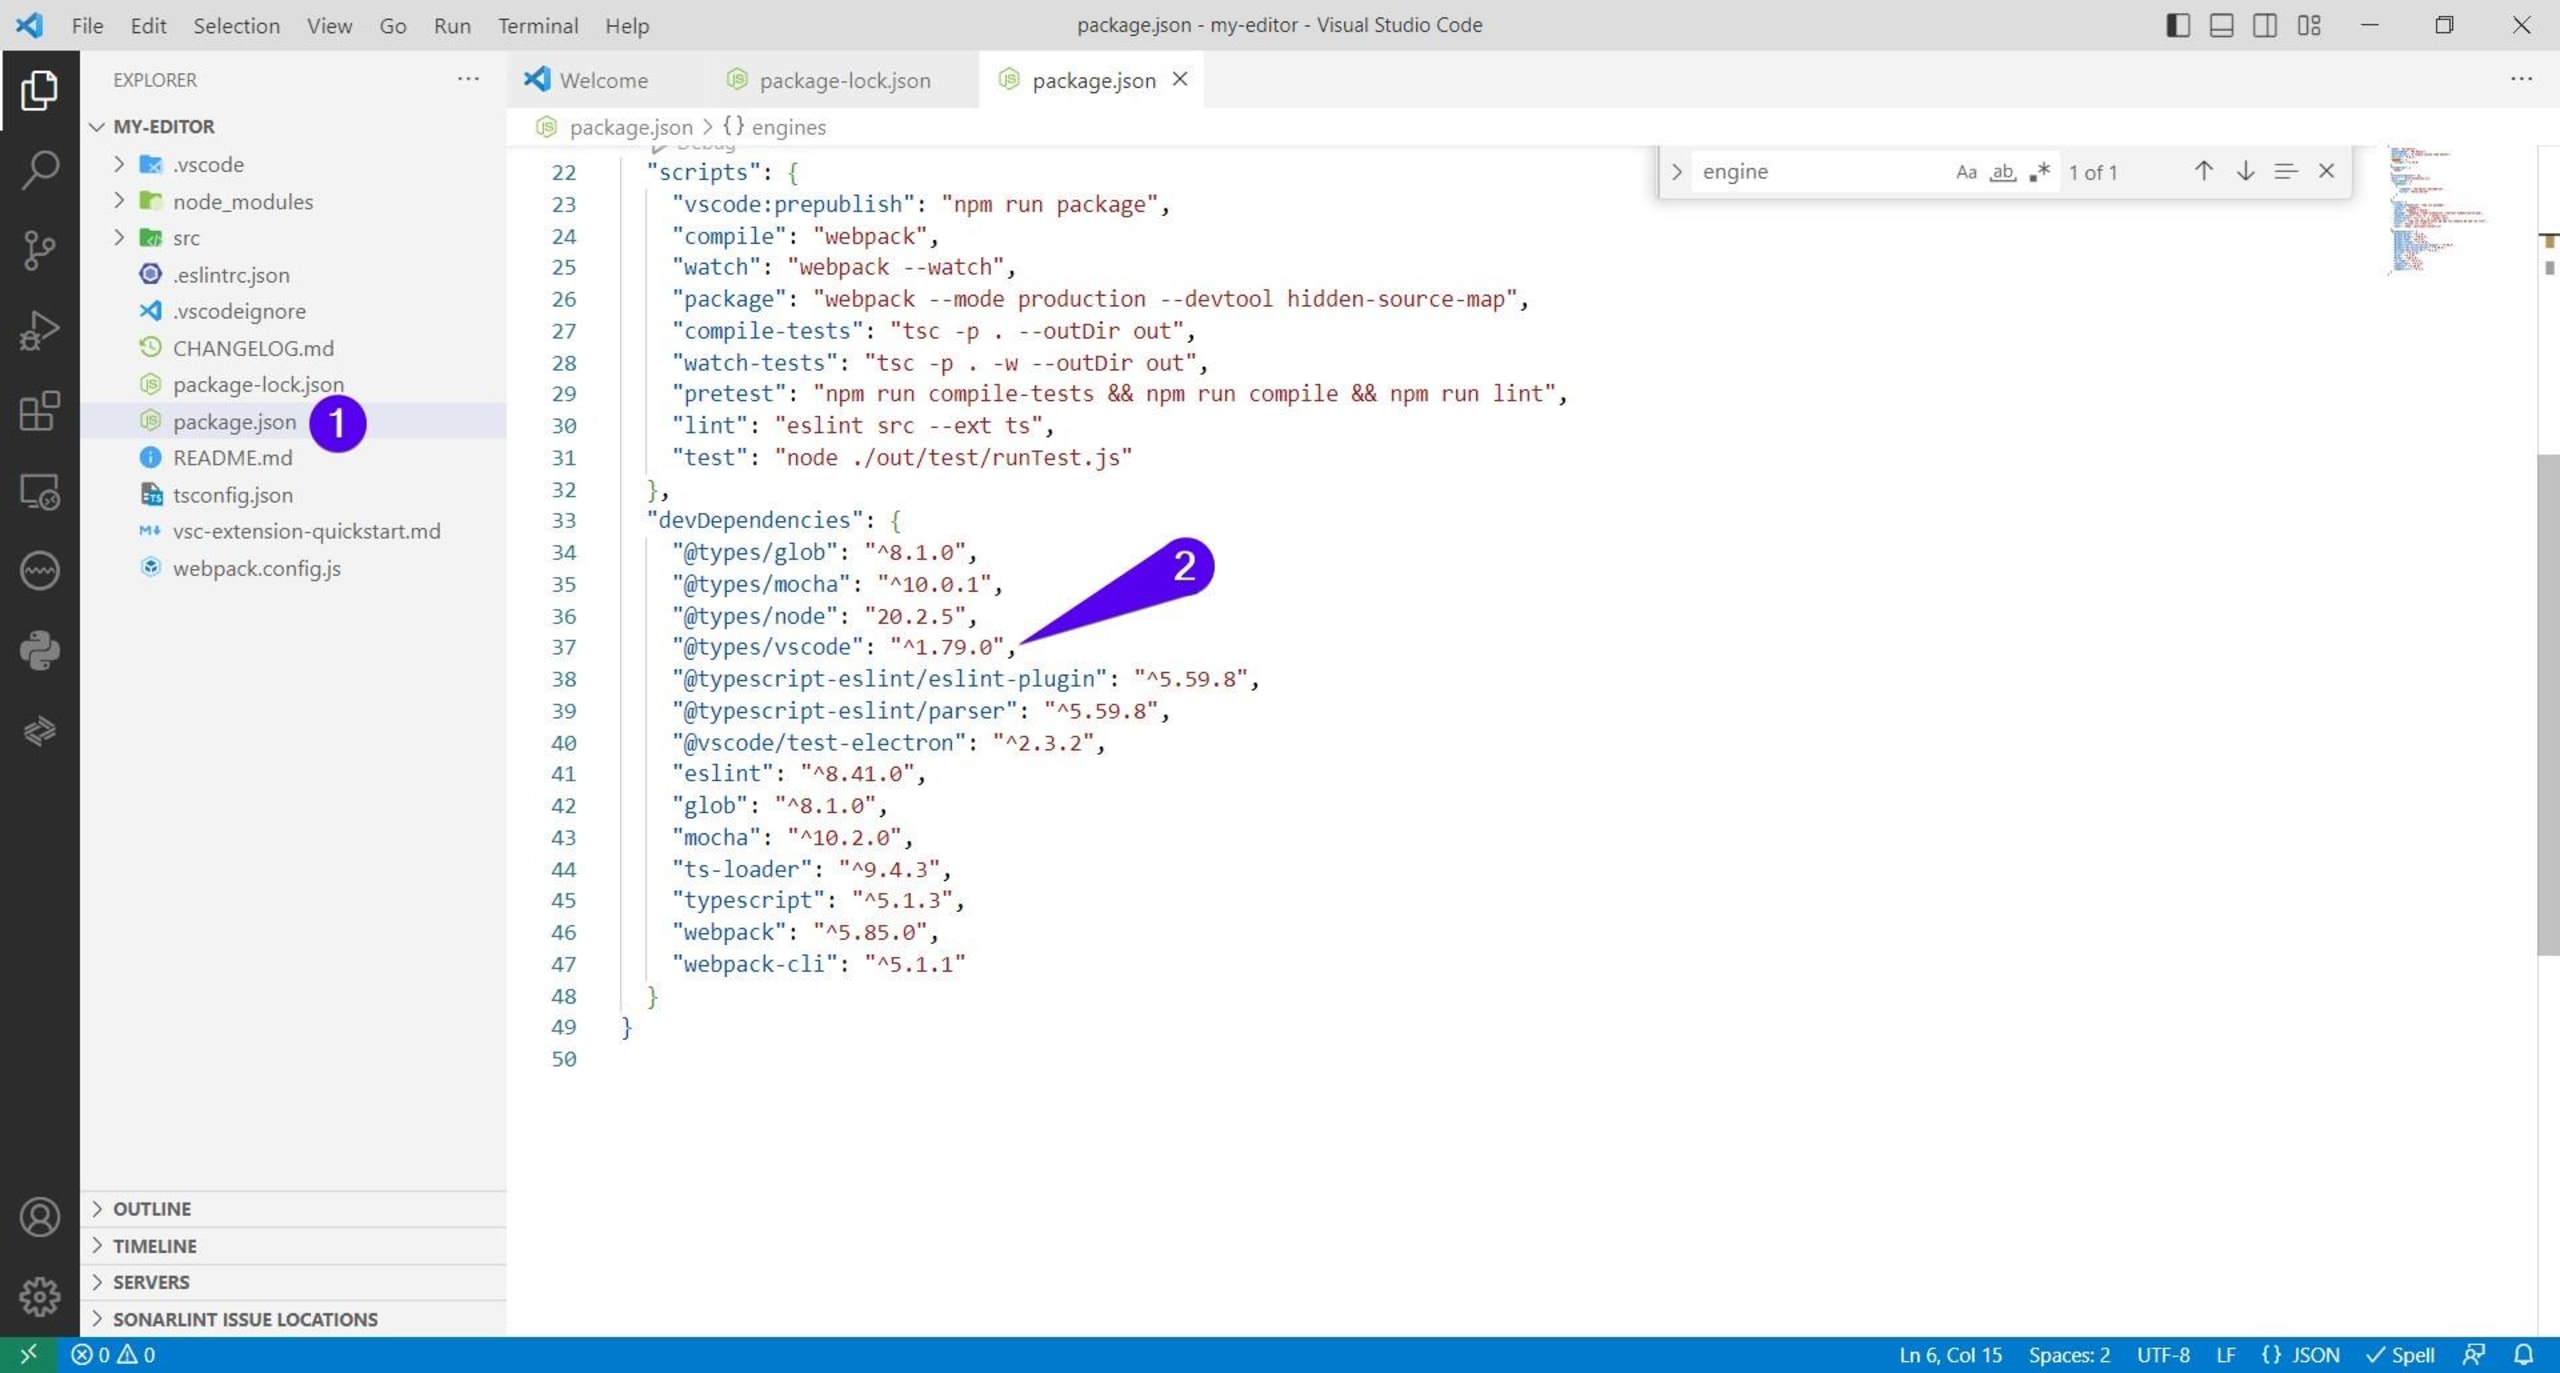
Additionally, you need to make sure that the @types/vscode package's version number matches the VS Code engine version. To do this, scroll up through the package.json file until you reach the "engines" object. The VS Code engine version number can be found next to the "vscode" key:
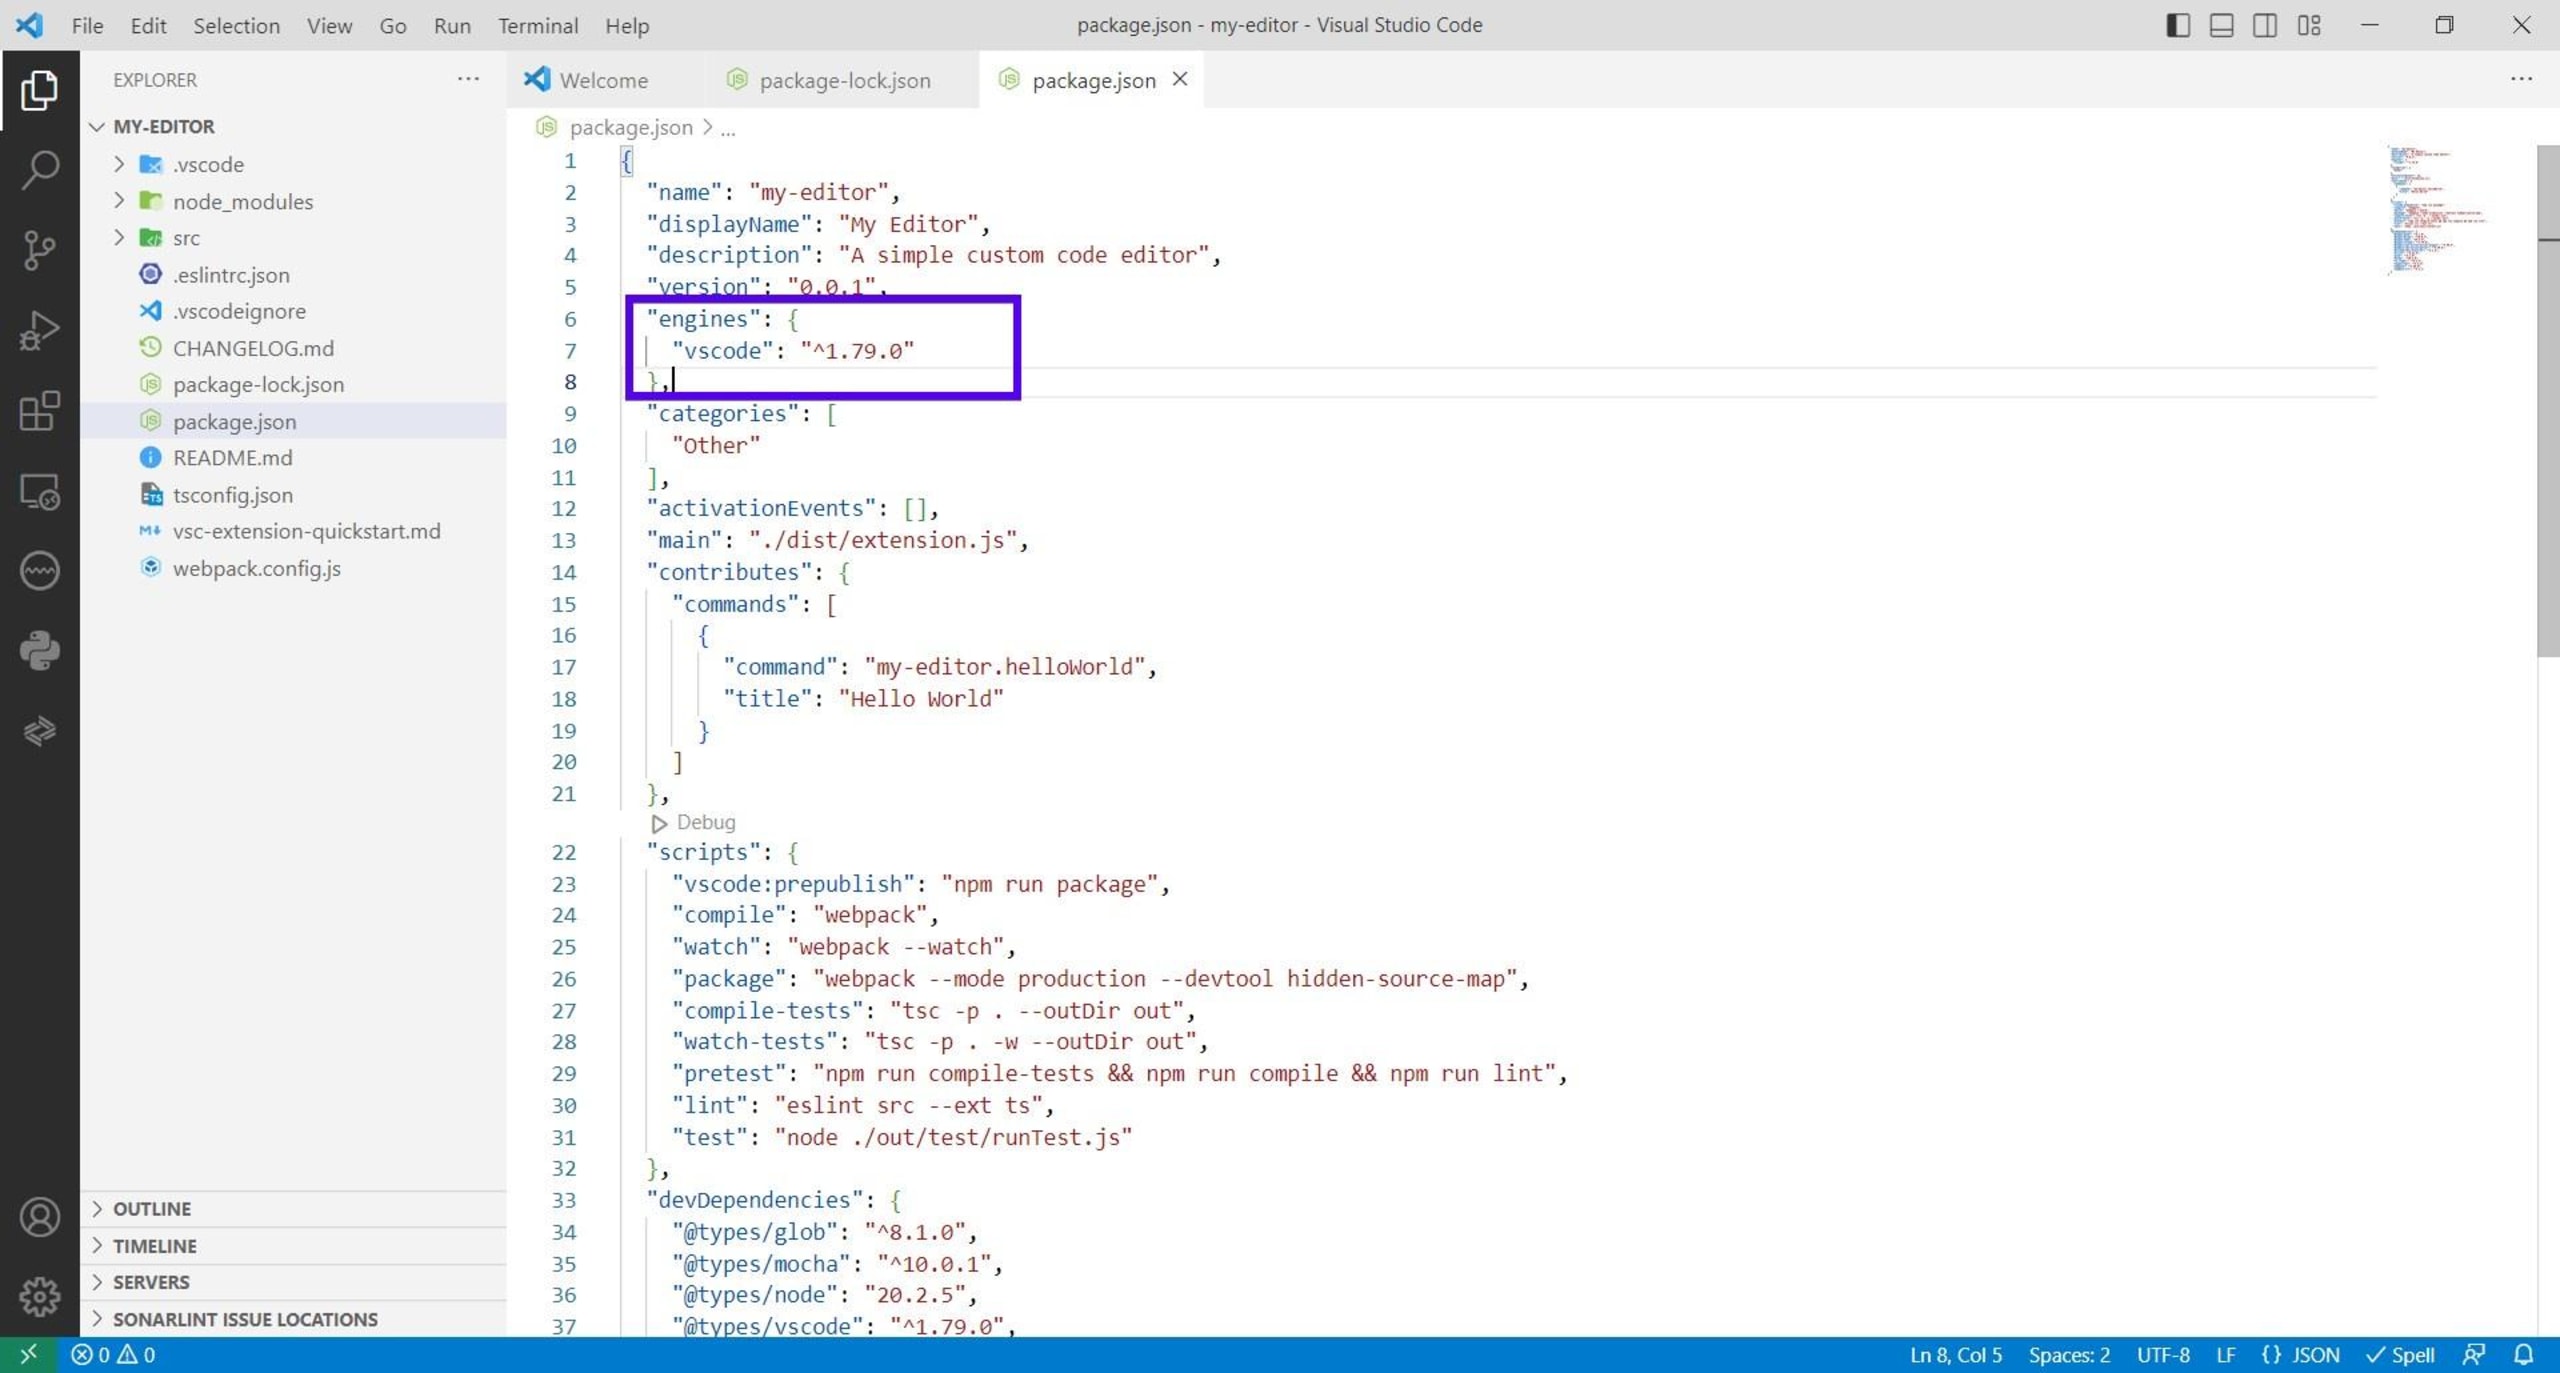
If the @types/vscode version number doesn't match the engine version, manually change the @type/vscode version number to match.
If you find the @types/vscode package is completely missing from thepackage.json` file, do not attempt to download and add it manually. You should use npm to install and configure the necessary packages for you by launching your command line terminal and navigating to your project's root folder (cd editor-tools). Then input and run the following command:
npm install --save-dev @types/vscode
Validate the package.json again and ensure it's referencing all the necessary modules. To reiterate, the entire point of ascertaining that your project is using the right vscode module is to ensure that you're using the most secure libraries to write your extension. In turn, this assures that your custom extension is secure.
The decision to update and split the old VS Code npm package into two separate packages was driven by various factors. One significant reason was that the original package included transitive dependencies to a compromised package called event-stream. This move was aimed at enhancing security in VS Code modules, in addition to improving performance, reducing complexity, and introducing new features.
However, you should also still consider running some preliminary security and quality checks on your project. This will ensure that your project was scaffolded correctly and securely.
Verify your project
To help you verify the security of your project's installation, you can use Snyk. The easiest way to integrate Snyk's tools into your VS Code workflows is by installing the Snyk extension after registering for a free Snyk account.
Once you've installed the Snyk extension, open the Extensions window, and search for "Snyk". Make sure you install the release version, which should be the first option in your search results:
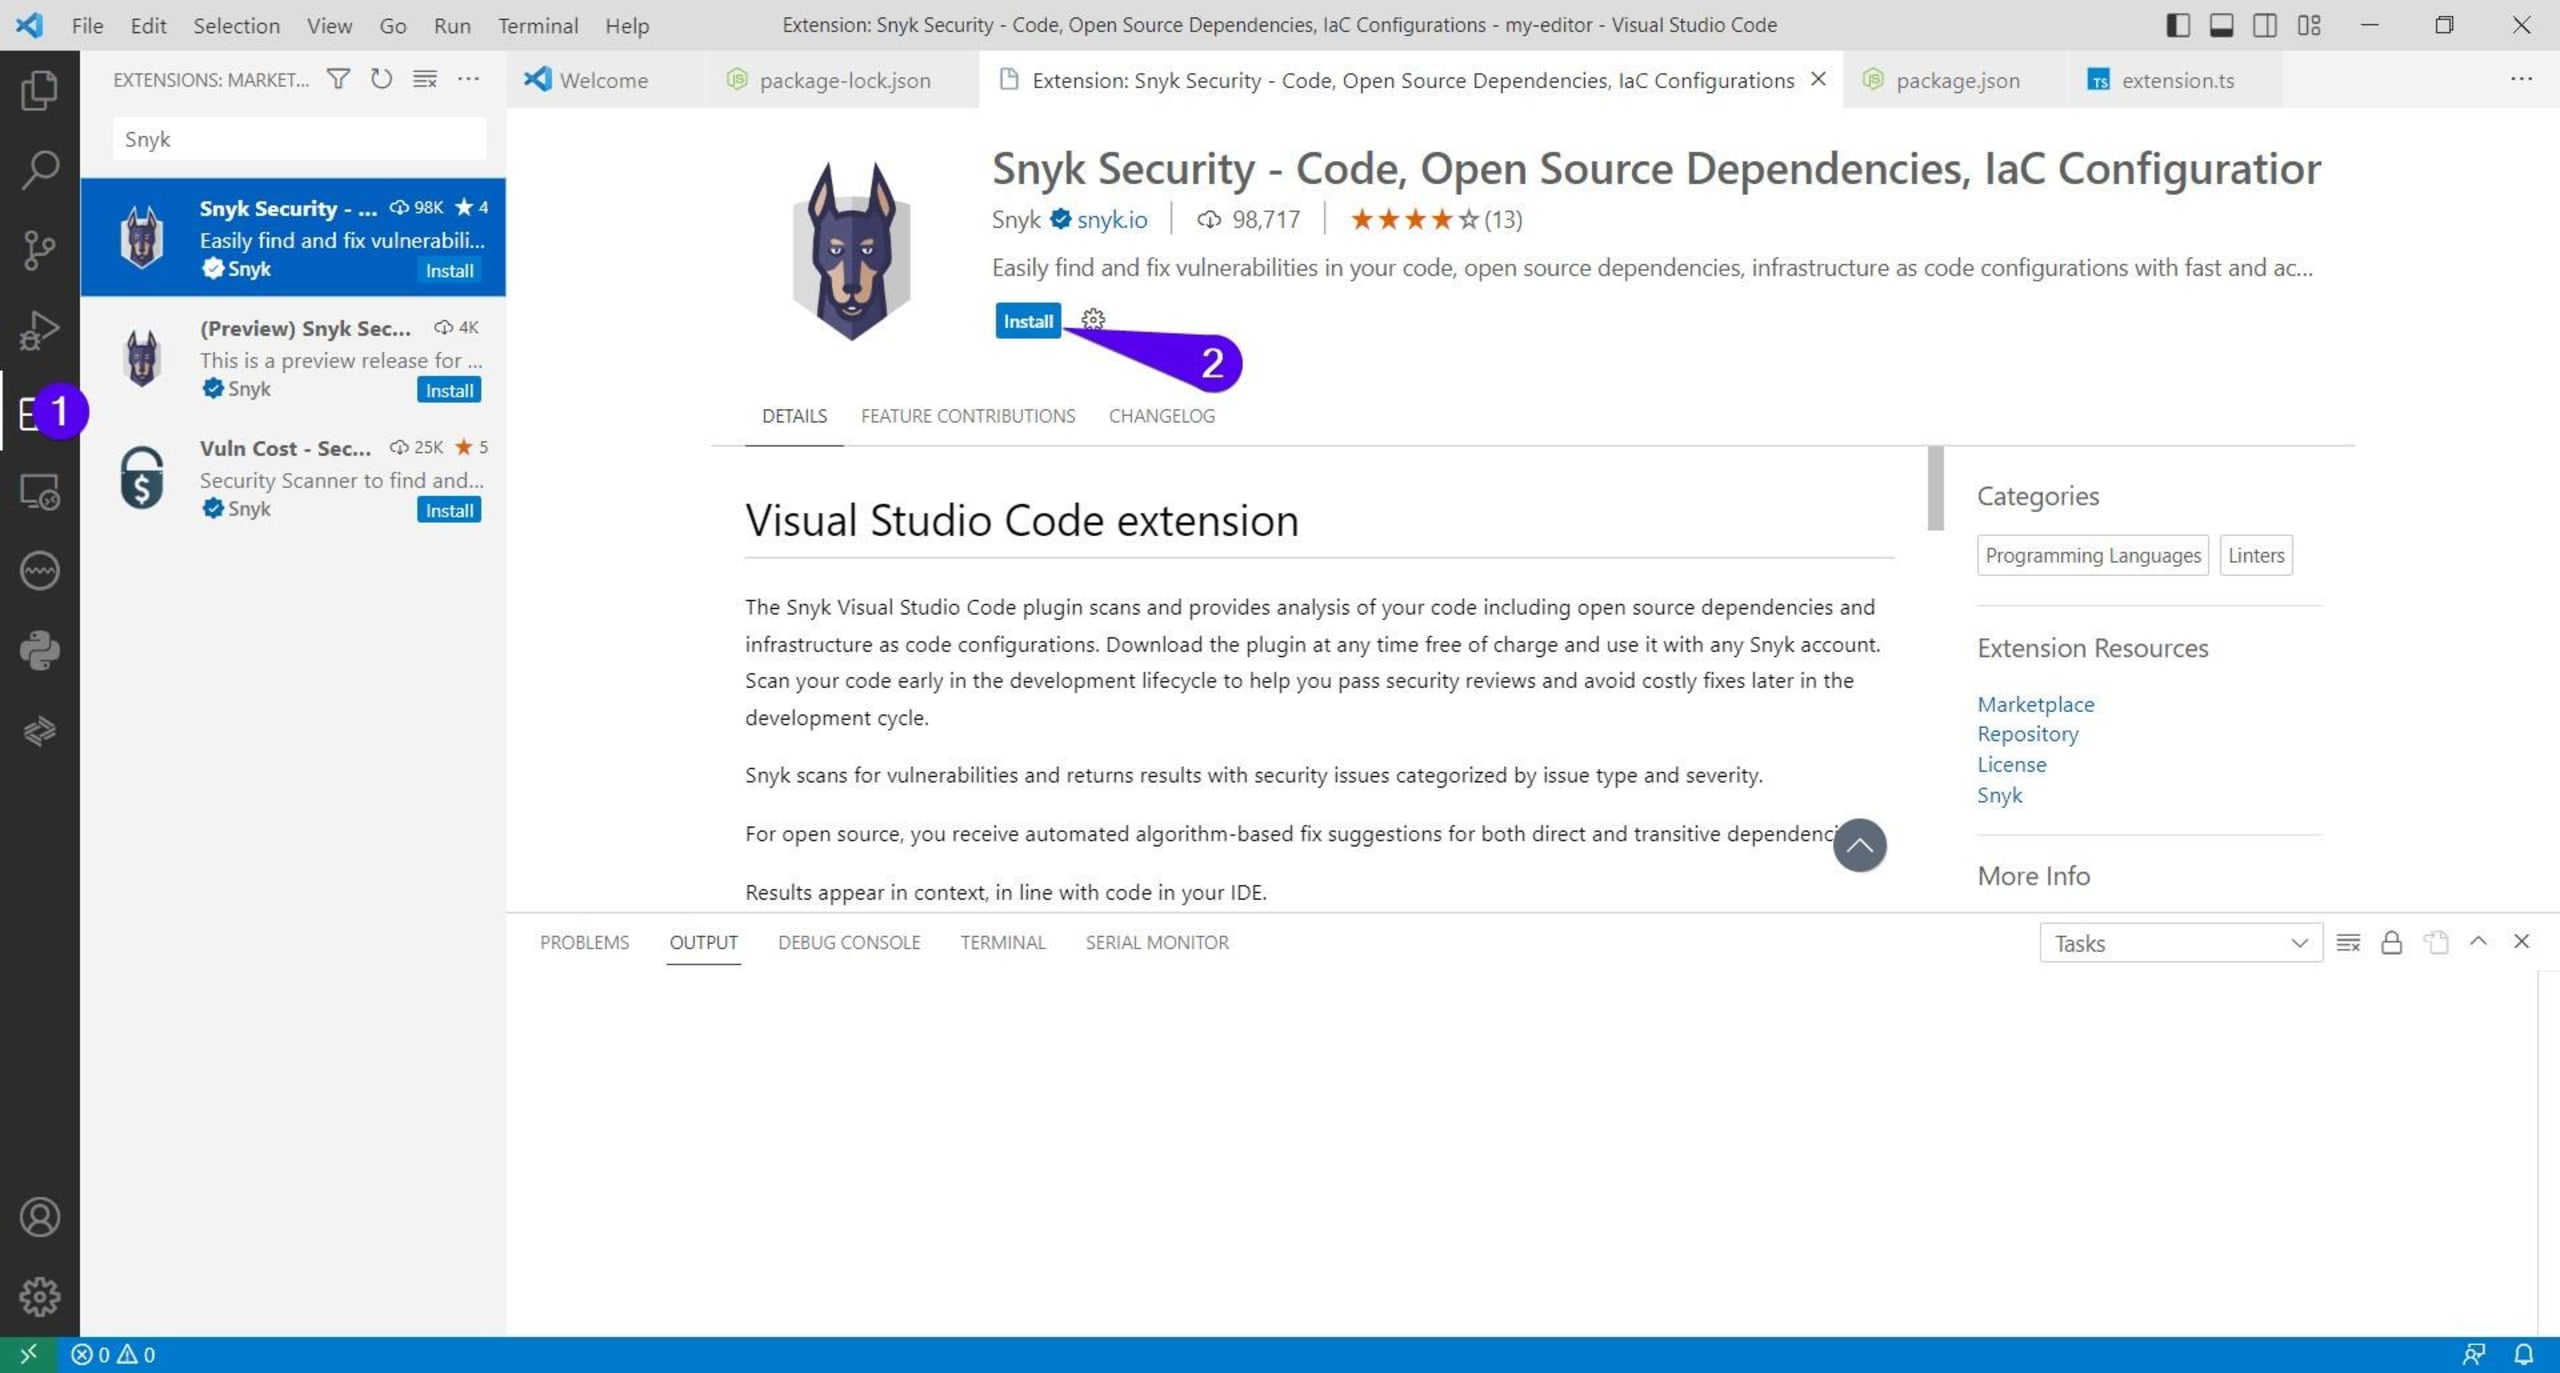
Alternatively, you can add the official Snyk extension from the web version of the Visual Studio Code Marketplace.
Once the installation is complete, you need to authenticate and connect your VS Code extension to your Snyk account. Click on the Snyk badge from the primary sidebar and then click on Trust workspace and connect:
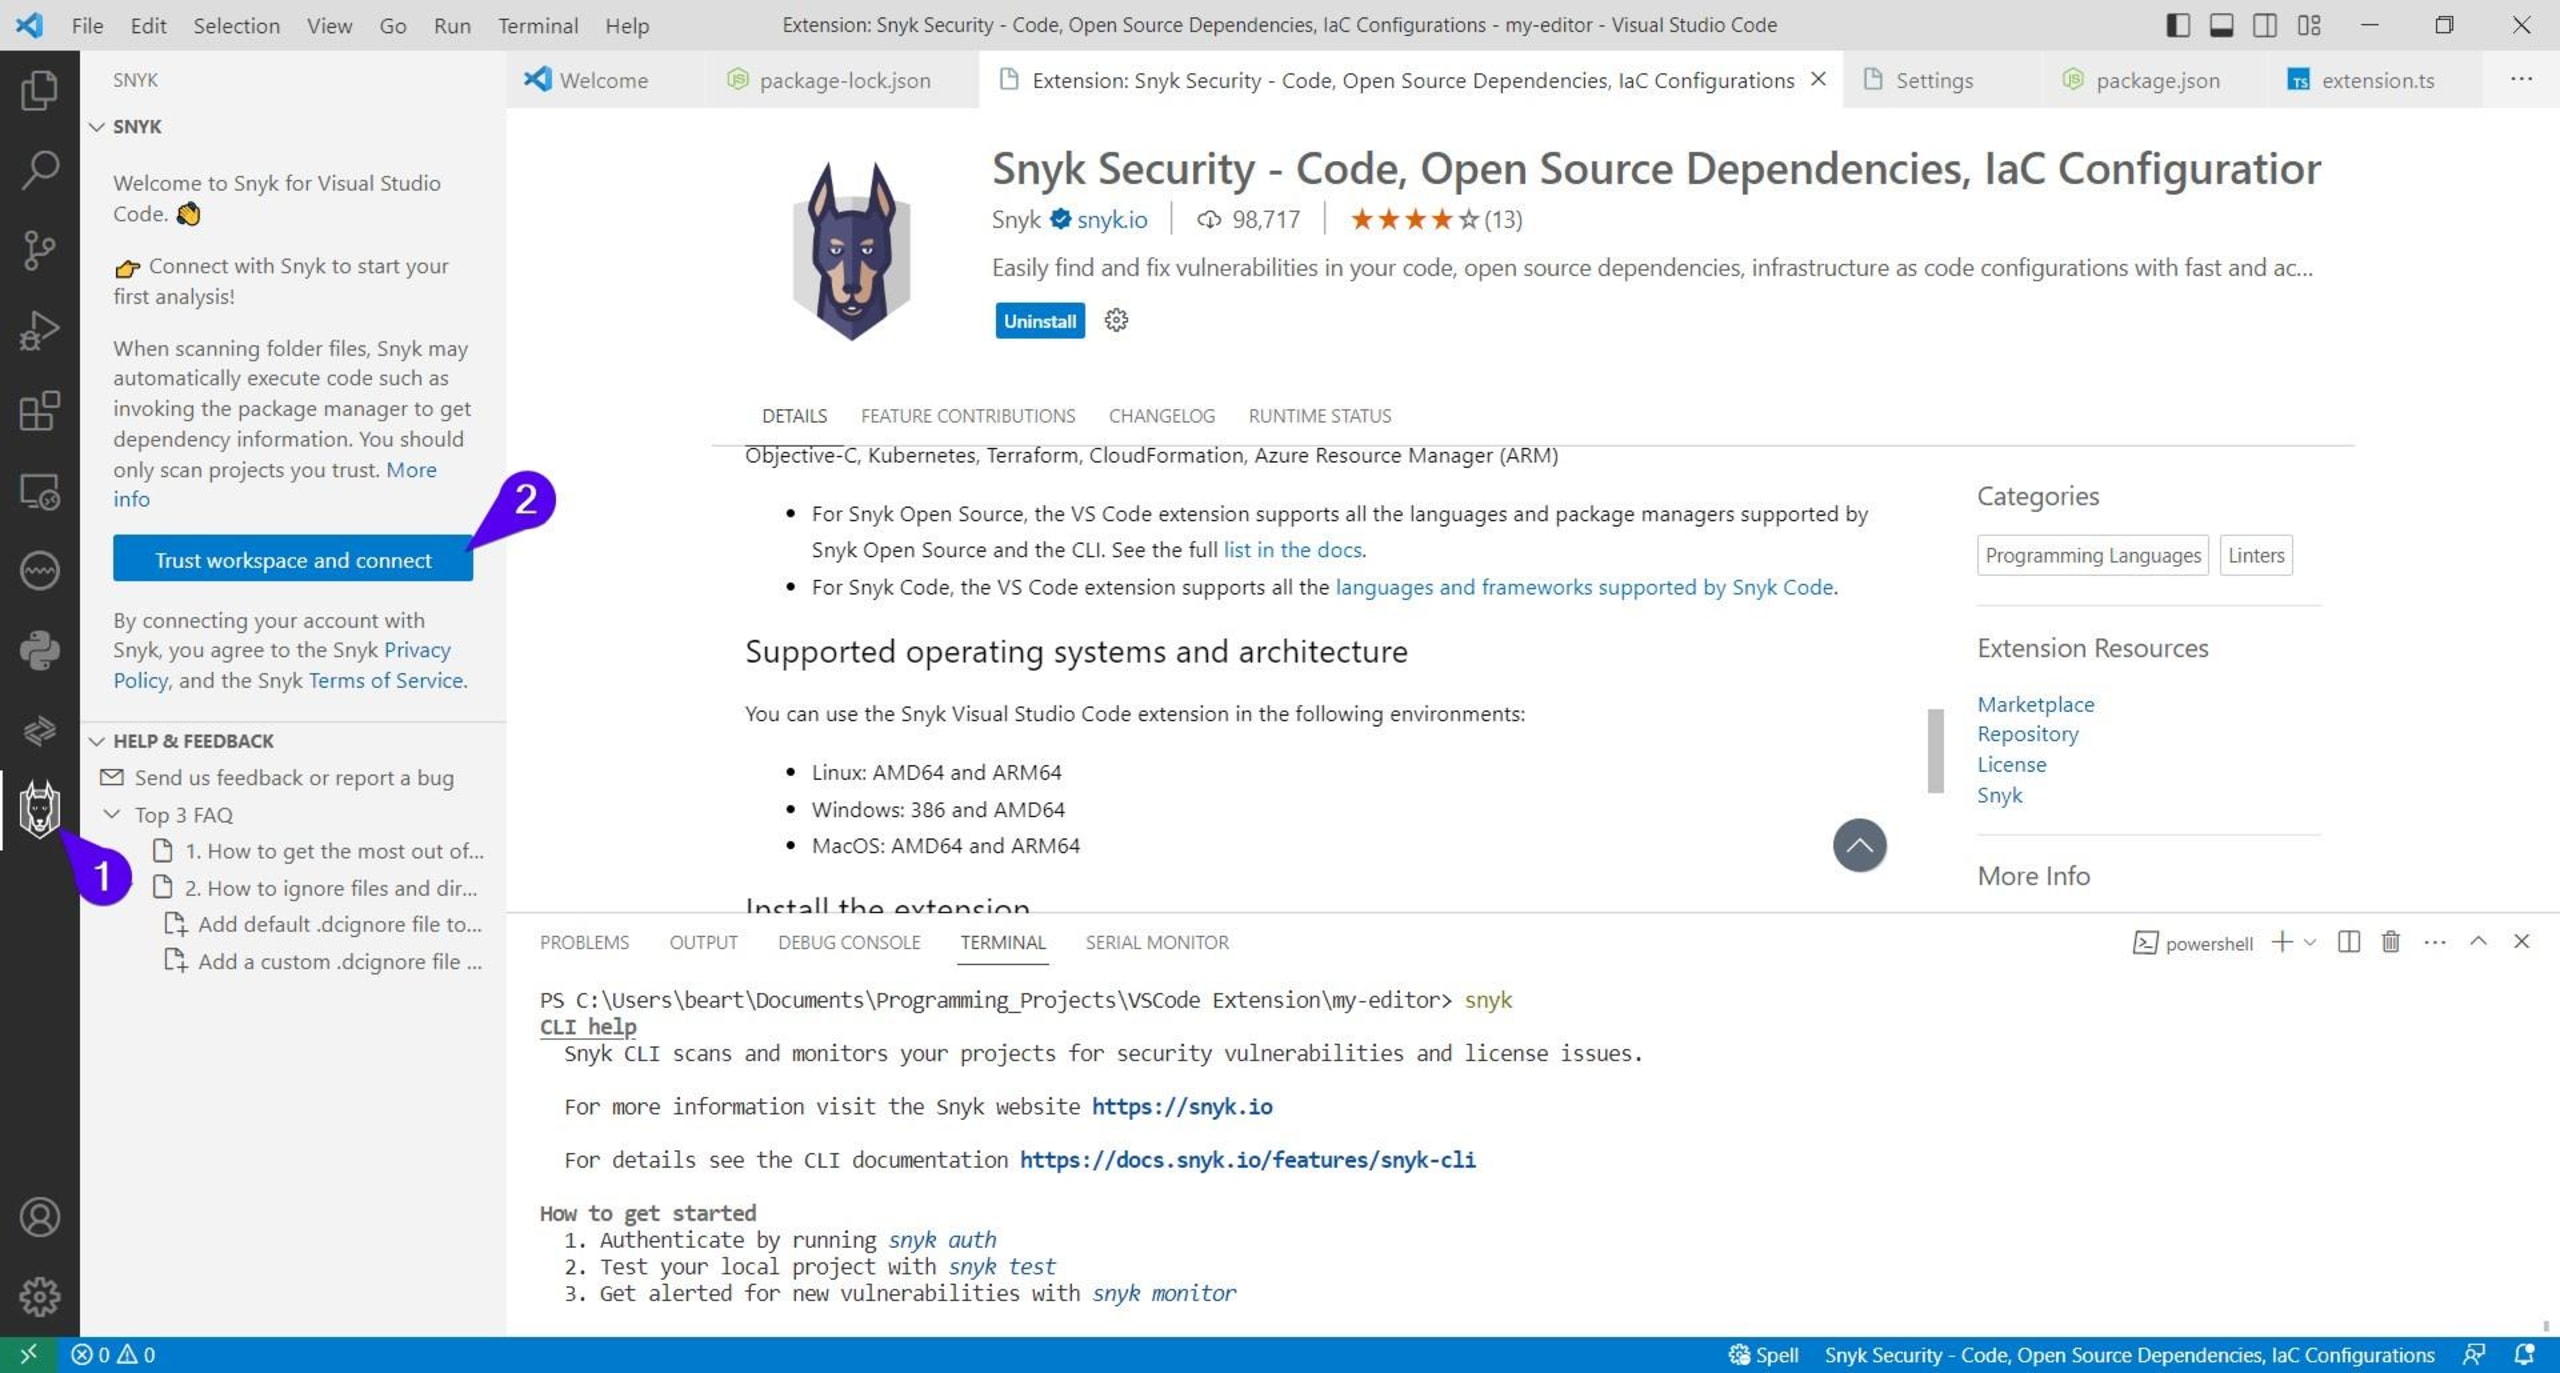
Your default web browser should open the Snyk authentication web page. Click on the large green Authenticate button. Upon successful authentication, Snyk displays a message informing you that your account has been authenticated and Snyk is ready to be used.
It's recommended that you read the official Snyk VS Code Extension Configuration documentation in order to configure your extension accordingly. It's also best to reload or restart VS Code once you've made these changes. Then return to the Snyk extension UI on VS Code and click on the Enable Snyk Code and Start Scanning button (if unavailable, see subsequent note).
Please note: If the button isn't available, Snyk should automatically start scanning your project. Additionally, VS Code may ask you to confirm that you trust the project folder. This is normal. If prompted, click the Trust Folder and Continue button.
If you're using Snyk’s extension default configuration, Snyk should automatically run the Open Source Security and Configuration scans. A button labeled Enable Snyk Code and start analysing should appear under the Code Security and Quality section of Snyk's panel. VS Code may also display an Enable Snyk Code button:
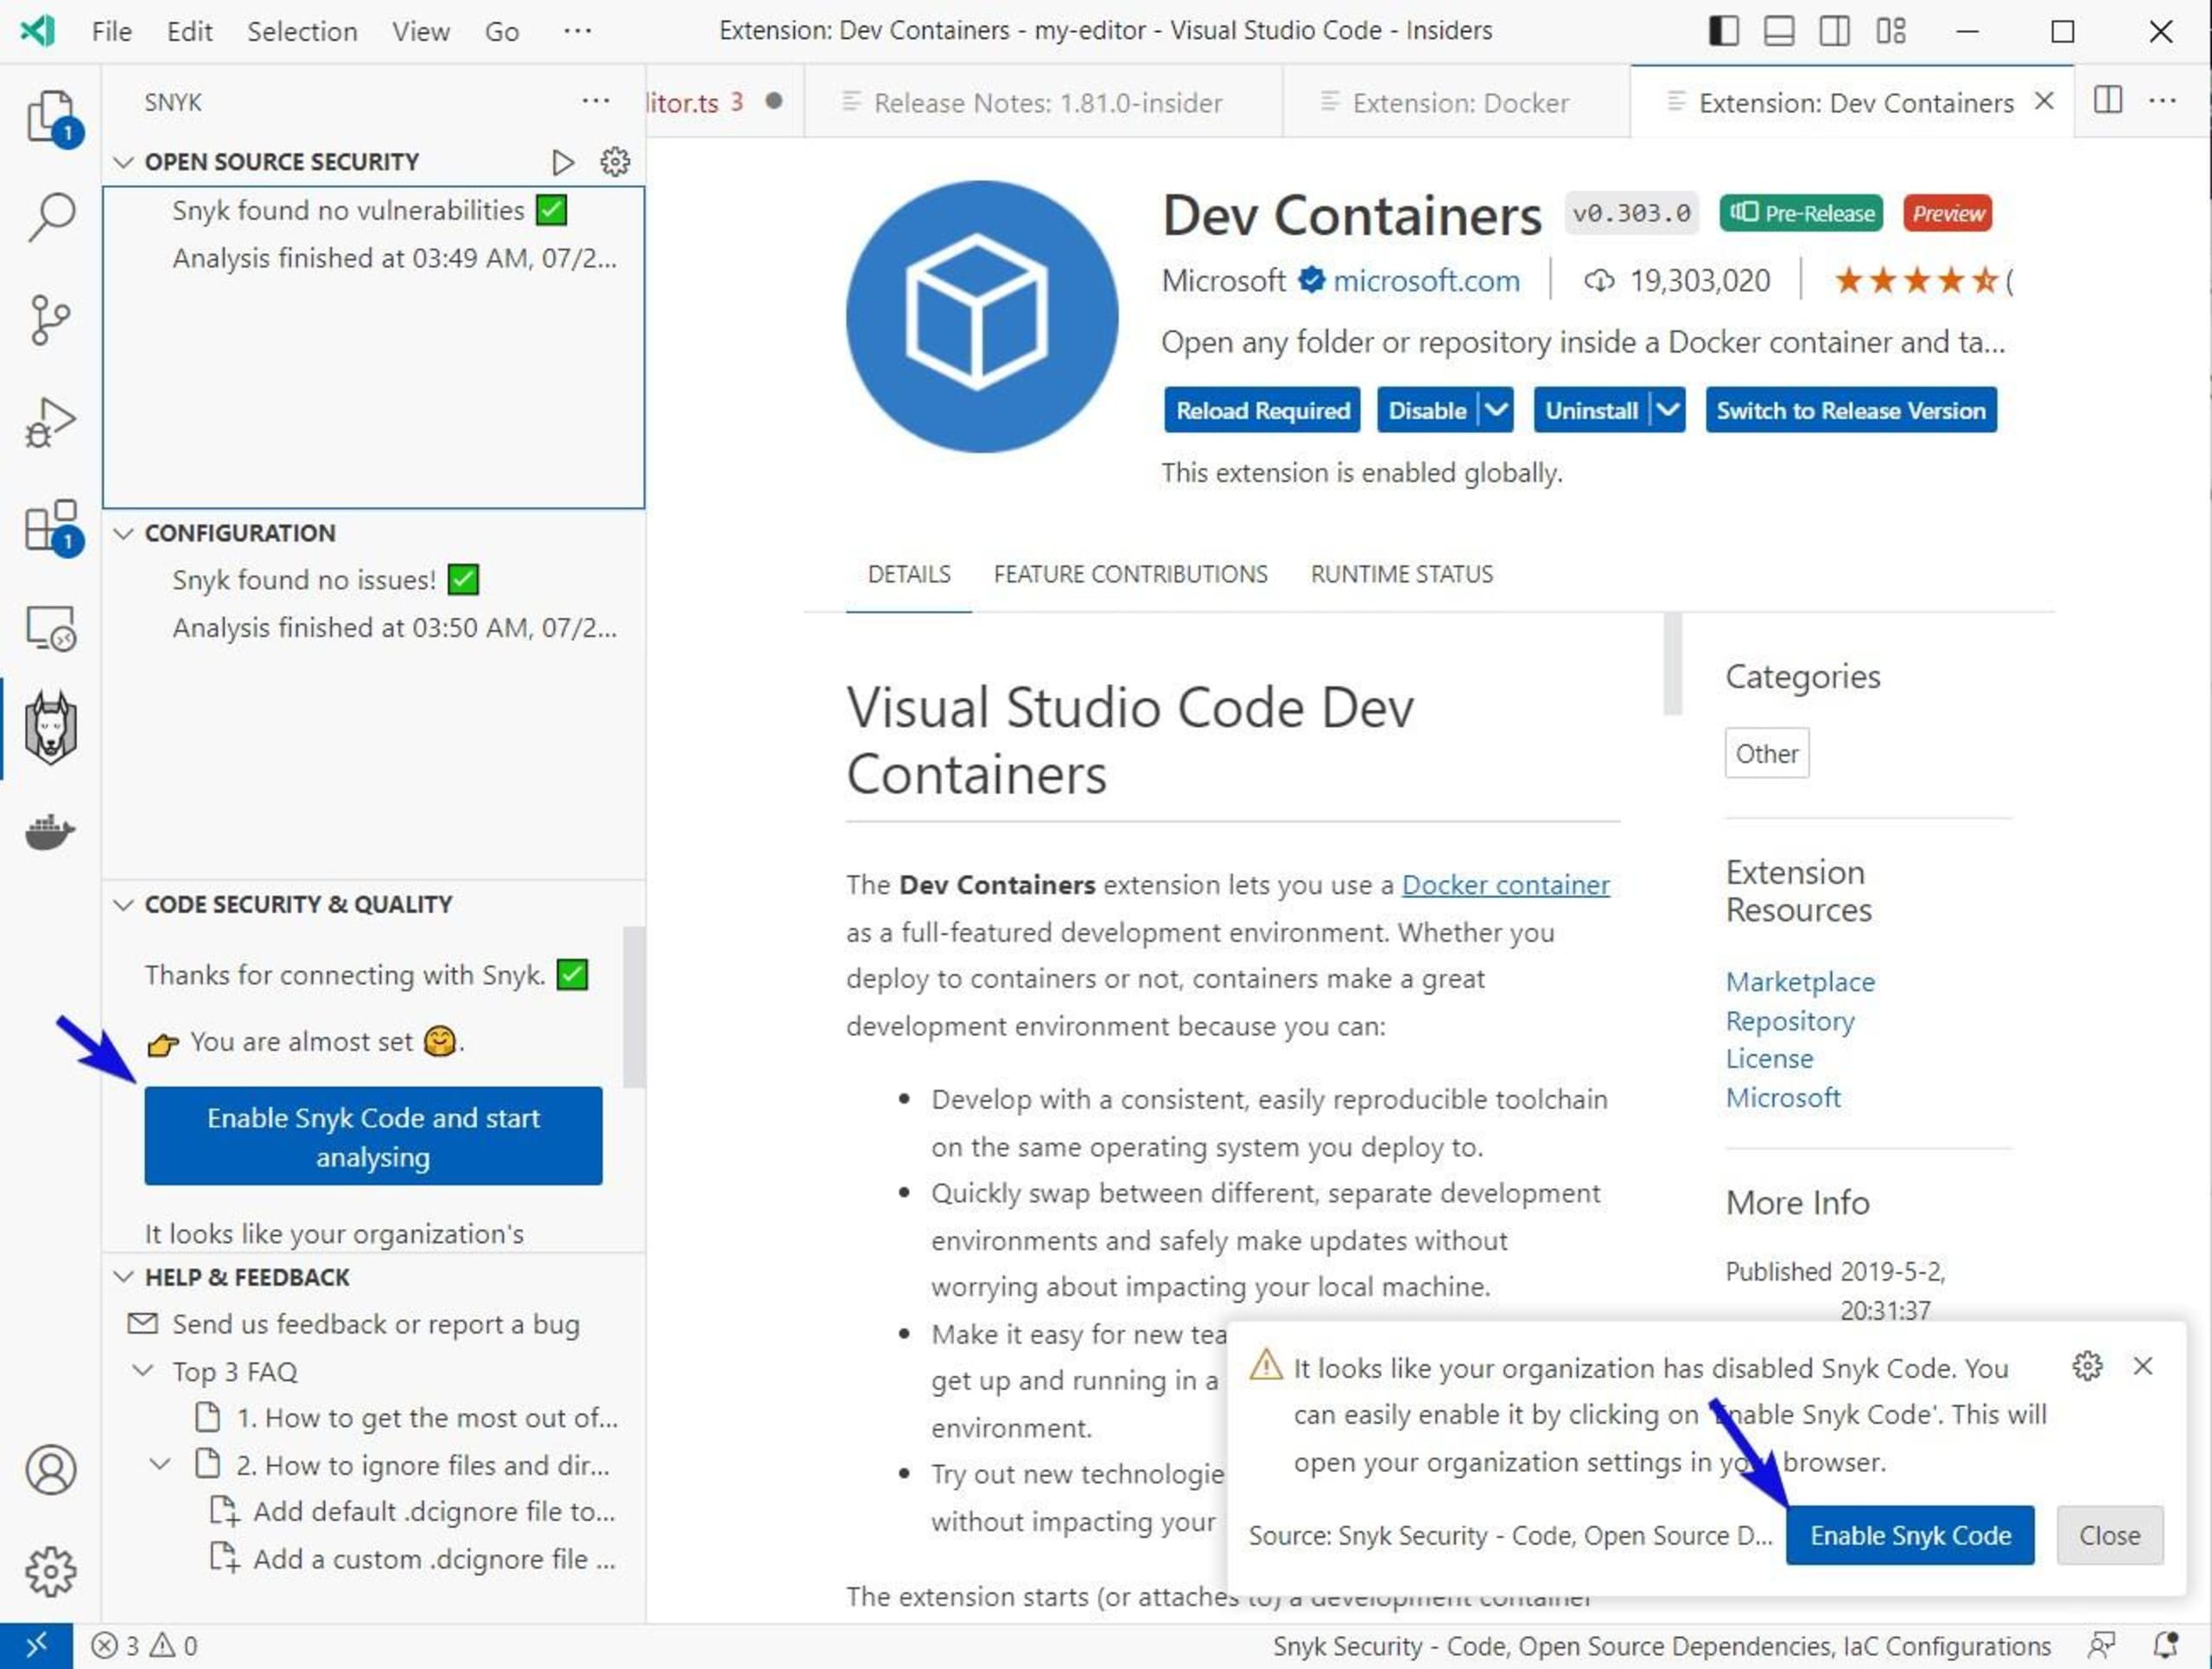
Clicking on either button will open the Snyk Code Settings page. There you'll find a brief description of what Snyk Code entails. Once you've read through it, click Save changes:
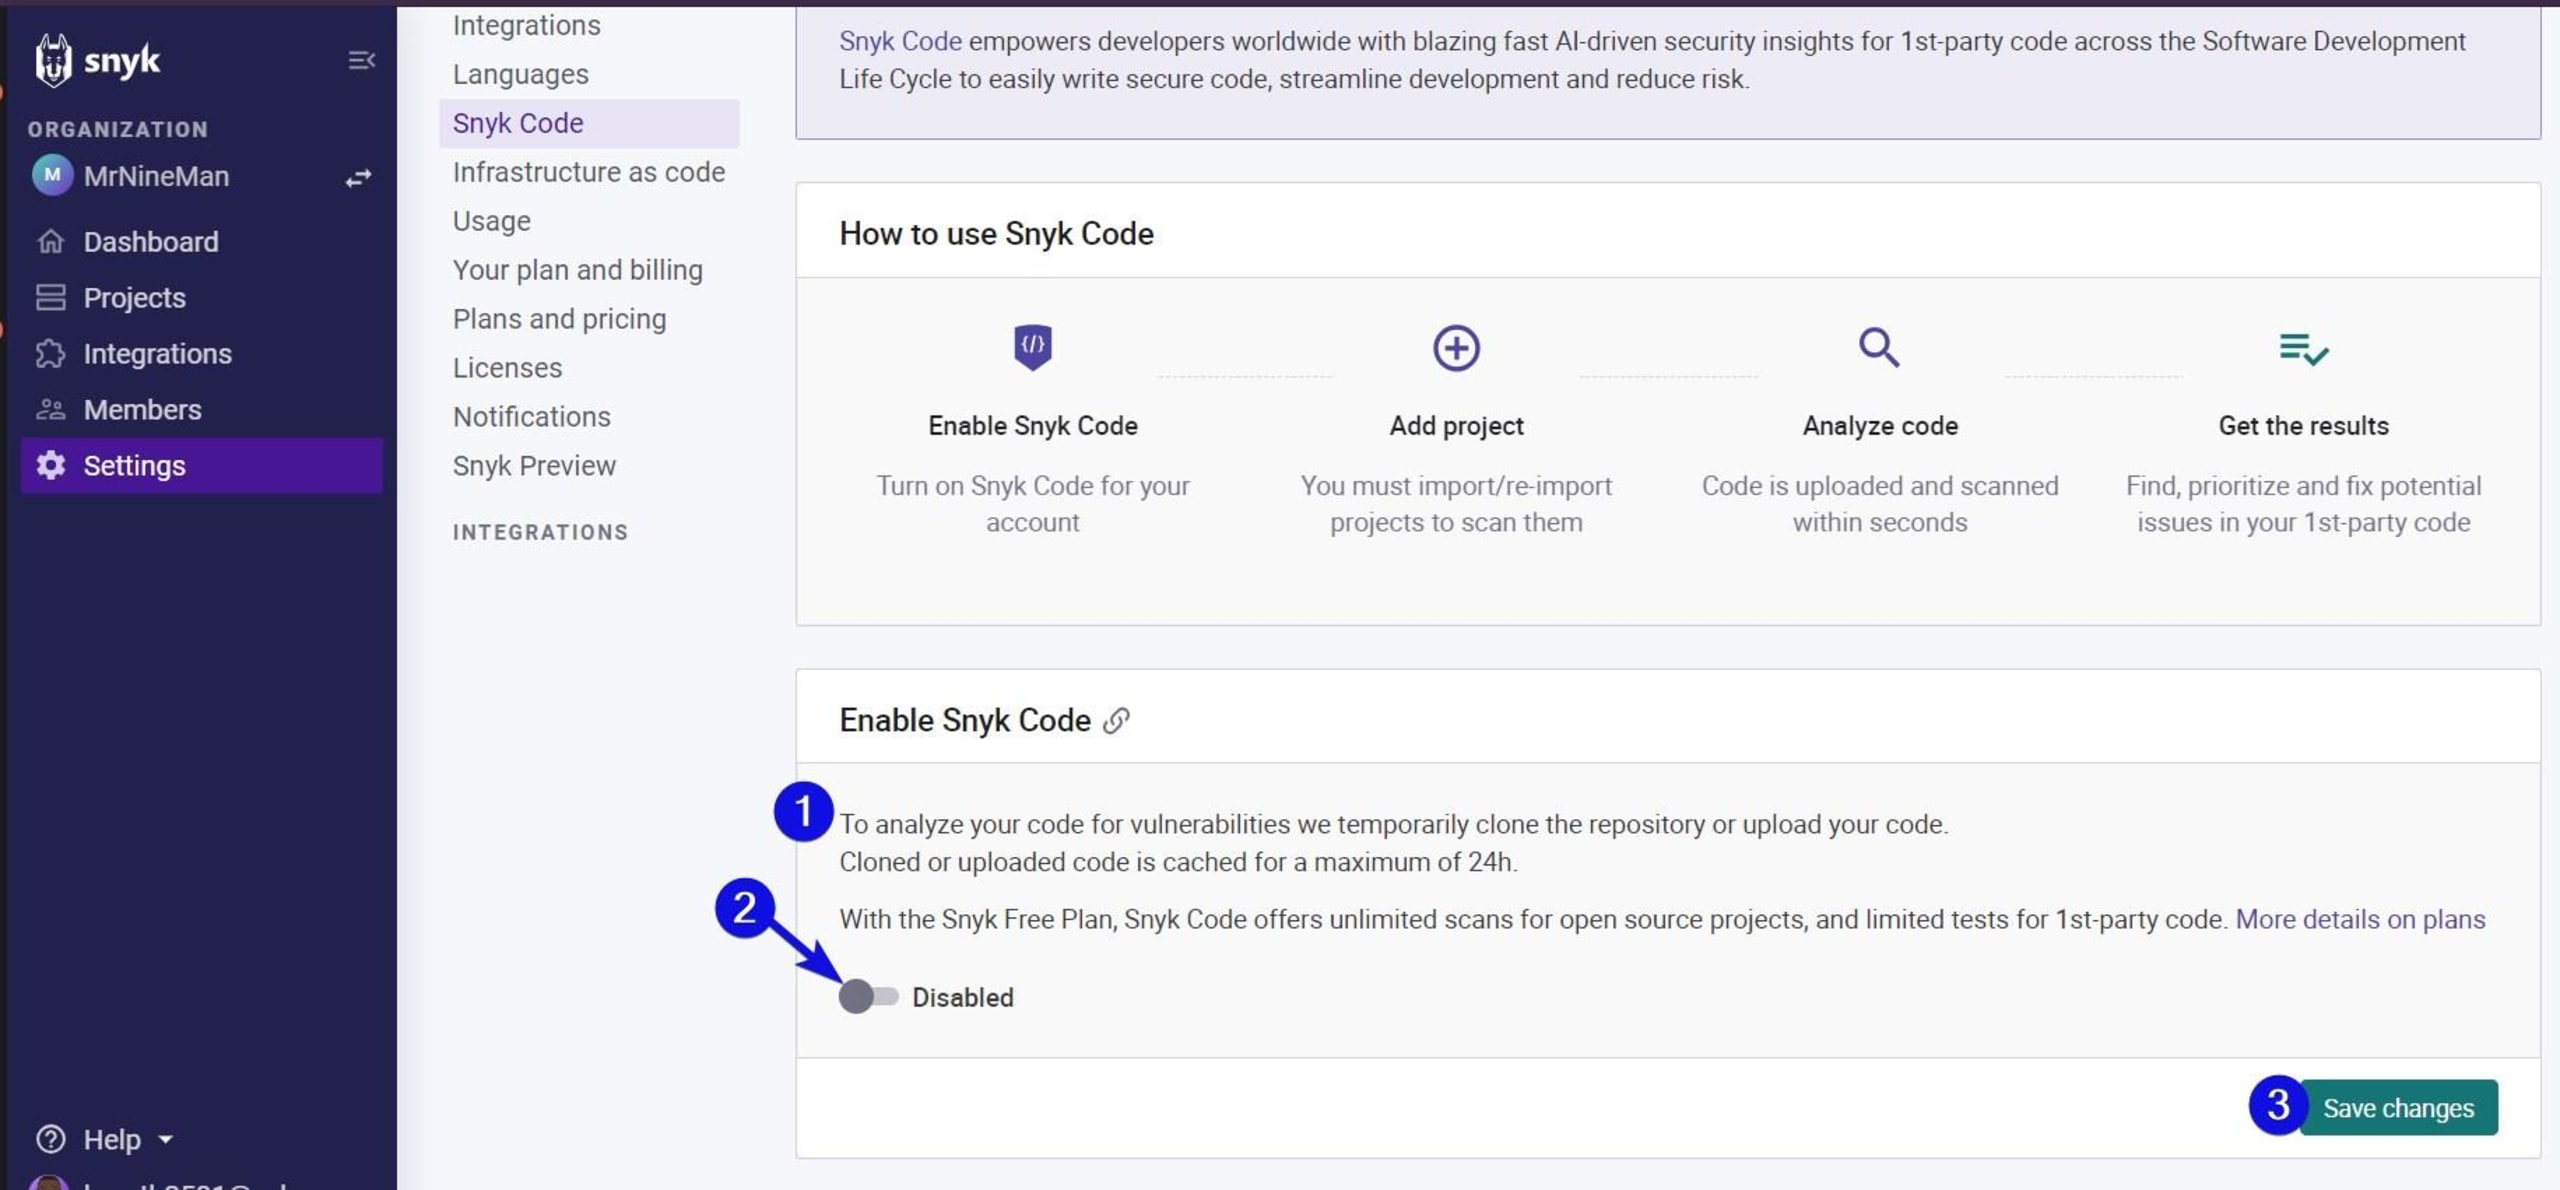
Return to the VS Code UI and Snyk’s panel. After a few moments, the Snyk panel should reveal its Code Security and Code Quality sections and start scanning.
Notice that the extension's UI panel is made up of four parts:
Open source security
Code security
Configuration
Code quality
If the Code Security and Code Quality features don't automatically start scanning, you may need to select the Play button next to their titles. The Play button appears when you hover over a section and allows you to rescan the project:
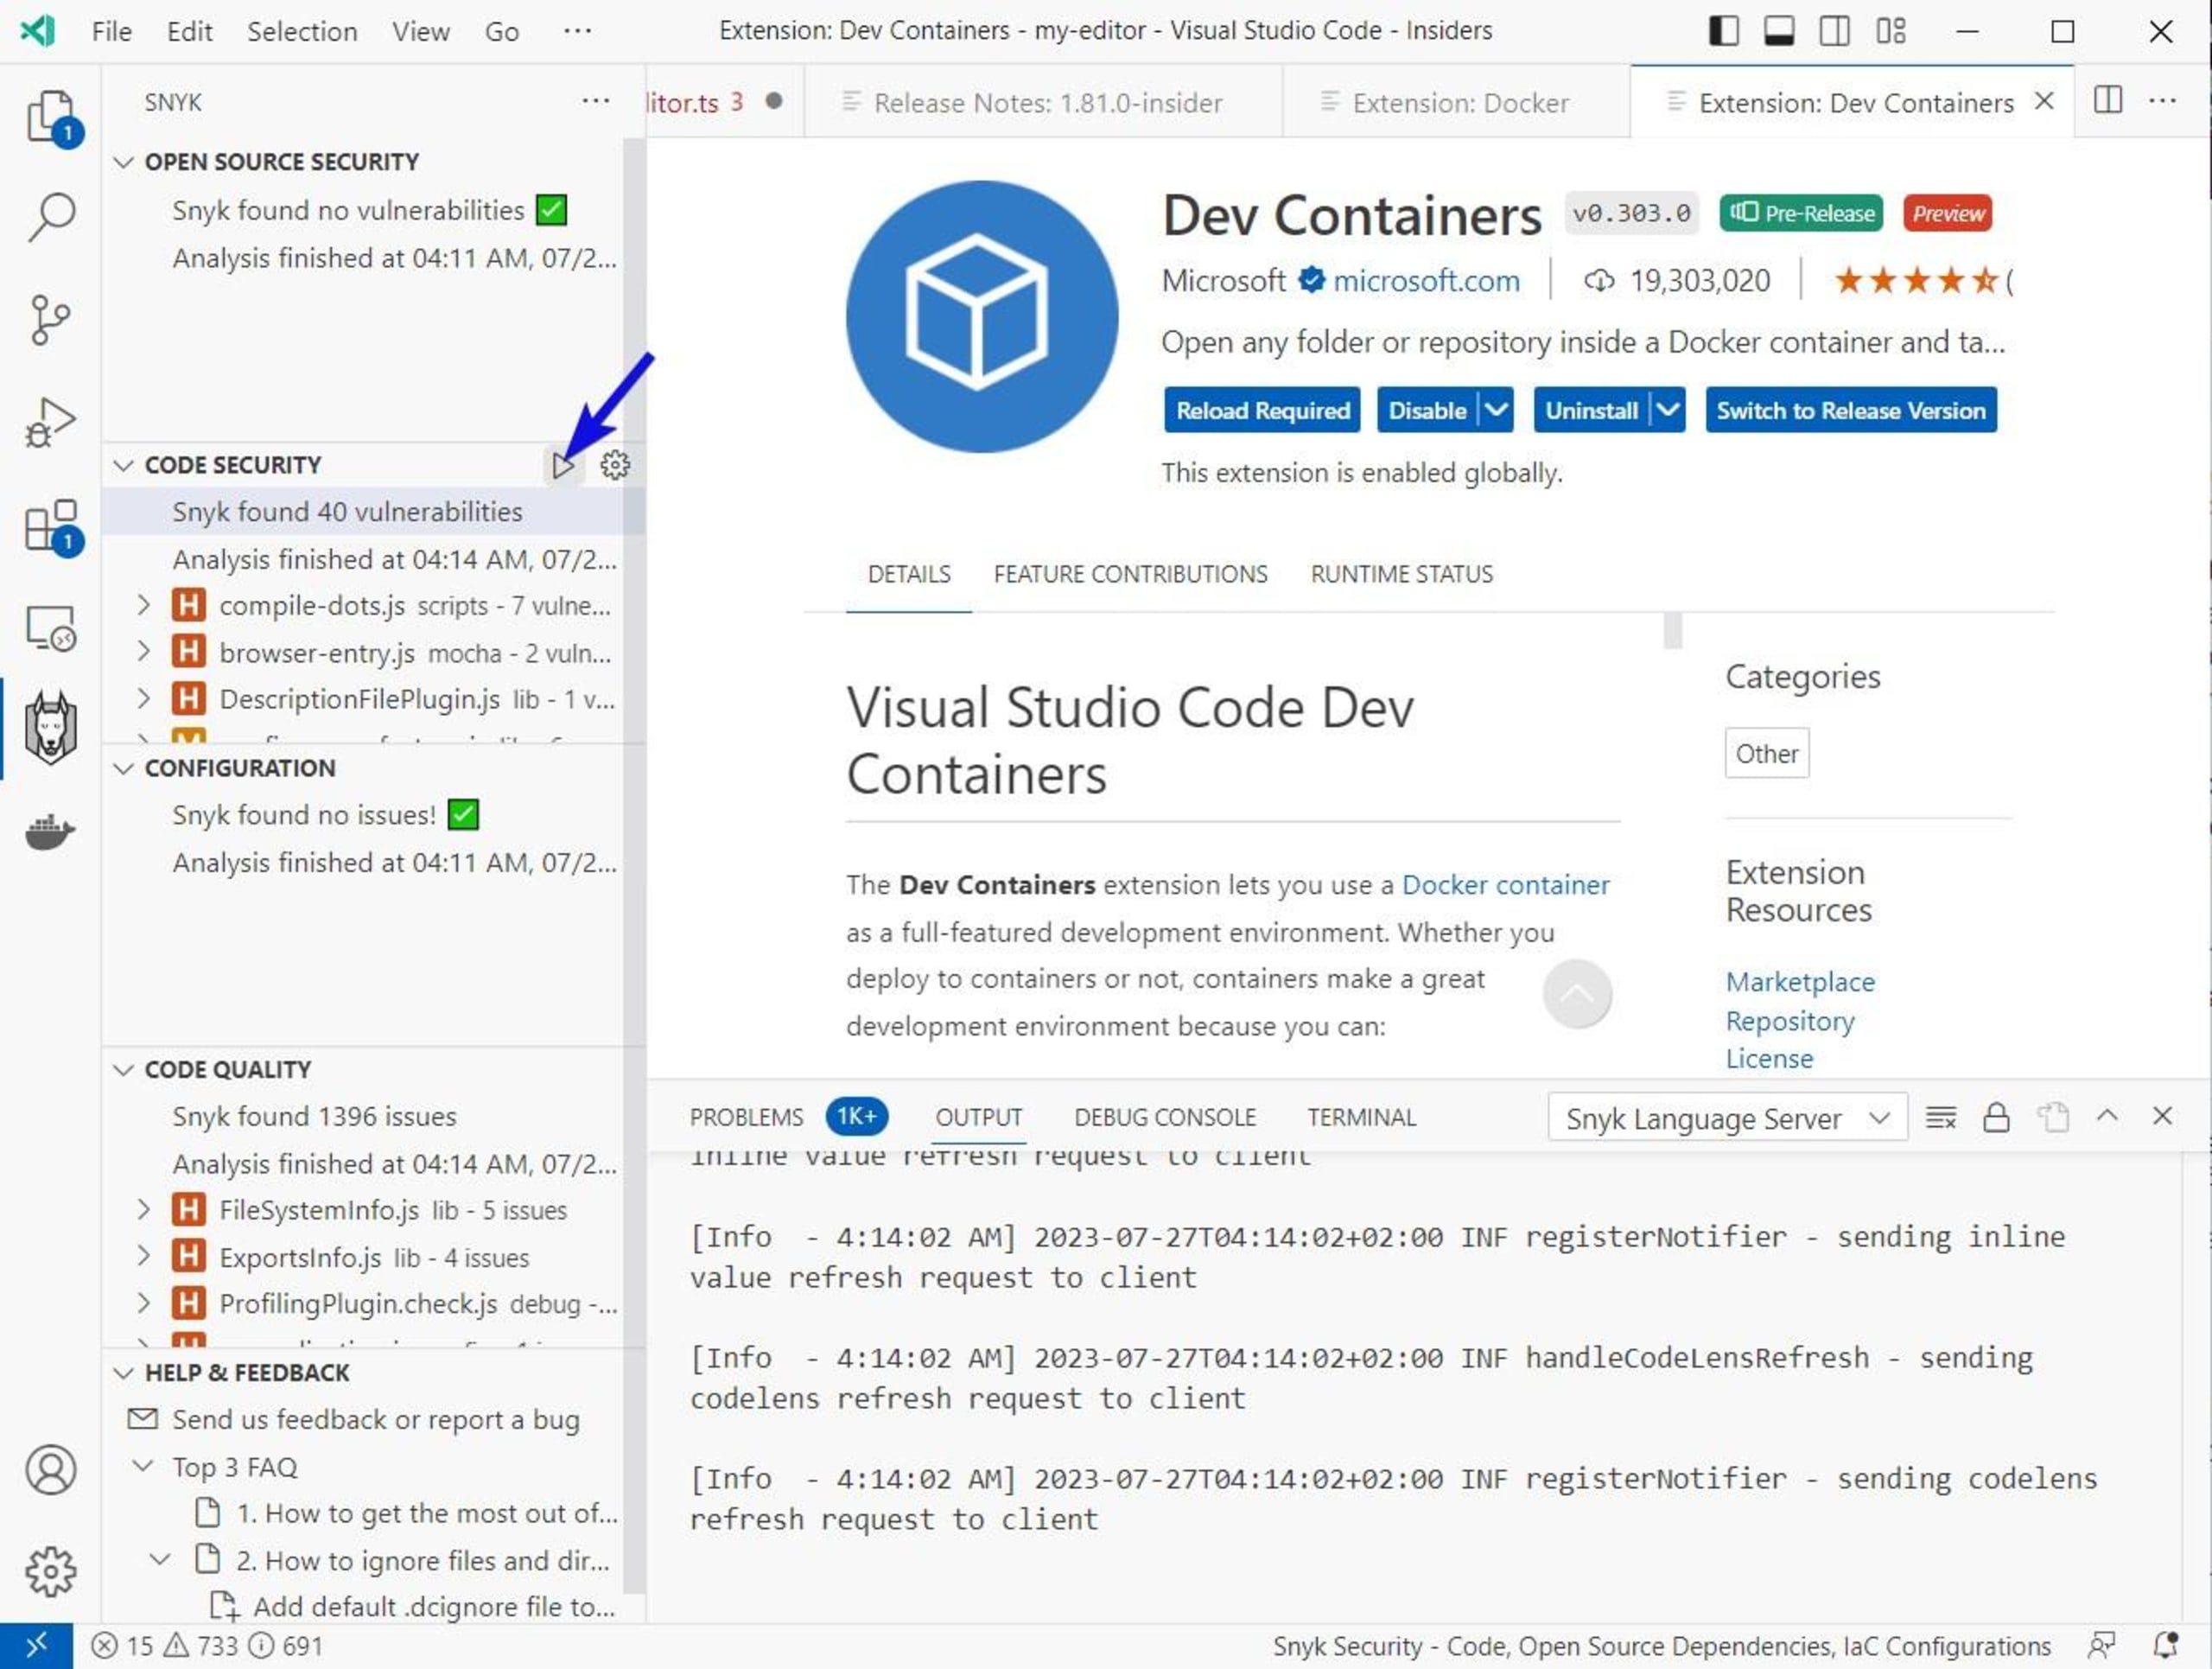
After your first scan, the Open Source Security and Configuration scanner should return negatives (no found vulnerabilities and issues). However, Code Security and Code Quality will display some issues and vulnerabilities:
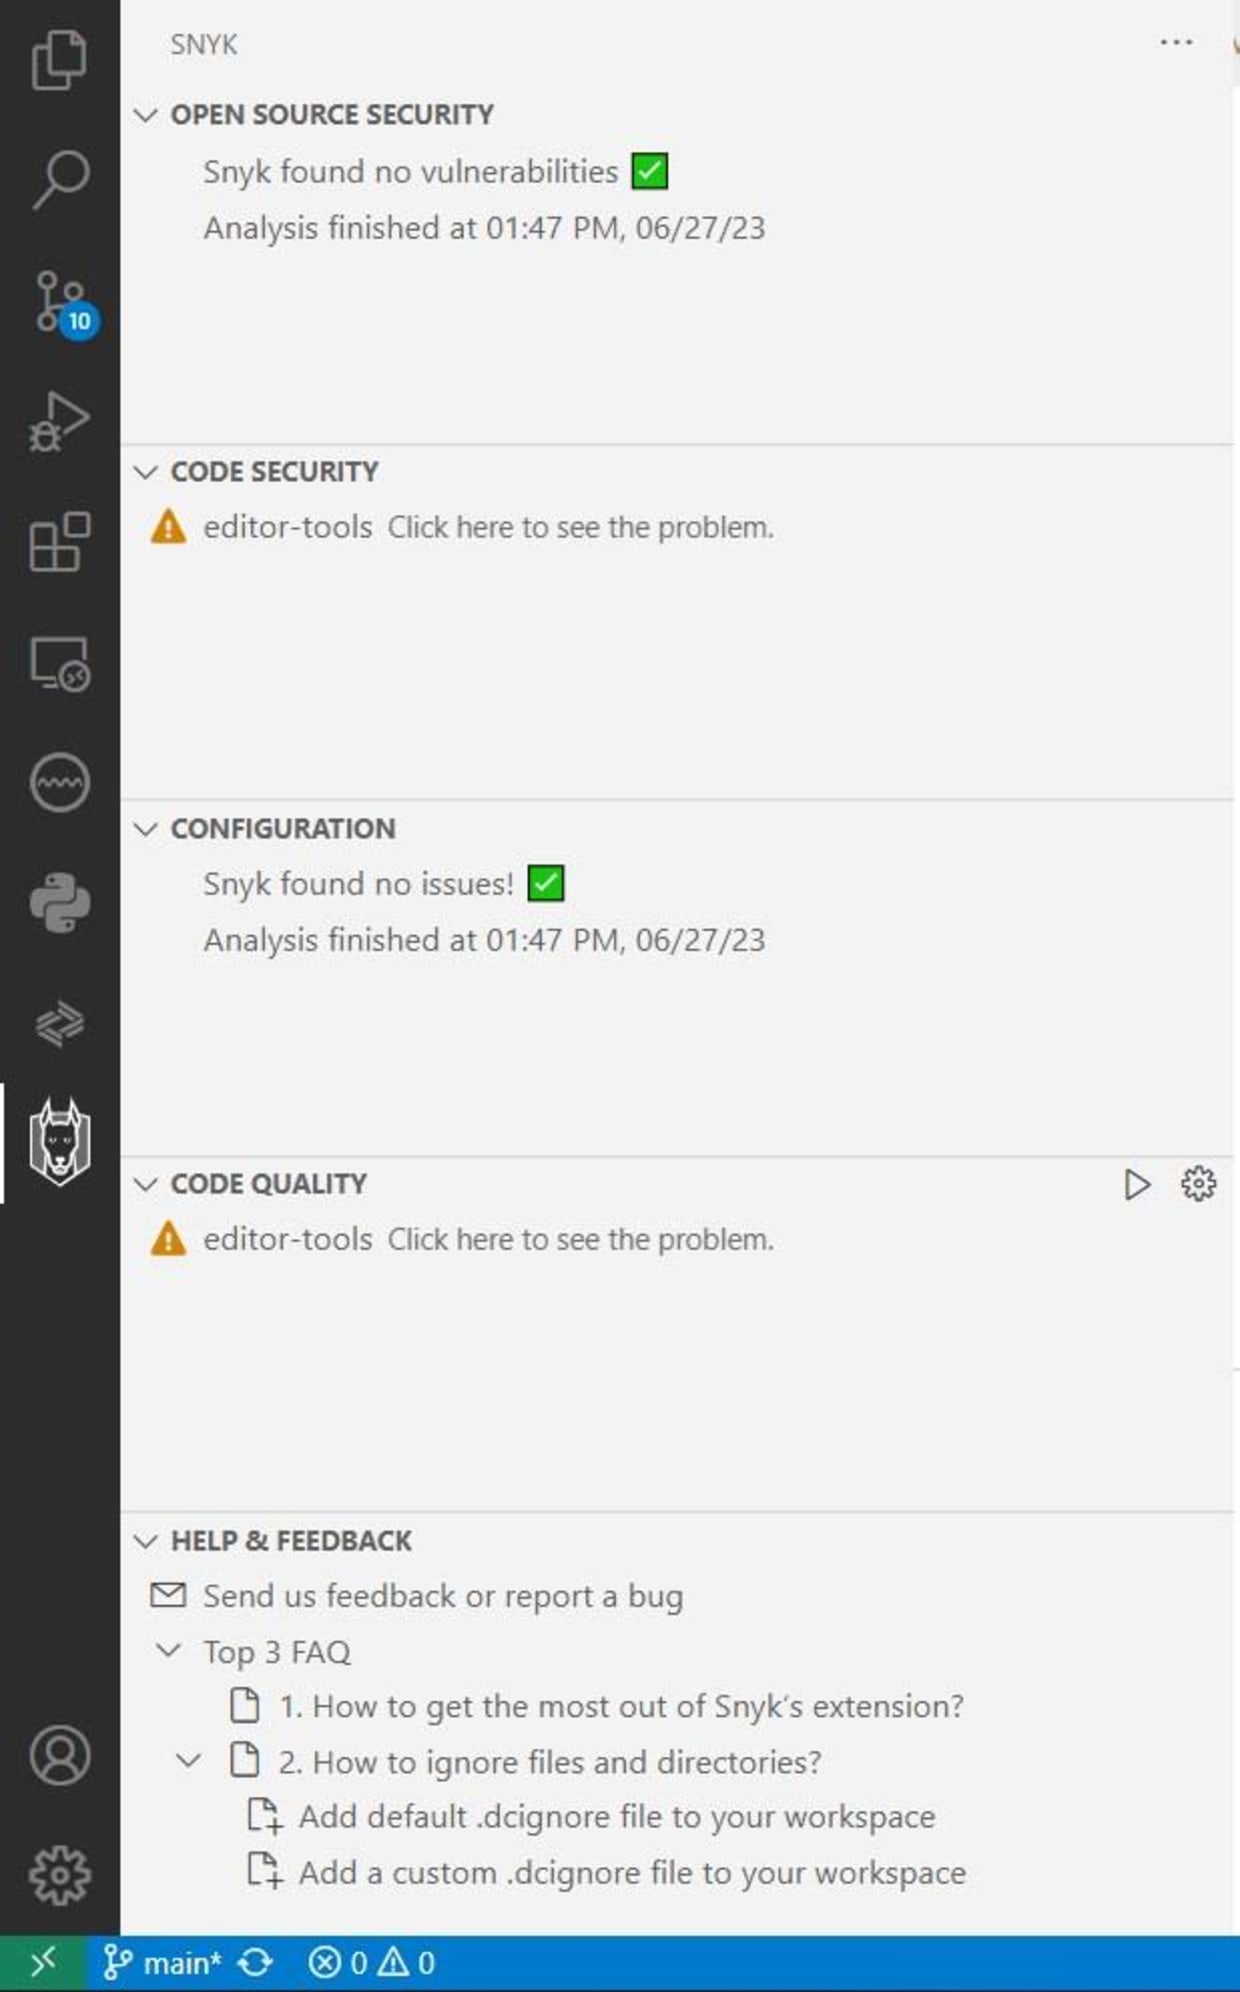
Expand the analysis results for a more detailed view. Most of the issues are negligible, as they're found in your dependencies. While you can make changes to these files, it would be better to skip over them.
Use the Analysis Results panel to peruse through the alerts and ignore and set exceptions where necessary (i.e. for external project modules). Now that you've prepared the project, run the extension to see what happens.
Run your extension
To run your extension, use the VS Code Explorer to navigate to the Editor-Tools/src/extension.ts file. For those familiar with object-oriented design patterns for programming languages like C# and Java, this works similarly to a main class.
Your extension.ts file should contain sample code generated by the Yeoman VS Code extension code generator. Press the F5 key to test this code, along with any other changes you made in the previous section.
Please note: VS Code may prompt you to specify a build task. This typically occurs if a default task hasn't been set in your tasks.json file. If this is the case, select npm: compile as your build task.
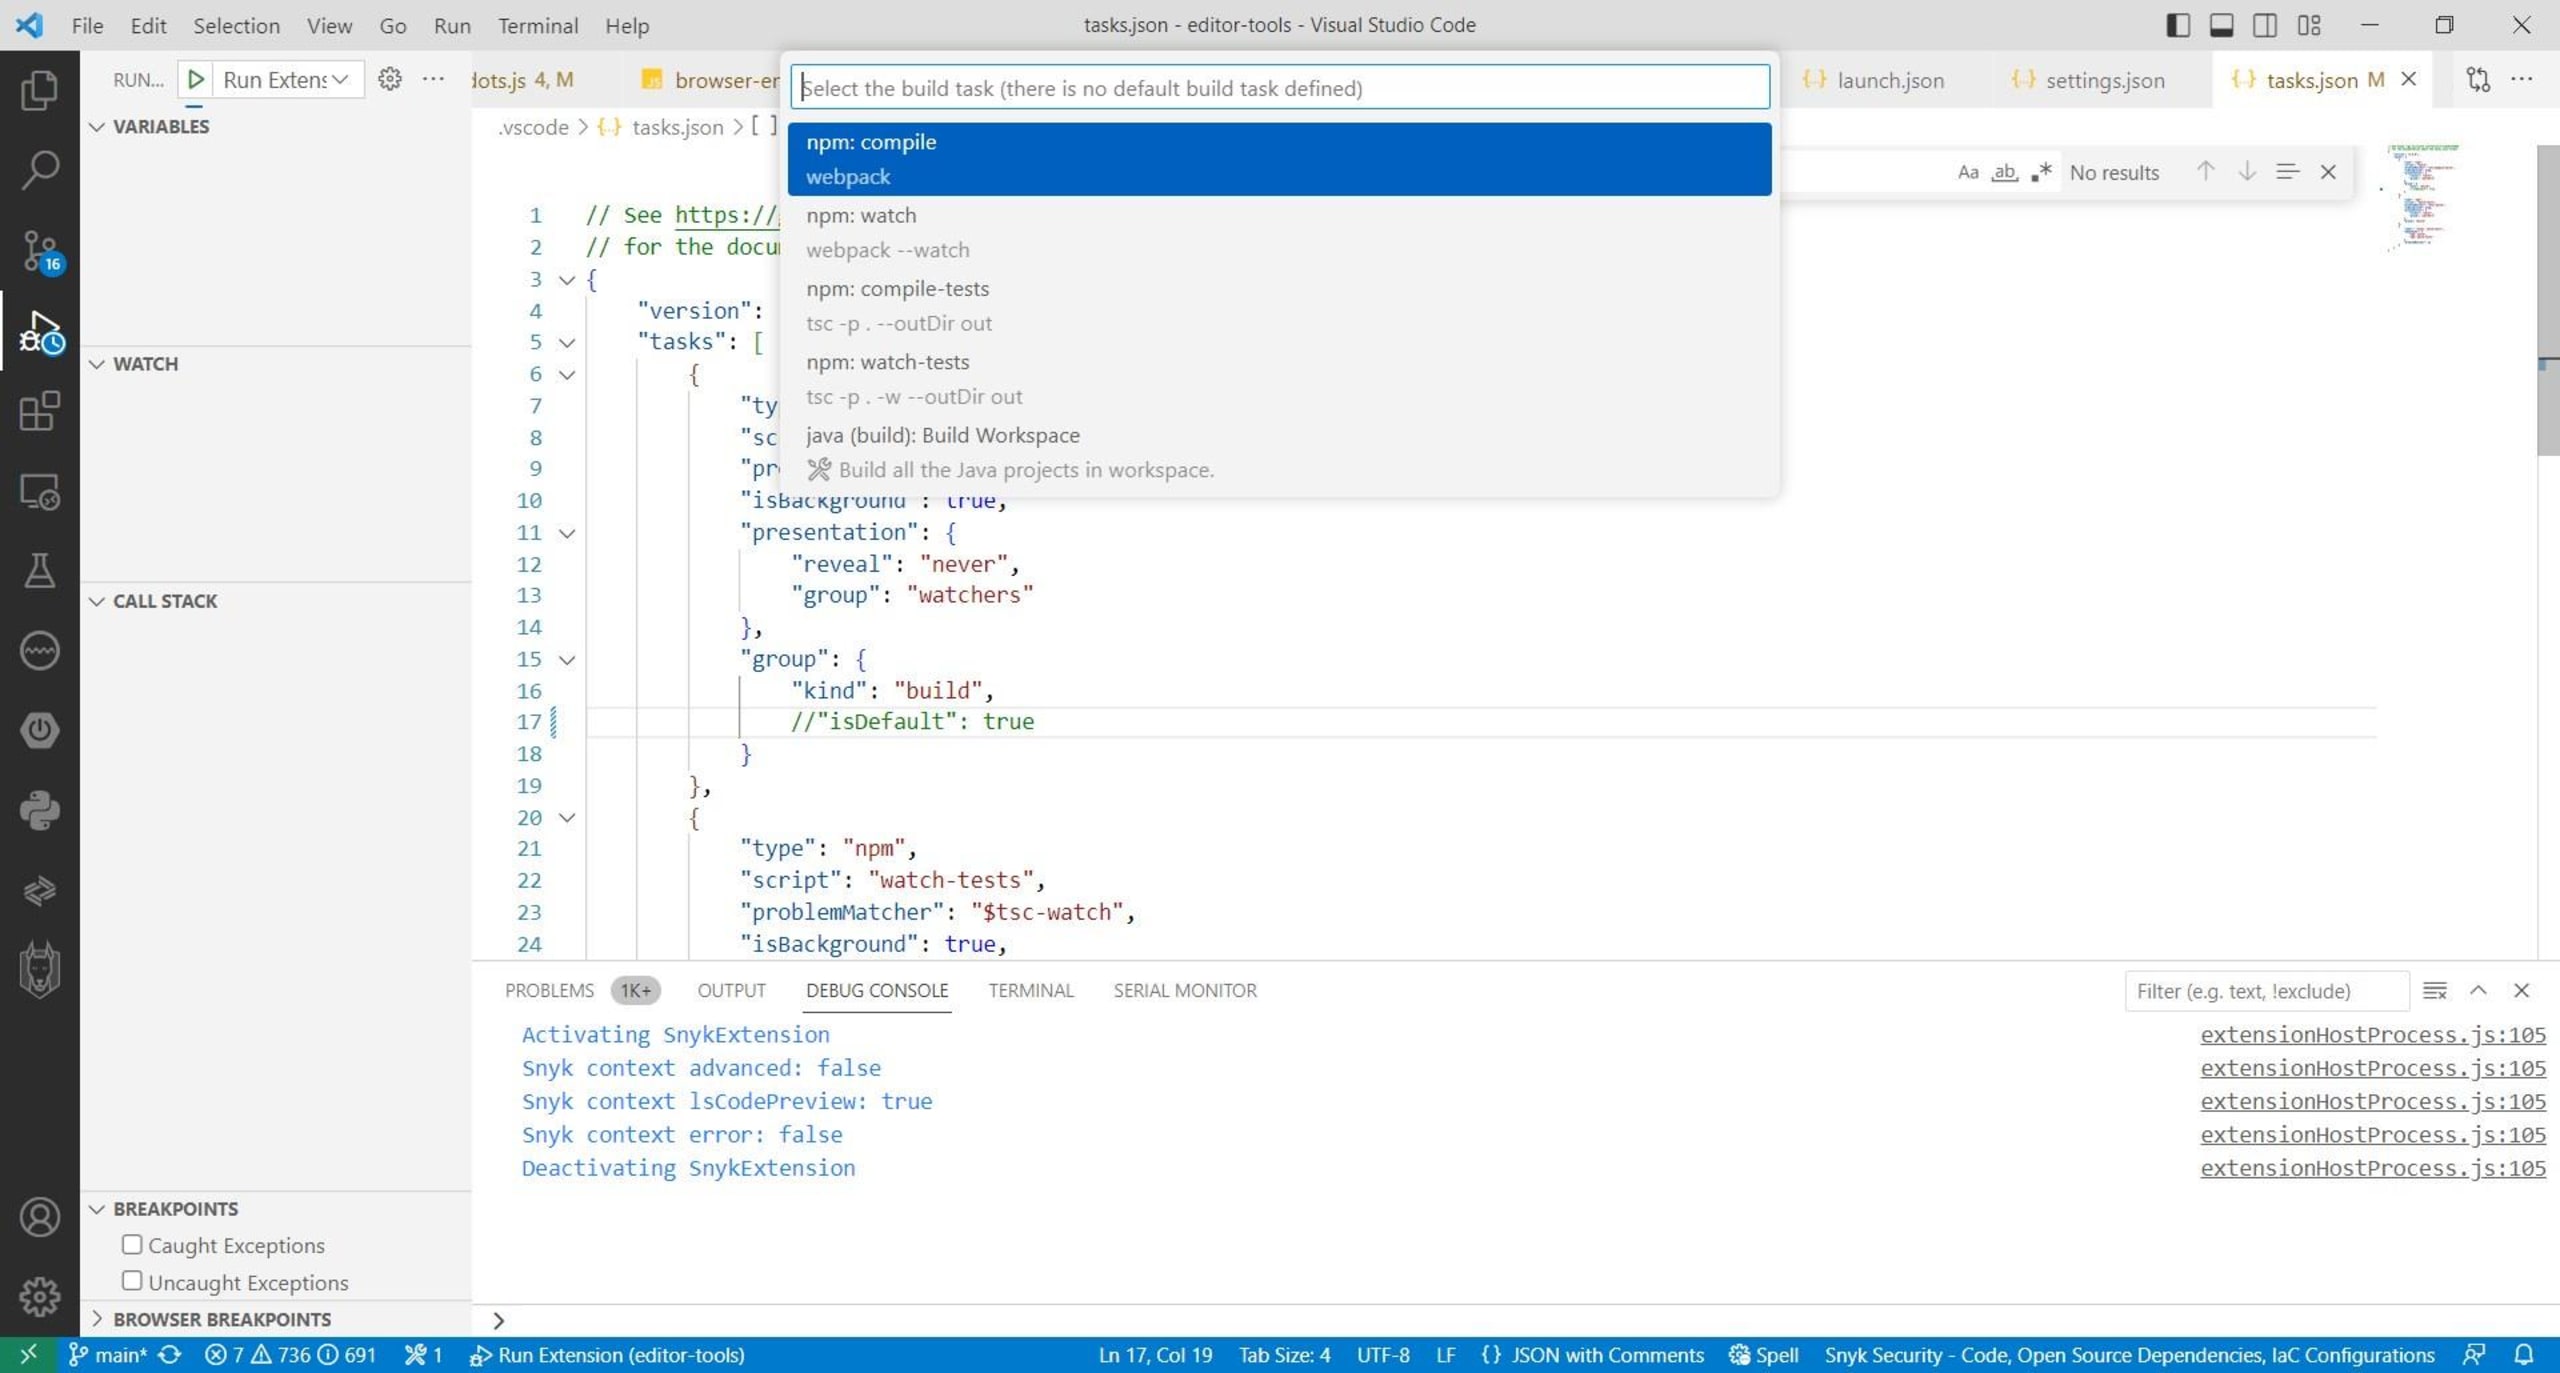
Before VS Code launches the Extension Development Host, it may display an error dialog informing you that errors exist after running the npm: watch pre-launch task. This is perfectly normal. Tick the Remember my choice in user settings checkbox and then click the Debug Anyway button:

Once the Extension Development Host is launched, open its Command Palette by pressing the Ctrl + Shift + P (for Windows) or Shift + Command + P (for Mac). Then enter the Hello World command into the Command Palette's text field. This displays a small pop-up message in the bottom right-hand corner:
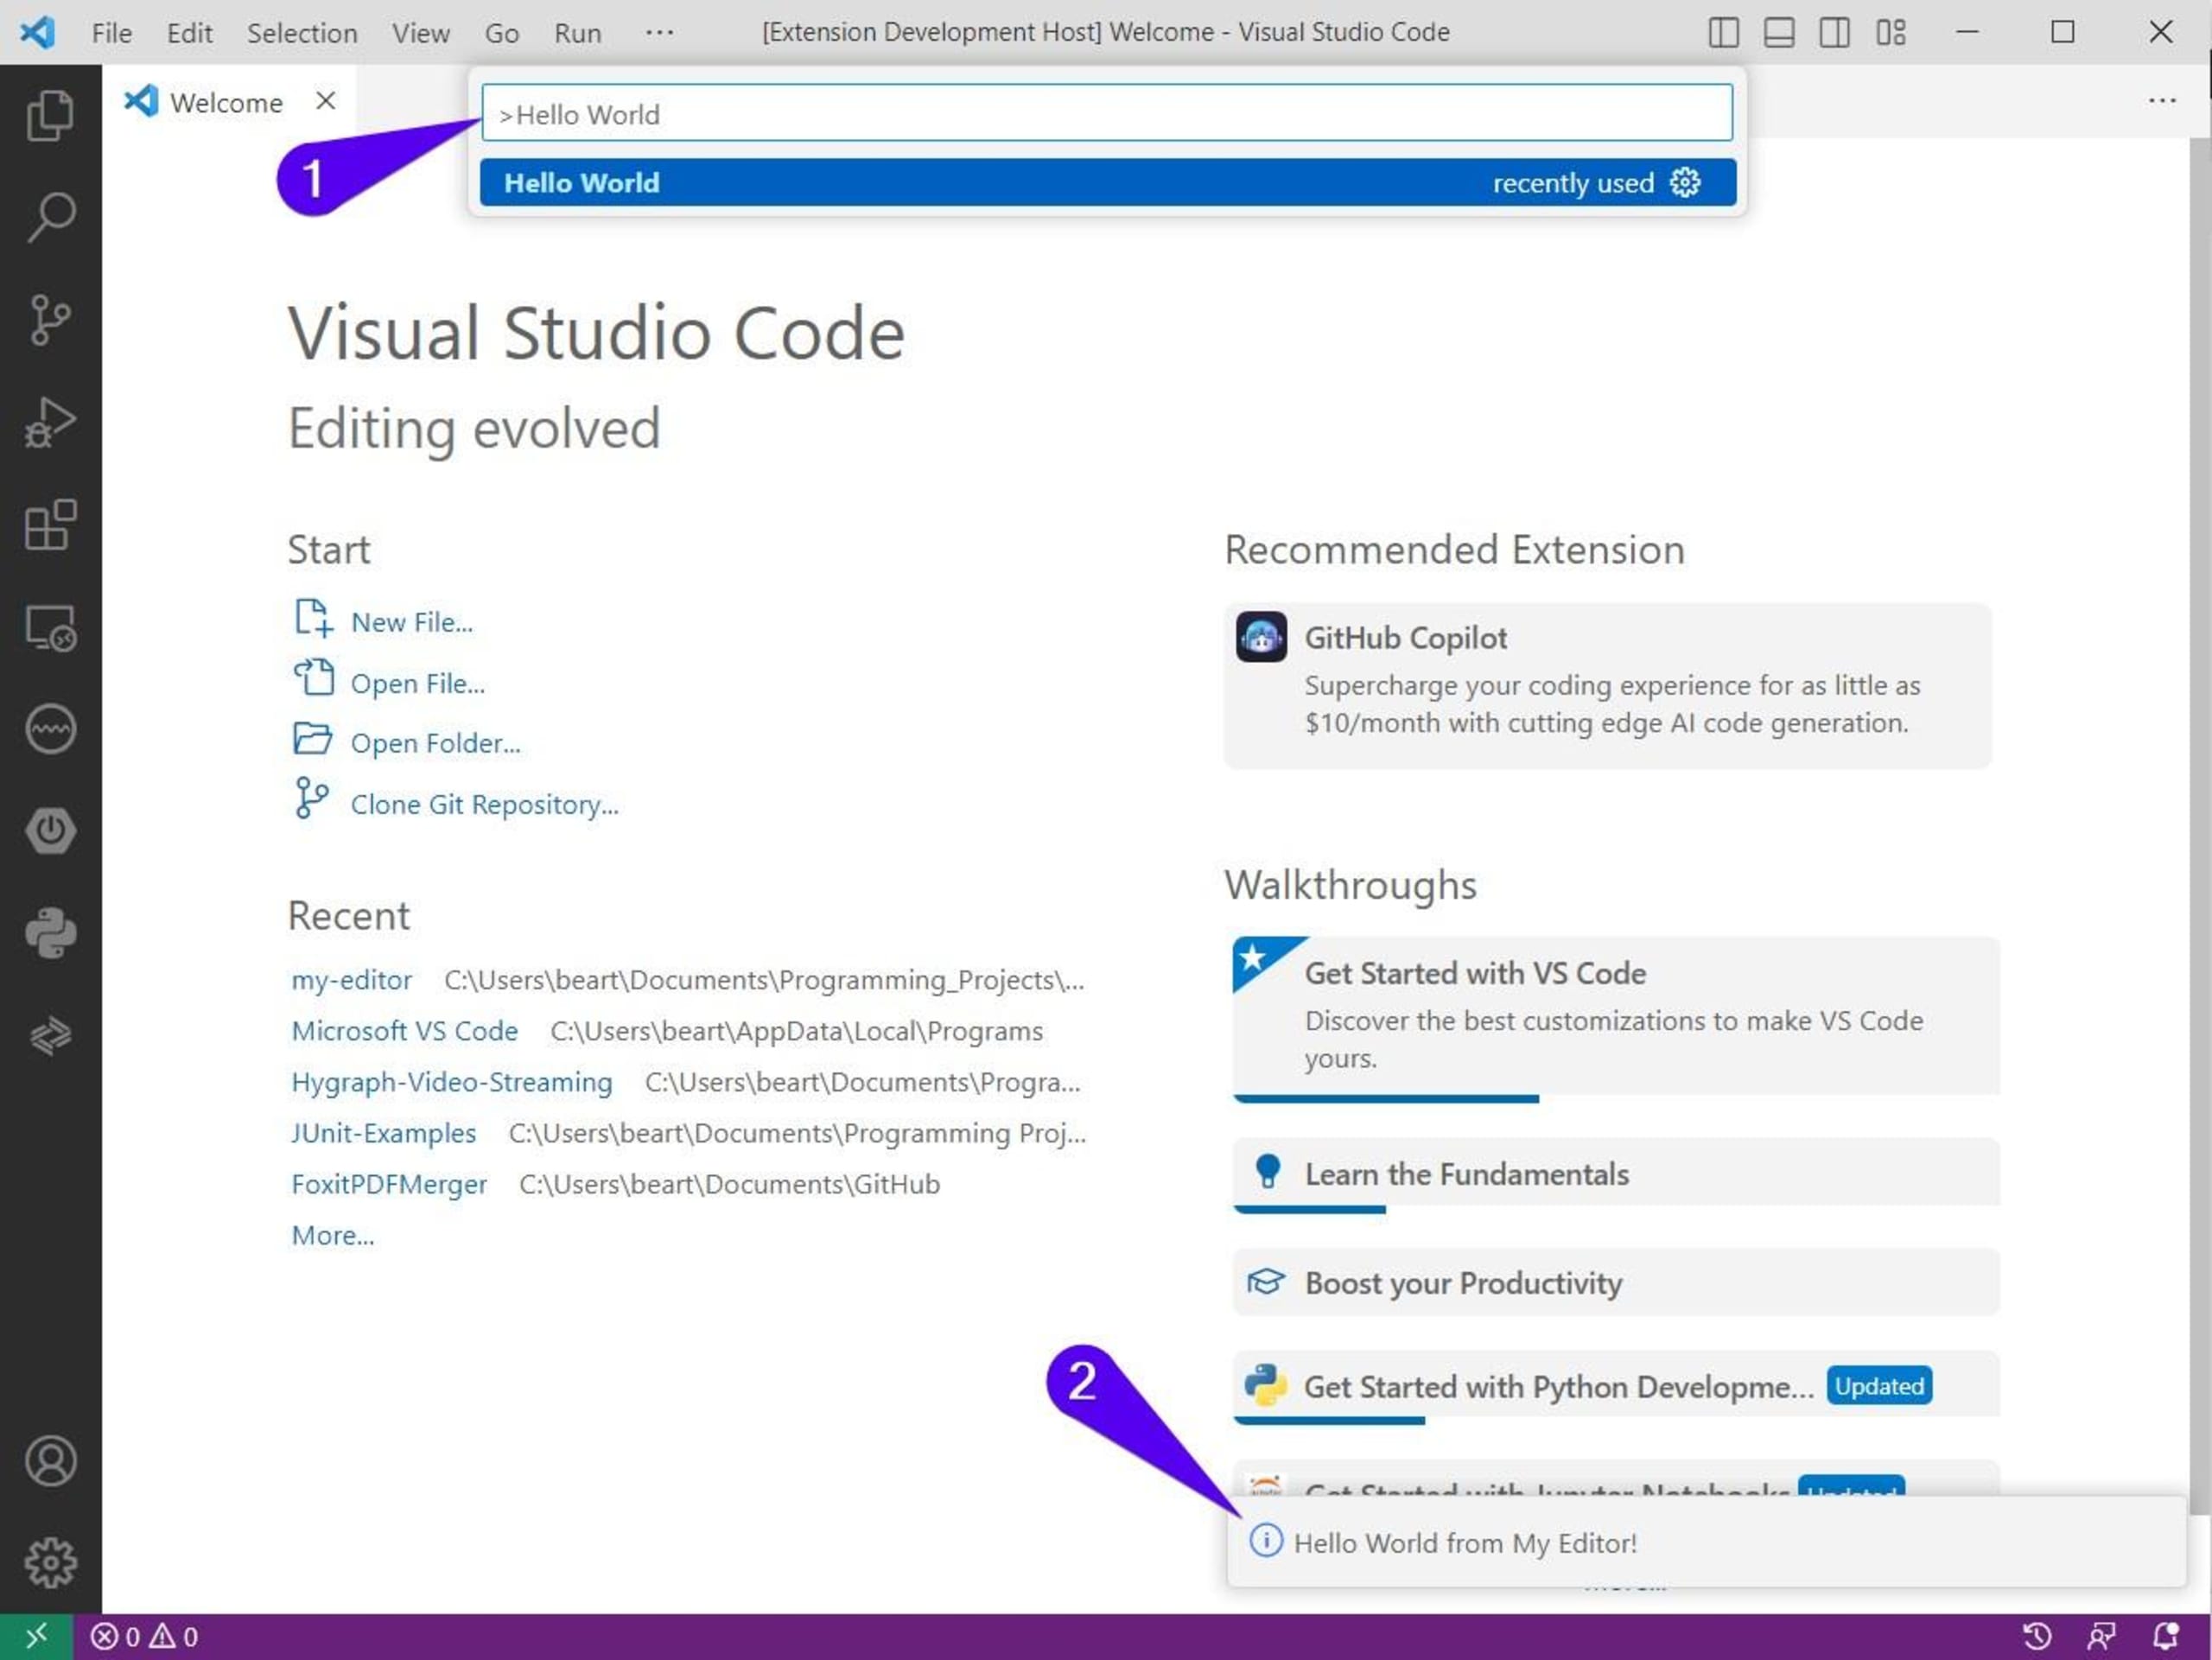
Make sure you close the Development Host to terminate the extension's run/debug session. In the next section, you'll finally get to build your extension.
Build and modify your extension
In this section, you'll build some simple functionality that can add text to VS Code's active text editor. Conceptually, it works similarly to the autofill function in applications like Excel.
To start, click on VS Code's file explorer and add a new file to your project's source code directory (SRC) called AutoFillExtension.ts:
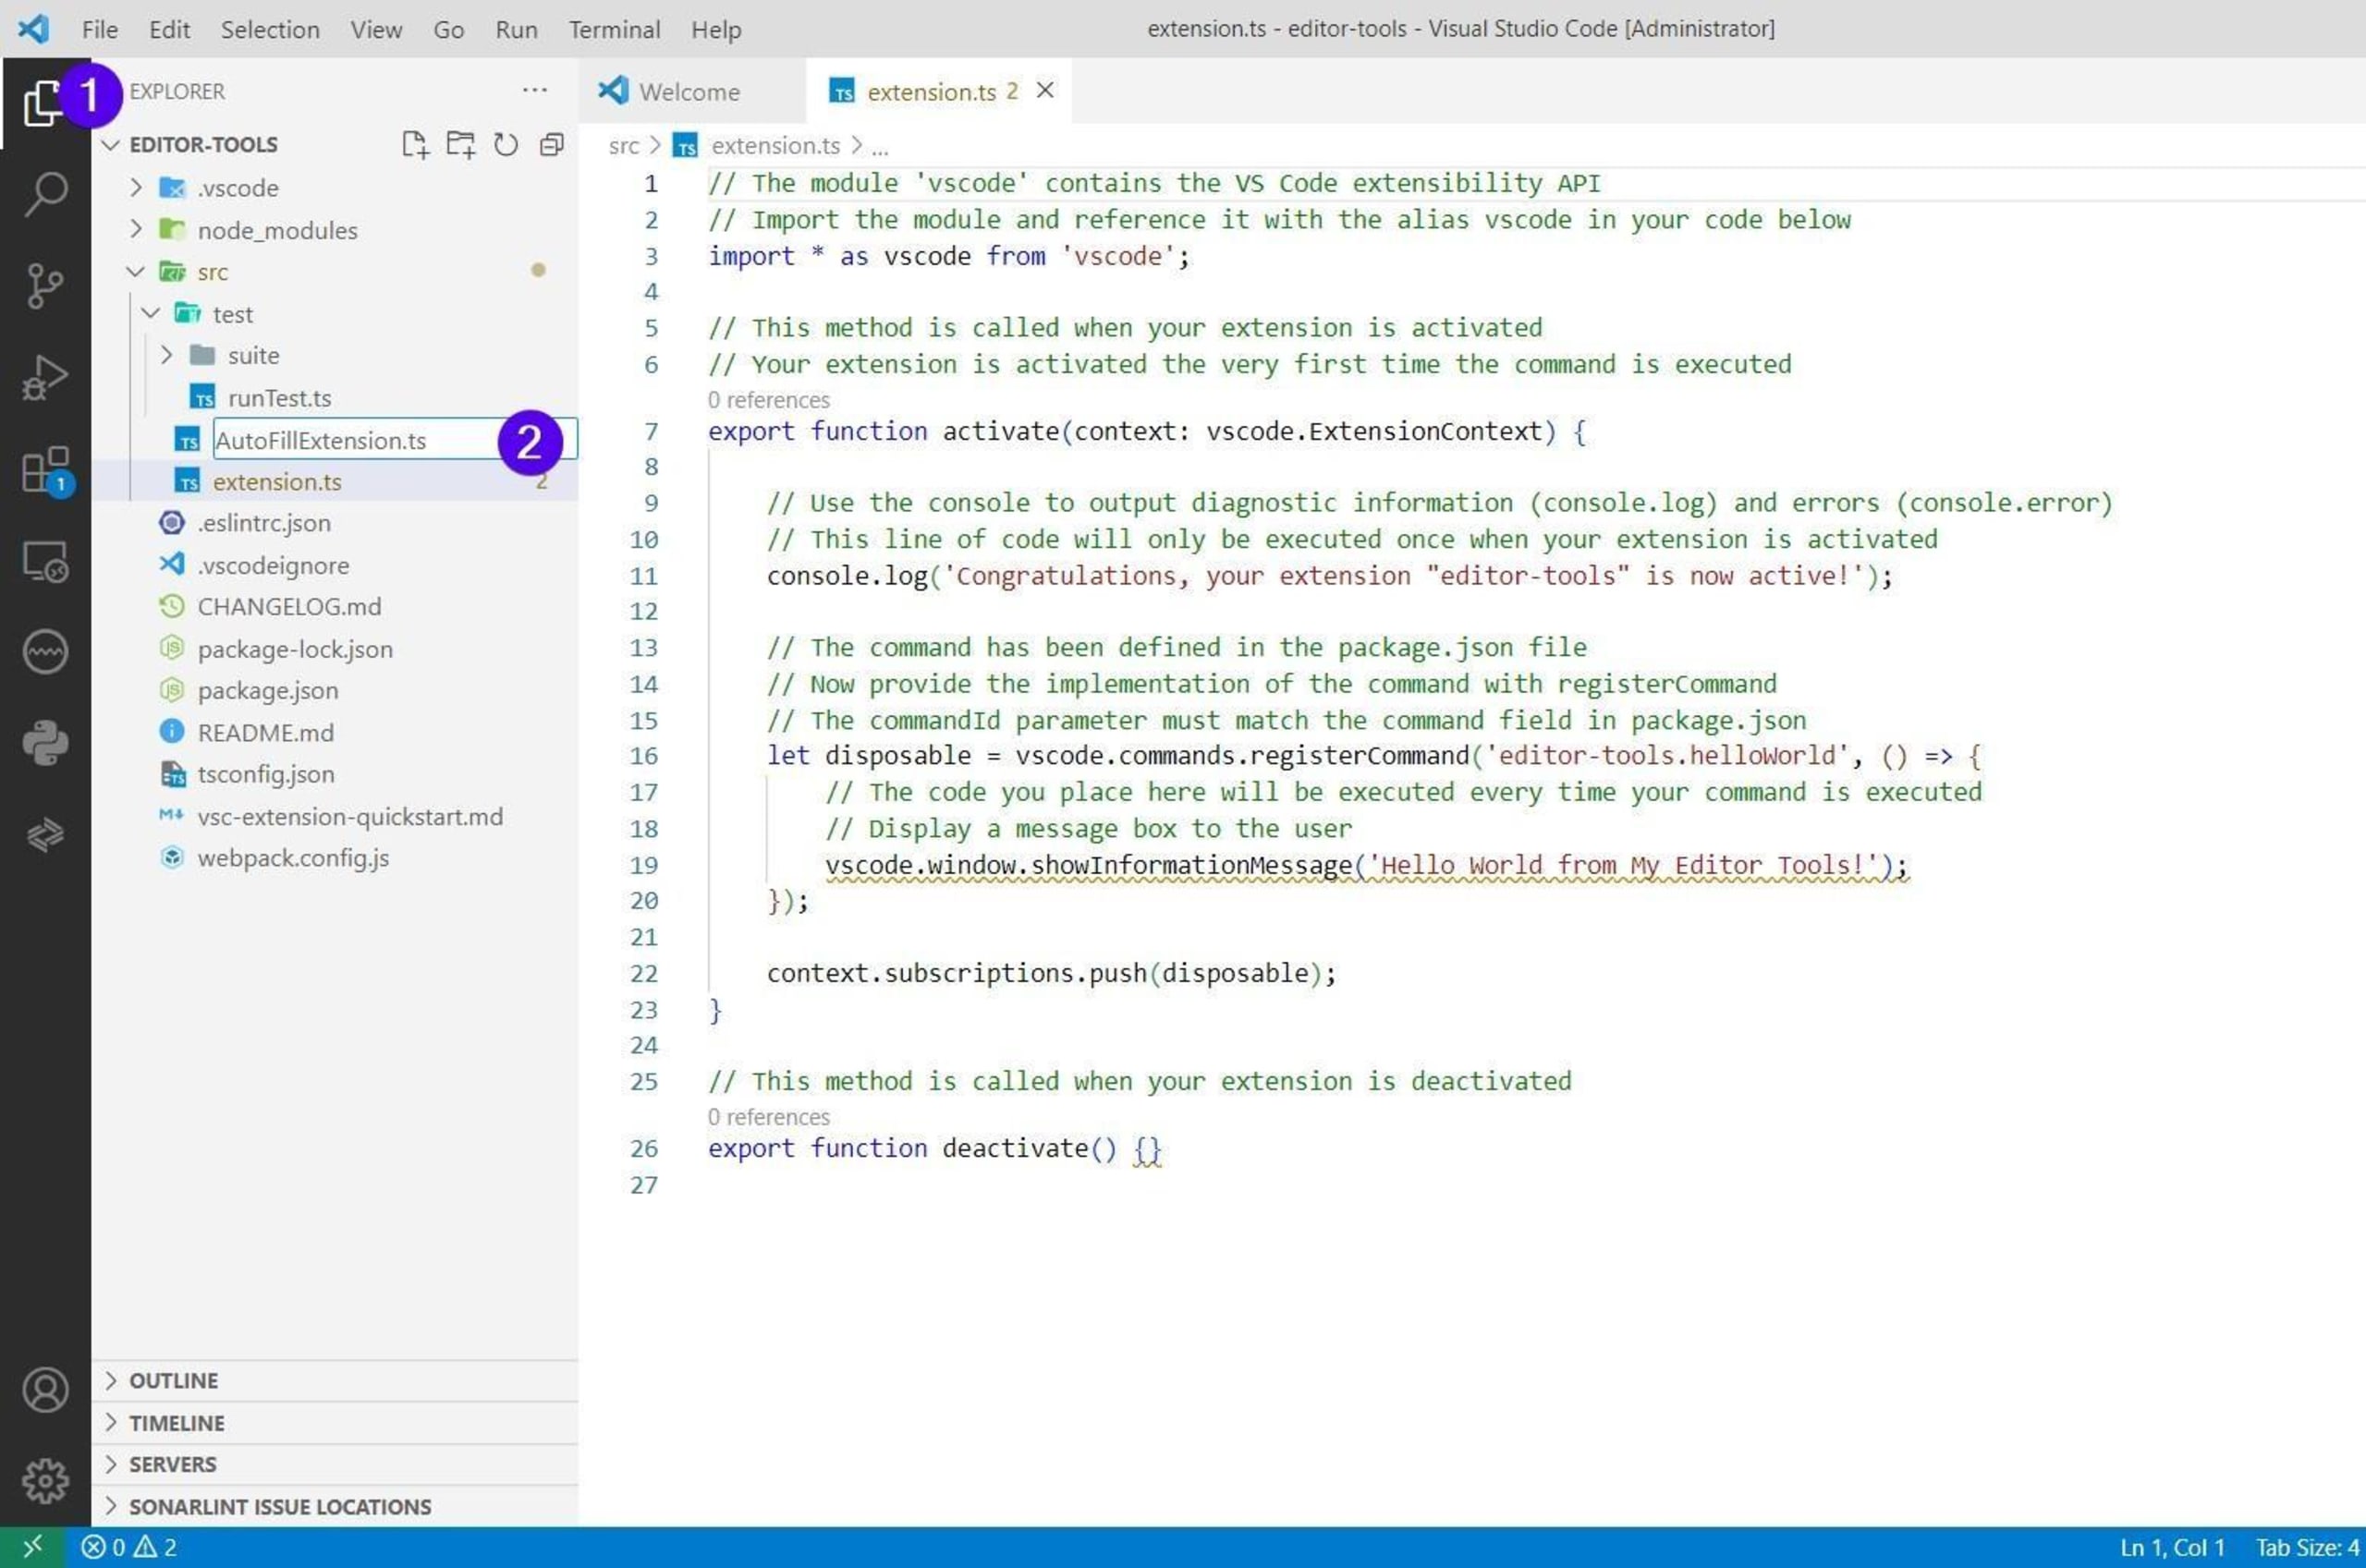
Add the following code to your AutoFillExtension.ts file:
1import * as vscode from 'vscode';
2
3export function autofillMyAddress() {
4    //Retrieve the currently active text editor
5    const editor = vscode.window.activeTextEditor;
6    //Check if the editor is undefined
7    if (editor) {
8        //Insert text at the current position using an edit builder
9        editor.edit(editBuilder => {
10            editBuilder.insert(editor.selection.active,'Street 6260-112 Glenwood Ave'
11            +'\nCity/Town   Raleigh'
12            +'\nState/Province/Region   Nebraska'
13            +'\nZip/Postal Code 27612'
14            +'\nPhone Number    (919) 785-2864'
15            +'\nCountry United States'
16            +'\nLatitude    35.859171'
17            +'\nLongitude   -78.703853');
18        });
19    }
20}
This code declares and exports a function called autoFillMyAddress. The function retrieves the currently active text editor (editor panel that has the current window focus) using the VS Code API's window namespace. It ascertains that there is indeed an active editor before adding text (a fake address that was randomly generated) to it using an instance of the TextEditorEdit class.
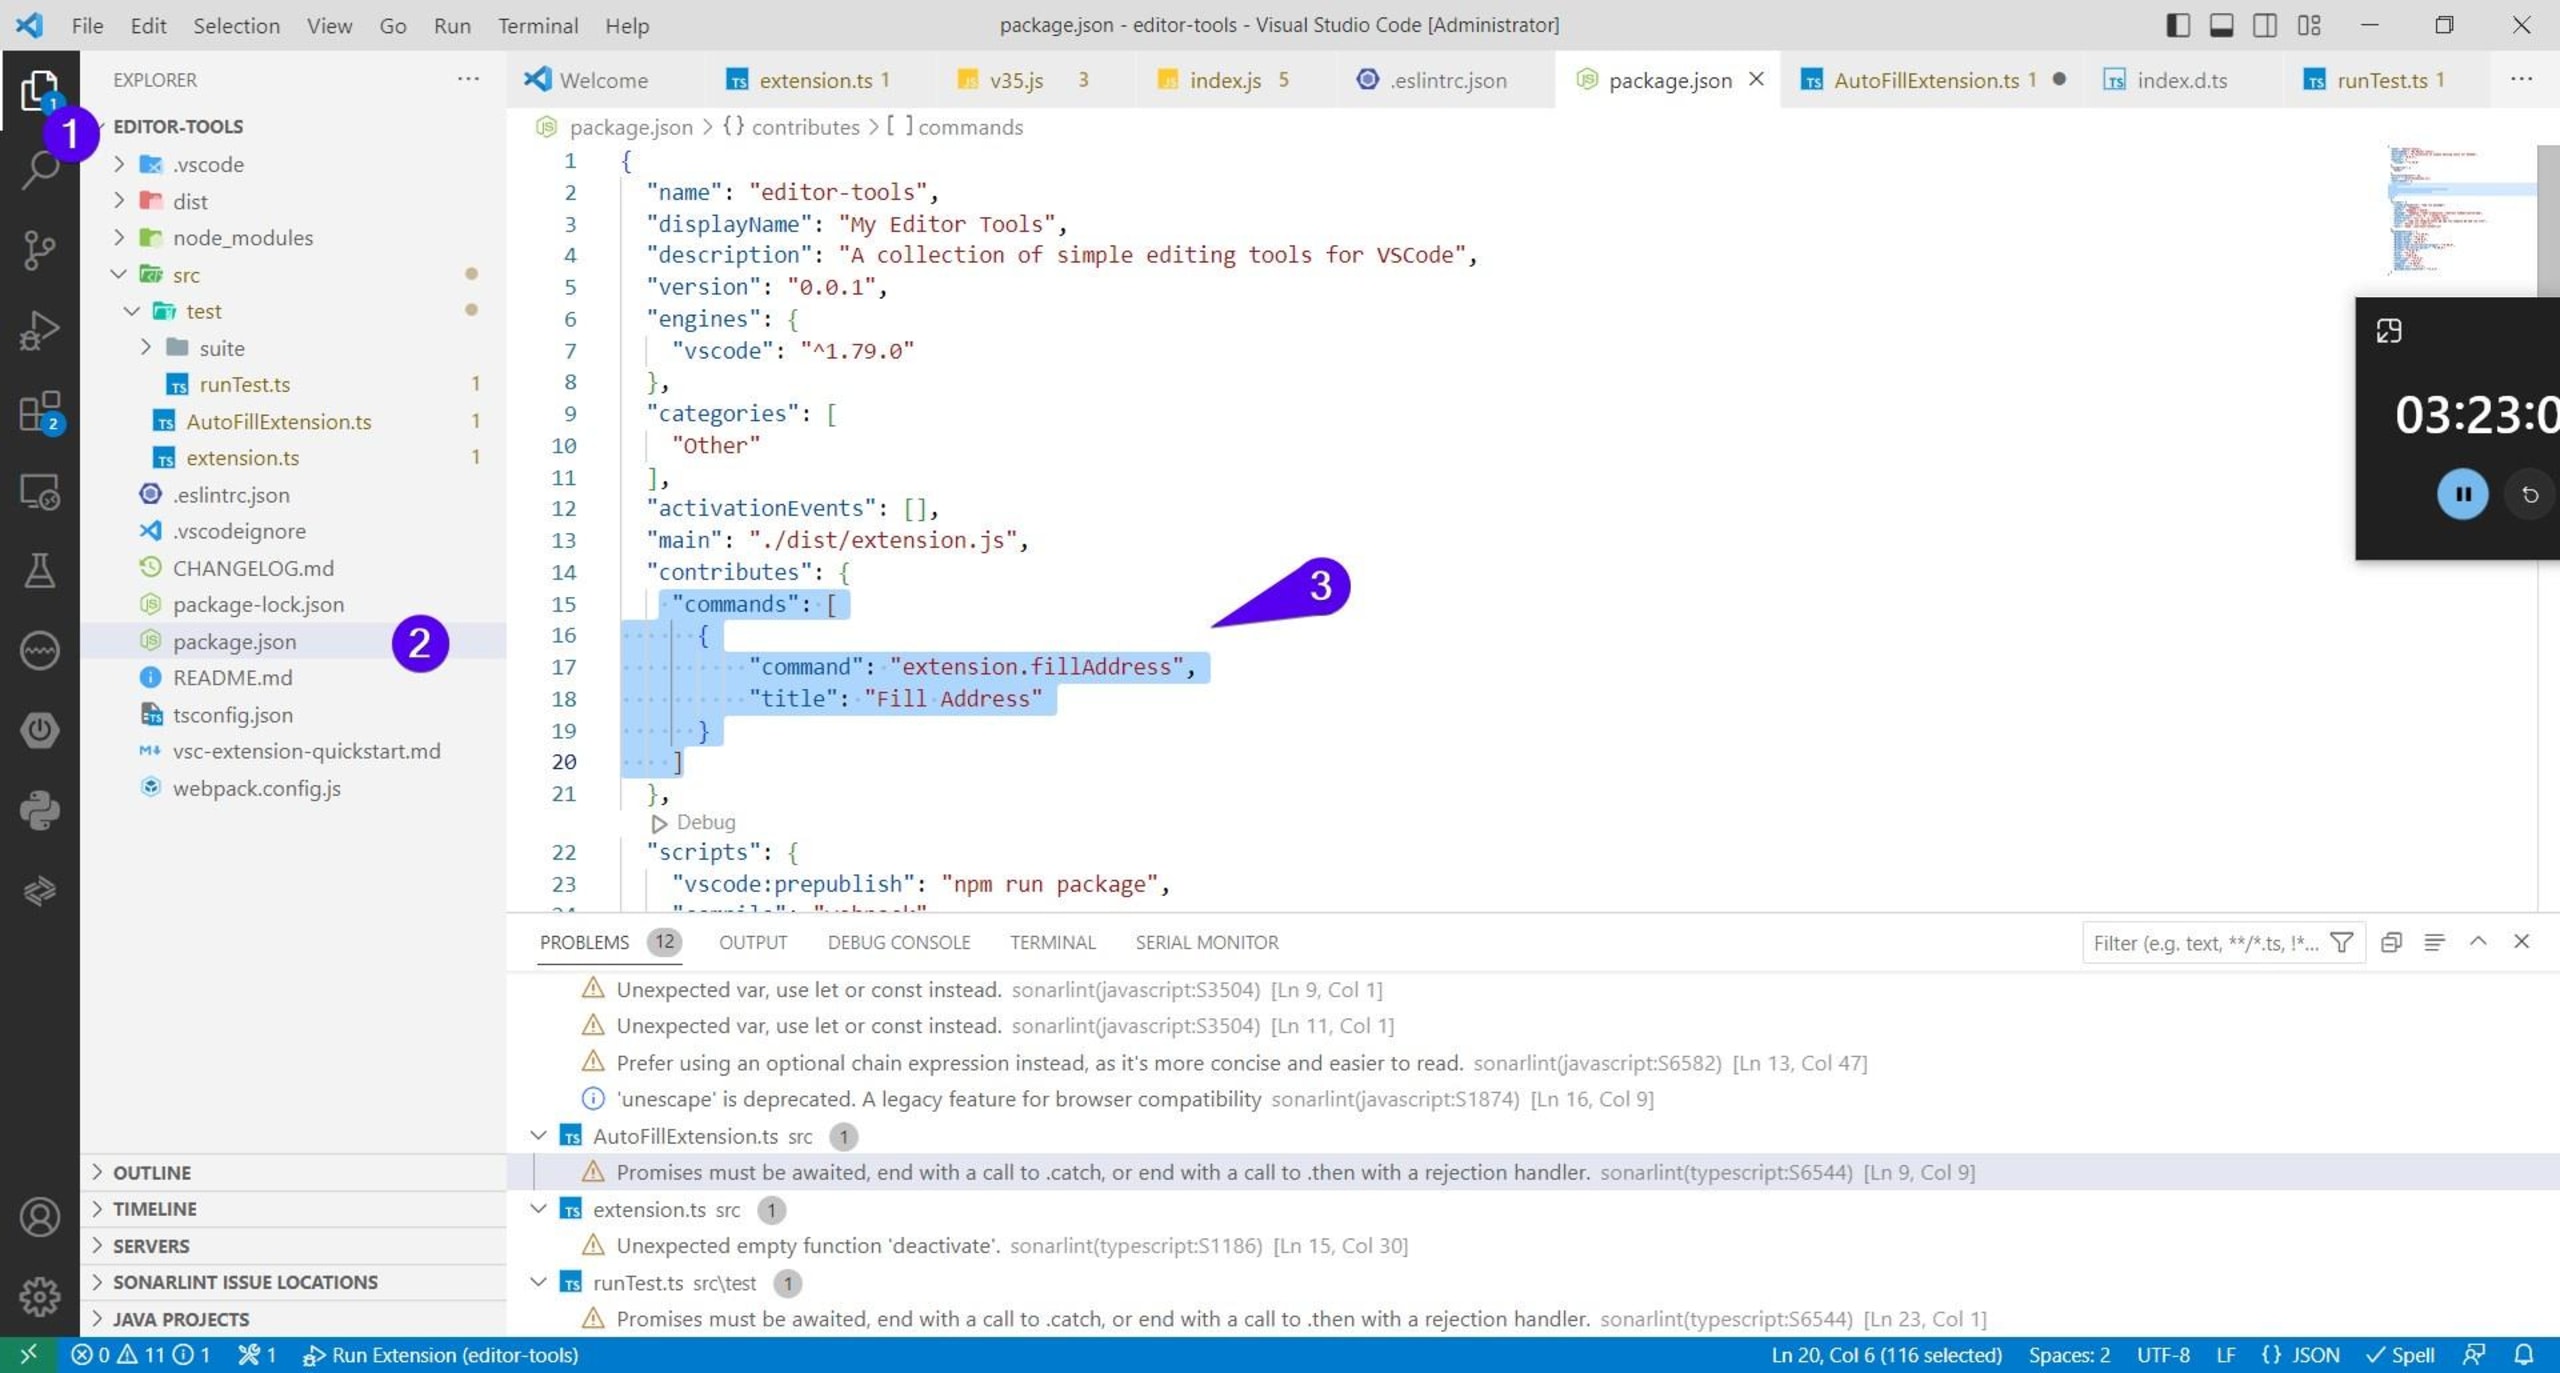
Once you've created your extension, you need to register and call it. To do so, use VS Code's file explorer to navigate to your package.json file. You need to add a contribution point so that your extension functionality can be called as a command from VS Code's UI.
Slowly scroll down through the package.json file until you reach the "contributes" object. Replace the "command" array along with its values with the following code:
"commands": [
    {
        "command": "editor-tools.fillAddress",
        "title": "Fill Address"
    }
]
Return to your project's extension.ts file and replace its content with the following:
1// The module 'vscode' contains the VS Code extensibility API
2// Import the module and reference it with the alias vscode in your code below
3import * as vscode from 'vscode';
4import * as autofill from './AutoFillExtension';
5
6// This method is called when your extension is activated
7// Your extension is activated the very first time the command is executed
8export function activate(context: vscode.ExtensionContext) {
9    let disposable = vscode.commands.registerCommand('editor-tools.fillAddress',autofill.autofillMyAddress);
10
11    context.subscriptions.push(disposable);
12}
13
14// This method is called when your extension is deactivated
15export function deactivate() {}
This code imports the AutoFillExtension module as an autofill object. Then it uses activate to register the extension's command and subscribe the extension to the ExtensionContext's list of subscriptions. Once the extension is deactivated, it is disposed of by VS Code.
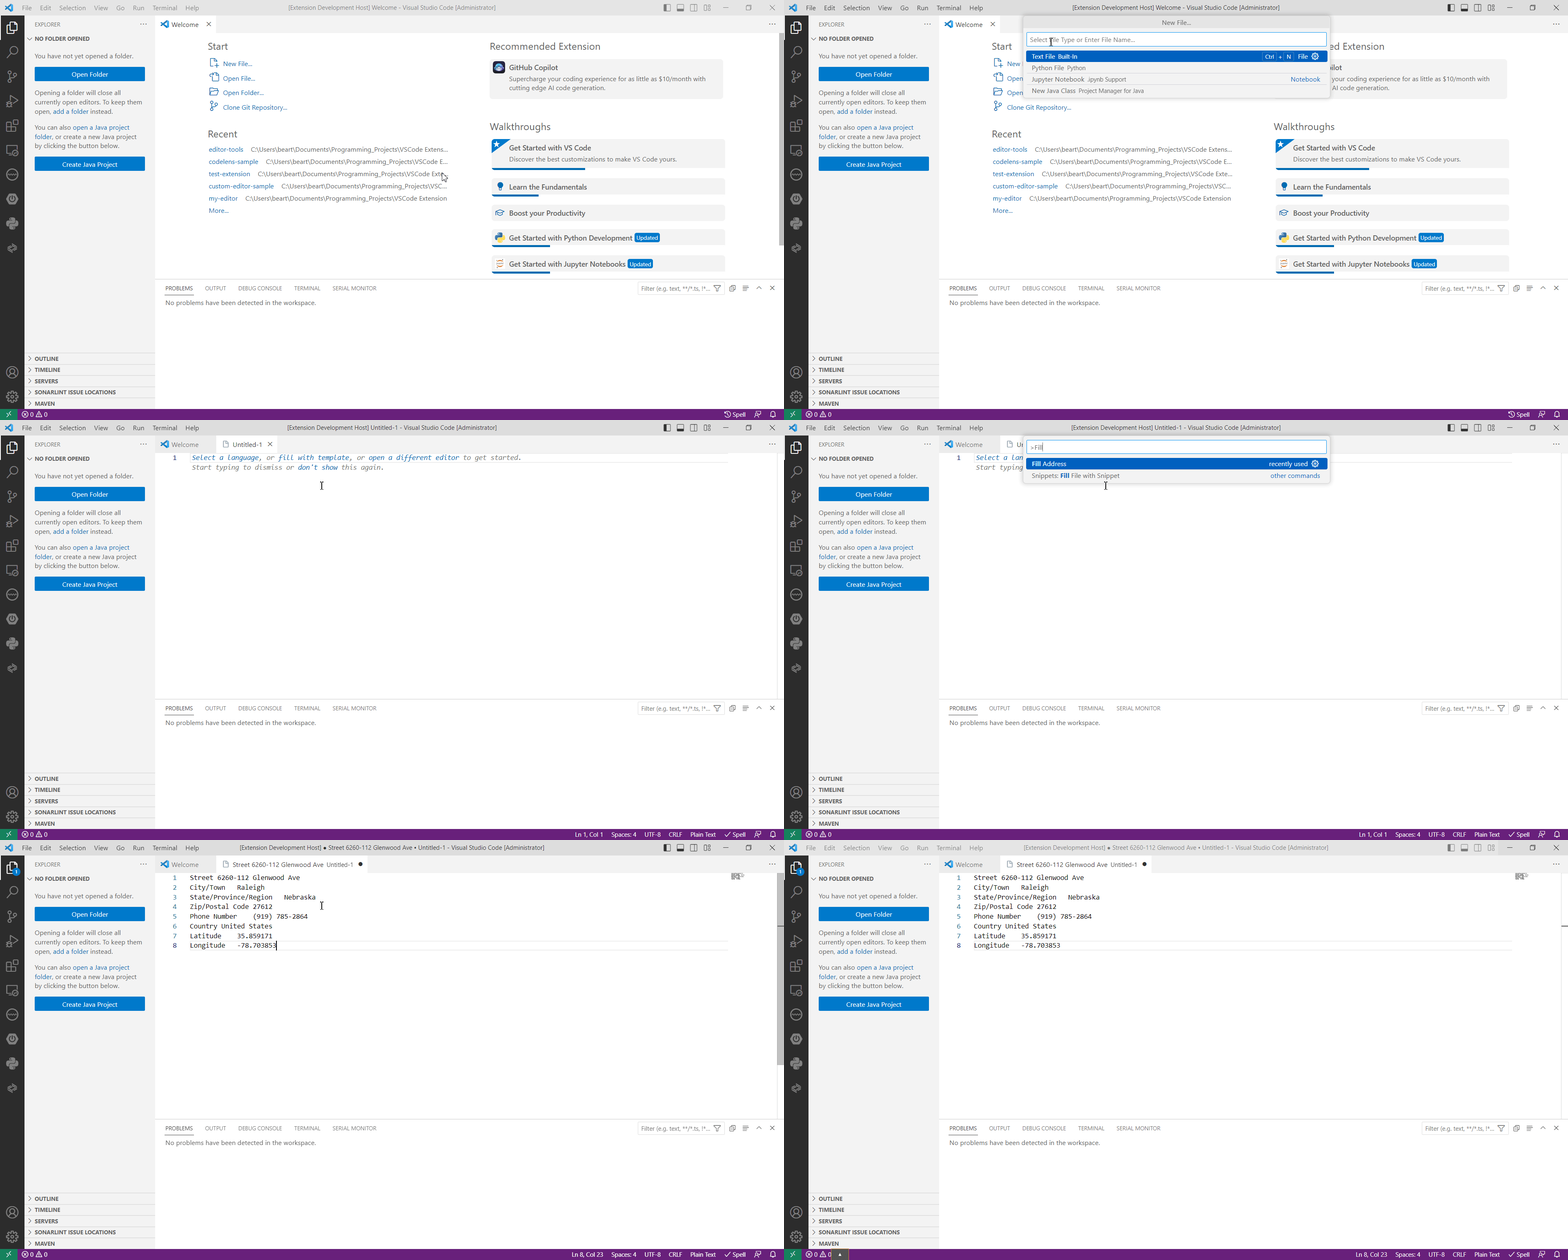
Now it's time to debug/run your extension (F5). To use the extension, open or create a new file (of any type) that can be edited. Then open the Command Palate and type in the Fill Address command:
Now we'll take your extension to the next level by leveraging the diagnostic features of VS Code. With this added functionality, your extension can perform a check on the current document to see if it meets a specific criterion. If the document falls short, your extension will display an error message.
Close the Extension Development Host and create a new extension in the src folder called LineDiagnosticExtension.ts and add the following content:
1import * as vscode from 'vscode';
2
3export function updateDiagnostic(collection: vscode.DiagnosticCollection) {
4    //clears previous errors
5    collection.clear;
6    //fetches current active text editor
7    let editor = vscode.window.activeTextEditor;
8    //ensures that active text editor is not undefined
9    if (editor) {
10        //fetches the document from the active text editor
11        let document = editor.document;
12        //fetches the number of lines
13        let lineCount = document.lineCount;
14        //verifies that the line count is not less than 8
15        if (lineCount < 8) {
16            //specifies the range to highlight and display errors over
17            const diagnosticrange = new vscode.Range(new vscode.Position(0, 0), new vscode.Position(lineCount-1, 10));
18            //sets the properties of VSCode's diagnostic features
19            collection.set(document.uri, [{
20                code: '',
21                message: 'Document has only ' + lineCount + ' line(s). The document must have at least 8 lines',
22                range: diagnosticrange,
23                severity: vscode.DiagnosticSeverity.Error,
24                source: '',
25                relatedInformation: [
26                    new vscode.DiagnosticRelatedInformation(new vscode.Location(document.uri, new vscode.Range(new vscode.Position(0, 0), new vscode.Position(7, 10))), 'Line Count')
27                ]
28            }]);
29        } else {
30            //if the line count is equal to or greater than 8, it clears all error messages
31            collection.clear();
32
33        }
34
35    }
36
37}
This file contains and exports a singular function: updateDiagnostic(). It accepts a single argument: DiagnosticCollection. The function uses the TextDocument module's lineCount property to return the number of lines in your currently active document. If the number of lines is fewer than eight, it produces an error message using VS Code's diagnostic capabilities. This includes a floating pop-up window and an entry in the Problems panel.
Next, you need to call UpdateDiagnostic() and register it as part of your extension. Open the extension.ts file and replace its content with the following:
1// The module 'vscode' contains the VS Code extensibility API
2// Import the module and reference it with the alias vscode in your code below
3import * as vscode from 'vscode';
4import * as autofill from './AutoFillExtension';
5import * as linelimit from './LineDiagnosticExtension';
6
7// This method is called when your extension is activated
8// Your extension is activated the very first time the command is executed
9export function activate(context: vscode.ExtensionContext) {
10    //create a new diagnostic collection
11    const collection = vscode.languages.createDiagnosticCollection('line count diagnostics');
12    vscode.commands.registerCommand('editor-tools.fillAddress',autofill.autofillMyAddress);
13
14    //Initial run of the upDateDiagnostic method
15    linelimit.updateDiagnostic(collection);
16
17    //Subscribes a new event handler that activates when an edit or change is performed on a workspace document
18    context.subscriptions.push(vscode.workspace.onDidChangeTextDocument(editorchangeevent => {
19        if (editorchangeevent) {
20            linelimit.updateDiagnostic(collection);
21        }
22    }));
23
24}
25
26// This method is called when your extension is deactivated
27export function deactivate() {}
This code imports LineDiagnosticExtension.ts using the alias linelimit. Then the code defines a new DiagnosticCollection. This only runs once when the activate function is called. After registering the Fill Address command, it calls the updateDiagnostic() function, which also runs once when VS Code is opened.
In order to update VS Code's diagnostic information, you need to monitor for any changes in the document. That's why this code registers an event handler called OnDidChangeTextDocument() that belongs to the workspace and monitors all document edits in the current workspace.
Next, the event handler runs the linelimit.updateDiagnostic method. Because you have two different extensions, you need to register both. In the previous example, the Fill Address extension and command are only registered and added to the subscription list when you run the command from the Command Palette. However, here, you want it to be activated when you initialize VS Code.
VS Code lets you specify what is known as activation events. Your extensions are only activated if an activation event occurs.
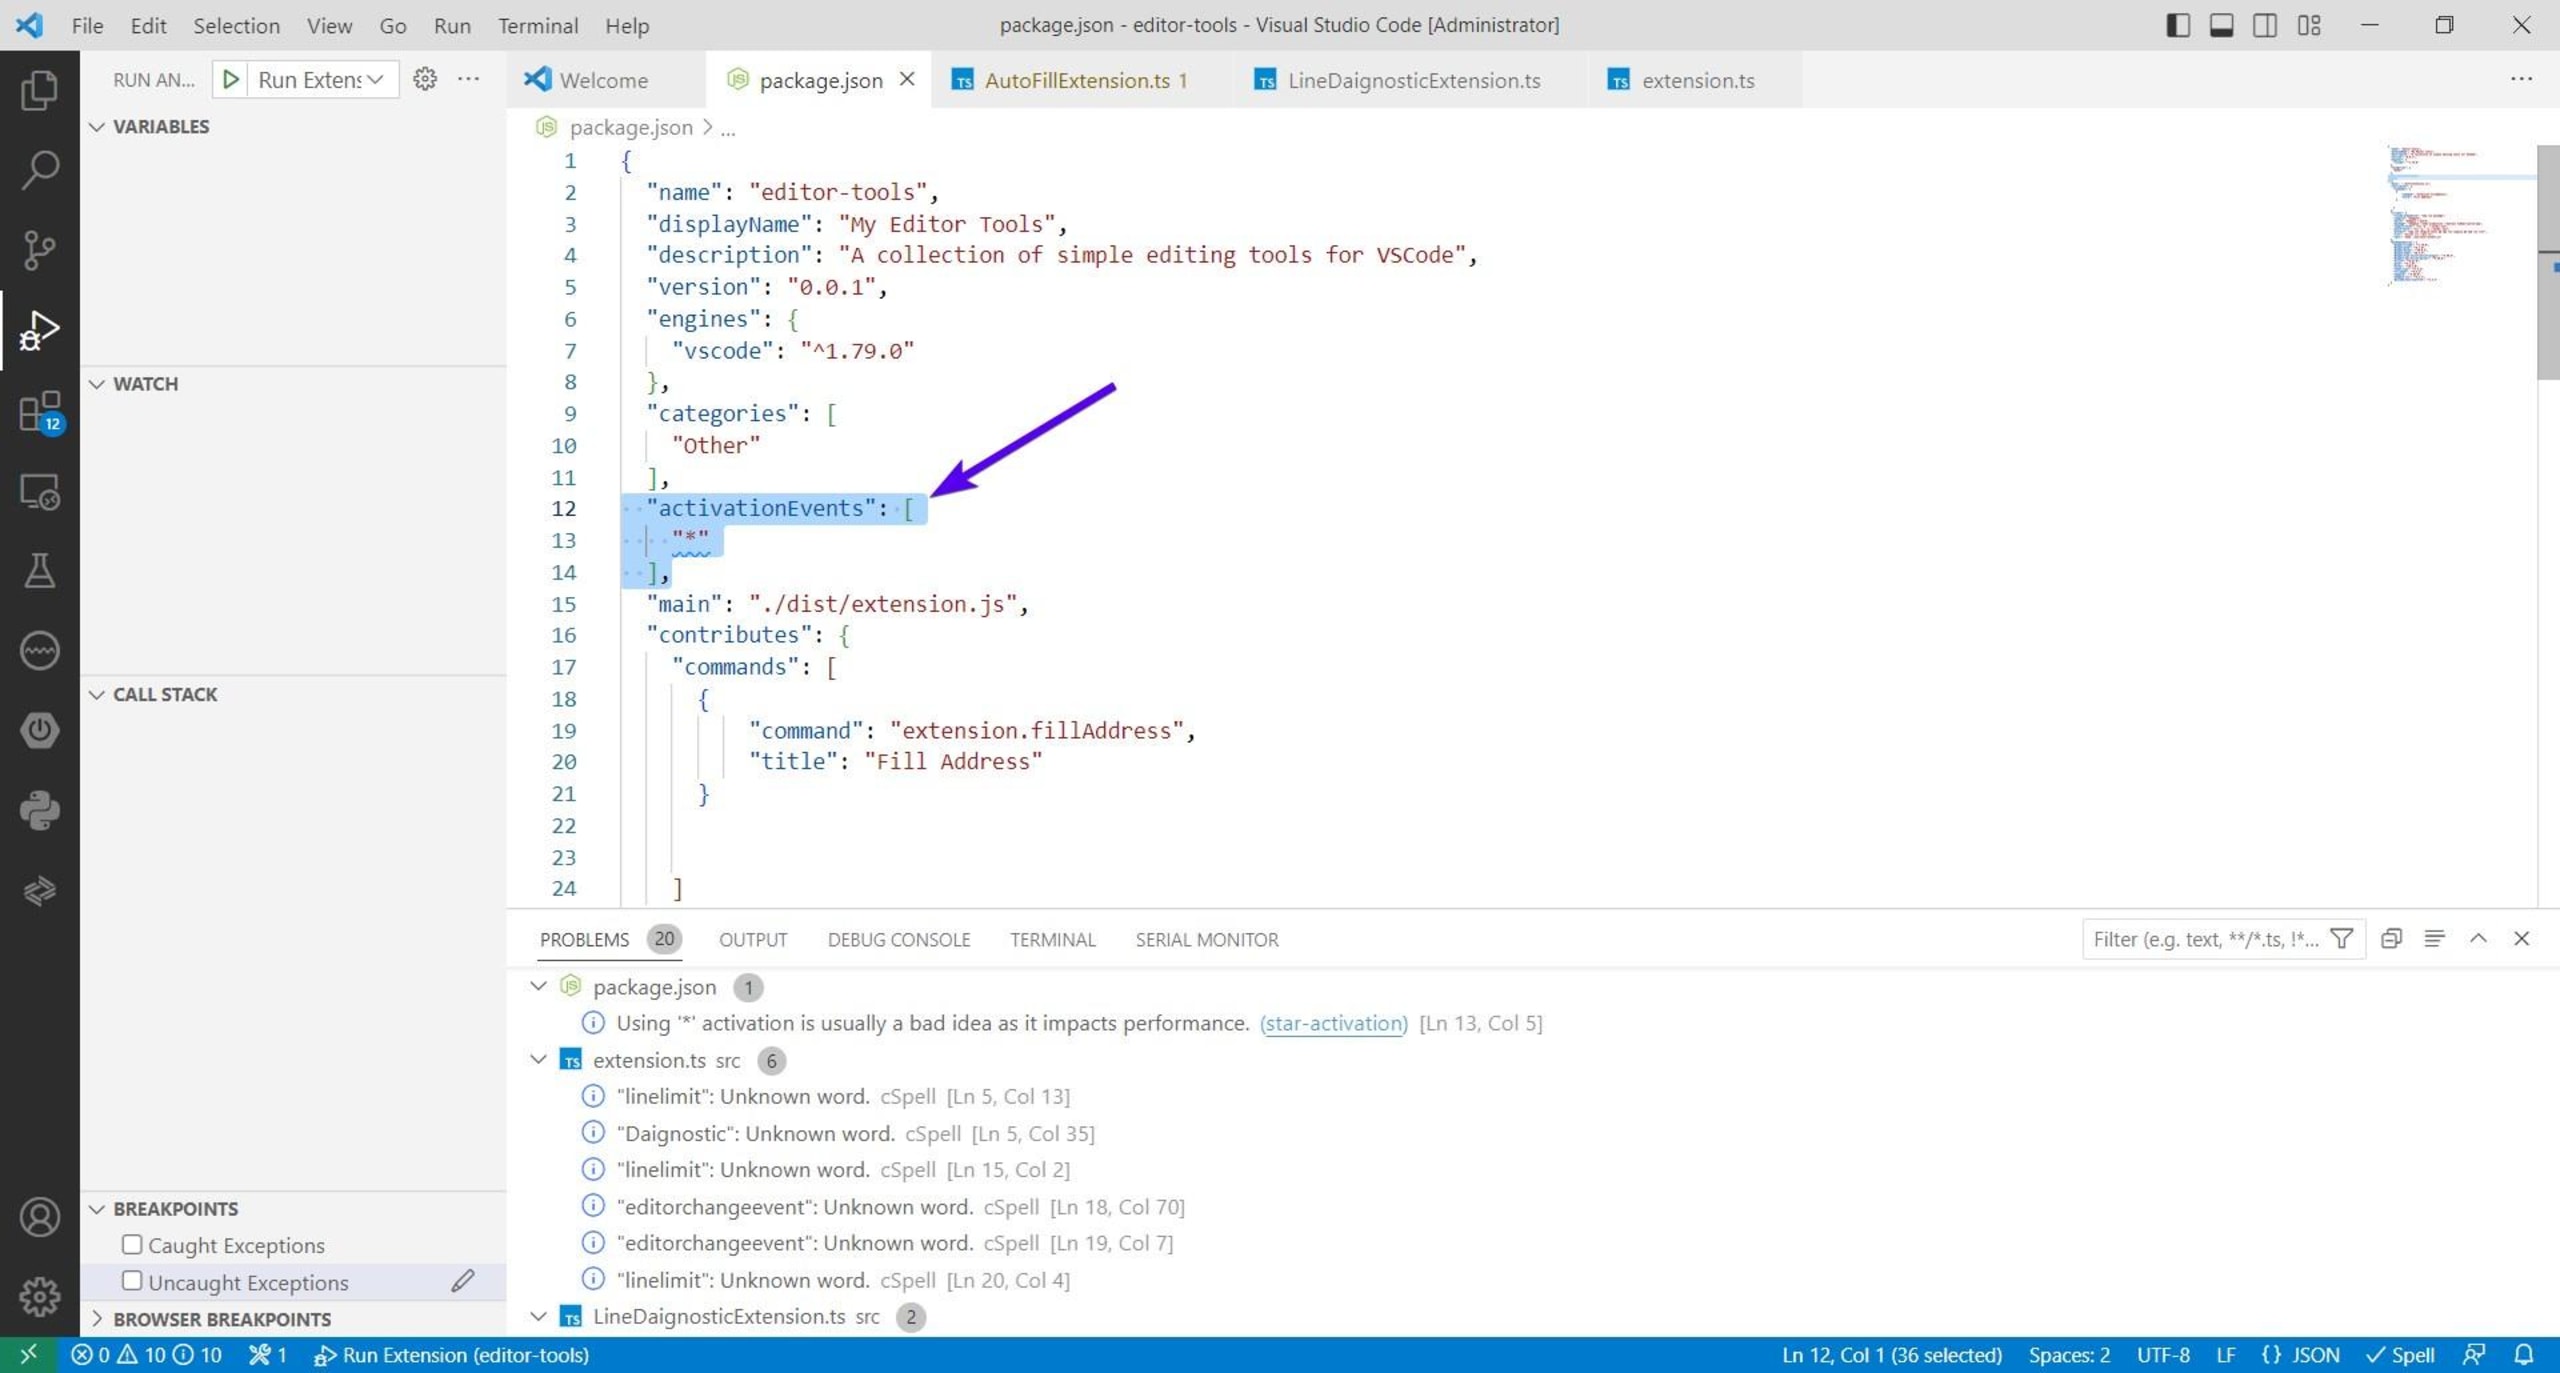
Open your project's package.json file. Scroll down until you find the activationEvents array and add "*" as the value (between the square brackets). This forces VS Code to activate all your extensions on all activation events. This action typically isn't recommended because it slows VS Code's start-up times. However, since these are two simple extensions, they shouldn't affect this project:
  "activationEvents": [
    "*"
  ],
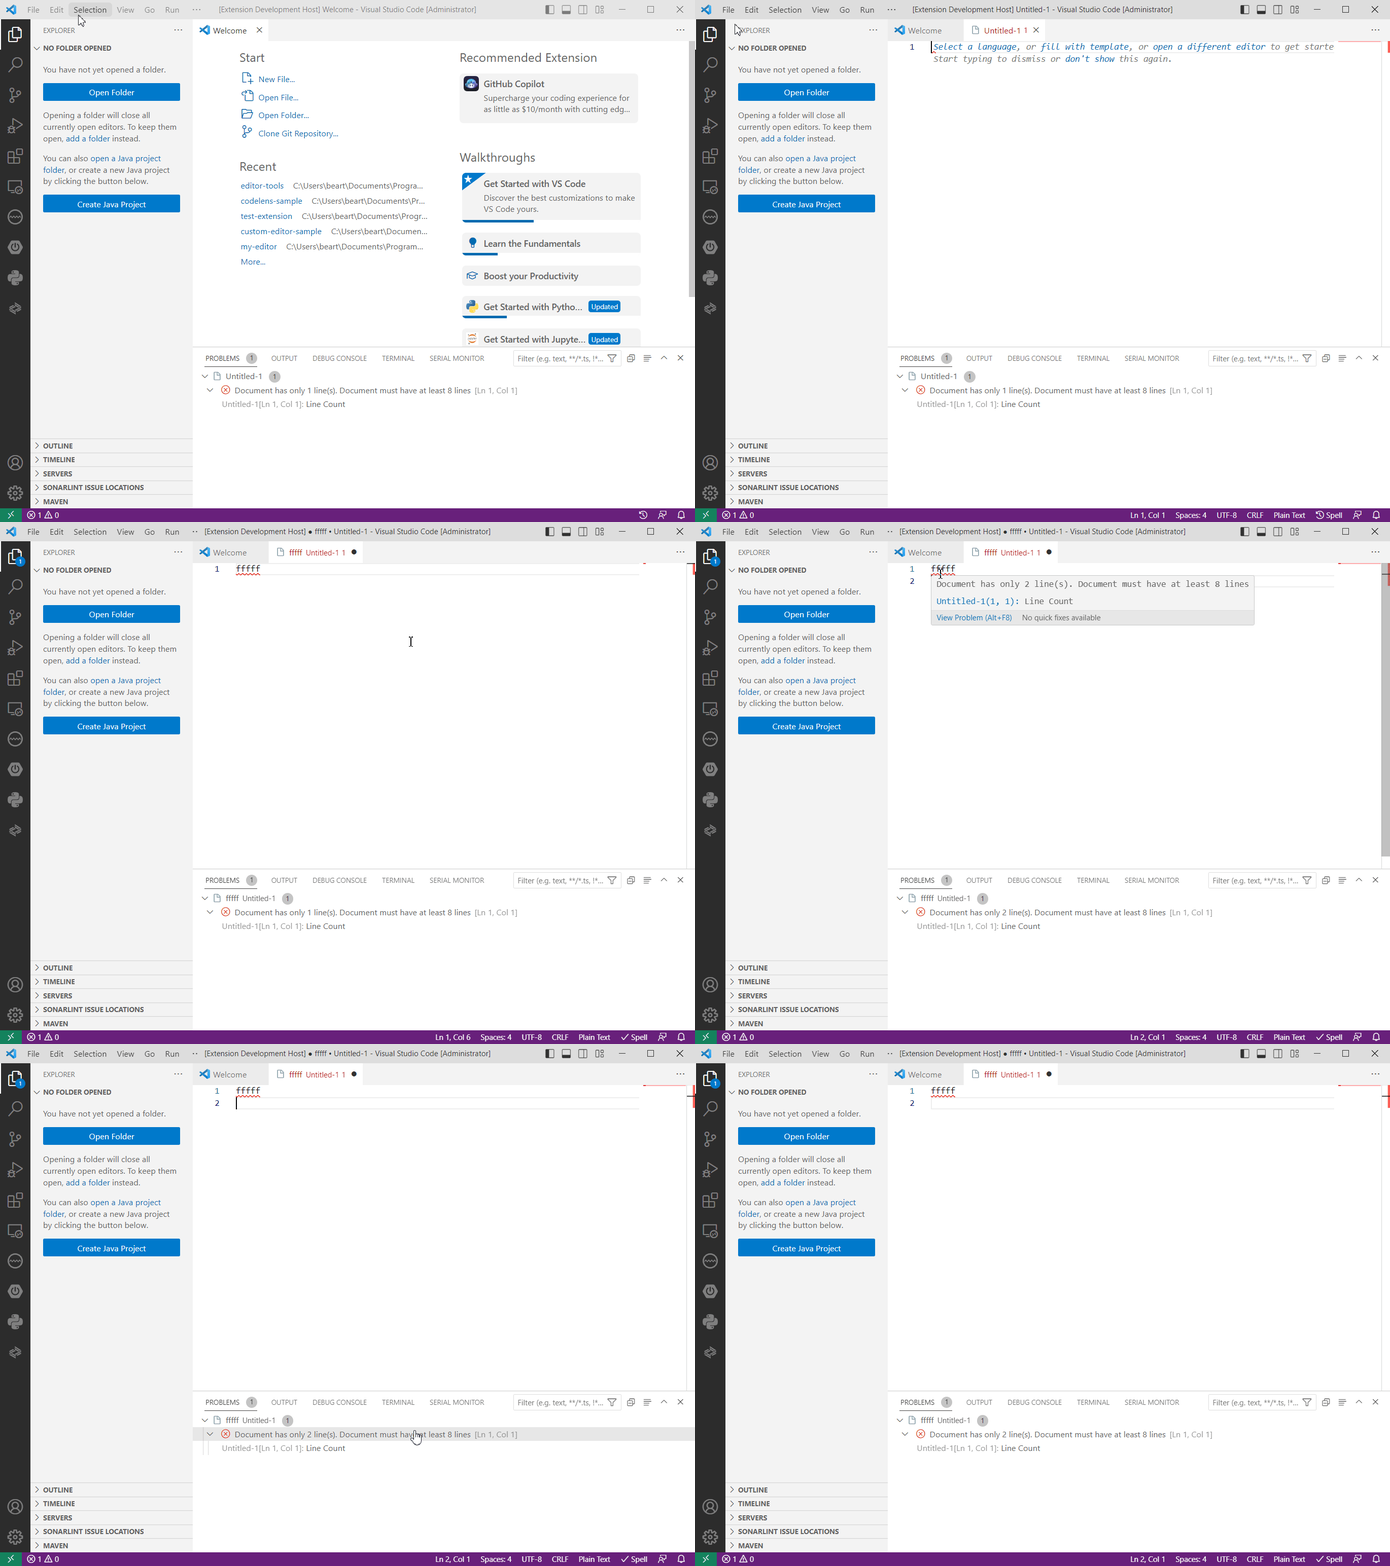
Now it's finally time to run and test your extension. To test the extension, create a new text file with something random into the text area. VS Code should underline the text in red and add a message to the problem panel:
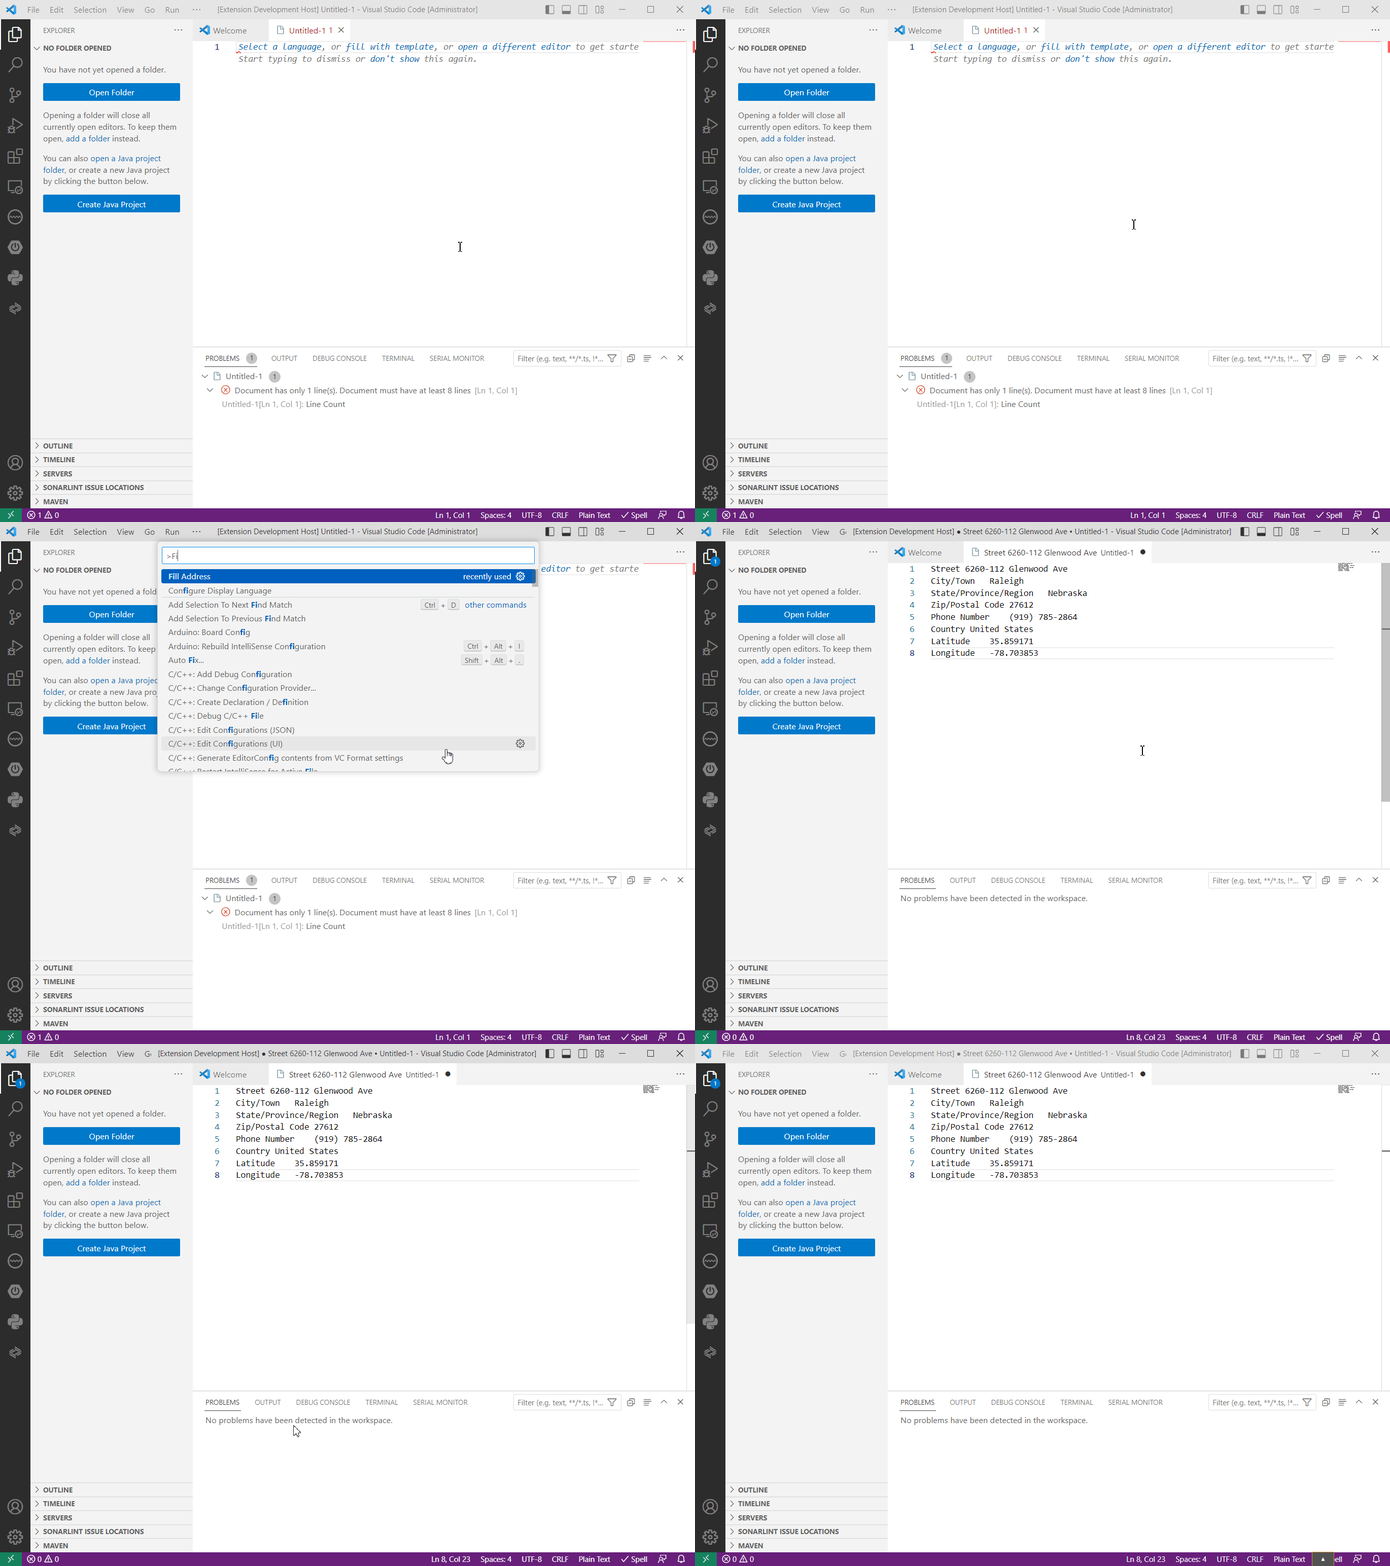
Adding eight more lines should clear the error message. Or use the Fill Address method to make it easier:
Then run Snyk again to verify the quality and security of your project. Look through the scan results, ignoring any alerts that are not related to the project files you've created. If you do encounter any relevant notifications, follow Snyk's recommendation to remediate. Now that you've verified the quality and security of your extension (along with its dependencies), it's time to publish it.
Package your extension
Microsoft makes packaging and publishing easy with its VS Code Extensions (VSCE) CLI. With the tool, you don't have to strictly publish your extension to the Visual Studio Code Marketplace. Instead, you can package it as a VSIX file and share it that way. You need npm to install the VSCE CLI.
Open a command line terminal of your choice and run the following npm command (it doesn't need to be run in a specific directory):
npm install -g @vscode/vsceOnce you've installed VSCE, navigate to your extension's folder and run the following command:
vsce packageIf you previously elected not to initialize a GitHub repository for your extension, you may run into a few warnings. These can be bypassed by simply selecting the yes option:

The packaging process shouldn't take too long. Once it's done, you'll find a new file in your project's root folder named editor-tools-0.0.1.vsix (or similar):
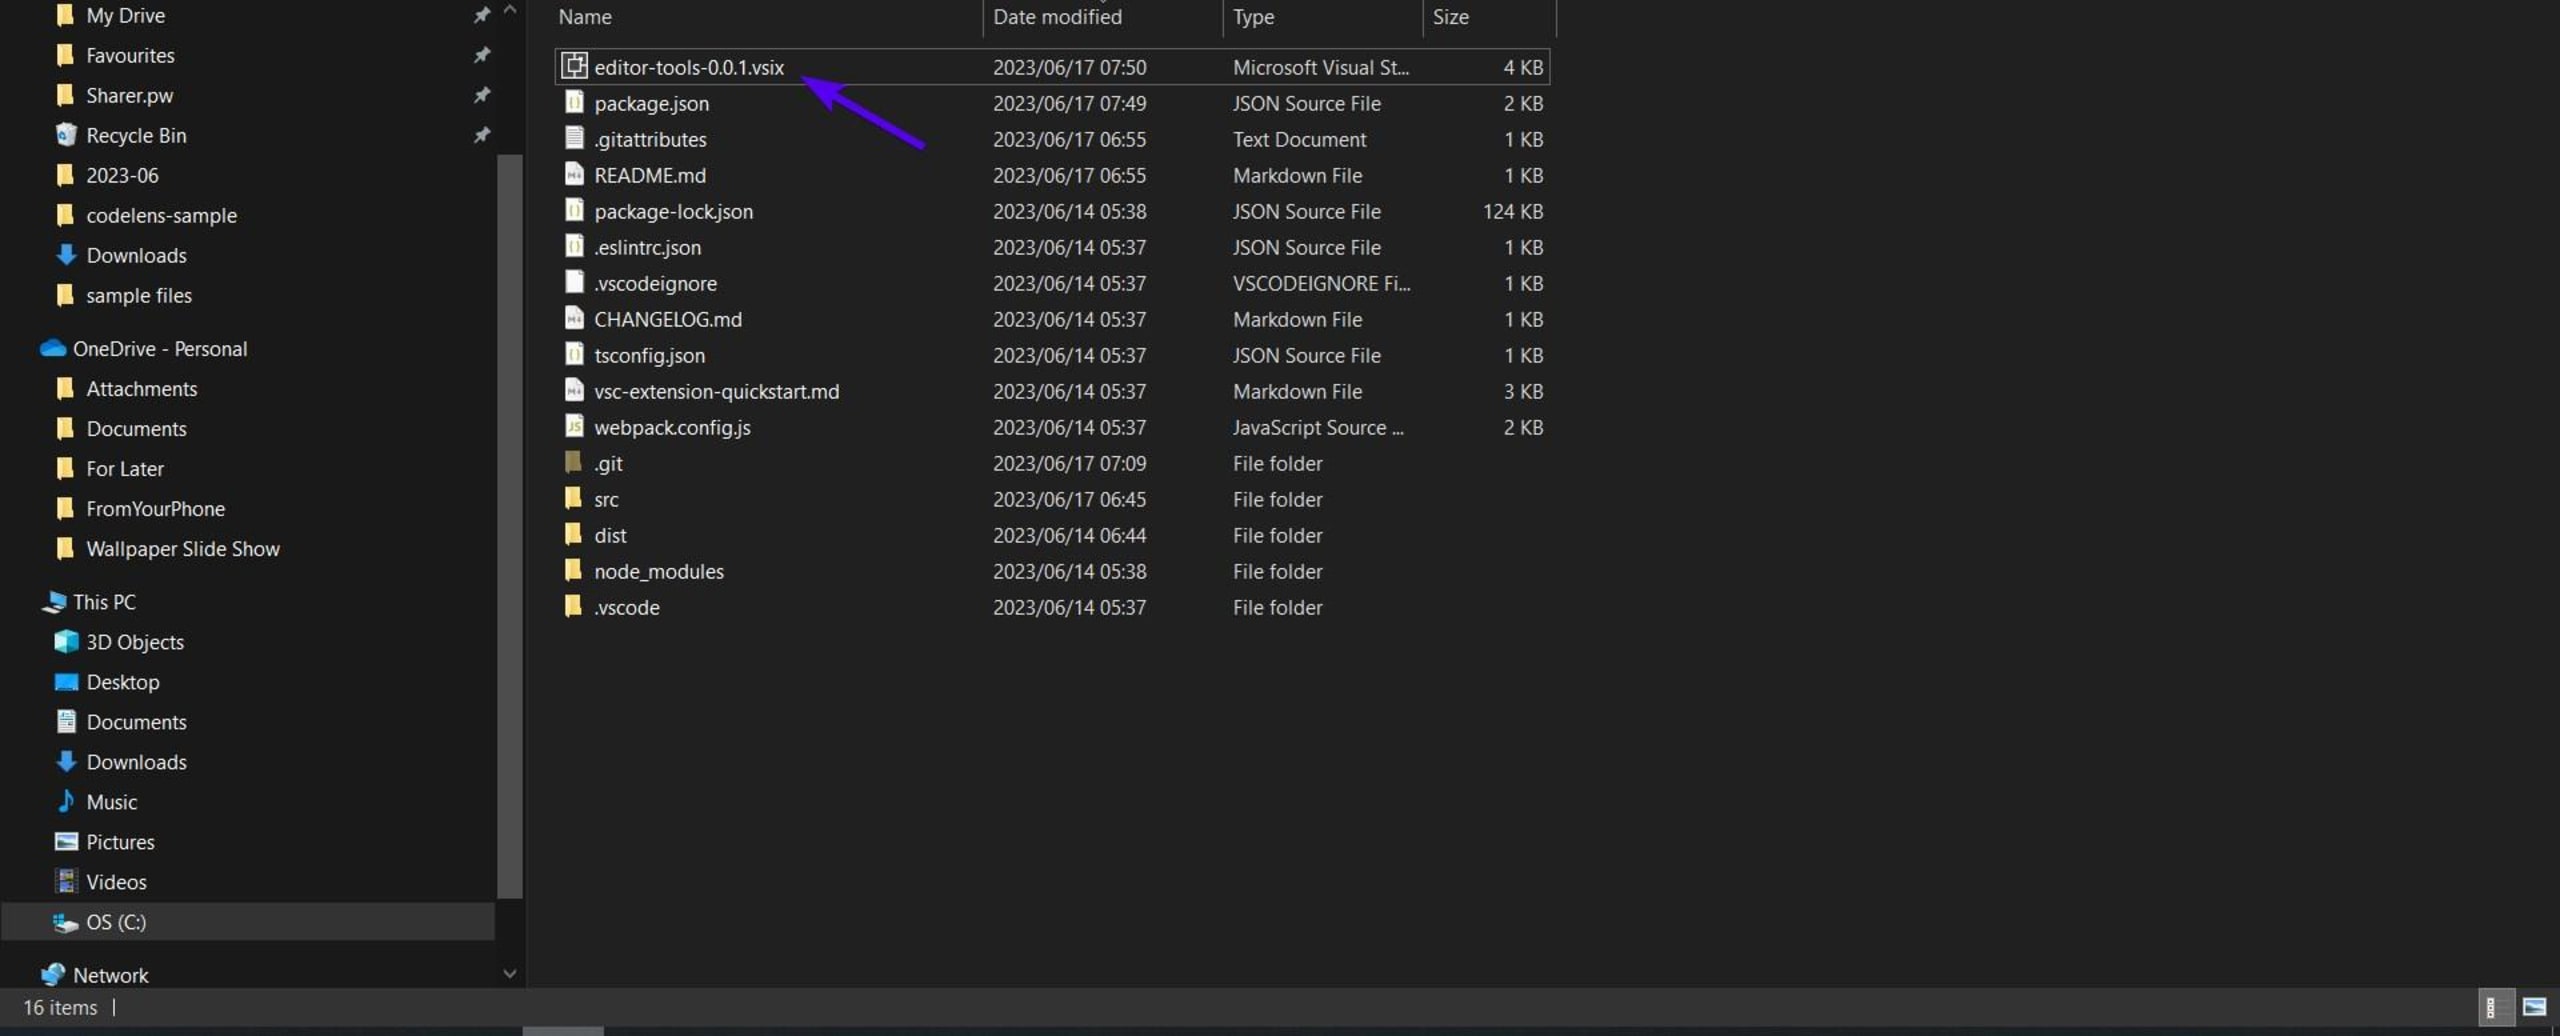
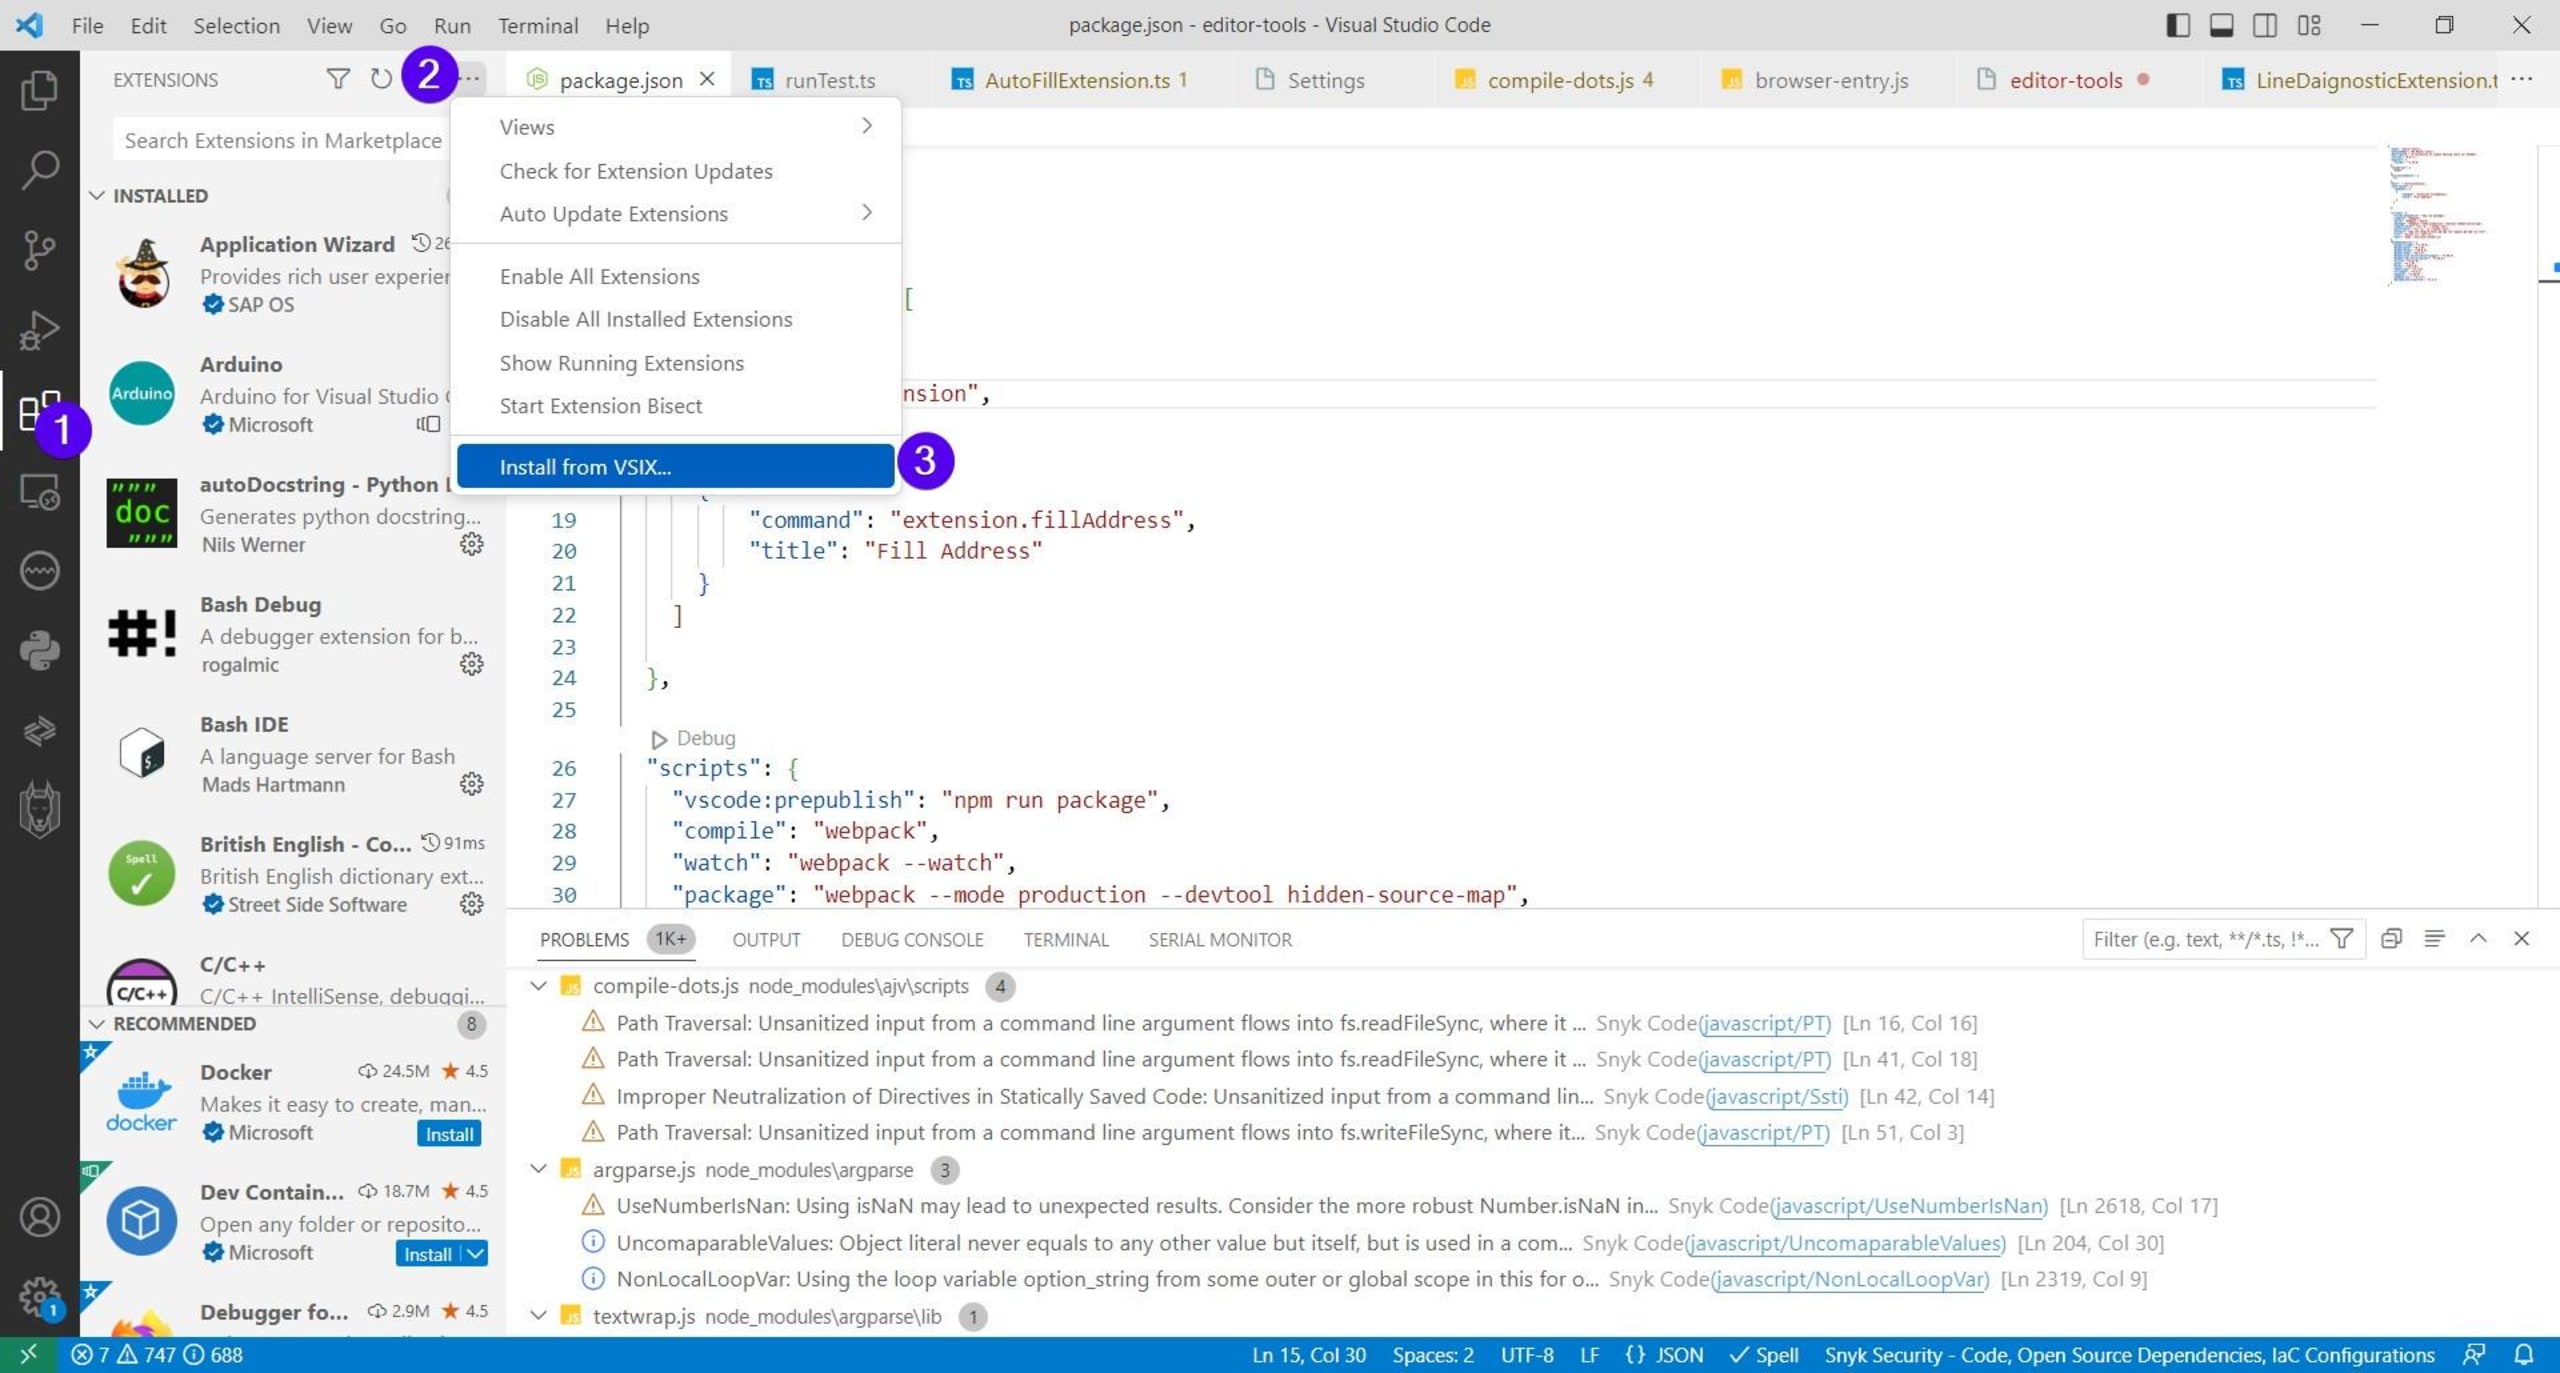
You can use this file to install your extension on your edition of VS Code. Open VS Code and navigate to the extensions panel. Click on the top ellipsis menu icon (Views and More Actions) and then select Install from VSIX:
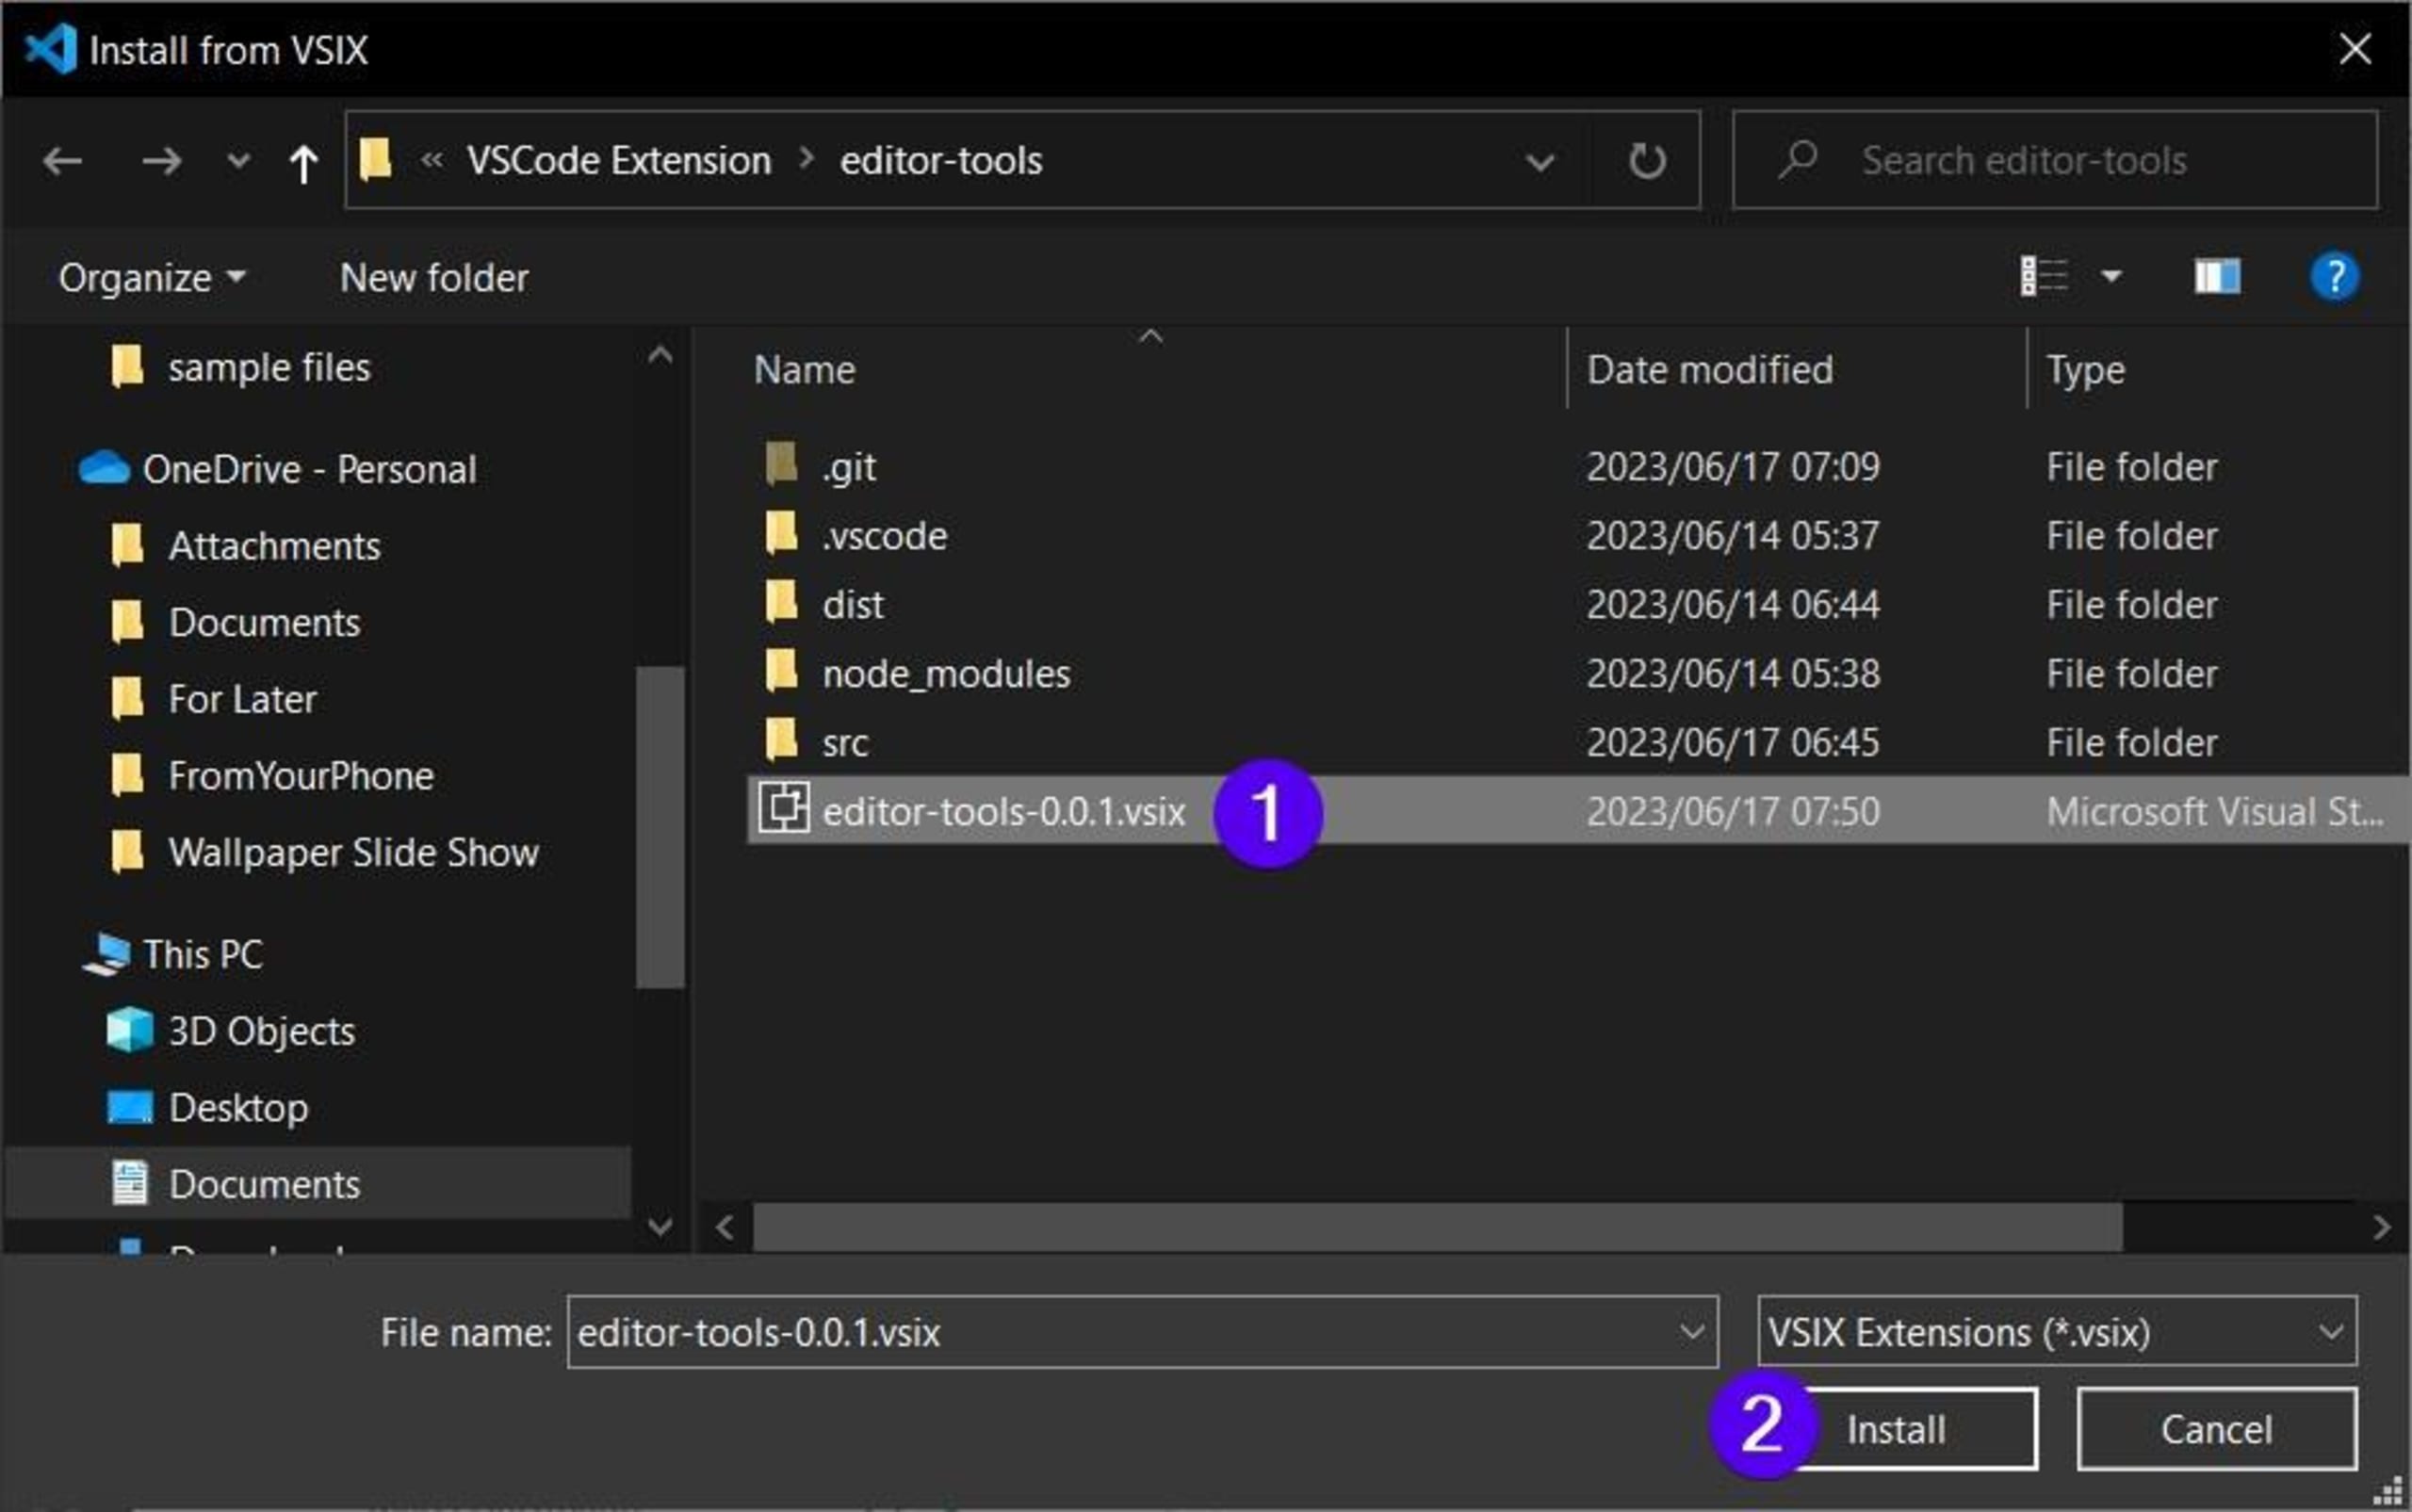
A file selection browser opens. Use it to find and select your extension, and then click on the Install button:
Once it's installed, VS Code displays a notification pop-up near the bottom right-hand corner of your screen:
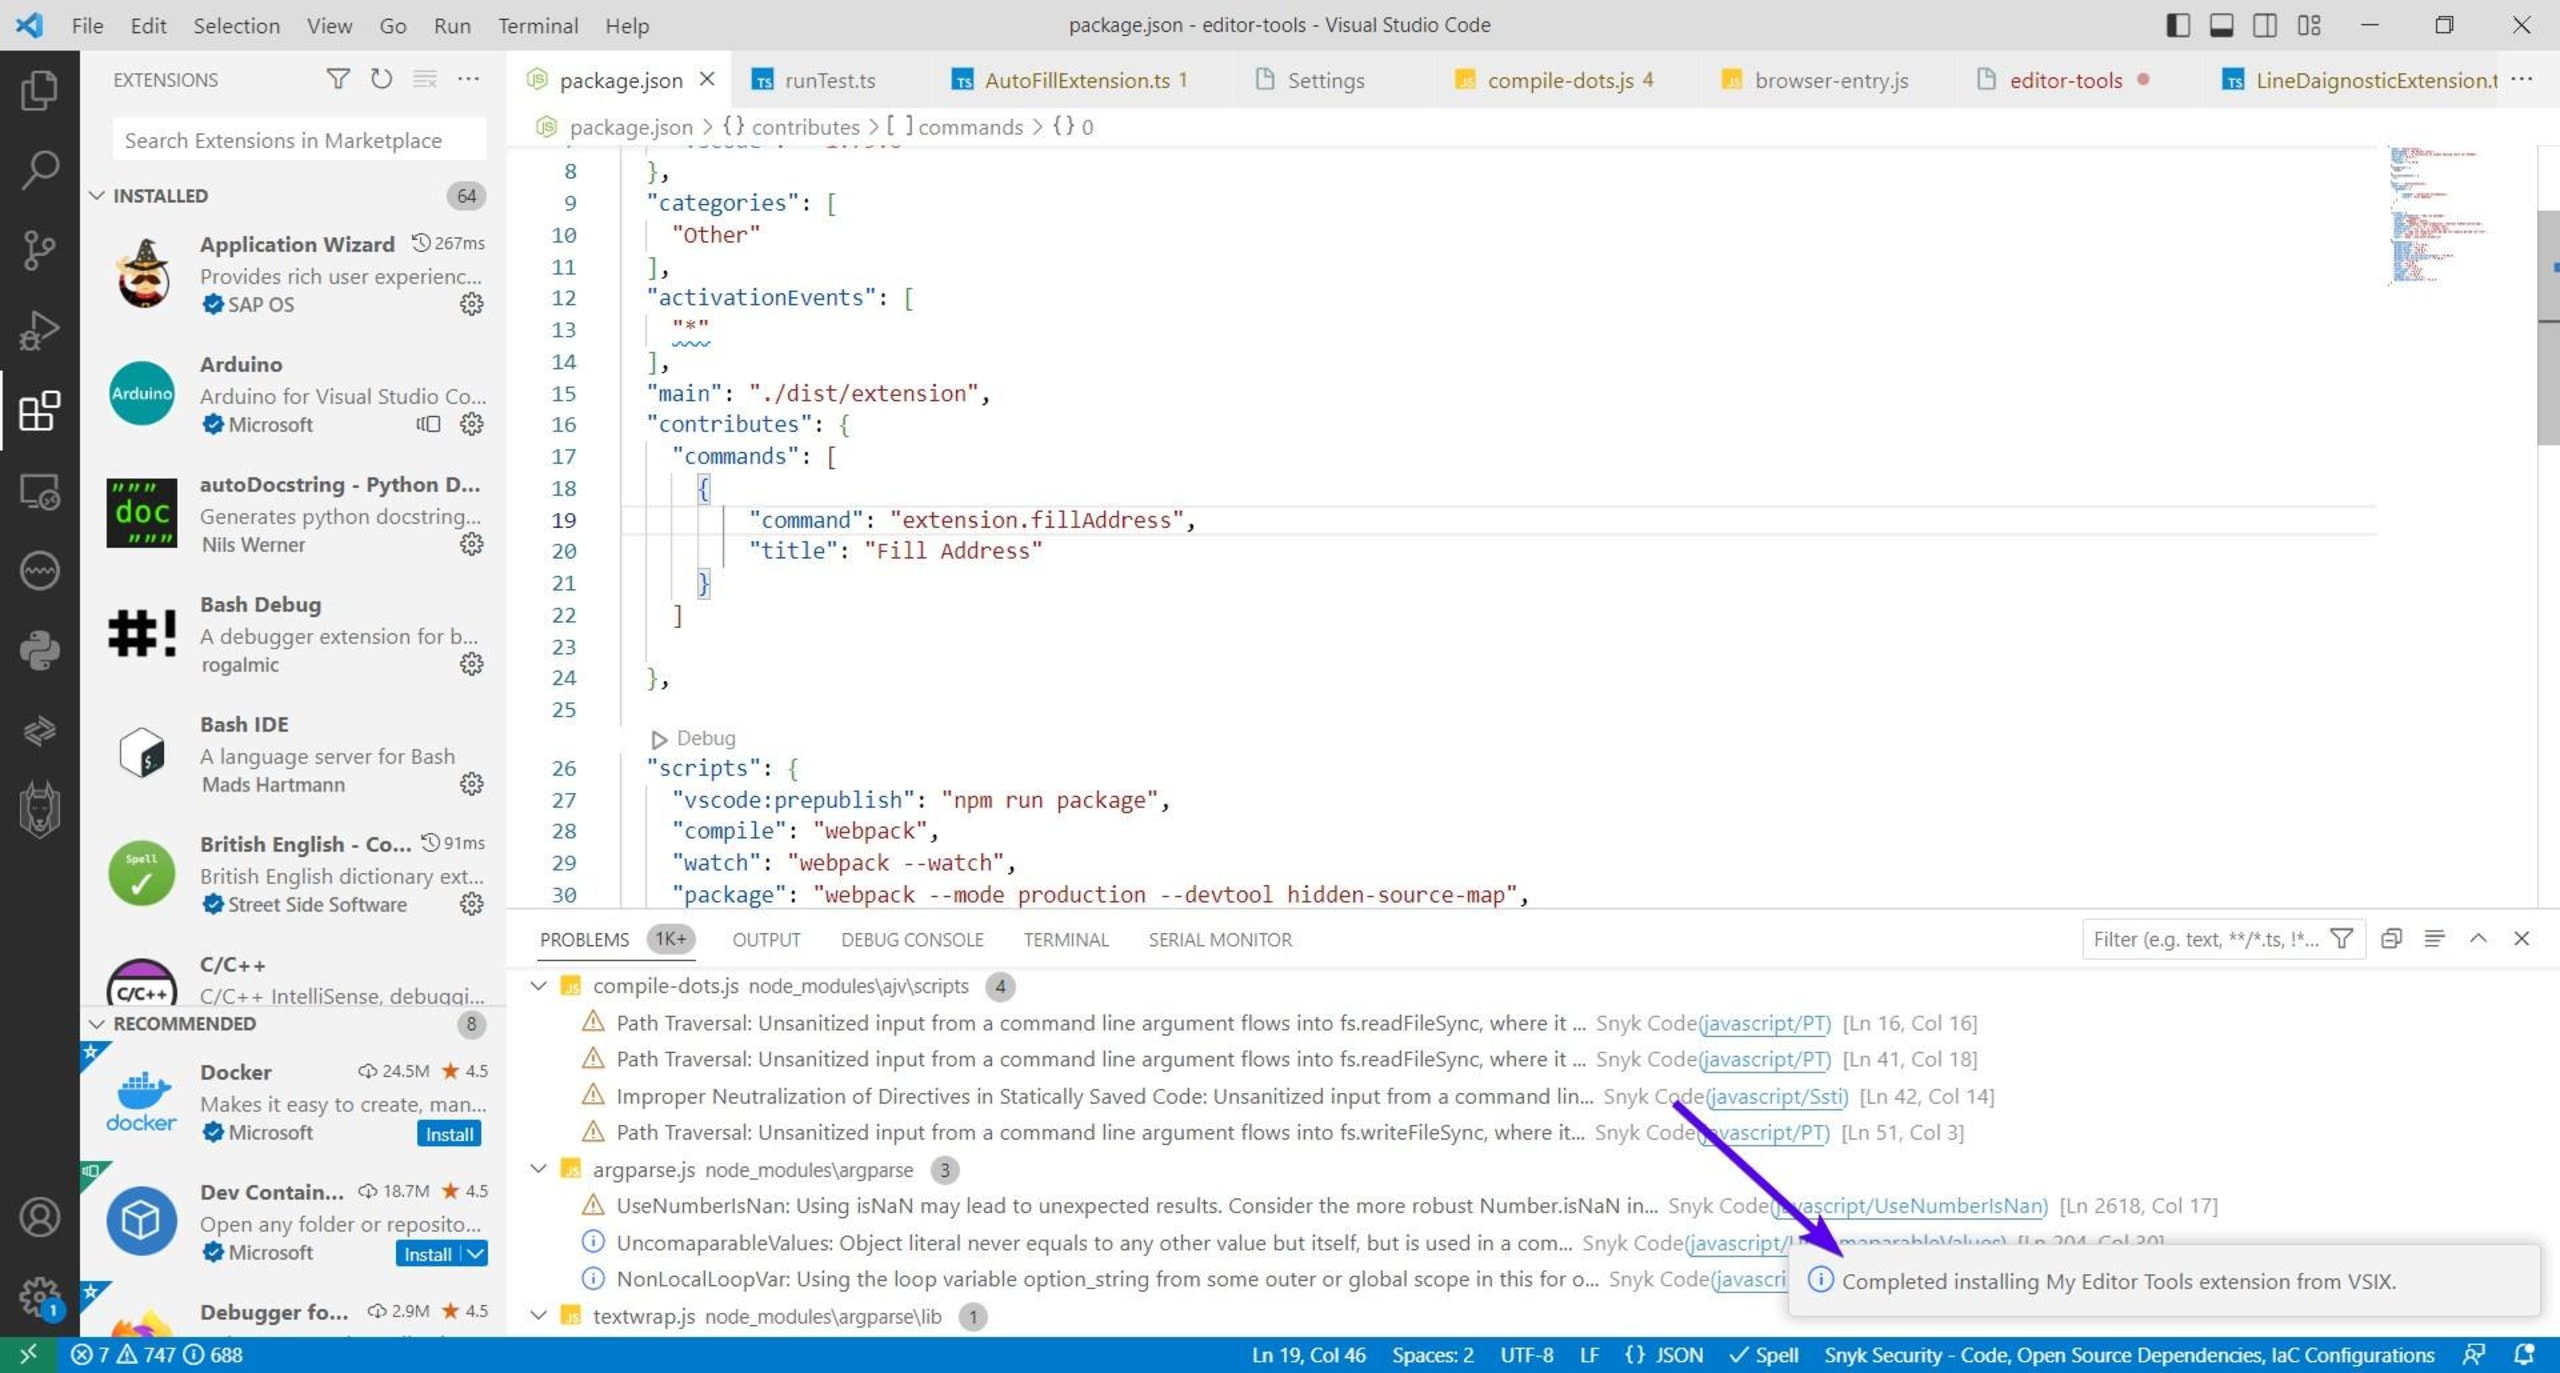
You should now be able to access your extension's functionality through your copy of VS Code.
Publish your extension
If this were an extension that we actually wanted to publish on the Visual Studio Code Marketplace, now would be the time to do it. Instead of publishing this sample extension, we'll just walk through the steps without you trying them yourself.
Please note: We don't recommend following along in this step, as we don't want to spam the Marketplace with demo applications. However, you can reference the following steps if you ever develop an extension for public consumption.
To publish your package, you need to create an Azure DevOps account for your organization and then use it to procure a personal access token.
You can use the Visual Studio Code Marketplace publisher management page to create a new publisher. Please note that the publisher name and publisher display name must be unique.
Once you've created a new publisher, you need to add a publisher key and value to your package.json file. The entry should use the publisher name, not the display name:
"publisher": "publisher name" //Publisher name and value

"name": "editor-tools",
"displayName": "My Editor Tools",
"description": "A collection of simple editing tools for VSCode",
"version": "0.0.1",
Then log into VSCE using your publisher name (ID) and personal access token:
vsce login <publisher ID>
After successfully logging in, you can publish your extension with VSCE by running the following command in your extension project's root folder:
vsce publishAlternatively, you can manually upload the VSIX to the Visual Studio Code Marketplace publisher management page. If you chose not to bundle your extension during the scaffolding process, you can do so manually using webpack or esbuild. Bundling can help improve your extension's efficiency and load times.
While bundling may not be necessary here, it may be necessary for your future projects. Before bundling, make sure that all the dependencies your project relies on are secure. Scanning your projects with Snyk can quickly affirm that your referenced libraries and modules are cyber-safe.
Additionally, because technology and cybersecurity are always changing, your dependencies, even if they're secure now, may not be in the future. Fortunately, you can use Snyk to continuously monitor your projects' dependencies. Snyk sends you notifications through email or Slack if it finds any potential vulnerabilities.
Conclusion
In this tutorial, you learned how to create a simple extension for VS Code. This process included teaching you how to initialize the project using Yeoman's VSCE generator. In doing so, you learned what the basic structure of an extension looks like; how to register and activate different types of extensions using the extension manifest (package.json); and how to package, bundle, and publish your extension.
Regardless of whether you're working on VS Code extensions or complex web apps, you need to take cybersecurity seriously. However, this isn't always easy, especially with the increasing adoption of continuous integration, continuous development (CI/CD). To address this, Snyk offers automated code quality and security checks, ensuring adherence to the latest industry standards. With Snyk, you can alleviate your concerns about falling behind cybersecurity trends and secure coding practices because it handles these aspects for you.
Secure your pipelines with Snyk
Add continuous security coverage to your CI/CD.
