Modern VS Code extension development: The basics
September 14, 2023
0 mins readAccording to the 2022 WakaTime Programming Stats, Microsoft Visual Studio (VS) Code is currently the most popular source code editor. And while it's often categorized as a source code editor, it can be used as a fully-fledged integrated development environment (IDE). All you need to do is add the right set of extensions from the Visual Studio Code Marketplace.
The allure of VS Code extends well beyond its extensibility. While there are a plethora of plugins currently available, there are occasions when building your own extension is a necessity. This series is designed precisely for that purpose.
In this part of our Modern VS Code extension development series, we'll discuss various extension types, delve into the typical architecture of VS Code extensions, and learn about some best practices for VS Code extension development. This article serves as your primer, laying a solid foundation before we dive deeper in the next post.
VS Code extension types
In the Visual Studio Code Marketplace, extensions and plugins are gathered into groups known as extension types or categories (based on their different functions and features). The easiest way to access these categories is via the web version of the marketplace, but you can also access them through Visual Studio Code's Extensions view UI using the @category: tag in the search bar:
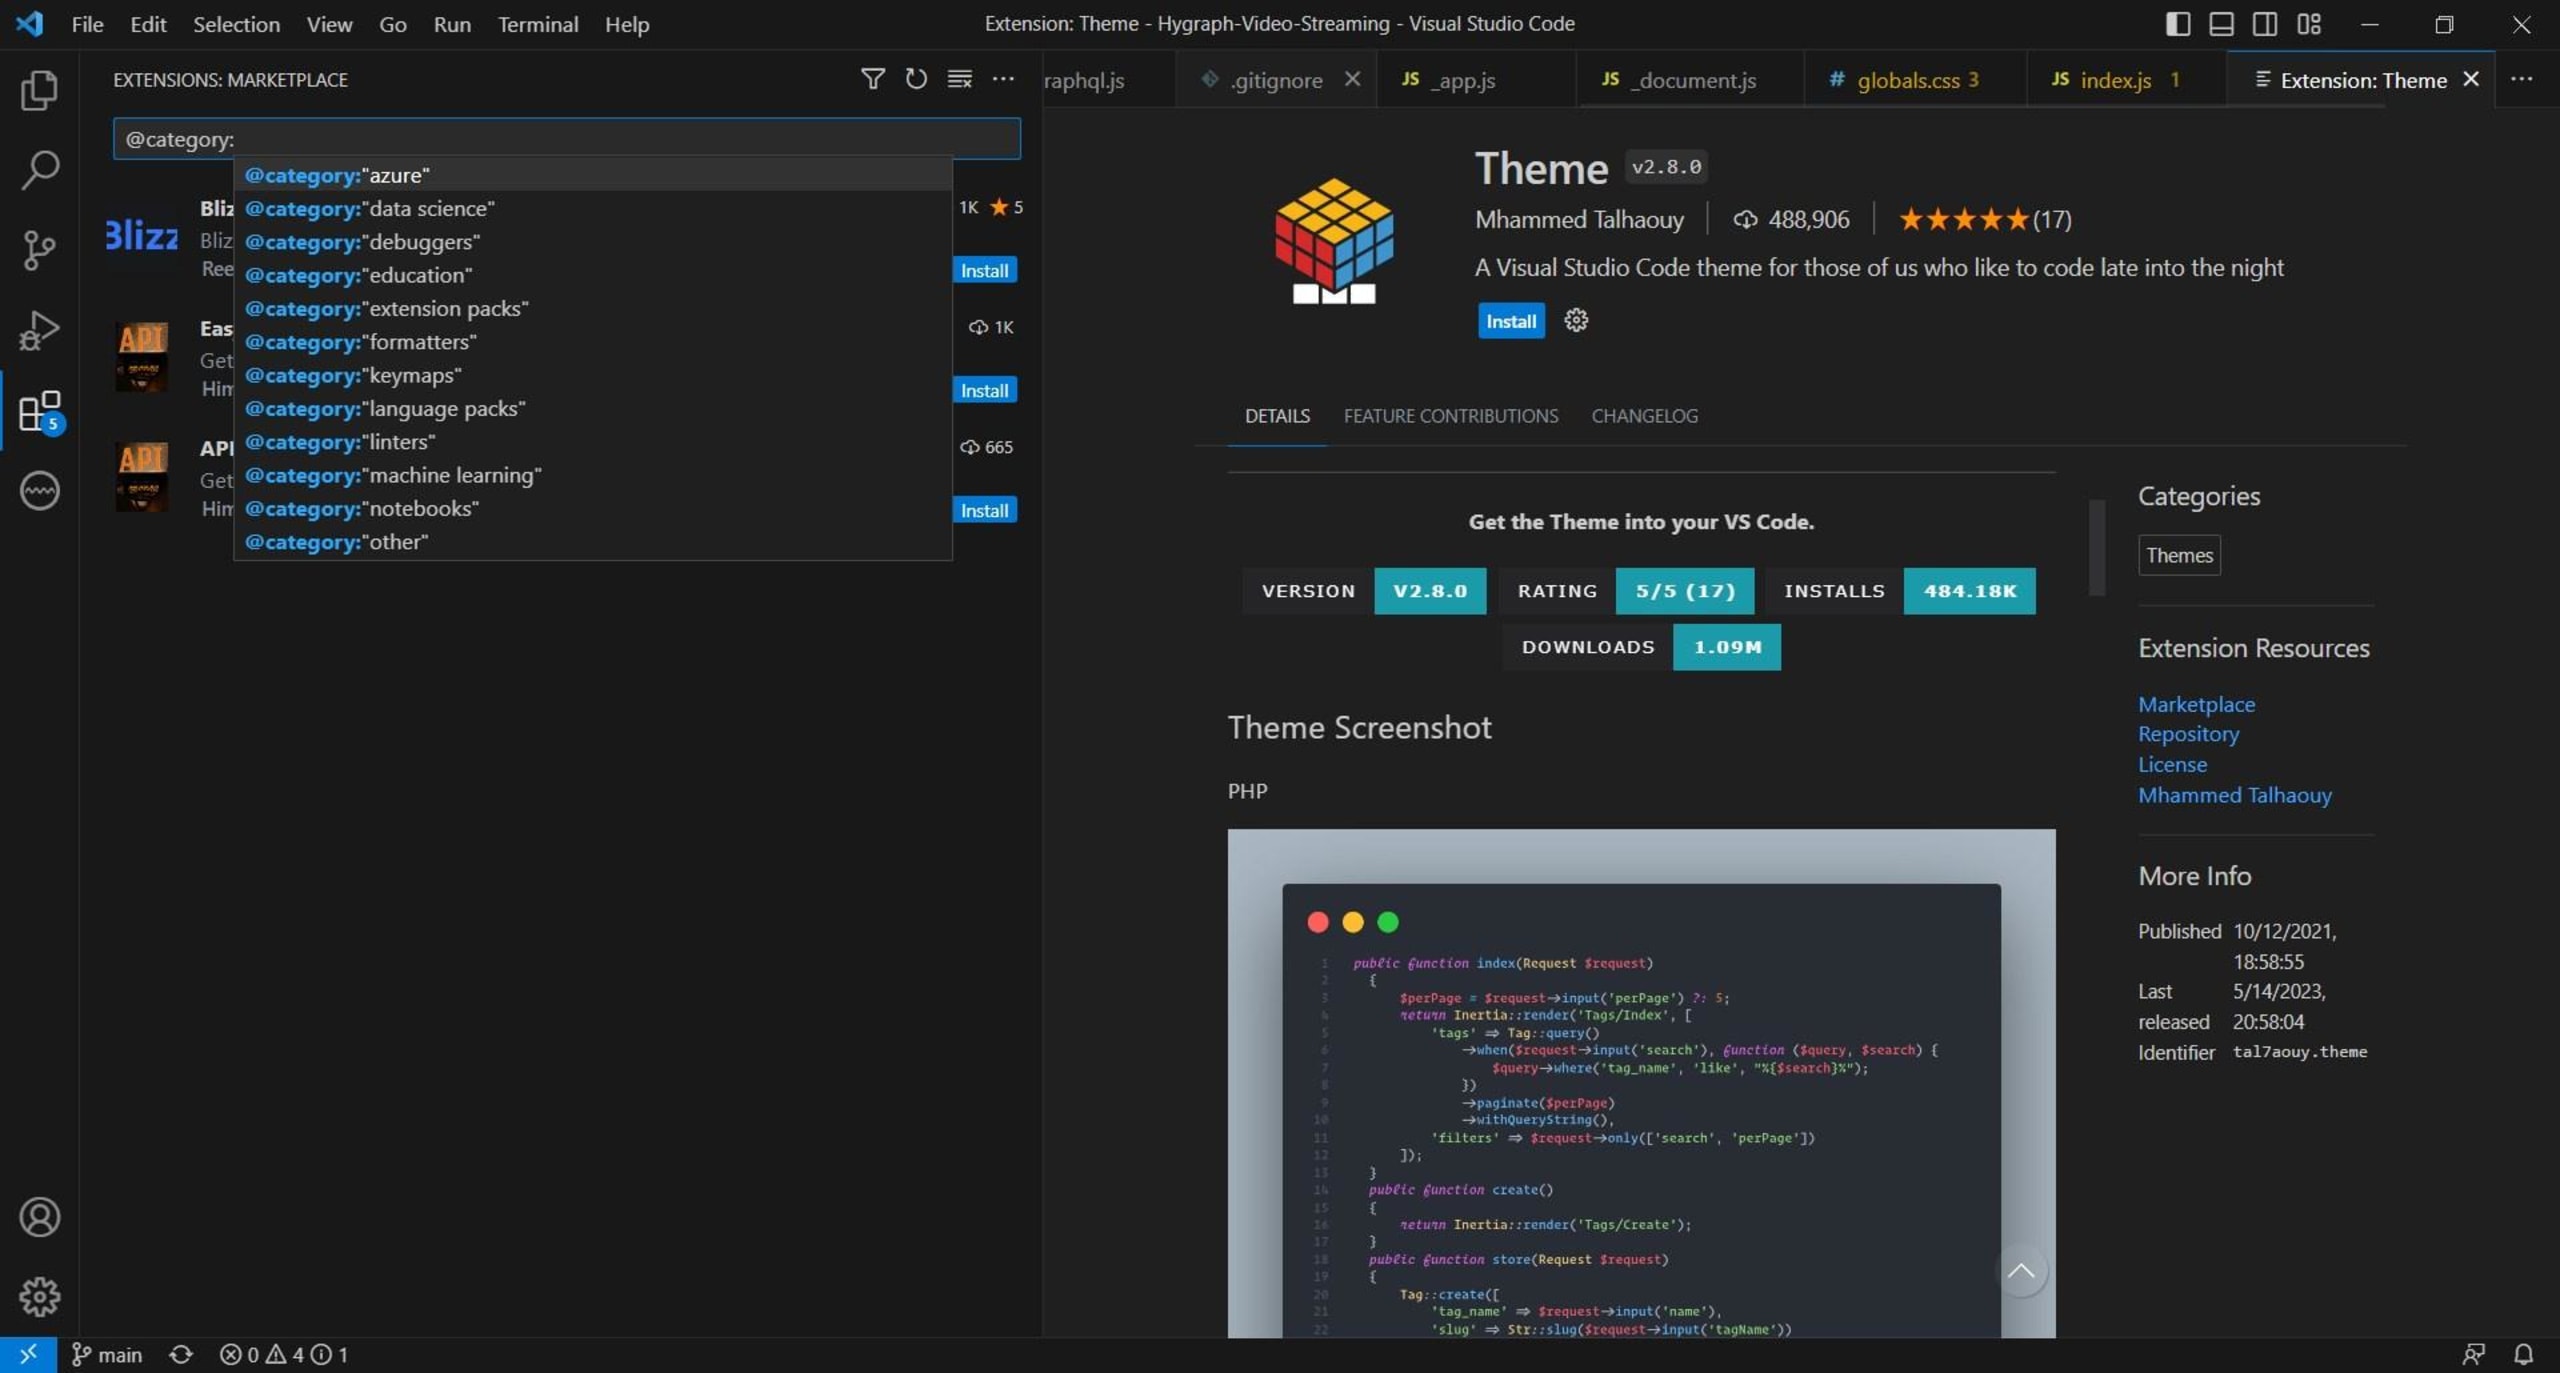
As you browse through this list, you may begin to wonder what these groupings actually mean. What qualifies one extension as a formatter and another as a theme?
The following are some of the most common extension types on the Visual Studio Code Marketplace and Open VSX Registry, an open-source, community-driven extension registry for Visual Studio Code (VS Code) extensions.
Themes
With over 10,000 entries, themes are one of the most common types of extensions on the Visual Studio Code Marketplace. They allow you to change the look and feel of your VS Code UI, including its panels, menus, and text area.
To search for all the theme-based plugins, use the @category:"Themes" filter:
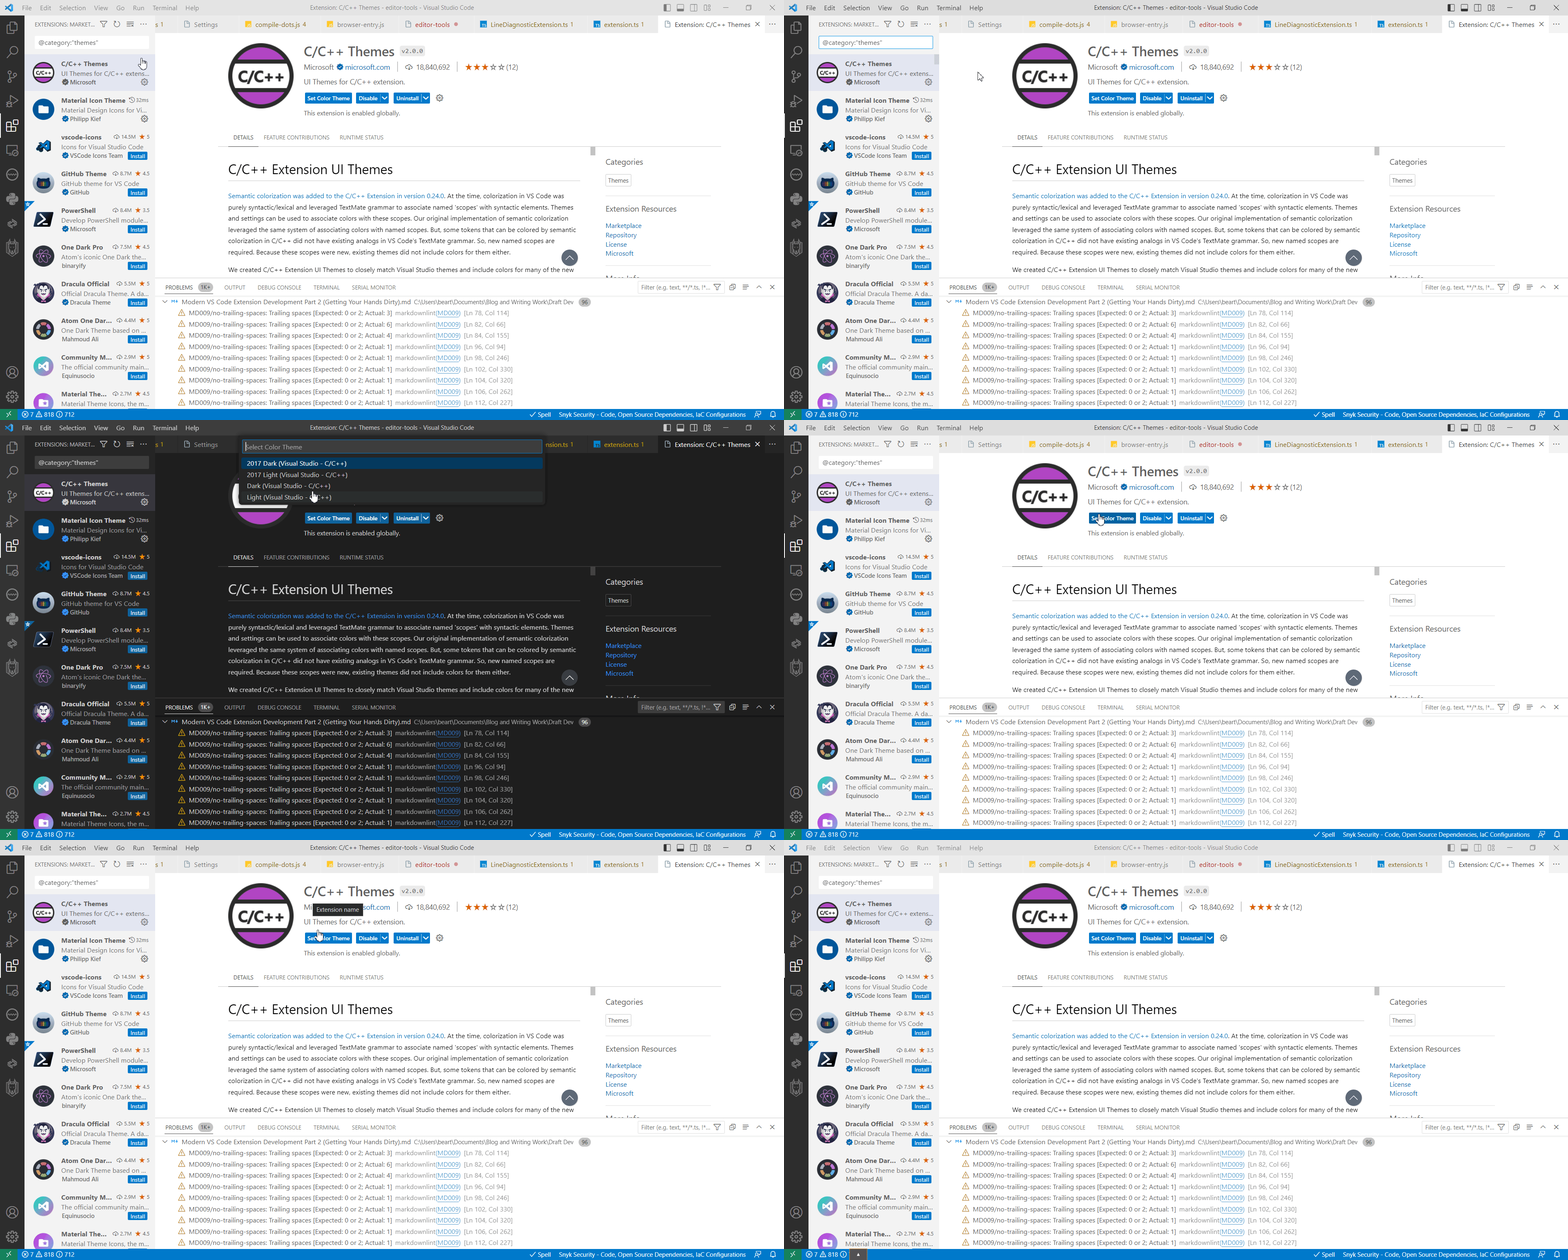
Some theme extensions are component- or plugin-specific. For instance, the C/C++ Themes plugin shown earlier introduces a set of visually optimized themes for C/C++ development, including enhancements for semantic colorization.
Color themes are typically created and configured using JSON and can be easily customized. You can find the workbench.colorCustomizations and editor.tokenColorCustomizations options under User Settings.
Typically, theme extensions serve a mostly cosmetic purpose and are one of the easier extensions to write. However, they can also be used for accessibility and to enhance the overall coding experience.
Functional extensions
Functional extensions are a collection of different categories containing extensions that add additional features to VS Code, such as linters (@category:"linters"), notebooks (@category:"notebooks"), formatters (@category:"formatters"), testing (@category:"testing"), visualizations (@category:"visualization"), programming languages (@category:"programming languages"), debuggers (@category:"debuggers"), and supply chain management (SCM) integrations (@category:"scm providers").
However, because Microsoft and VS Code have a limited number of category tags, some categories may not accurately define the purpose of an extension. For instance, Snyk Security is defined as a linter and programming language extension. And while the Snyk Security extension may seem like a linting tool, it's so much more than that. Its primary aim is to make your software development projects more secure. It scans for open source vulnerabilities, code vulnerabilities, license issues, insecure infrastructure as code (IaC) configurations, and more:
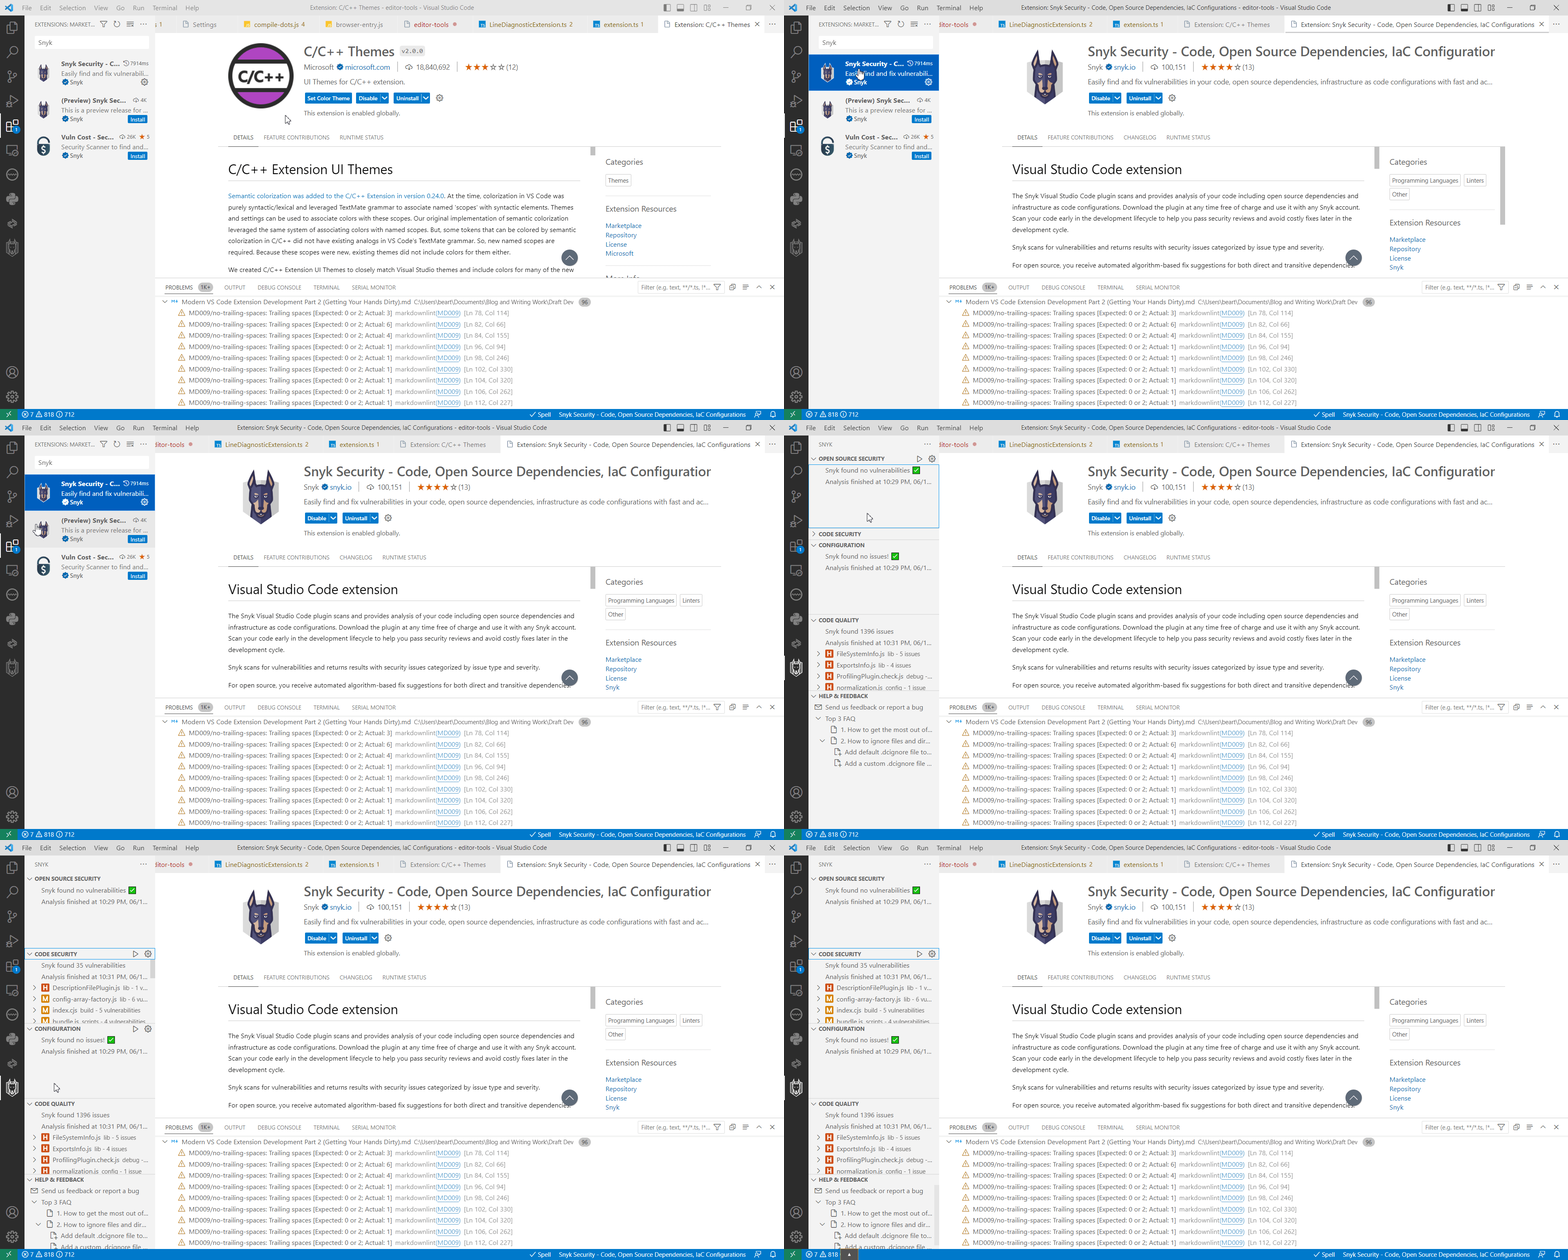
In fact, VS Code plugins like Snyk Security can also help improve extension development. Snyk can automatically verify that your extension's dependencies are secure, ensure that your projects are configured correctly, and validate the quality and safety of your code.
Snippets and shortcuts
Snippet and shortcut extensions help you customize VS Code's keymap (@category:"keymaps") and code snippet (@category:"snippets") features. For instance, REST Client is a multilanguage extension that generates snippets and templates for HTTP requests:
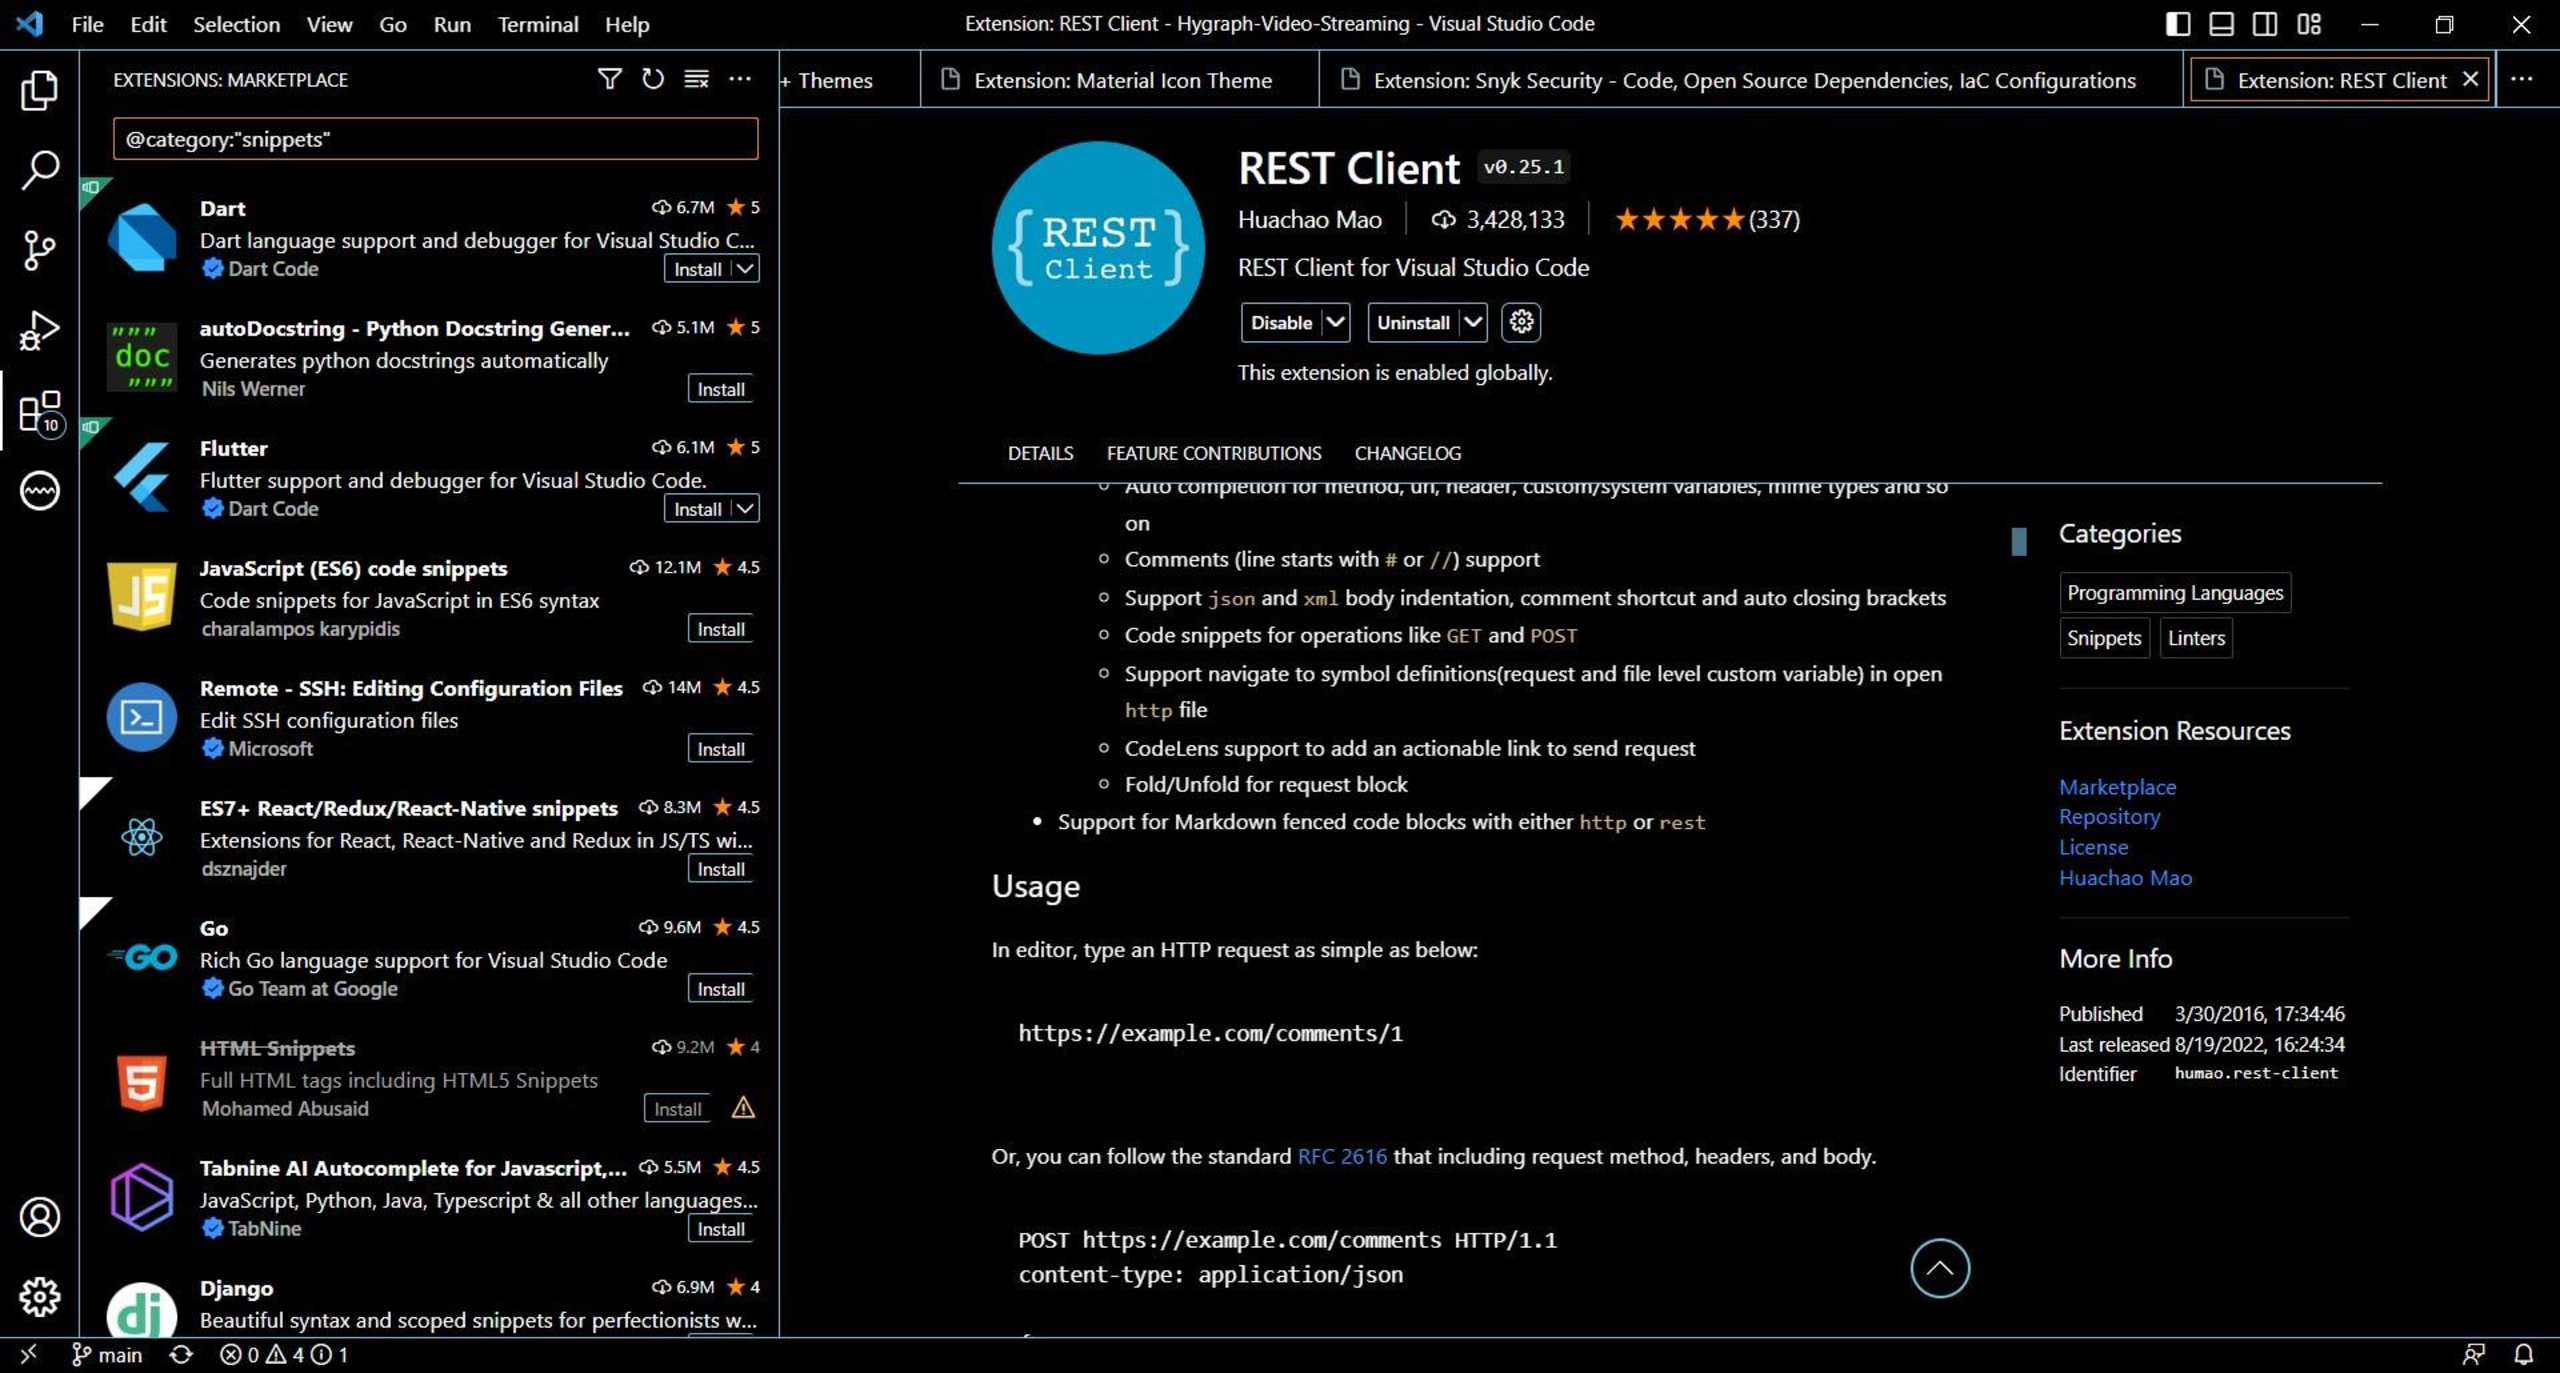
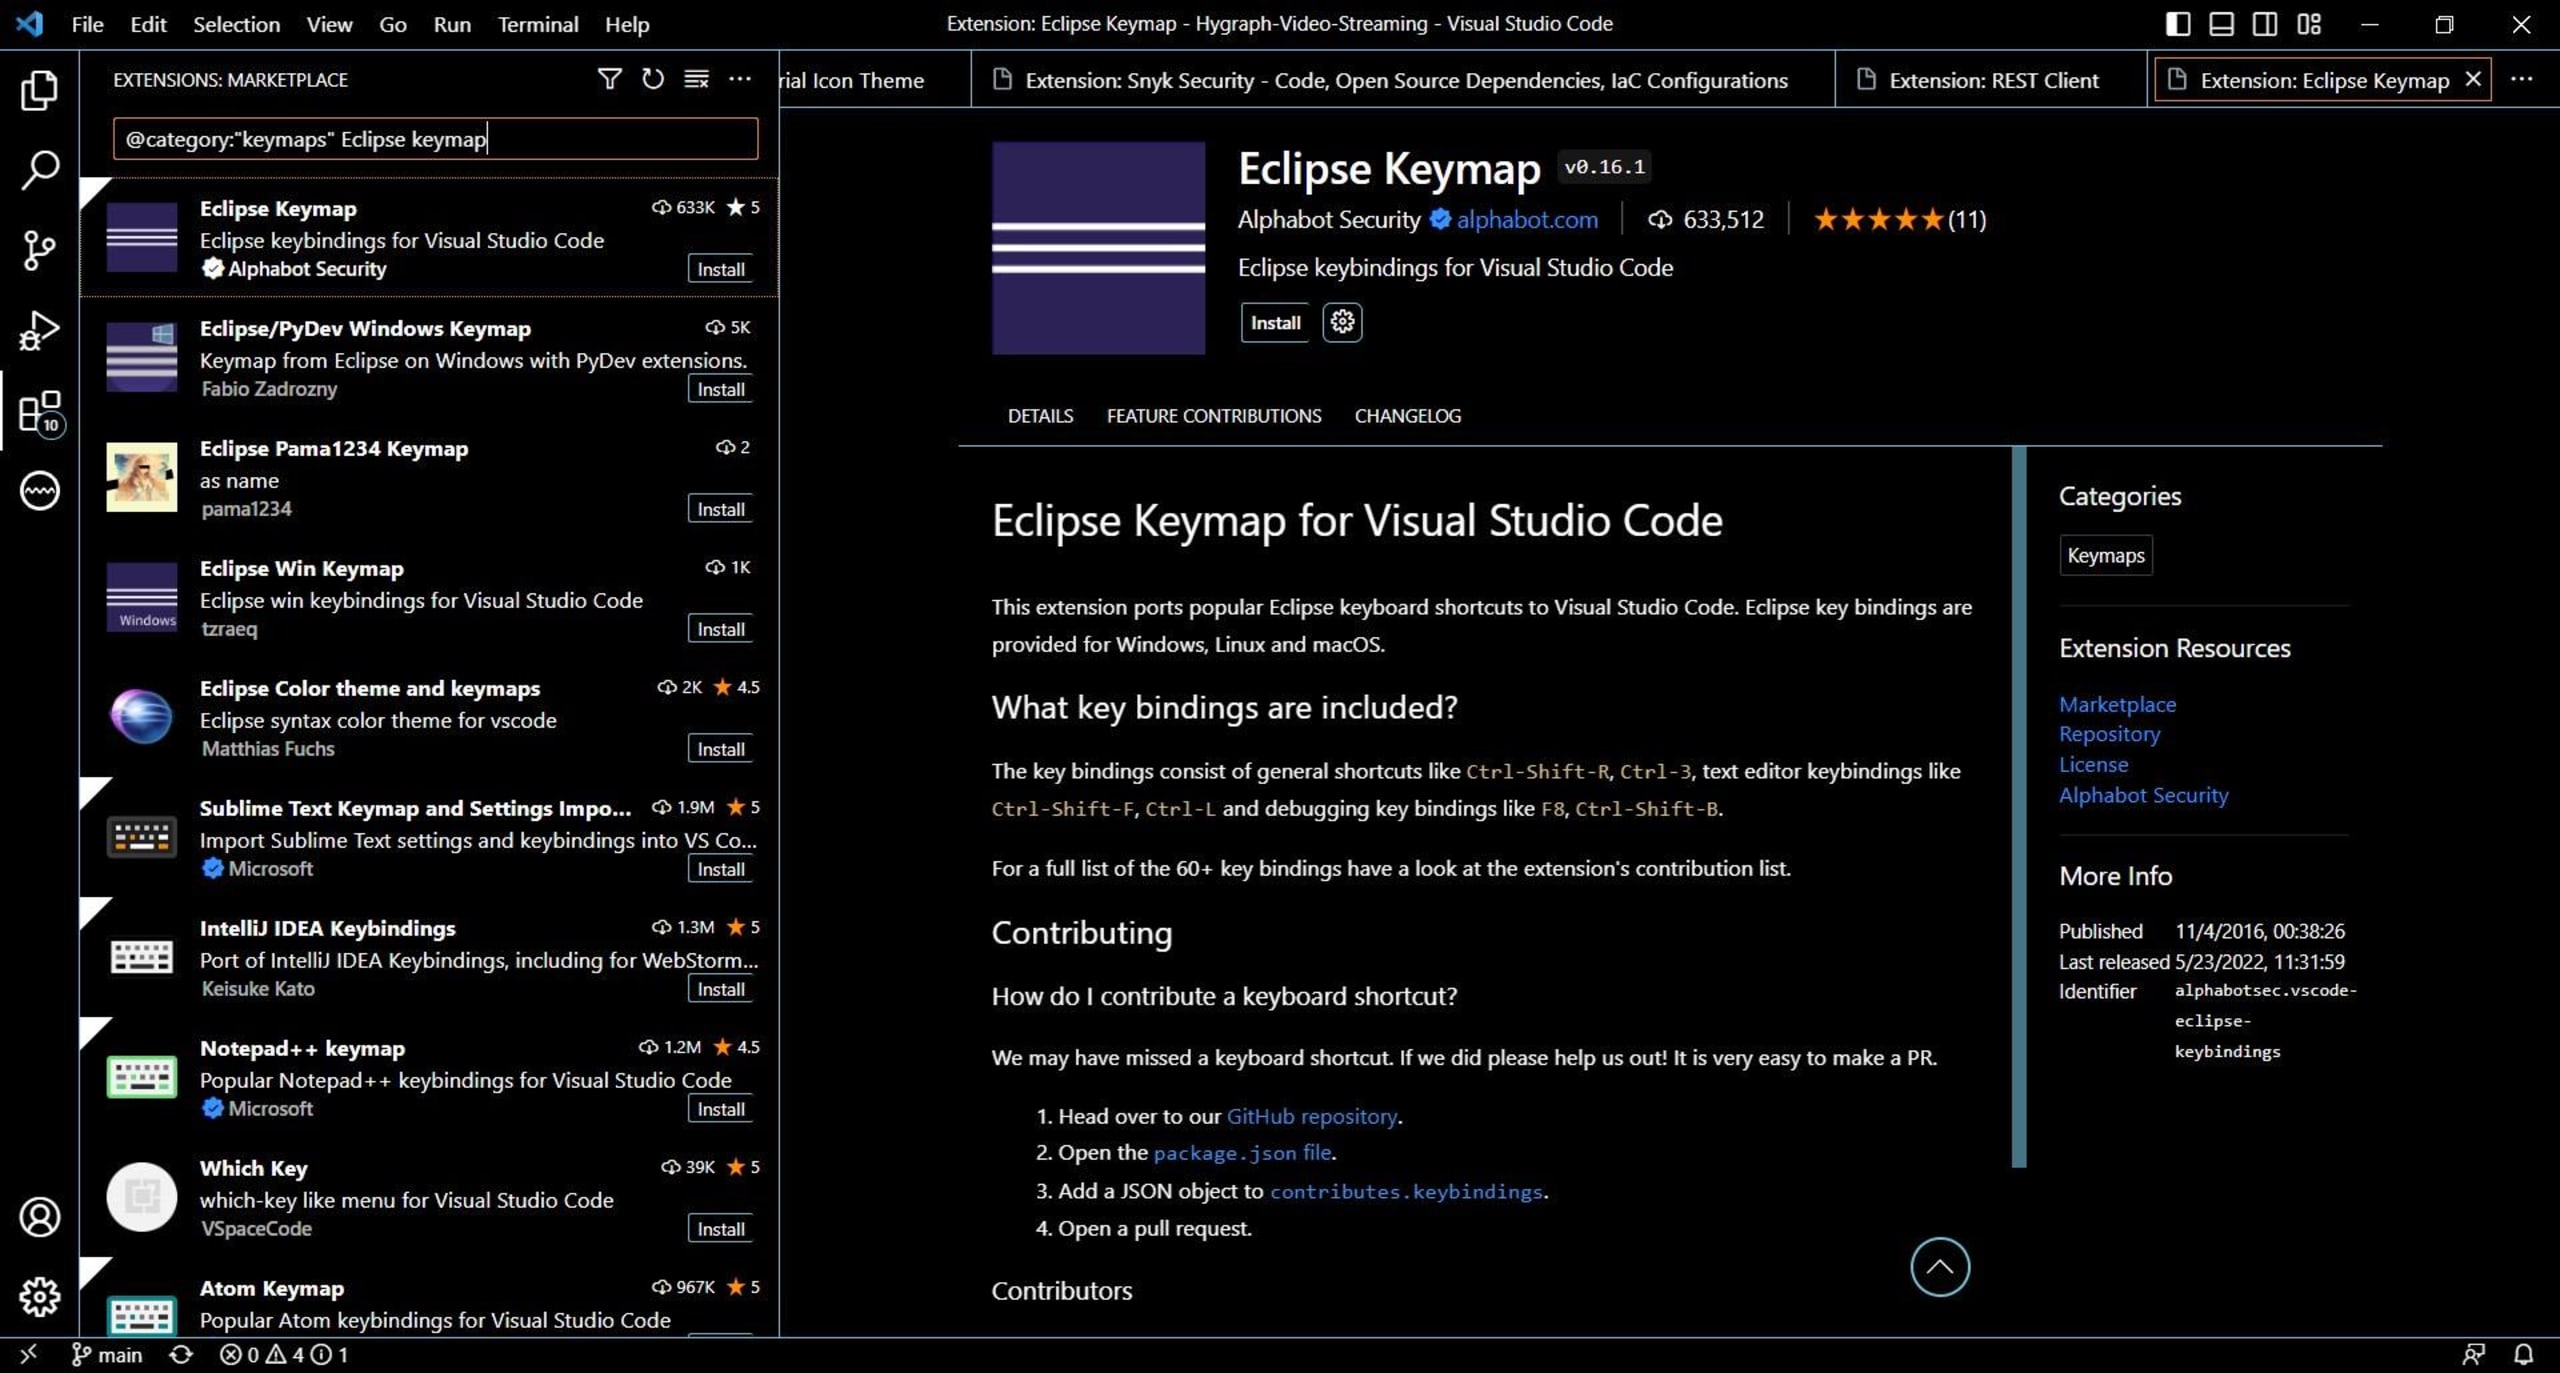
In comparison, Eclipse Keymap adds Eclipse IDE key bindings to VS Code. This is useful for Java developers who use Eclipse as their primary IDE and may be interested in migrating to VS Code:
Packs
Packs come in two flavors: language packs (@category:"language packs") and extension packs (@category:"extension packs"). Language packs contain localization data, such as text translations and keyboard inputs. For instance, the Chinese (Simplified) (简体中文) Language Pack lets you replace VS Code's default UI language with Simplified Chinese.
VS Code also allows you to apply changes to its display language after you've installed the language pack. If you're interested in helping with translations and contributing to a language pack's creation, consider joining the VS Code community localization project.
Furthermore, extension packs are made up of multiple extensions packaged as one installation. They usually follow a theme or supply you with a quick start development environment. For example, the Python Extension Pack contains the Python for VS Code extension, as well as the Python Environment Manager, Python Indent, and autoDocstring - Python Docstring Generator.
After you click on the Python Extension Pack's Install button, VS Code simultaneously installs all the extensions in the pack (that aren't already installed):
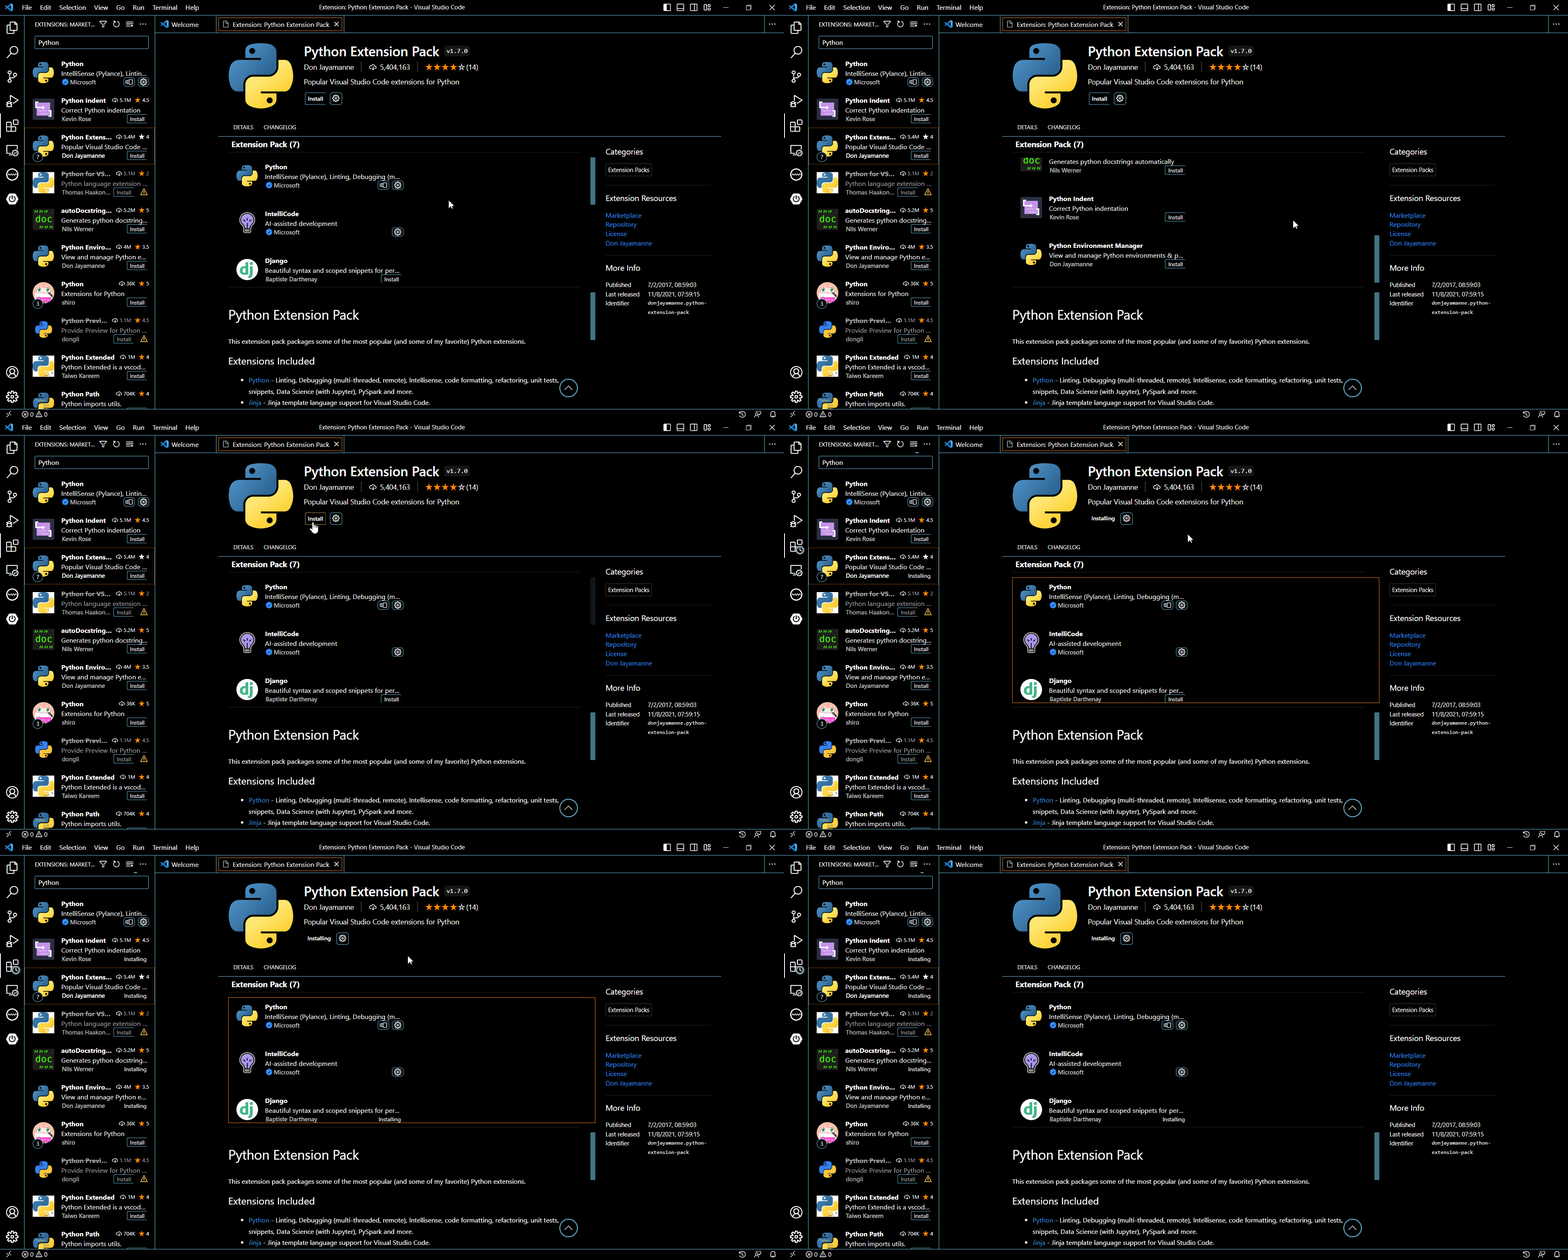
Ultimately, extension packs save you from downloading multiple extensions individually. This is especially ideal when setting up workspaces for languages that aren't directly (or officially) supported by Microsoft. It can also be a great way to package all your custom VS Code extensions.
After you've decided what type of extensions you want to build, it's time to start outlining the structure.
The typical architecture of VS Code extensions
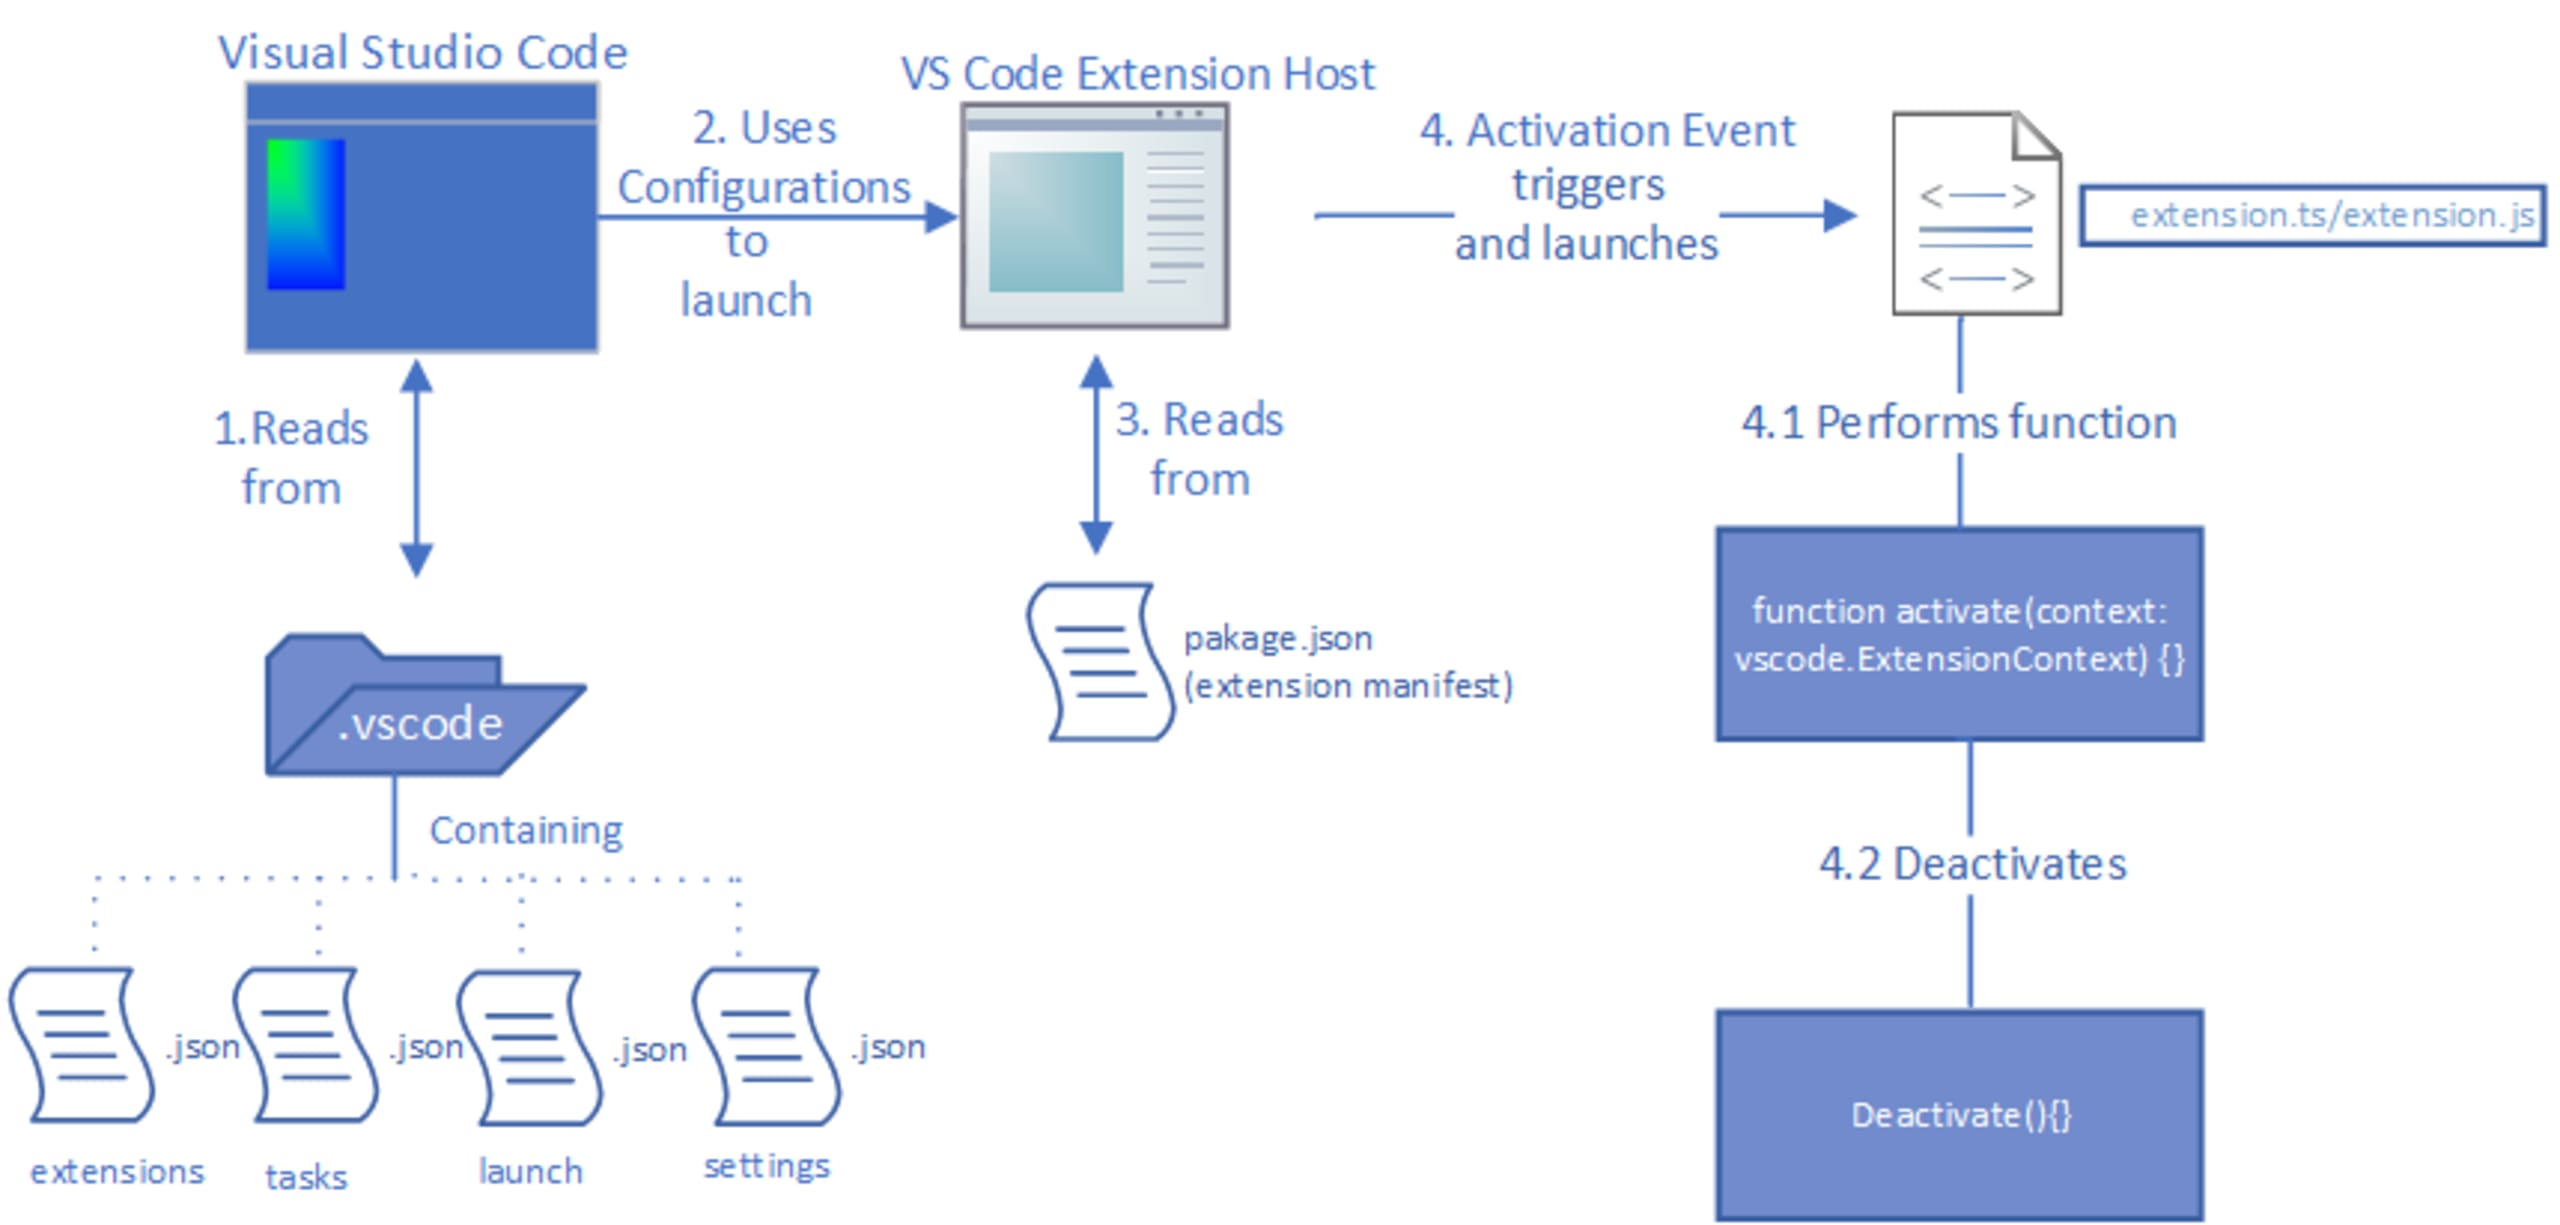
The VS Code Extension Host is responsible for running extensions. It uses the extension's manifest (package.json) to find the location of the extension's entry and run it according to its Activation Events. These Activation Events are also declared in the manifest file. They allow you to define triggers for your extensions (e.g. upon the execution of a command or when a specific language is selected).
The package.json file also contains a list of dependencies that are crucial to your extension project. This includes the @types/vscode module, which allows you to plug into VS Code's extension API.
Please note: The @types/vscode module supersedes the `vscode-extension-vscode package, as the latter has been deprecated and should not be referenced in your package.json file or anywhere else in your project.
The extension manifest also contains a set of Contribution Points. Contribution Points let you control how your extension's capabilities are called from VS Code (e.g. you can set a command or menu item to call your extension).
The extension entry file contains the core behavior of your extension. It mainly relies on the vscode module, which should always be the first import in your extension:
export function activate(context: vscode.ExtensionContext) {
    //Instructions and Commands
}
The vscode module contains the VS Code API that provides you with a collection of interfaces that can extend VS Code's functionality. This includes the extension interface, which contains the functionality you need to manage, configure, and create extensions.
The extension interface's activate method lets you define what your extension does when it's activated and is the next step in the extension entry file:
export function activate(context: vscode.ExtensionContext) {
    //Instructions and Commands
}
This code acts similarly to an event handler, declaring a set of commands that run when an event occurs. You can also include a call and export for the deactivate function:
export function deactivate(context: vscode.ExtensionContext) {}This allows you to perform post-activation/run cleanup for your extension.
Entry files can be written in either TypeScript or JavaScript; however, it is encouraged that you use the former. Regardless, both TypeScript and JavaScript extension projects should be accompanied by a config file since it marks a directory as your project's root folder and helps the compiler find it. The config file also includes various properties and compiler flags. You must use the tsconfig.json file for your TypeScript projects and the jsconfig.json files for your JavaScript projects.
Your extension project directory also contains two additional files under the .vscode folder:
1. tasks.json
tasks.json defines a set of folder/project/workspace-specific tasks that VS Code should execute when triggered. These tasks mainly consist of project build instructions and configurations. For instance, since VS Code builds its extensions using package managers like npm, your extension project's tasks.json typically contains a reference to them, like this:
	"type": "npm",
	"script": "watch",
	"problemMatcher": "$ts-webpack-watch",
	"isBackground": true,
	"presentation": {
		"reveal": "never",
		"group": "watchers"
	},
	"group": {
		"kind": "build",
		"isDefault": true
	}
This tasks.json sample defines a build watcher that monitors your project's compilation processes for errors and warnings. This script primarily relies on npm to execute and package the ts-webpack-watch problem matcher.
2. launch.json
launch.json defines how VS Code should run (or debug) your extensions after they've been built. It includes information about the runtime your extension uses:
"configurations": [
    {
        "name": "Run Extension",
        "type": "extensionHost",
        "request": "launch",
        "args": [
            "--extensionDevelopmentPath=${workspaceFolder}"
        ],
        "outFiles": [
            "${workspaceFolder}/dist/**/*.js"
        ],
        "preLaunchTask": "${defaultBuildTask}"
    },
]
This launch.json sample is a configuration that defines VS Code extension launch instructions. This includes where the source code and packaged executables are located.
A basic extension project directory looks like this:
Project Parent Folder
├── .vscode
│   ├── launch.json
│   └── tasks.json
├── src
│   └── extension.ts    //Extension Entry File
├── package.json       	//Manifest
├── tsconfig.json
Best practices for VS Code extension development
Because of how VS Code extensions are structured, developers may be prone to skip some of the fundamentals. However, if you want to build your extensions effectively, there are certain principles you must follow, including the following best practices:
Test your extensions thoroughly
If you plan to publish your extension(s) to any supported Visual Studio Code Marketplace, you want to avoid adding any defective code. This means you need to ensure your extension is well-tested via various software assessment techniques, such as unit tests (where applicable) and stringent scenario testing.
While you're not required to use external plugins or libraries to test your VS Code extensions, VS Code provides you with a set of mechanisms and tools for integration testing. In particular, its Extension Development Host allows you to test your extensions in an environment that's separate from the official VS Code instance.
Don't forget that users rate and review extensions on the Visual Studio Code Marketplace, so it's important to thoroughly test your extensions. Don't risk your brand's reputation by deploying a buggy or unsecured product.
Store sensitive data as securely as possible
VS Code has evolved the way it saves and stores user data. Before the introduction of VS Code 1.53, user information was handled using the ExtensionContext interface; however, this wasn't an efficient solution.
Today, the best way to manage sensitive information in VS Code is by using its SecretStorage utility.
Adhere to Microsoft's VS Code User Experience (UX) guidelines
Microsoft has a set of User Experience (UX) guidelines that help ensure extensions are consistent with VS Code's architecture and standards. Acquainting yourself with all these guidelines is recommended, but you should pay special attention to the ones that are specific to your extension's functionality.
For instance, while your extension may not implement any sophisticated visual components, such as webviews, its core features may be complex enough to warrant a walkthrough. Creating a walkthrough, which is an interactive quick-start tutorial, helps new users acclimate themselves to your extension's features. As a best practice, developers should generally ensure that their software is well-documented (both in code and usage).
Additionally, make sure you make the getting started process as easy as possible. This means adding the necessary images and visual cues. Microsoft recommends using SVGs with the VS Code API's theme color.
The best VS Code extensions fit into the UI so seamlessly that it's nearly impossible to distinguish them from VS Code's core features.
Bundle your extensions
Because VS Code is owned by Microsoft, it's easy to forget that VS Code (and its variants) is a cross-platform application. In addition to Windows, VS Code is available for the latest macOS, Debian, and Red Hat–based Linux distros. This means your extensions should follow VS Code's core principles and should be functional on every platform that supports VS Code.
The best way to accomplish this is through bundling. Microsoft recommends utilizing esbuild for bundling your VS Code extensions due to its speed and efficiency. webpack is another good alternative.
Additionally, as the adoption of platform as a service (PaaS) continues to increase, it's important to make sure your extensions are compatible with Visual Studio Code for the Web. Only bundled extensions can seamlessly function with this web-based version.
Additionally, both esbuild and webpack can minify your code. Minification functions by removing unnecessary text and changing the names of members (i.e. methods/functions and variables). Unfortunately, this can change some of your code's behavior. For instance, source code using the Function.prototype.name and toString() functions have been known to malfunction after minification.
The reality is that many minifiers encounter these limitations. If you suspect that the webpack minifier is causing problems with your code, you have the option to disable it temporarily until you identify the underlying issue.
In contrast, esbuild doesn't perform minification unless explicitly instructed to do so [using the --minify flag, offering you more control over the minification process.
Developers should also ensure that their critical dependencies are optimized for bundling. Unfortunately, if you try to bundle dynamic dependencies, your bundles will likely fail. These dependencies should either be declared as static or excluded using externals. Developers can use Snyk's dependency-check to make this process easier.
Secure Your Extensions
The Visual Studio Code Marketplace actively scans new extensions and updates for malicious content. Additionally, VS Code users can report unsafe extensions using the Report Abuse link. However, despite these precautionary measures, the Visual Studio Code Marketplace isn't free from malicious content.
Research published by Snyk found that there were multiple vulnerable extensions on the Visual Studio Code Marketplace that could open systems up for a variety of different attacks, such as server-side request forgery and directory traversal.
Many of these extensions aren't made with malicious intent; developers simply fail to prioritize security because they're unaware of the risks or they simply don't have the time. Security measures should be considered and implemented early in the development cycle.
This may seem like a daunting task, but thanks to tools like Snyk, you don't have to formulate your own security practices and checks. Snyk offers a free plan, so any developer can afford to use and integrate its core features.
In addition, Snyk knows that modern software development is fast-paced. By allowing you to link your GitHub or Google profile, Snyk makes registering for a new account easy. Moreover, you're not restricted to using the Snyk Web UI to authenticate or access Snyk's features. You can use the Snyk CLI or one of its many other integrations, including the VS Code extension:
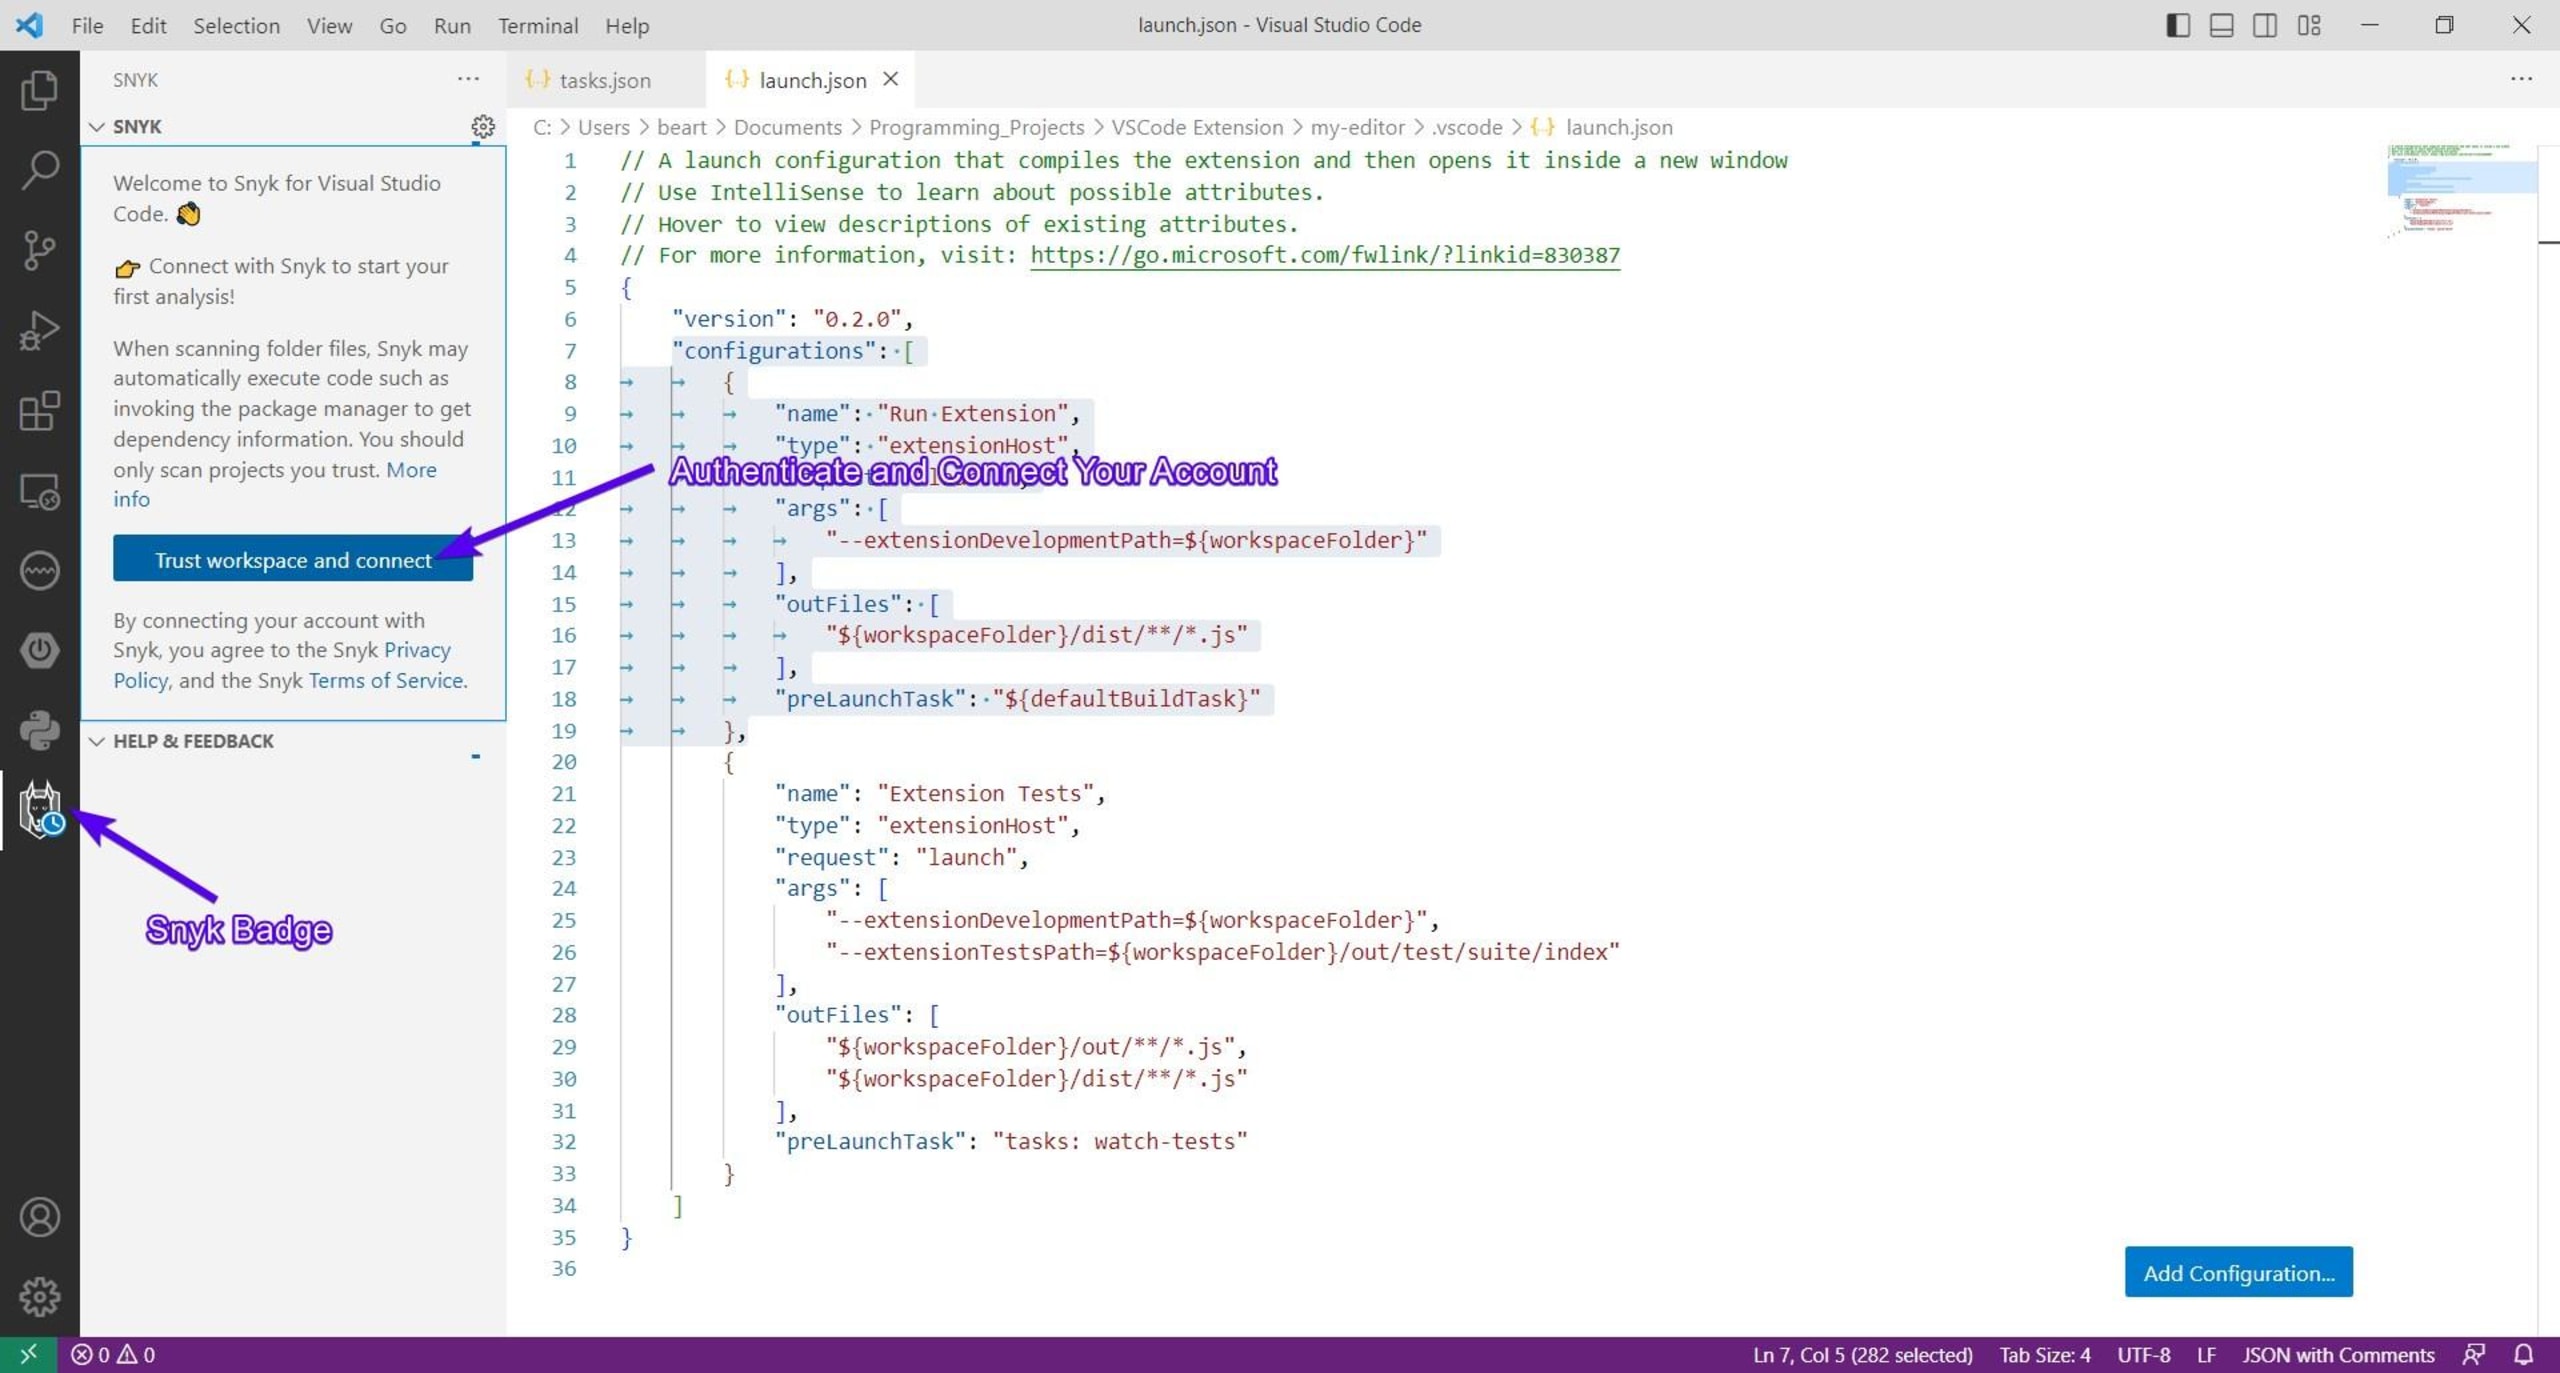
Not only can it scan for security issues in your written code, but it can also scan the modules and libraries your code relies on. Snyk's VS Code extension's UI is a miniaturized version of the Web UI. It integrates into many of VS Code's UI elements, including its diagnostics, problems view/panel, and editor. With it, you can see which lines of your code open your extension to potential attacks:

Since some of your modules or dependencies may be sandboxed once your extension is published, it isn't always necessary to secure them manually. For instance, you can use Snyk's analysis panel to ignore any lines or files that you feel are irrelevant to your project's security:
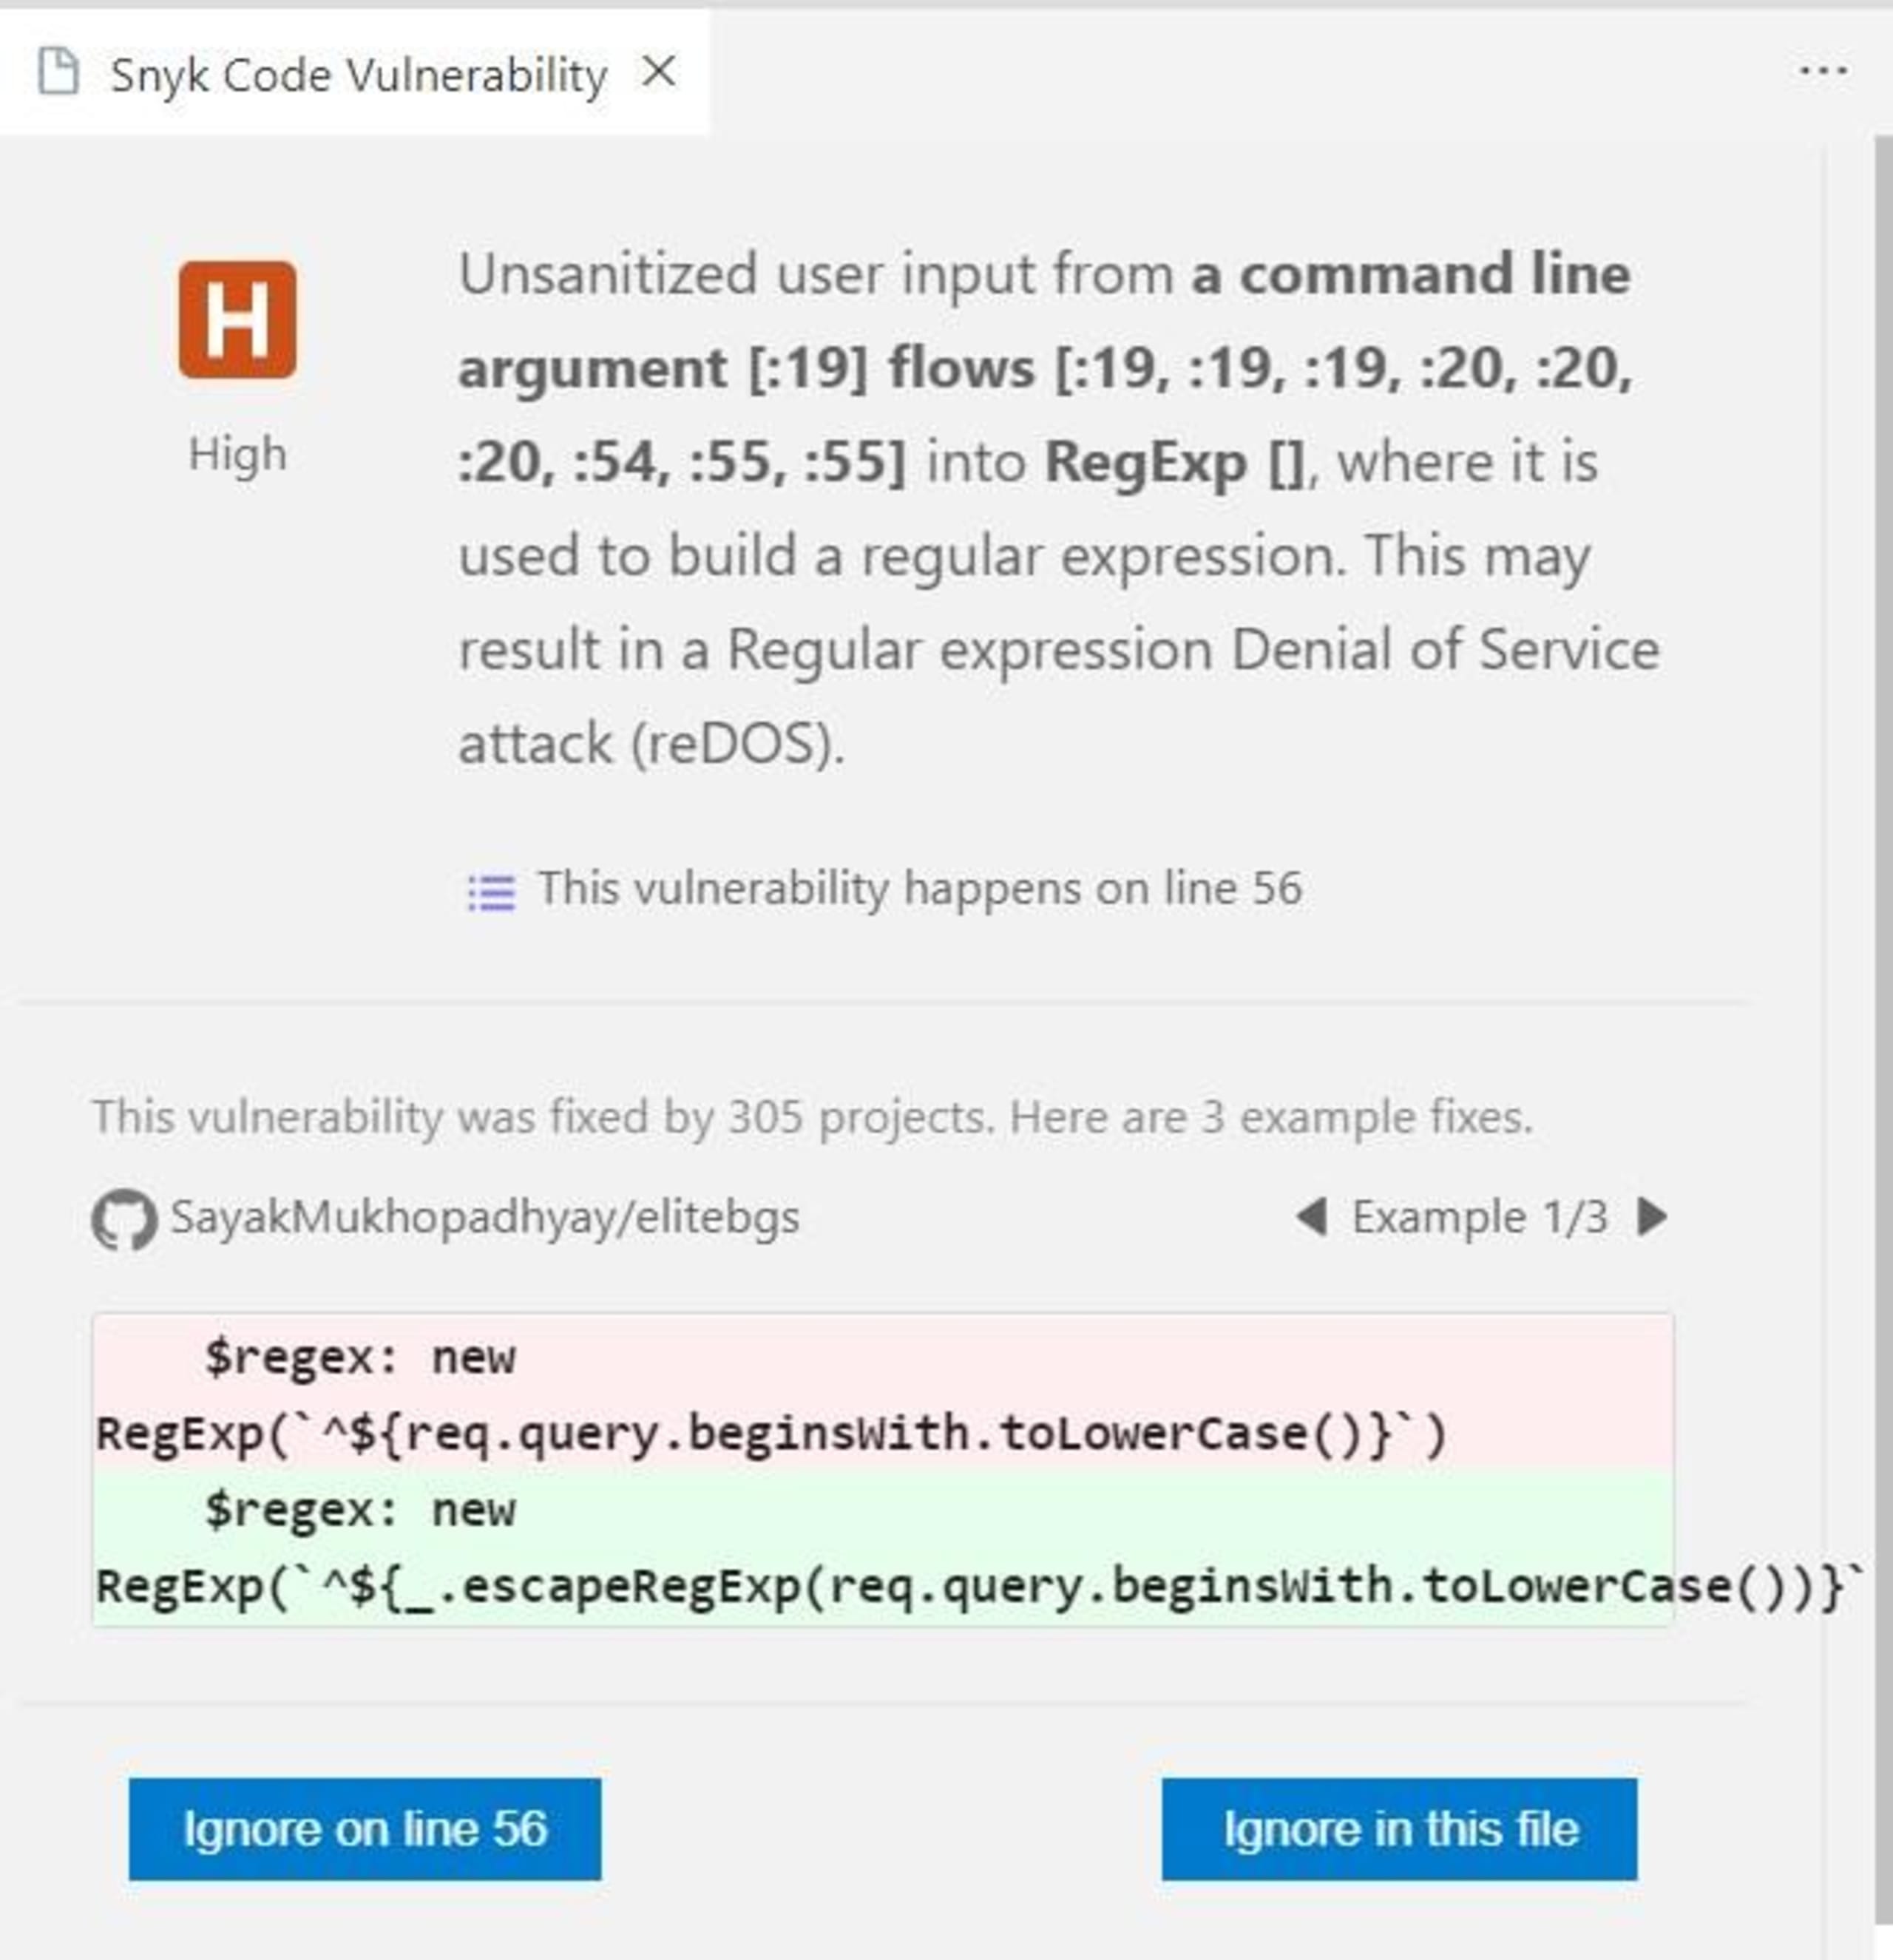
By default, the Snyk VS Code Extension automatically monitors and scans your project as you're creating it. However, you can also configure the extension to run when and how you want it to:
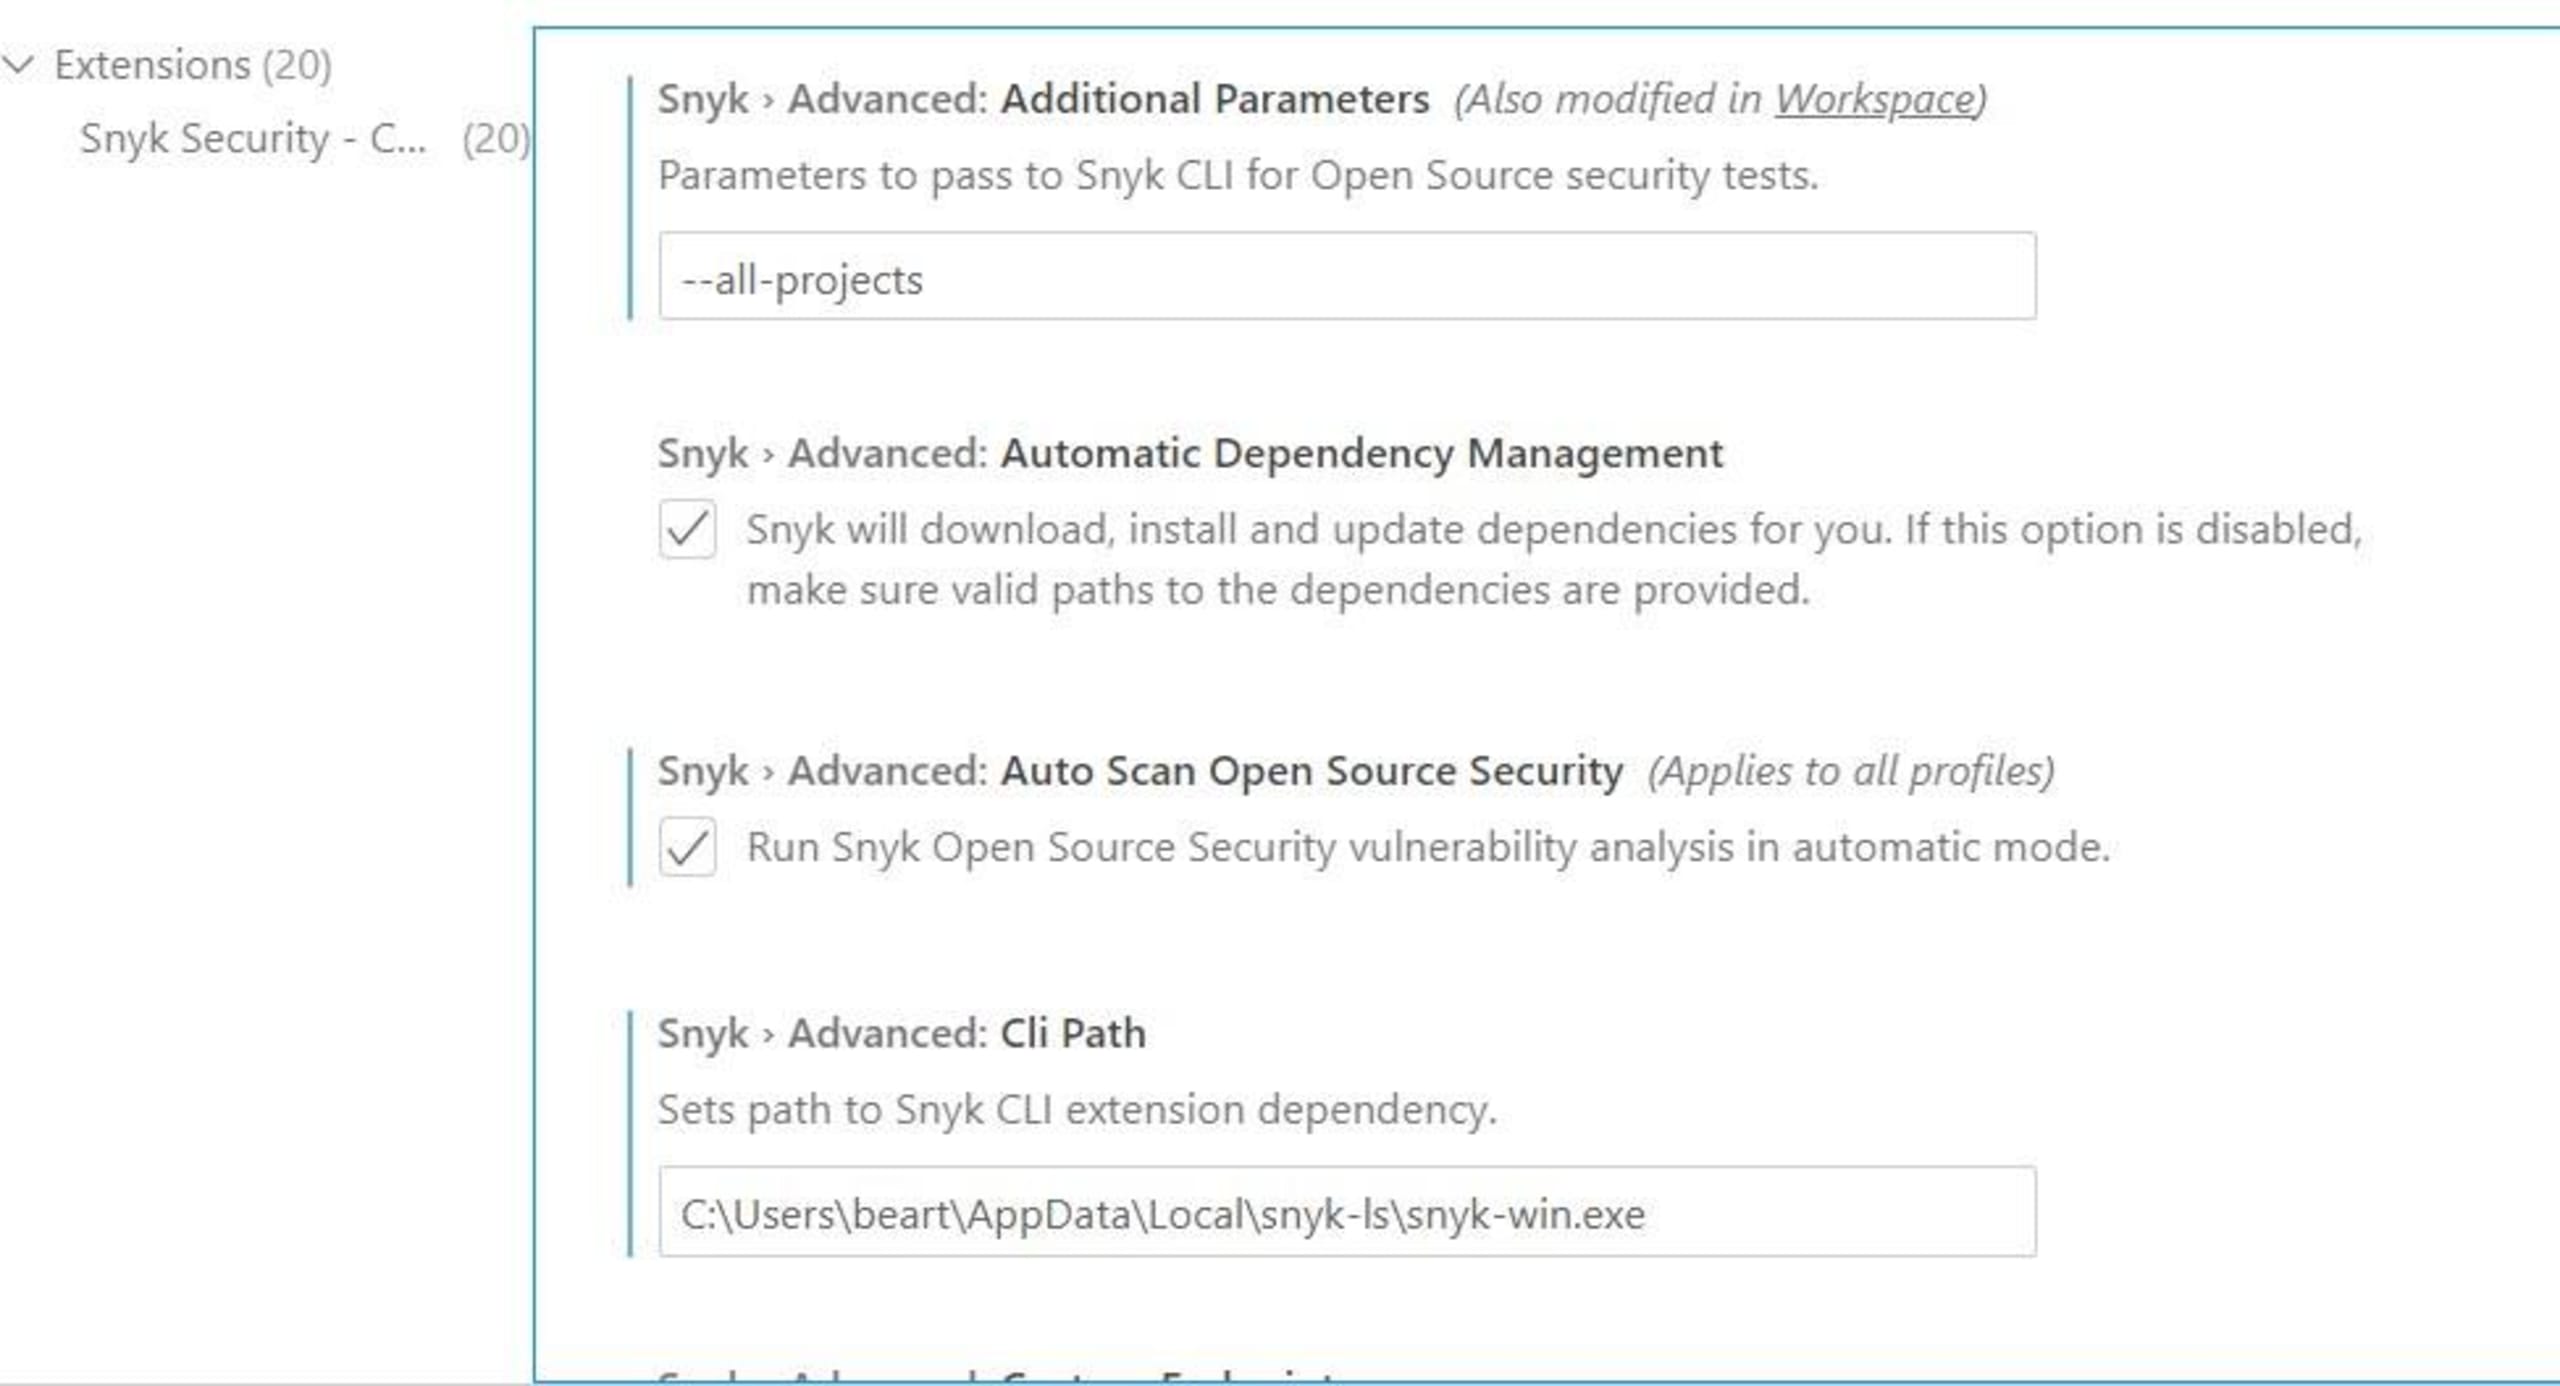
Ultimately, you decide how the extension fits into your workflow.
Conclusion
This guide provides you with all the knowledge you need to start developing VS Code extensions. In it, you explored the basic structure of VS Code extensions, including how the extension manifest connects to the entry file. Additionally, you learned about some best practices that will help you get started.
Chief among these is ensuring that your extension meets Microsoft's UX standards and that your extensions are secure. The best way to verify that your extensions are using high-quality source code and secure dependencies is with Snyk, the developer-first security platform. Snyk features an impressive list of integrations, one of which is a VS Code plugin that can be used to perform and automate quality and security checks on your projects.
Get started with Snyk for free
No credit card required.
Create account using Bitbucket and more options
By using Snyk, you agree to abide by our policies, including our Terms of Service and Privacy Policy.
