Container images simplified with Ko
October 10, 2022
0 mins readIn a previous article, I wrote about how — and why — you might want to use the Google Open Source group’s Jib tool to build your Java application container images. Jib builds slim, JVM-based, OCI-compliant images that follow best practice guidelines without the need for a container runtime like Docker, and it removes the need to write and manage Dockerfiles. What if you are building Go applications, though? Well, there is another open source tool for Go that works similarly called Ko.
Note: During the drafting of this article, the Ko project was migrated from a Google owned GitHub repository to it's own top-level organization, "ko-build". We have updated verbiage in this post to reflect this but references to "Google Ko" may still be found online and in module names for a while, be assured that this is the same project. Congratulations to the Ko project for the success that merited this migration!
In this article, we’ll look at using Ko to build container images without Dockerfiles, SBOMs, and integrating with Kubernetes.
What is Ko?
Ko is a single binary, command line tool that is designed to be used in your development process in place of where you run the go compiler today. In addition to compiling your application, it will also generate an ultra slimmed-down container image that has your application installed in it. Like Jib, Ko will push the image to a registry or drop it into your local Docker image cache, depending on how you configure and/or run it.
Ko also has a few additional tricks up its sleeve related to software bill of materials (SBOM) construction as well as Kubernetes integration to help make iterative development and deployment processes super simple.
What problems is Ko trying to solve?
Many programmers, regardless of the language they work with, are new to container construction and often have a lot of questions about image building such as:
Which base image should I use, and is it compliant with my organization’s policies?
How do I best combine commands to minimize layer bloat?
How much of my app should I copy into the image to run my application?
What tooling do I need to learn to build the image? (Docker? Buildah? BuildKit?)
Are there standard annotations I need to include per my organization’s requirements?
Application architects and leads also want to make governance and standards implementation easy for their teams to follow, but maintaining uniform practices can be challenging when every team has unique and organically crafted Dockerfile patterns.
Security teams also care greatly about what goes into an image and the tooling used to construct it. For example, the practice of exposing the Docker engine — or the host machine’s docker.sock — to a CI build node can give build environments elevated access levels on those nodes.
“[The Docker] daemon… has a lot more capabilities beyond building and interacting with registries. Without additional security tooling, any user who can trigger a docker build on this machine can also perform a docker run to execute any command they like on the machine… Not only can they run any command they like, but also, if they use this privilege to perform a malicious action, it will be hard to track down who was responsible.”
— Container Security by Liz Rice, Chapter 6
On the other hand, introducing new build tools can be complex and increase the learning curve for those in charge of the build systems. Ko aims to address each of these areas while providing a superior experience to the developers using it.
Image building with and without Ko
To describe how Ko addresses the above-listed challenges, let's first look at an example of how it compares to existing Go + Docker build steps.
Building the image without Ko
For this example, we will build the classic Go tutorial application, the “Hello World” web app.
1. In an empty directory, create the following as hello.go:
2. We will go ahead and build the binary as part of our Dockerfile as that is a common pattern:
This is a multi-stage build, with the first stage named build, based on the golang official image. In this stage, we copy the content of our app (which is simply the hello.go file at the moment) to the image under /go/src and simply run the go build tool with the parameters needed to produce a static binary.
In the second stage, we start from the Google Distroless project’s static:nonroot base image, set the default user to nonroot, copy the hello binary from the build stage into the top-level directory, set some metadata about the port we want to expose, and define that ./hello gets run by default at container startup.
Why two stages?
It is a common practice to do the build of your application in the Dockerfile as this guarantees that the right version of your compiler gets used both on a developer’s workstation and in any automated builds. A common error, though, is to deploy the same image that the build happened in. This is a security risk because you end up including not only extraneous tooling like the compiler, but also the source code of your application in that deployed image. If an attacker is able to exploit a vulnerability or get a copy of your image, they will have a lot of information and tools at their disposal to expand their attack. By starting from the distroless/static:nonroot base image, we have an extremely minimal filesystem with a non-root default user.
3. With our Dockerfile sorted out, we now can use the docker build command to construct a locally cached image and give it a tag:
Note: Your output may look a little different depending on which version of Docker you are running and if you have BuildKit enhancements enabled.
4.For others to use this image, we need to push it to a registry repository. In this example, I’m running a local repository on my workstation at port 5000 via the registry:2 image from DockerHub. (This is why I tagged the image with the localhost:5000/ prefix.)
Pushing to a registry with Docker is pretty straightforward using the docker push command:
Note: If this were a managed registry, I would have needed to authenticate to it with docker login first.
5. Finally, to run our image, we could use docker run or an appropriate kubectl deployment. For this simplicity’s sake, we’ll do the former:
and we can test the app with a simple curl command:
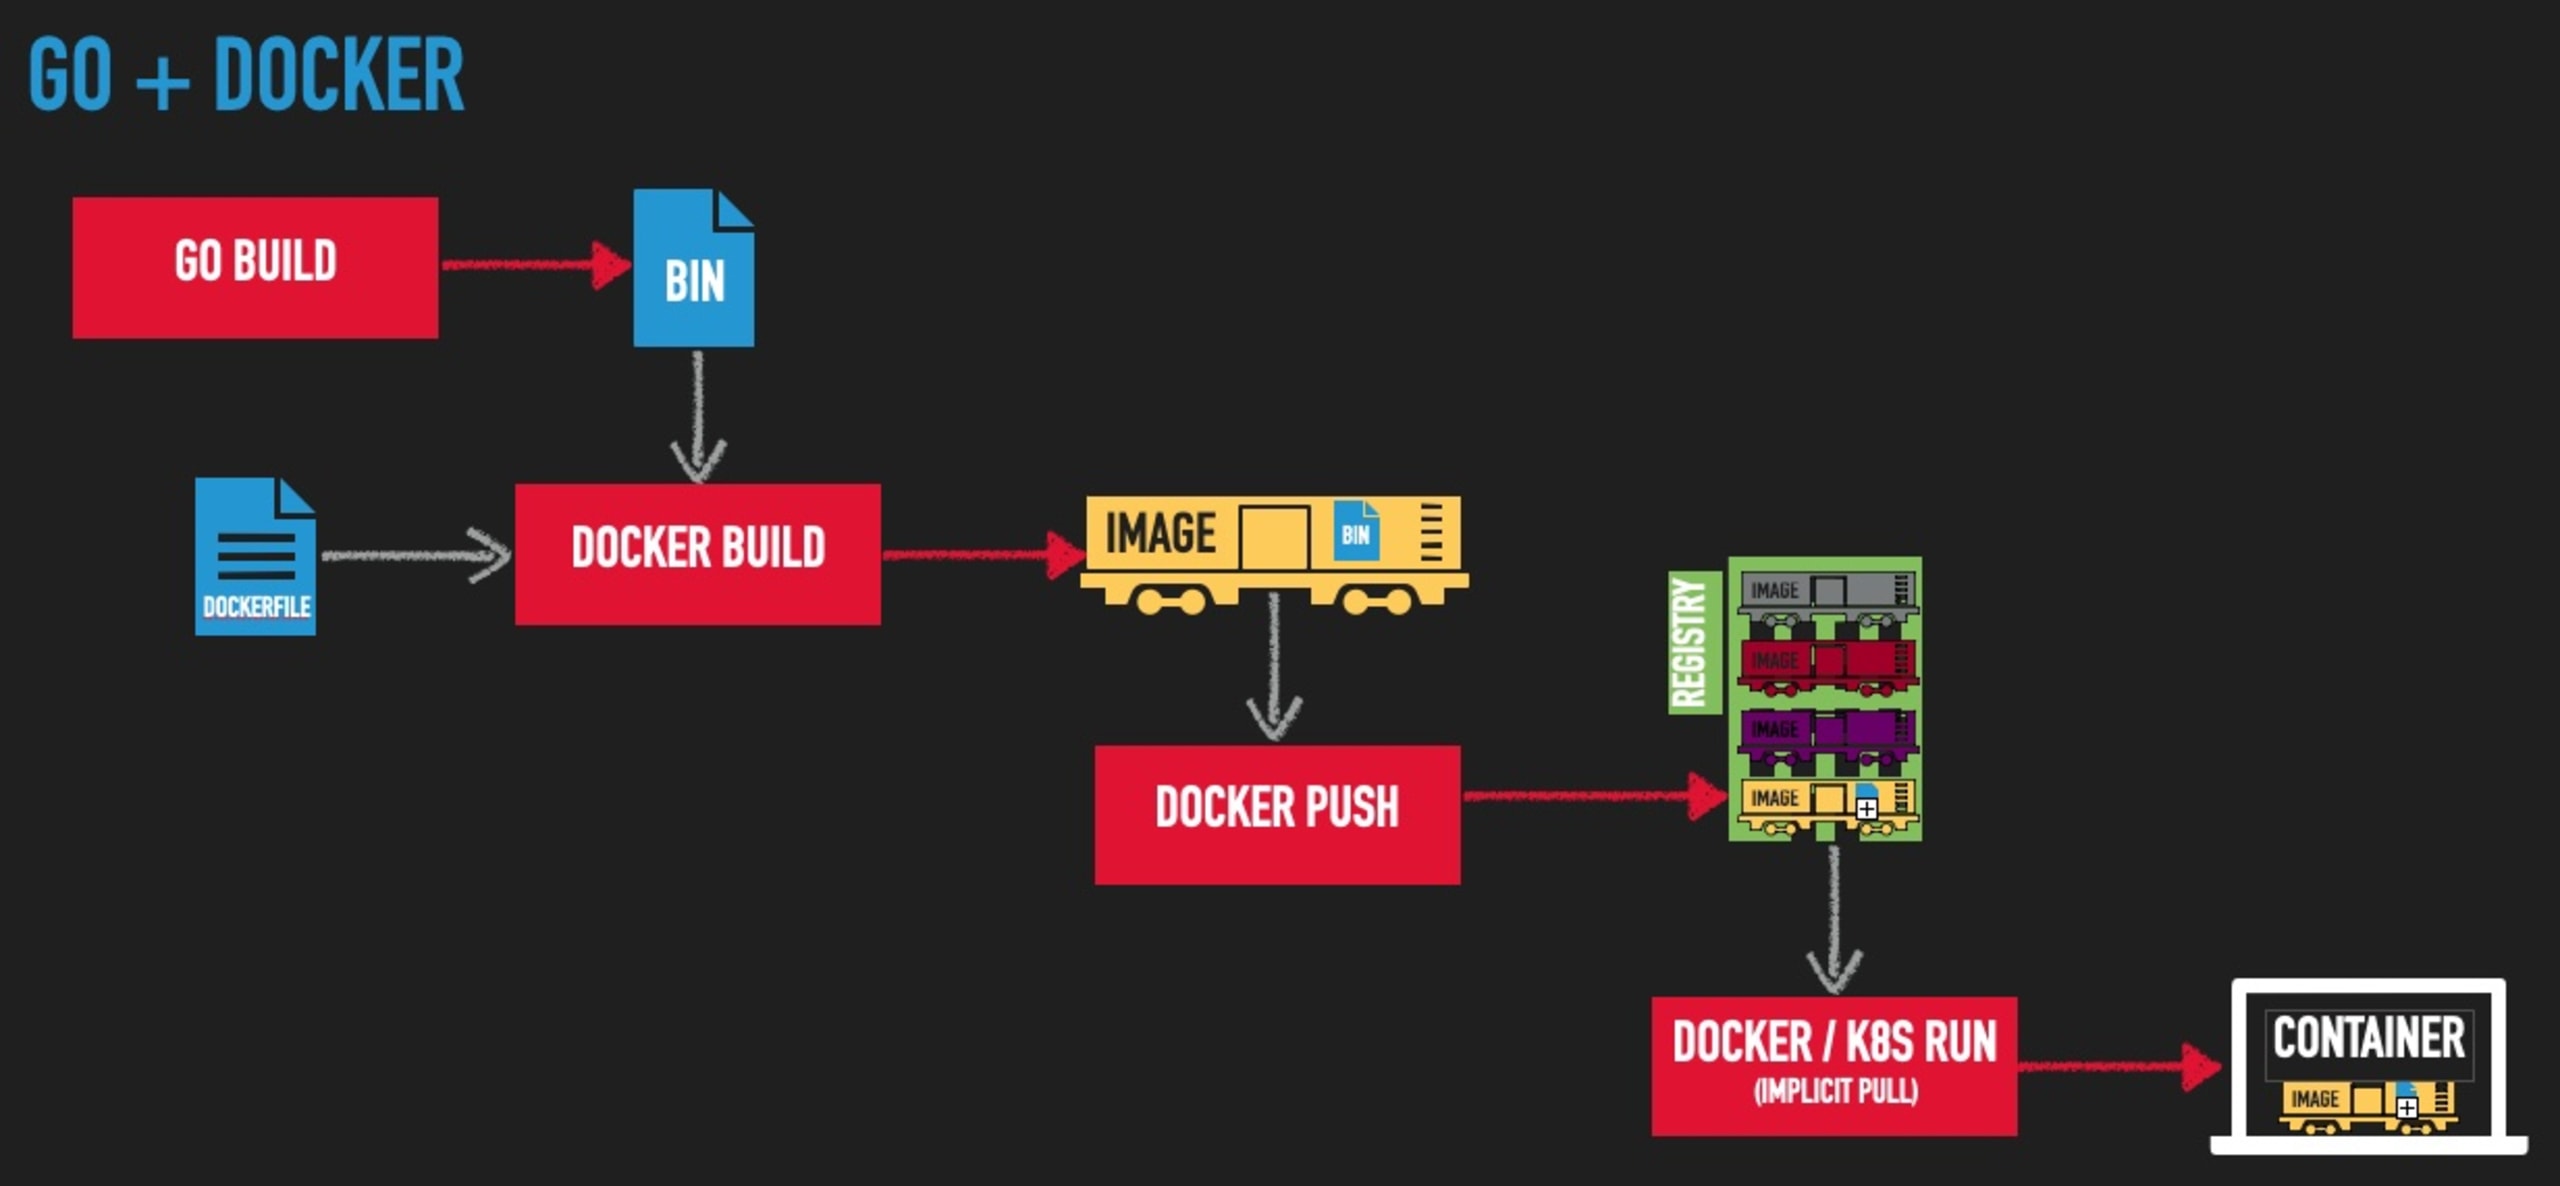
If we were to visualize the steps we just performed, it might look something like this:
Now let’s rewind back to the beginning and see how this would work with Ko.
Building the image with Ko
1.We’ll start with the same hello.go file in an empty directory:
2.Next, we set our image registry into an environmental variable and run ko build:
That command:
compiled our application into a static binary
put it into a well-formed image, and
pushed it to my registry.
No Dockerfile or container runtime engine was required to do any of this. Additionally, you’ll notice references in the output about an SBOM being created and published; we’ll come back to that later.
Note:The image tag here contains an md5 hash that, by default, is the import path of your go application. Since we don’t have a full Go module in this example, that hash is simply taken from hello.go. See the Ko documentation for more information on tags.
3. Now we will run the image via docker run:
... and test with curl:
Visualizing the Ko pipeline might look something like this:
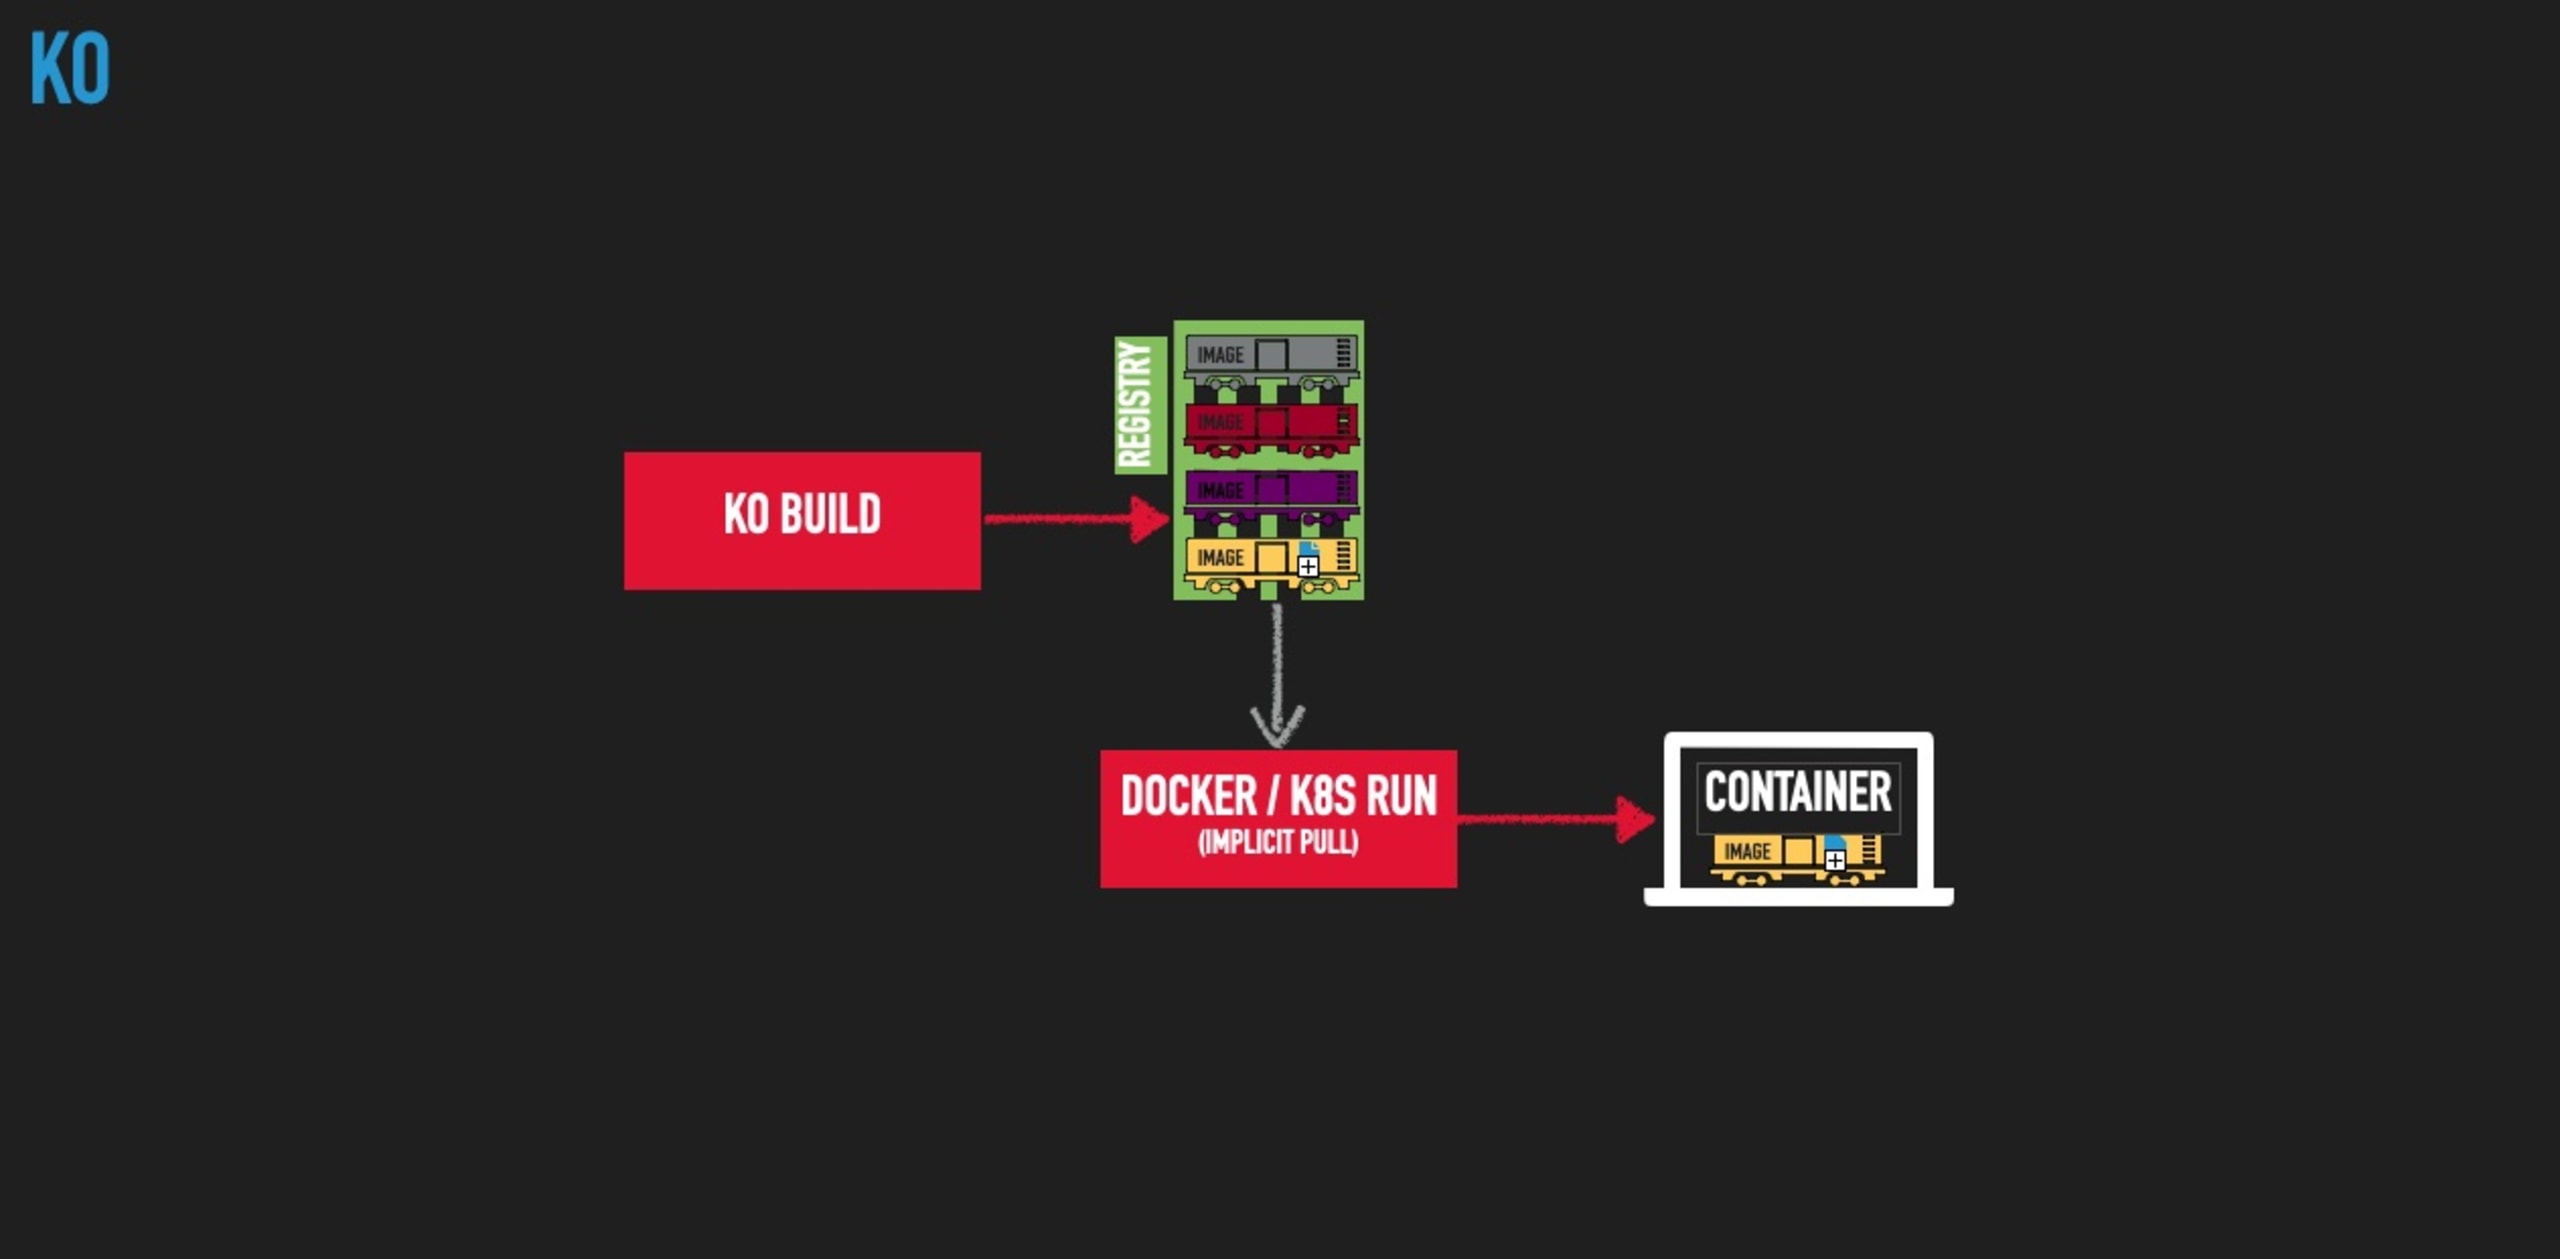
By letting Ko do the heavy lifting of image authoring, creation, and pushing, we reduced the number of steps to perform, the dependence on the container runtime engine at build time, and the expertise and maintenance requirements that the Dockerfile required.
Smart defaults, deterministic specializations
Ko users benefit from the collective definition of best practices by the open source community, but what if your organization has custom standards that don’t comply? This is where Ko’s command line options and/or ko.yaml configuration file comes in handy.
Custom base image
Let’s say, for example, that your company has a specific image from which all Go applications need to use as their base. Simply include defaultBaseImage: line in a ko.yaml file in the top level directory with that image as it’s value.
Go compiler flags
To explicitly specify the go compiler -ldflags as we had in our original example, simply add a builds: entry to the same ko.yaml file with appropriate settings as specified in the Ko documentation.
Docker labels
Docker labels — a.k.a. OCI annotations — are a way to apply metadata to an image that is useful for referencing information such as the source repository it came from, CI build that created it, or any other data your team wants to embed. For more about image labels and when you might want to use them, check my blog on How and when to use Docker Labels.
Ko supports adding labels via its command line --image-label flag:
Note: As of the publishing of this article, there is no way to specify image labels from the .ko.yaml configuration file but there is an open issue for adding that functionality.
Other interesting Ko features
Image SBOMs
As we saw above, Ko will automatically generate and push an SBOM for your new container image. By default, it will be in SPDX format, but CycloneDX is also available by passing the flag --sbom=cyclonedx on the command line. You can also turn this feature off by passing --sbom=none; these and other configuration details are in the Ko documentation.
A full discussion of SBOMs and their role in creating a secure supply chain is out of the scope of this article but if you’d like to learn more, check out Building SBOMs for open source supply chain security.
Kubernetes integration
If your image needs to be tested in the context of a Kubernetes cluster, you undoubtedly have run into the hassle of needing to manage a recurring cycle of steps like:
Build my image
Deploy it to my registry (or otherwise load it into the Kubernetes cluster)
Update my deployment YAML with the new image tag
Redeploy via
kubectl
Ko can make this much easier by automating all of these steps into a single command: ko apply. With a simple change to your deployment YAML, replacing the image tag with a specially formatted ko:// one, ko apply will automatically perform all of the above steps for you, deploying to whatever cluster you have actively set in your kubectl config context.
For example, let’s imagine you have a sandbox or locally running Kubernetes cluster and need to iteratively deploy and test your work as you go. Here is a deployment manifest for our “hello” application to deploy there:
You can see that the image: line which contains ko://, followed by the path to the Go module of our application in GitHub.
Now, we simply run ko apply and give it the YAML file in an -f flag like we would with kubectl:
We now can test our application, make a change and re-run ko apply -f myfile.yaml as many times as we need and it will do all the heavy lifting for you!
As you would expect, there are other Kubernetes commands that you likely would need, such as:
deletefor removing your deployments, andresolvefor generating YAML that you can feed intokubectlor other tools.
See https://github.com/ko-build/ko#kubernetes-integration for full documentation details.
Challenges to using Ko
We’ve talked about all of the reasons why you might want to take the plunge and start using Ko in your workflows, but before you start, let’s talk about some of the challenges that you may face using Ko.
Cross-platform concerns
If you develop on a non-Linux based machine, the lack of a container runtime can, in some ways, make things a little harder. Having a container based build image allows you to encapsulate both the build tools as well as the OS and its libraries into a common base build image and effectively ignore the fact that your workstation platform may not match that of your production environment.
Case in point: The Go+Docker part of the example above will work on just about any platform because, regardless of where you build it, the golang base image provides the necessary Debian based, glibc libraries available for the Go builder to create the static binary. If, however, you try to run the Ko example with the same ldflags options on a MacOS machine, for example, you’ll get errors about missing libraries needed to do the static bindings.
This is because MacOS/Darwin does not include the necessary libraries to do the cross-complication for a Linux static binary (at least not at the time I am writing this). Not to pick on Apple too much, similar issues can come up for disparate CPU architectures with Linux and Windows WLS workstations too.
Skillset atrophy
The skills and knowledge leveraged to create and maintain well crafted container images is a valuable commodity and using tools which abstract or remove the need to have them can reduce the ability to deal with issues if something fails. In fact, the fewer the number of people on a team that understand container technologies, the greater the dependence is on those people with the needed experience when it comes to troubleshooting and maintenance at runtime. In extreme cases, this can lead to burnout, attrition, and/or outages.
Security complacency
If the process of container image construction becomes completely automated away from the developers, compliance with processes like image vulnerability scanning may falter. Vulnerabilities in un-updated images, packages, libraries, etc. can creep in exposing your application to attack so make sure such scanning is still being done via other automated means such as:
Build scriptings or Makefiles
Git hooks
CI build steps
If you are not already doing image scanning, Snyk offers free container image scanning that finds vulnerabilities in images and provides simple, actionable remediation advice.
Simplifying container images
Ko — and other alternative image building tools — can greatly simplify your Go application container image construction tasks and help streamline and standardize the way your teams build images. One of the greatest benefits is to your CI tooling as you no longer need to expose a container runtime to your build environment, greatly reducing privileged access attack vectors in your SDLC. Regardless of whether you choose to use a build tool like Ko, be sure your teams are well versed in container technologies and the security ramifications of any processes and tools they use to build their images.
Get started in capture the flag
Learn how to solve capture the flag challenges by watching our virtual 101 workshop on demand.