How to secure JavaScript applications right from the CLI
Gideon Idoko
October 24, 2023
0 mins readAccording to Snyk's 2022 State of Open Source Security report, the average JavaScript project has 49 vulnerabilities, including common ones like unsafe dependencies, cross-site scripting (XSS), weak input validation, and cross-site request forgery (CSRF). And given JavaScript's widespread use, robust security measures are increasingly important to safeguard your applications from cyberattacks. While implementing these security measures during development is crucial, it's equally important to start early, and doing so from the CLI makes the process easier.
That's why this article will guide you through the process of securing your JavaScript applications using the Snyk CLI.
What Is the Snyk CLI?
The Snyk CLI is a powerful tool that can scan and monitor your applications, containers, and infrastructure as code (IaC) for security vulnerabilities. Because it integrates seamlessly into your development workflow, it can be run locally or in your continuous integration, continuous delivery (CI/CD) pipeline. This allows you to proactively address security concerns early in the development process.
When scanning your JavaScript project with the Snyk CLI, it checks the project's dependencies against a massive security vulnerability database and reports any issues. It also follows up with insights on how to fix these problems. This can involve upgrading to a secure version of a vulnerable package or using alternative, non-vulnerable ones.
Benefits of using the Snyk CLI during development
With the Snyk CLI, you can improve the security, reliability, and release velocity of your projects. Here are some of the key benefits of doing so:
Security scanning for code and dependencies: The Snyk CLI scans your codebase and dependencies for known security vulnerabilities and provides details about the security issues, including severity levels and recommended fixes.
Early detection of vulnerabilities: With the Snyk CLI, you can detect vulnerabilities early in the development lifecycle so they can be addressed sooner with less cost and effort.
Remediation guidance for addressing vulnerabilities: Along with identifying vulnerabilities, the Snyk CLI suggests updates to vulnerable dependencies or alternative libraries, making it easier for you to fix identified issues.
Support for compliance requirements and best practices: While ensuring that you're adhering to best practices, you can carry out security audits and evaluate compliance using the reports that the Snyk CLI generates.
Language and ecosystem support: Thanks to its support for a number of languages, the Snyk CLI can be used to test a wide range of projects such as Java, Python, .NET, Ruby, PHP, and many others, making it a great choice for polyglot teams.
Developer-friendly experience: The Snyk CLI's intuitive terminal commands make it easy for developers to integrate security checks into their development workflow. Aside from the CLI, Snyk can also be used in your IDE through plugins and extensions.
How to install the Snyk CLI
There are a number of ways that you can install the Snyk CLI on your machine, ranging from using the available stand-alone executables to using package managers such as Homebrew for macOS and Scoop for Windows.
However, the easiest way to install the Snyk CLI for your JavaScript application is to do so using the npm or Yarn global installation since you most likely already have Node.js installed. Ensure you're using Node.js version 12 or later and run the following command to install the Snyk CLI as a global npm package:
Alternatively, you can install it globally with Yarn by running yarn global add snyk. For more information, refer to the Snyk CLI installation guide.
How to secure JavaScript vulnerabilities with the Snyk CLI
Now that you've installed the Snyk CLI, explore the features that it offers by testing a sample JavaScript project.
Set up a sample JavaScript project locally
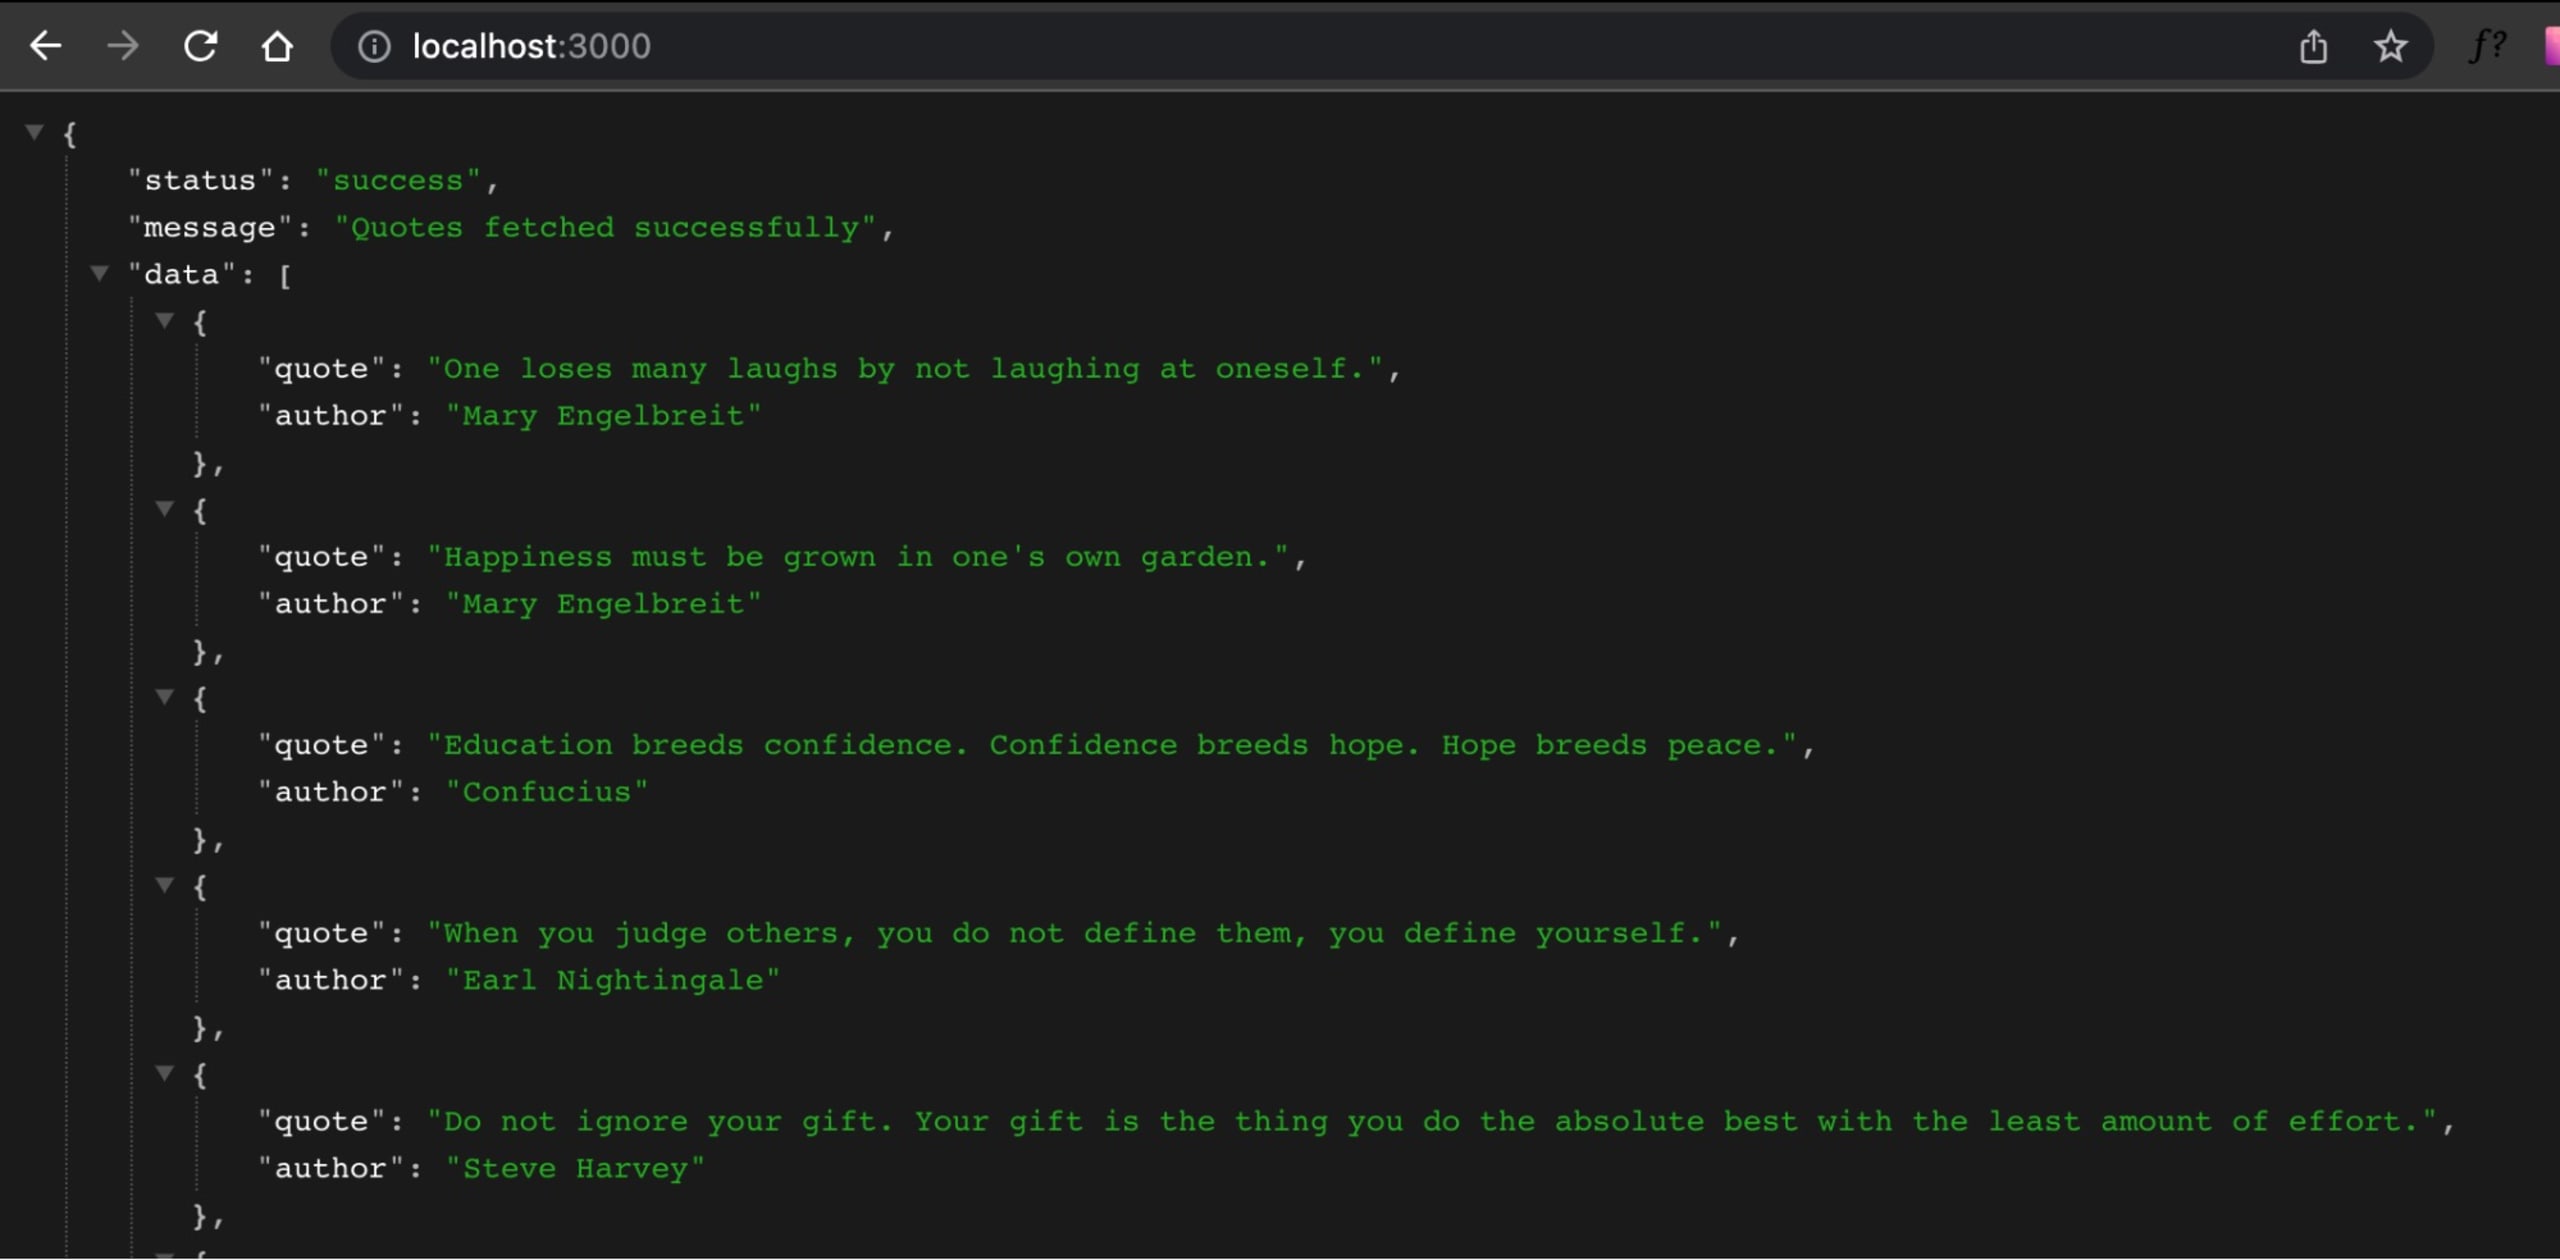
To help you quickly set up a project test with the Snyk CLI, a sample JavaScript project has been made available in this GitHub repository with all the necessary manifest files. The project is a simple quote API that uses Lodash and Express as their dependencies. The quote API has a GET / endpoint that returns a list of quotes and a GET /random endpoint that returns a random quote.
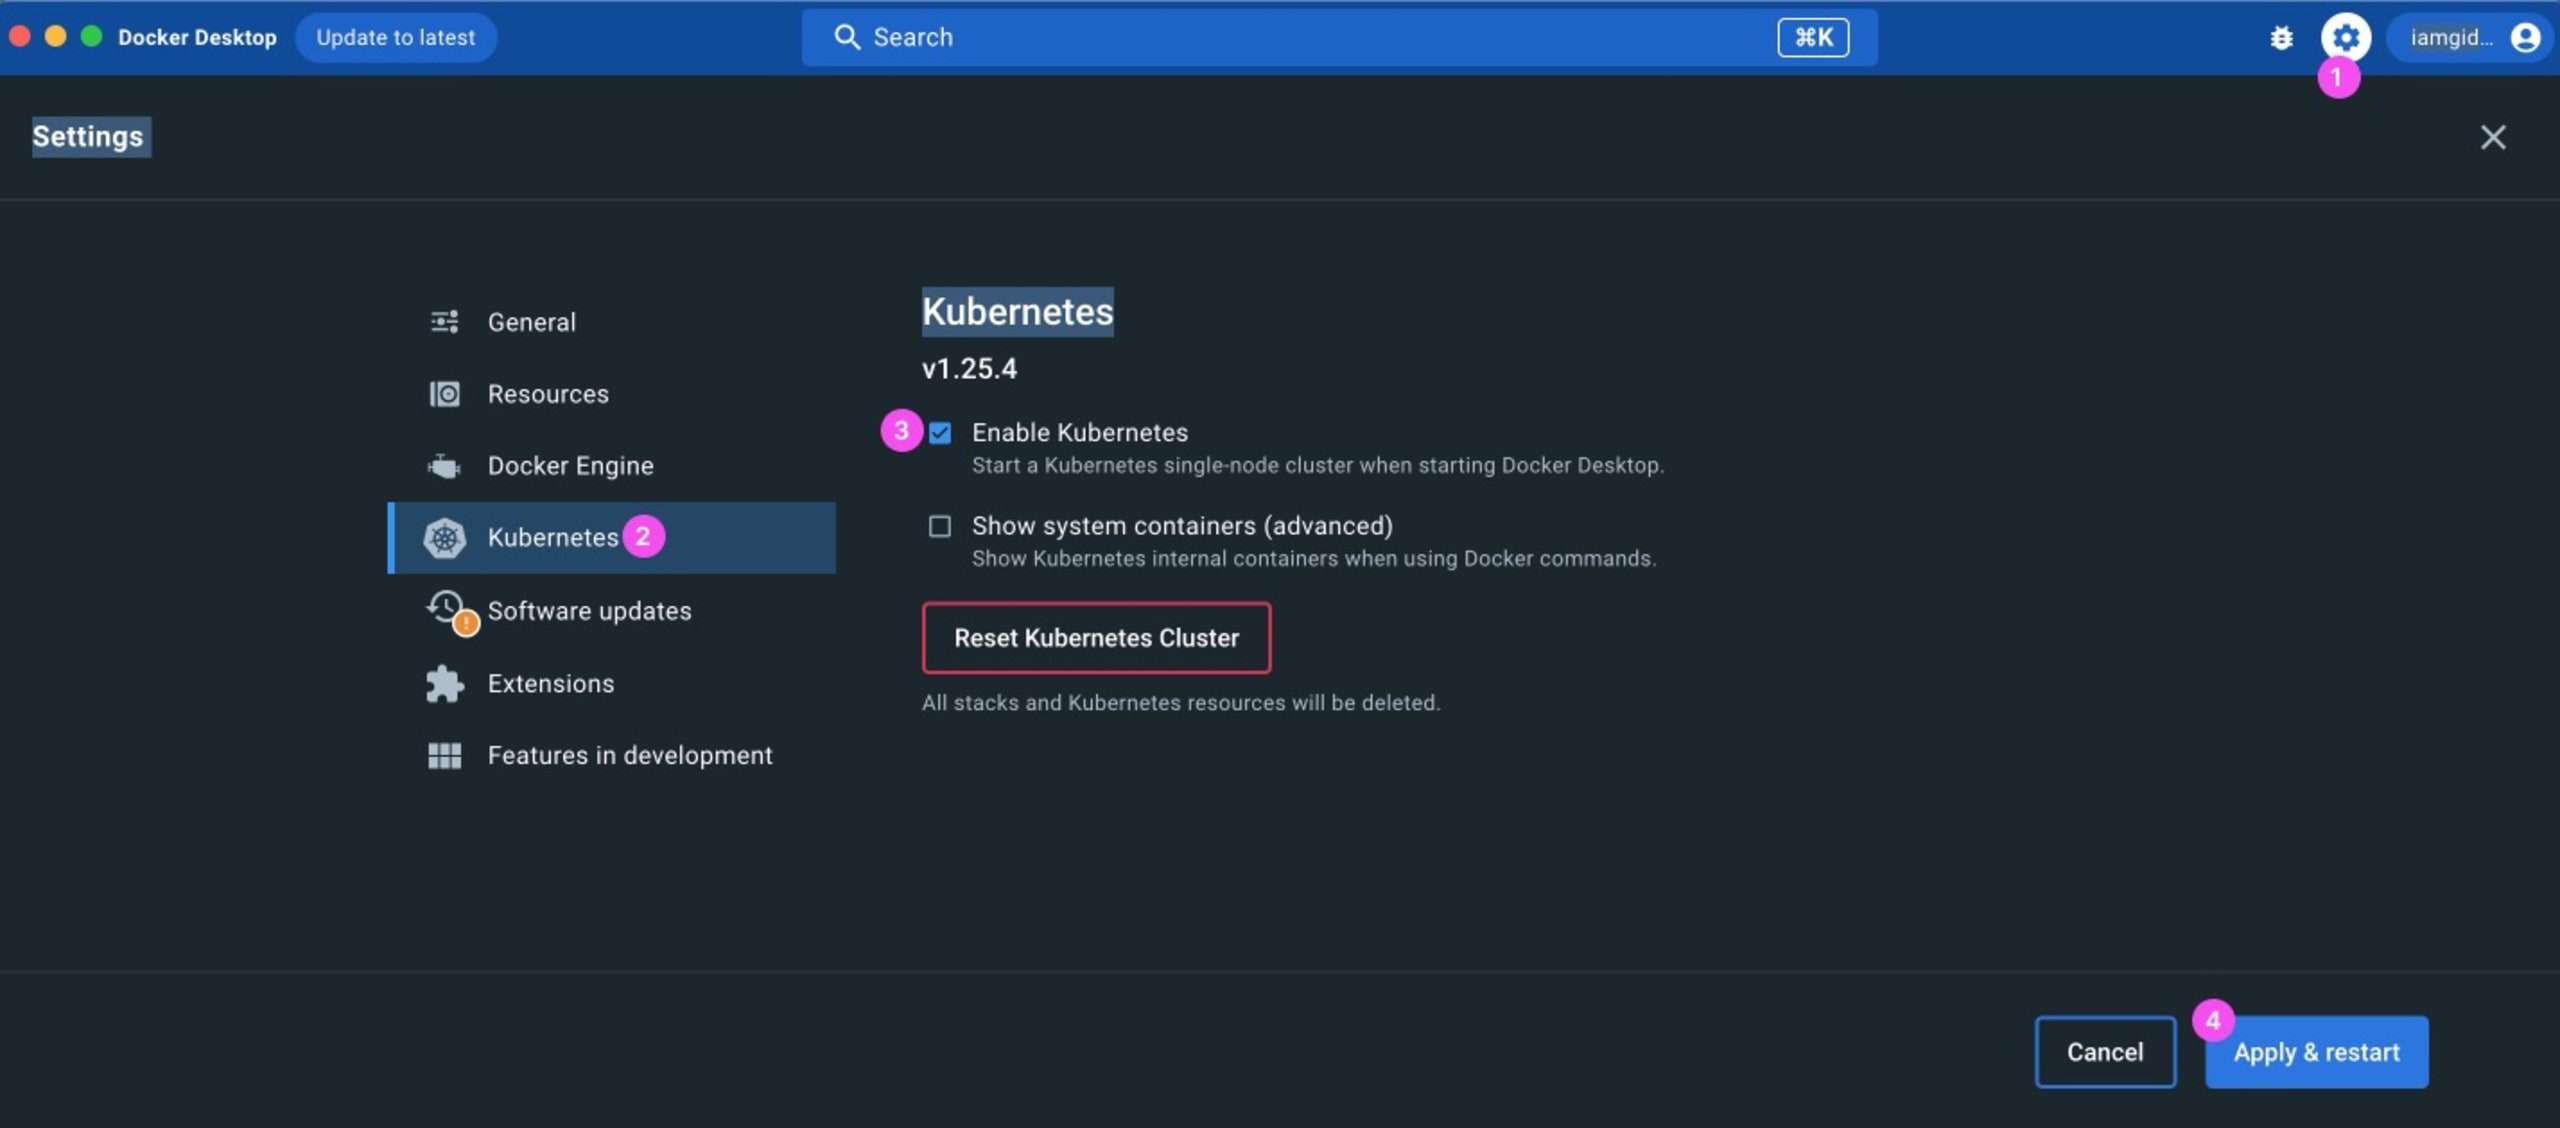
The project uses Docker for containerization and Kubernetes as part of its infrastructure. The easiest way to set up Docker and Kubernetes on your local machine is to install Docker Desktop and enable Kubernetes in its settings:
To set up the sample JavaScript project, clone the repository to your local machine:
Then go into the project directory and install its dependencies:
Note that the project's JavaScript code is available in the server.js file. Run npm start to start the app on port 3000:
Now, create and spin up a container for the app by running the following Docker command:
This builds a vulnnode Docker image from the Dockerfile, runs it, and exposes the container on port 4000.
Finally, create a Kubernetes resource for the app:
This code uses the kube.yml manifest file and makes the app available on port 5000. At this point, you've got everything set up, and it's time to move on to scanning the project.
Authenticate your machine
The Snyk CLI must be linked to a Snyk account, which means you need to authenticate your machine before you can use it. If you don't have one, sign up for a free Snyk account so you can follow along. After you've logged in, go to your terminal and authenticate the Snyk CLI with this command:
This opens a web page in your browser. Click on the Authenticate button, and your Snyk CLI will be authenticated.
If this authentication method doesn't work, you can explicitly use your API token. Go to Account Settings > General > API Token and copy your API token. Then authenticate with the token in your terminal using the following:
By now, you should get a message indicating that your account has been authenticated and the CLI is ready to use. Dive into the Snyk CLI commands that will help you test your JavaScript project.
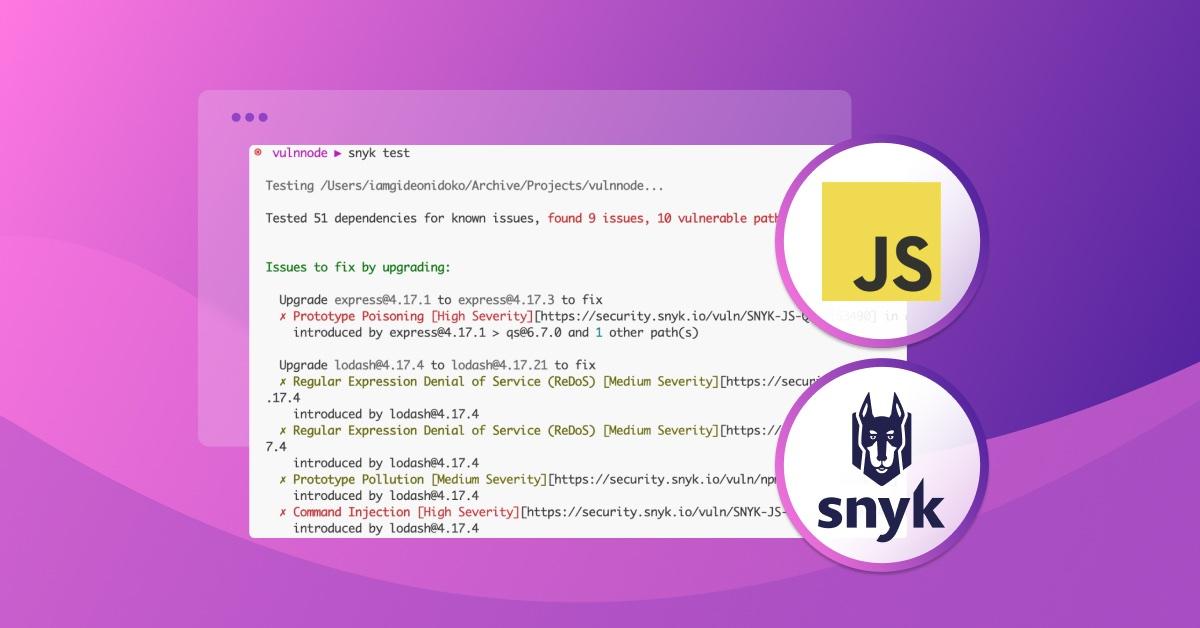
snyk test
The snyk test command validates open source software for security and licensing flaws. It analyzes the project's dependencies to identify any known security vulnerabilities present in those dependencies. It also reports information about those vulnerabilities, such as their types, descriptions, vulnerable file paths, and steps to address them.
When you run snyk test , the Snyk CLI tries to automatically detect manifest files with dependencies (like the package.json file in the project you set up) and test it. Note: Snyk looks for local dependencies to test for vulnerabilities, which is why we downloaded the project's dependencies during setup.
To scan the project, run the test command in the same directory:
You'll get an output that looks like this:
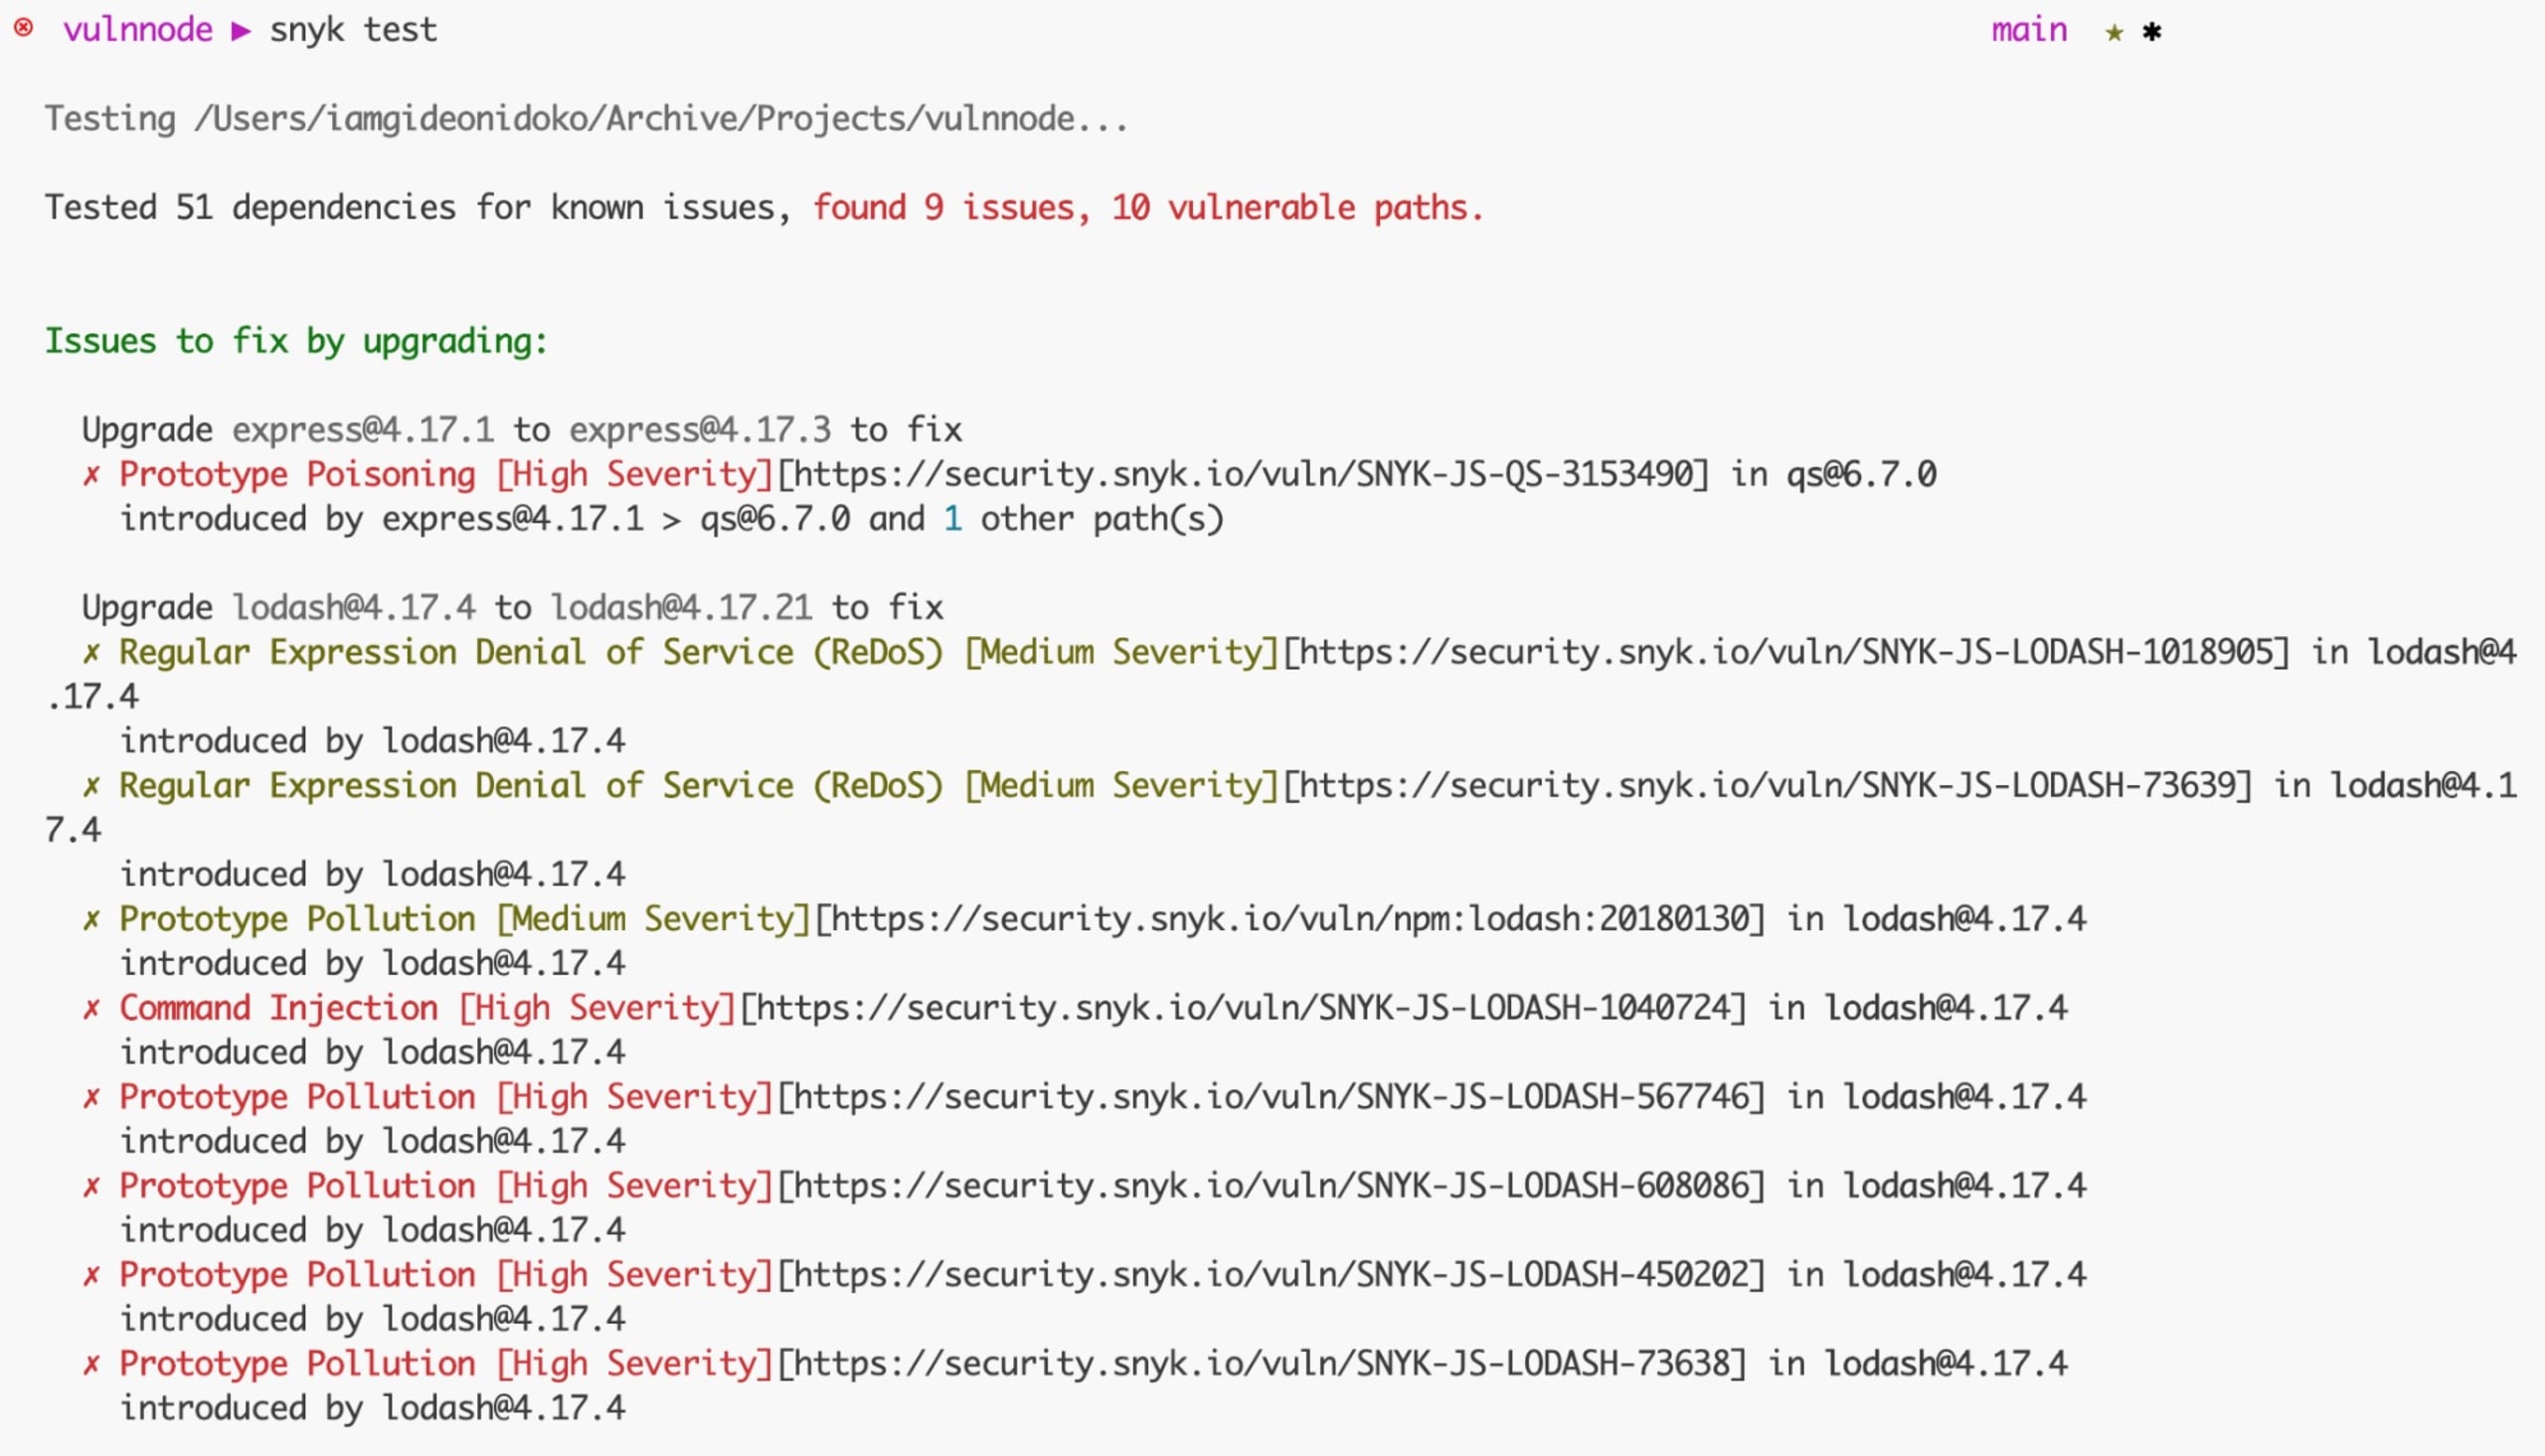
Snyk tested the project's dependencies, found some issues, and reported them with a description of the issue, including the issue ID, the severity, and a link to where you can learn more about the issue.
All the issues are grouped in an Issues to fix by upgrading section, which means that updating the libraries linked to the issues removes one or more of the vulnerabilities. You'll learn in detail how to fix these issues later.
Other sections where issues from the test can be grouped include the following:
Patchable issues mean there's no available update that fixes the problem, but you can use a patch as a workaround instead.
Issues with no direct upgrade or patch mean that there's no available update or patch that fixes the problem. You can decide to retain the dependency or replace it with an alternative.
Note: If you prefer to have the output in a JSON file, simply add the --json-file-output=./path/to/file.json flag to the Snyk CLI command.
In a CI/CD pipeline, you can run a snyk test that breaks the pipeline if the project contains vulnerabilities; that is, the exit code of the test command is not 0.
snyk monitor
When you run the snyk monitor command, it captures a snapshot of your project and sends the data to Snyk. It's essential to understand that snyk monitor is not meant to replace snyk test, as its main purpose is to create a snapshot and track it over time. It's a valuable tool to have before deploying to production. Additionally, Snyk keeps you informed by notifying you through your preferred contact method whenever a new vulnerability or remediation relevant to your project is identified.
To ensure that the snapshot ends up in the right location, it's recommended that you specify extra information such as the organization (--org) and name of the project (--project-name).
To see snyk monitor in action, run the following command:
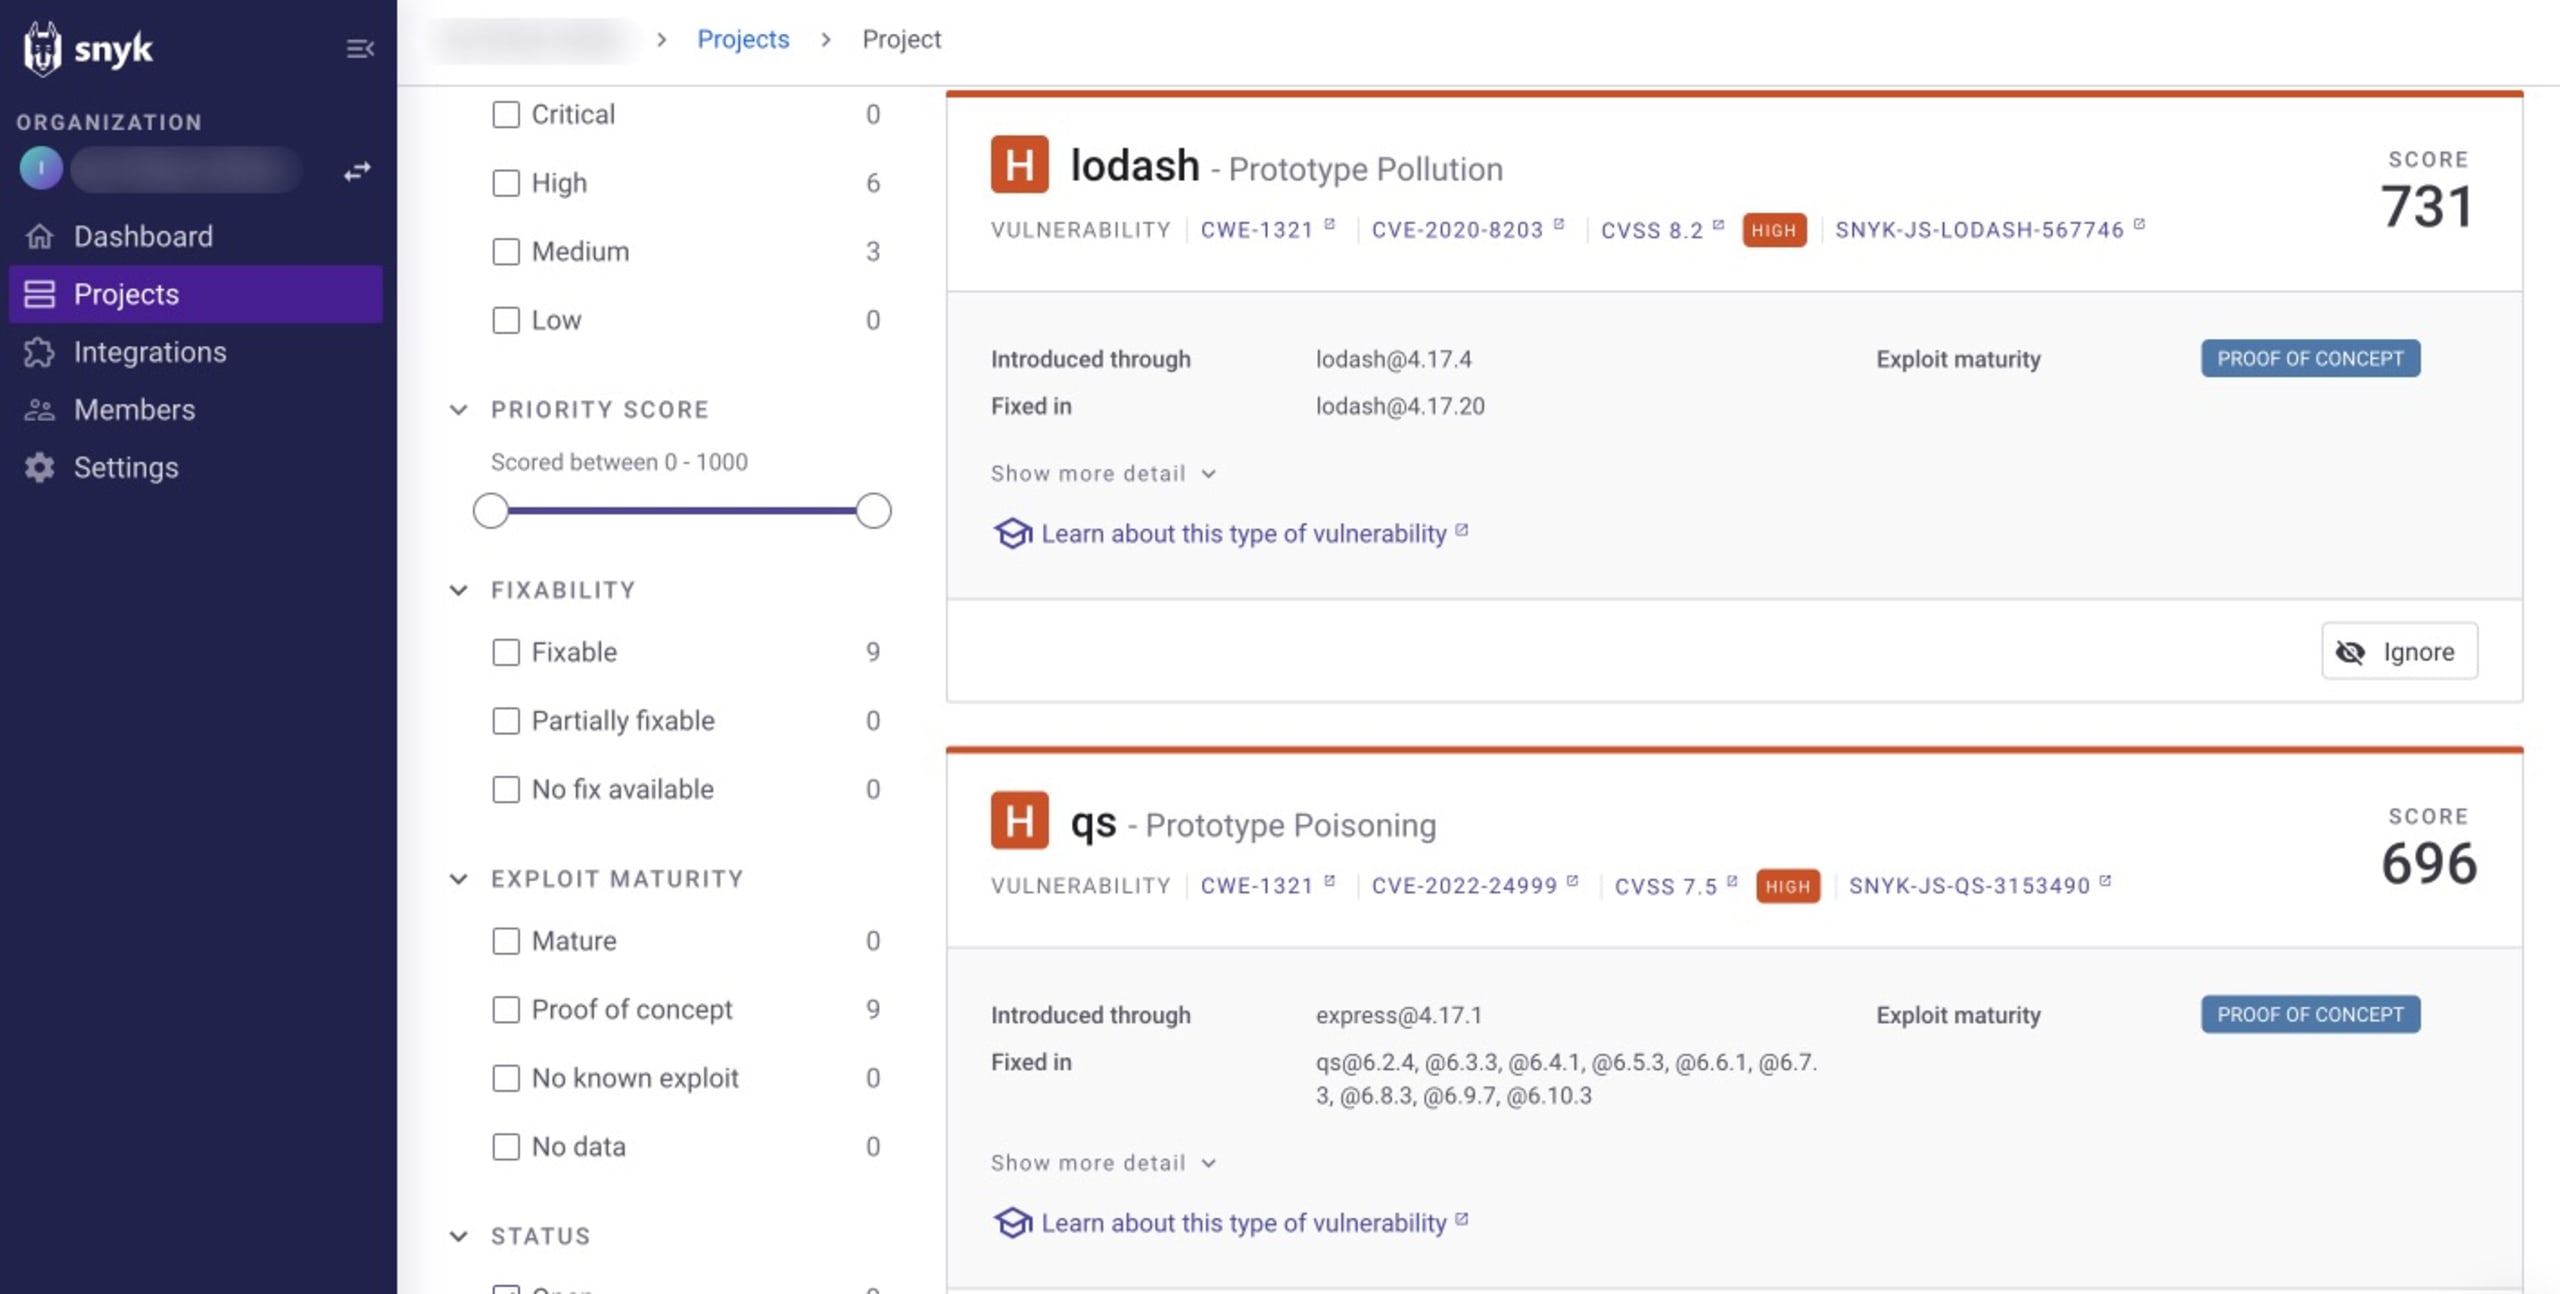
Replace <YOUR_ORG> with the organization where you want the project snapshot to be. After running the command, you get the link to the snapshot in the response, like this:

Follow the link to take you to the snapshot on your Snyk dashboard:
snyk ignore
There are certain scenarios where a patch or update that fixes a vulnerability does not exist or where you believe that a vulnerability can't be exploited in your app. If this happens, you can instruct Snyk to ignore the vulnerability for a given time frame. By using the snyk ignore command, you can manage known issues or false positives that might not be immediately fixable or are not relevant to your project's context.
When utilizing snyk ignore, you need to identify an issue with its vulnerability ID. This can be retrieved from the output of the snyk test command. For example, the regular expression denial of service (ReDoS) vulnerability associated with the current Lodash package of the project has an ID of SNYK-JS-LODASH-1018905, so you can ignore it by running this:
Here, the --expiry flag specifies how long the issue should be ignored, and the --reason flag specifies the reason for ignoring the issue. This command creates a .snyk policy file that holds information about the vulnerability in the root directory. This prevents the vulnerability from being flagged in the future when executing snyk test.
snyk container
The Snyk CLI has two container commands (test and monitor) that test and monitor local or remote container images, such as Docker images, for known vulnerabilities. The syntax for both commands is the following:
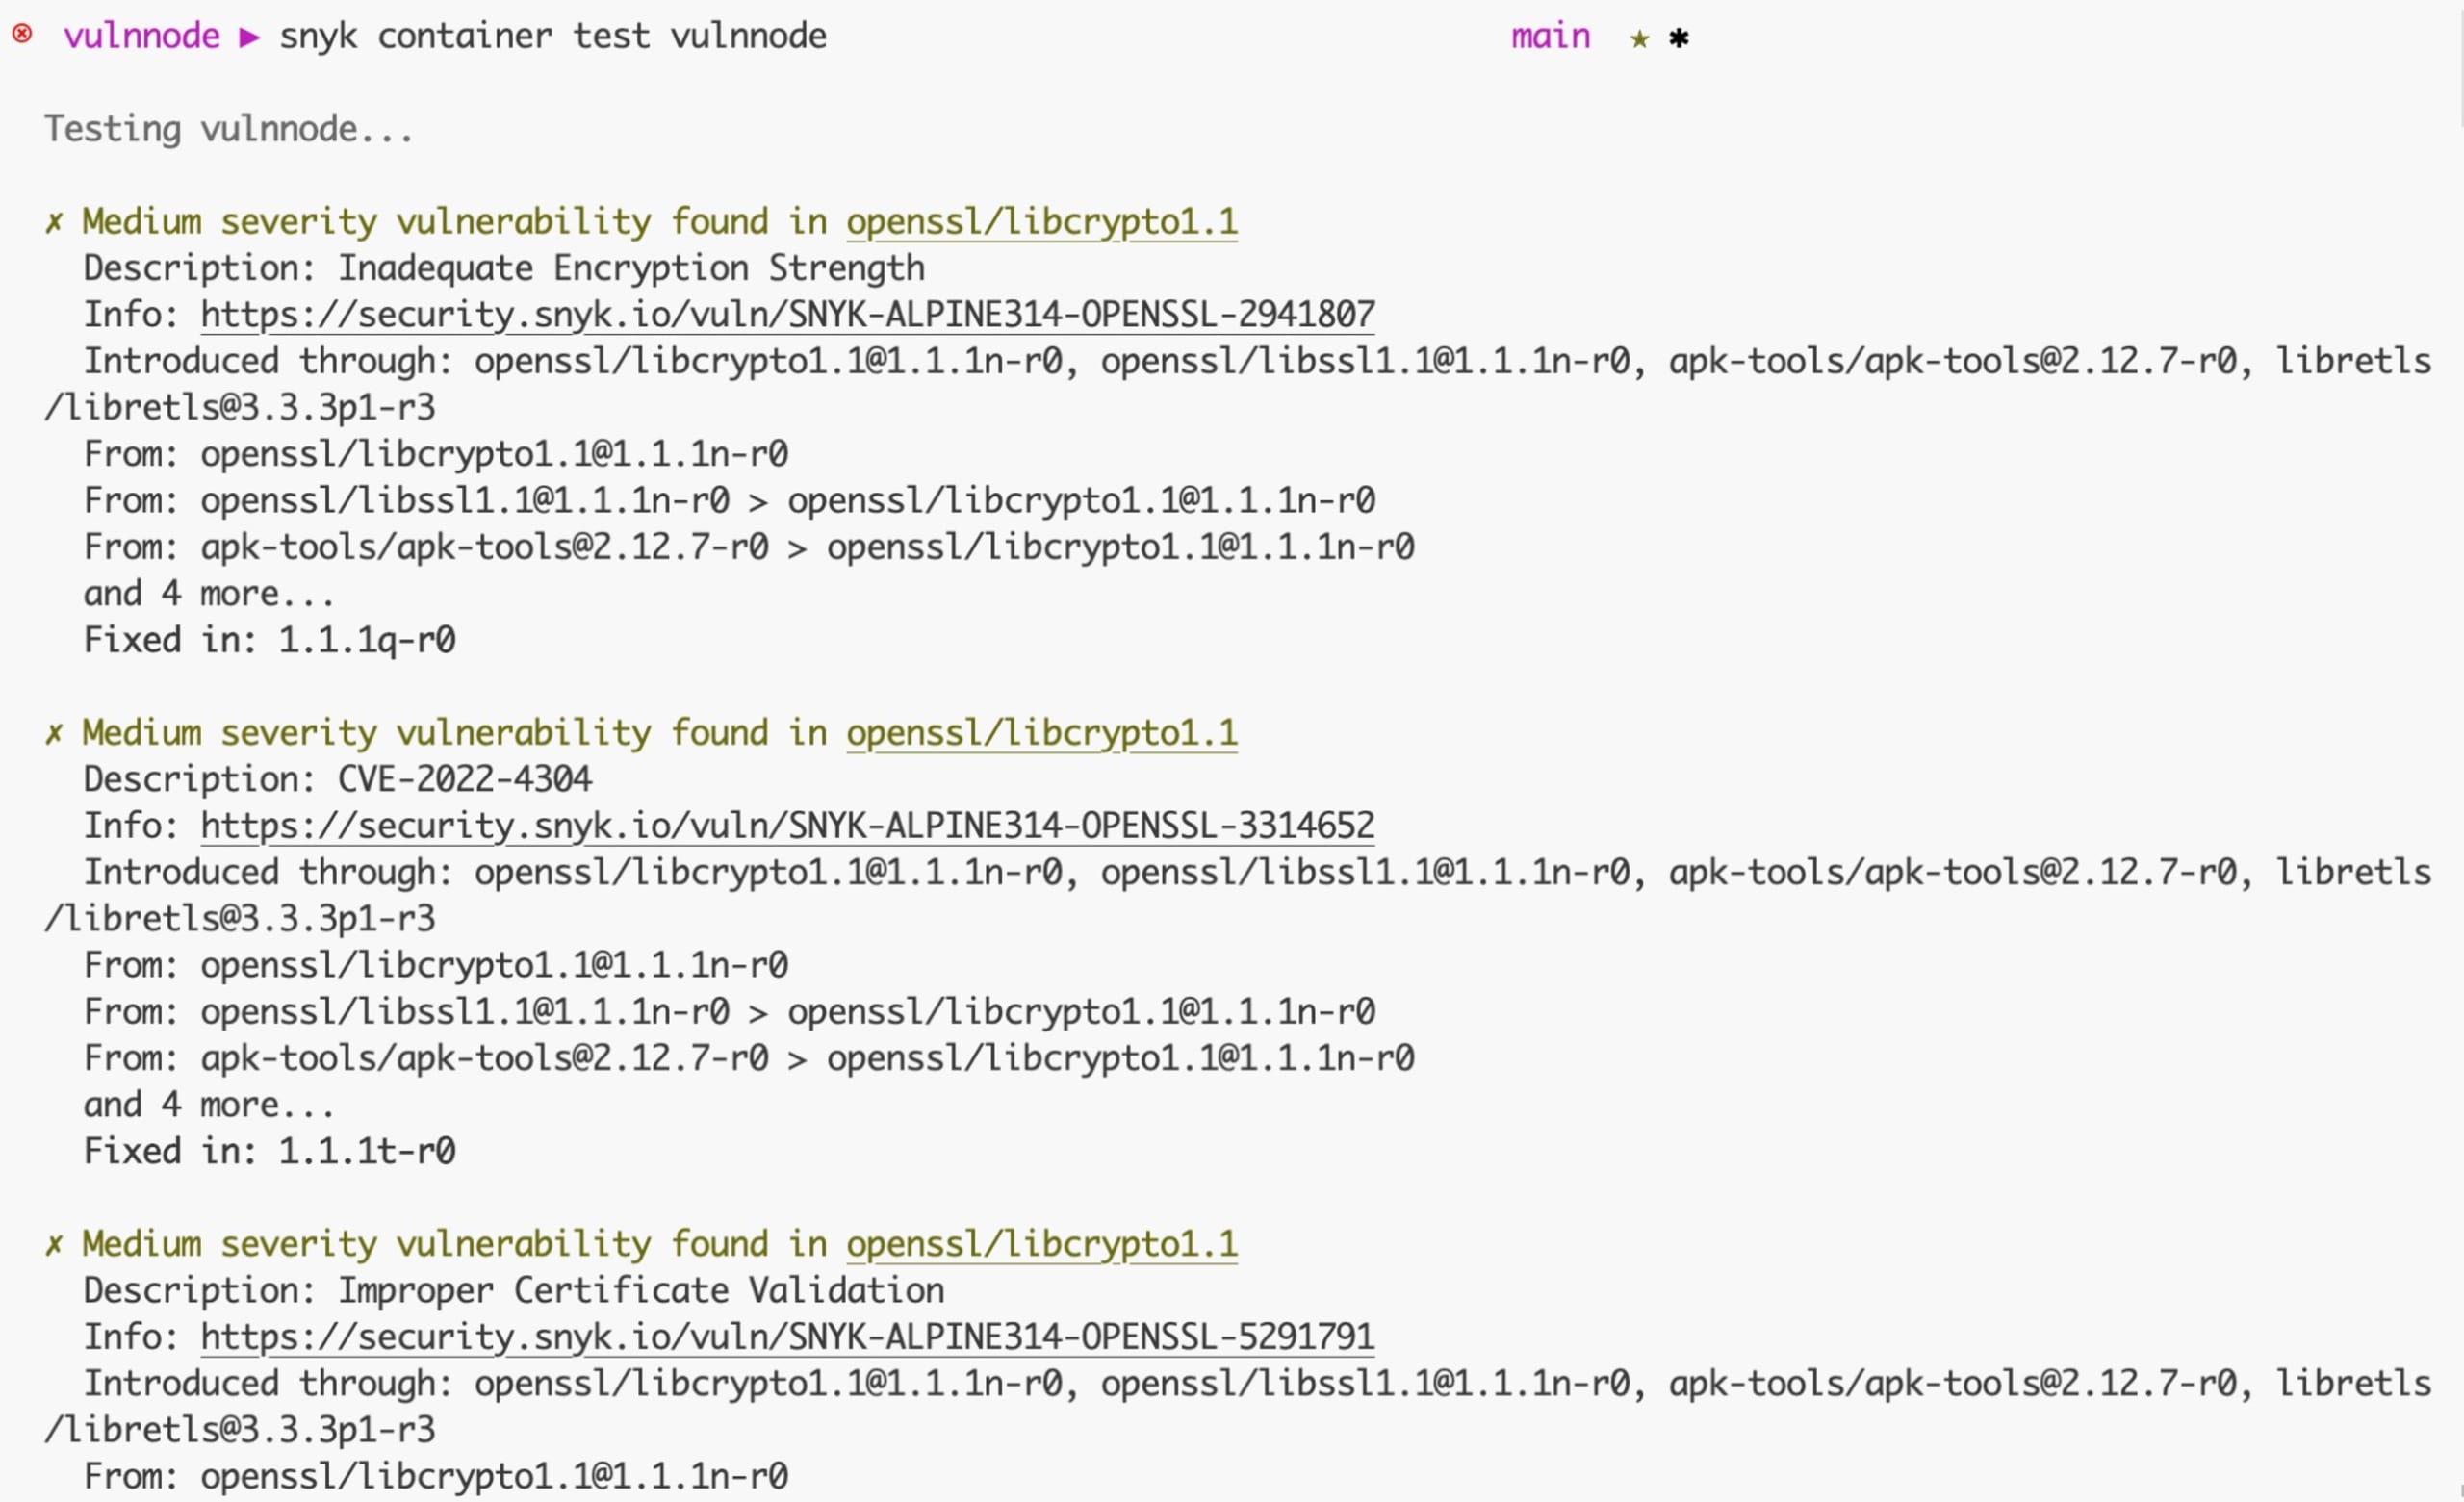
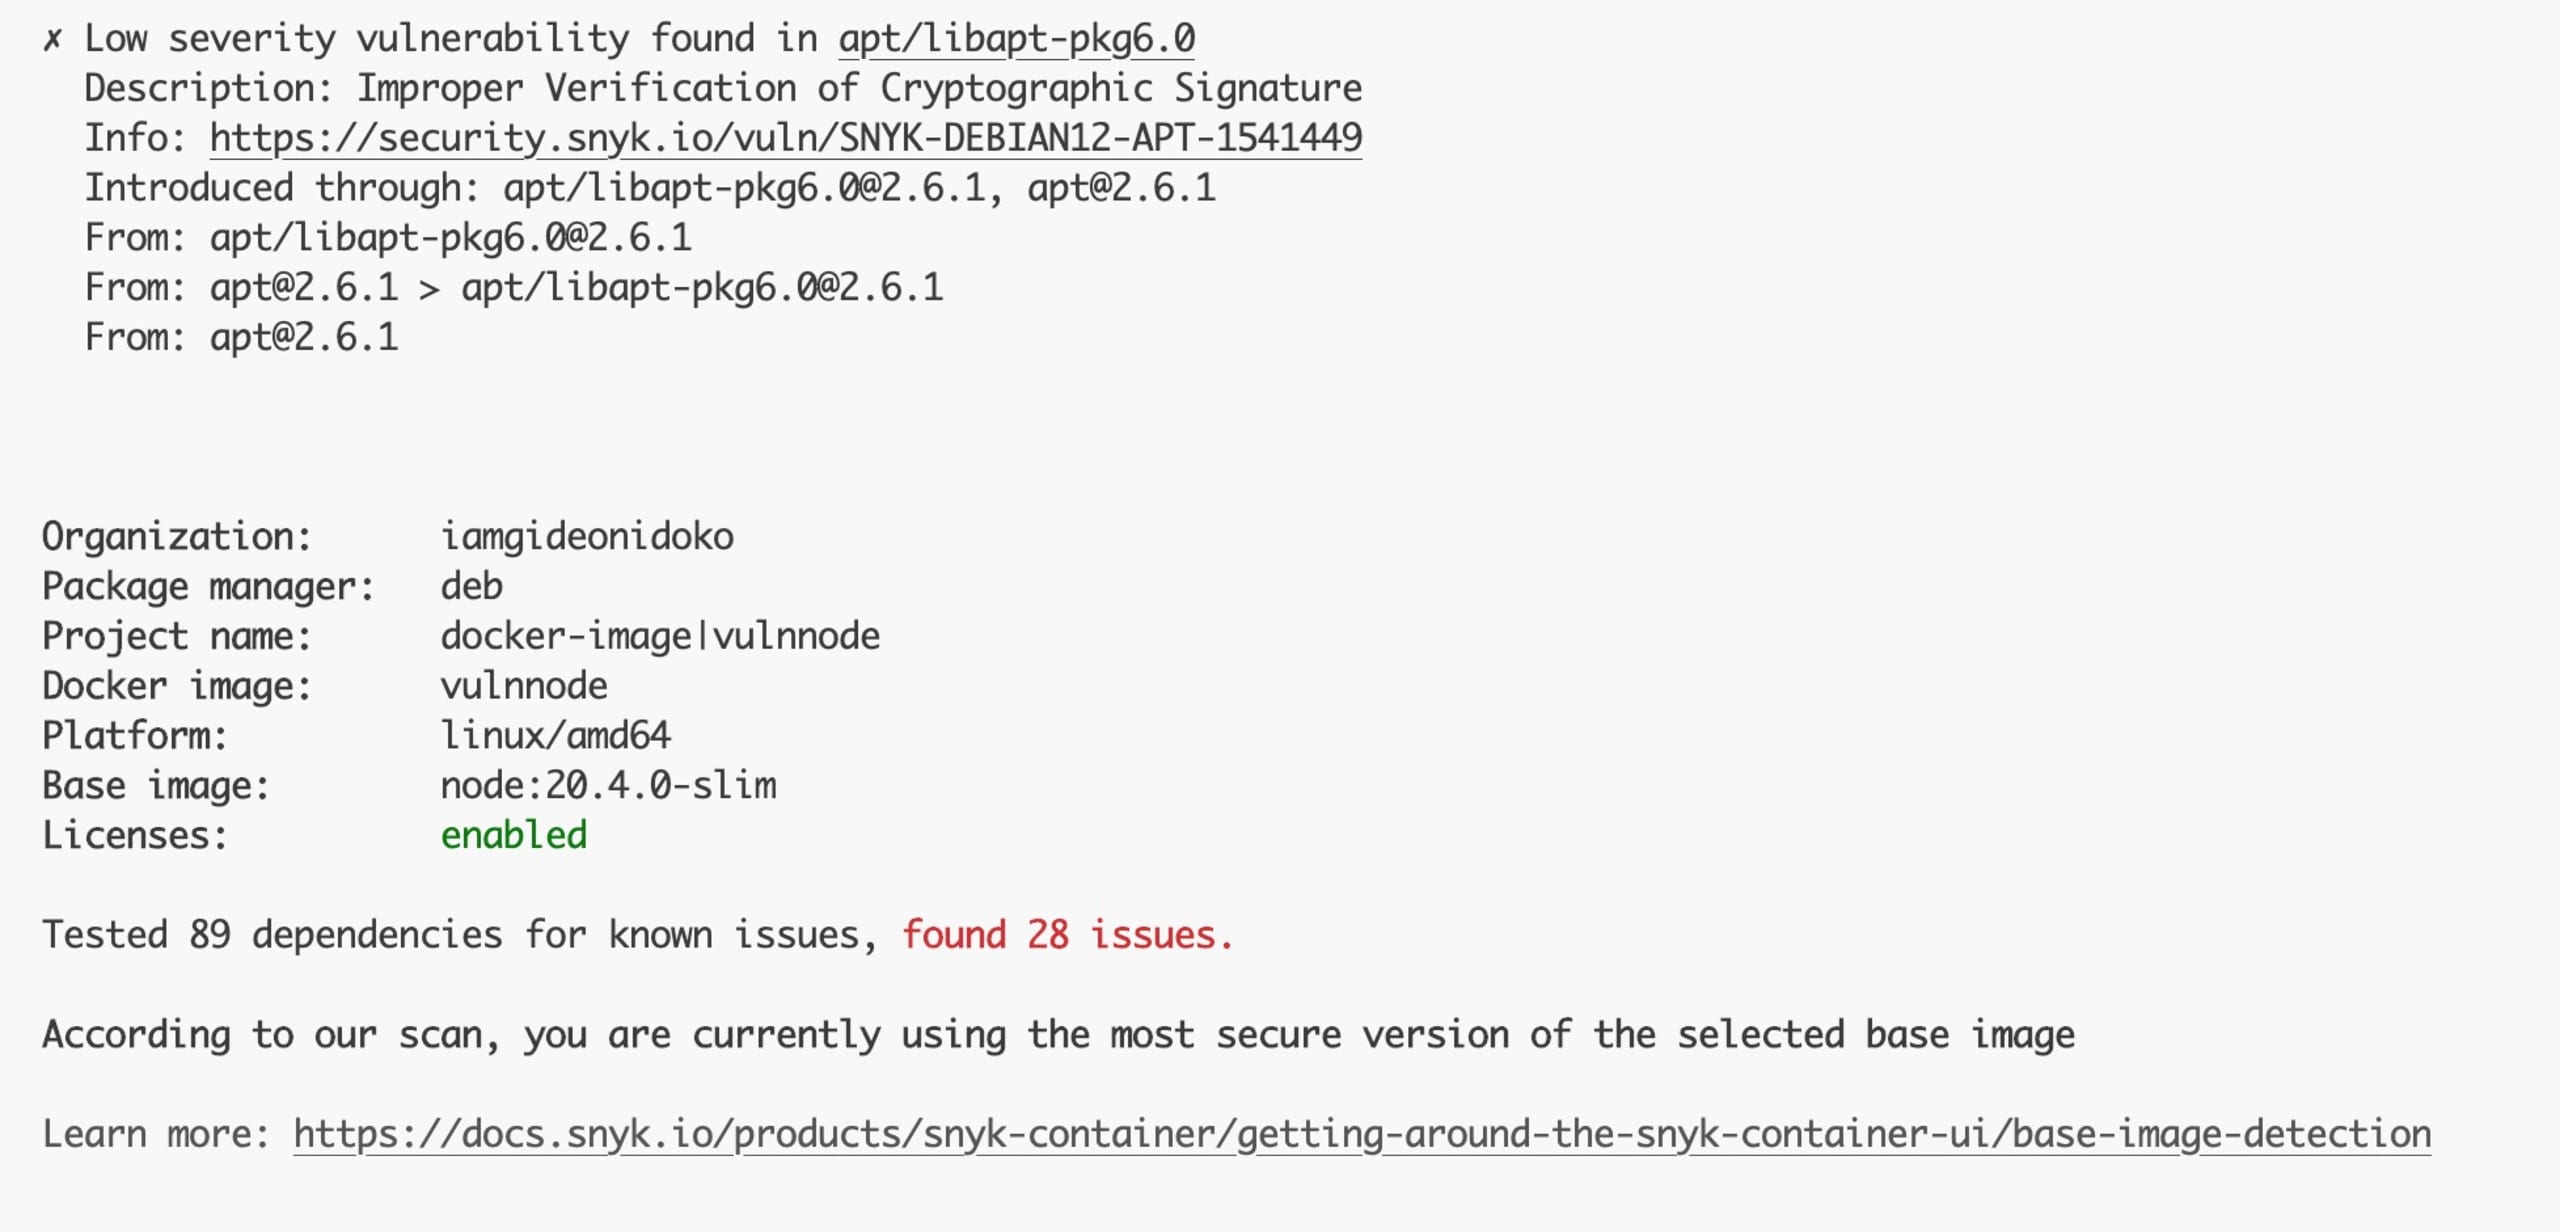
Because you built the image during set up as vulnnode, test it using the following:
You should get an output that looks like this:
You'll learn how to fix these issues a little lower in this article. Like the snyk monitor command, you can monitor and take snapshots of the vulnnode container image with the following:
snyk iac
With IaC, cloud resources, networking, and configurations aren't set up manually; rather, they are managed and provisioned through code. The snyk iac command identifies security vulnerabilities in your configuration files. As a result, you can address misconfigurations before they pose a security risk.
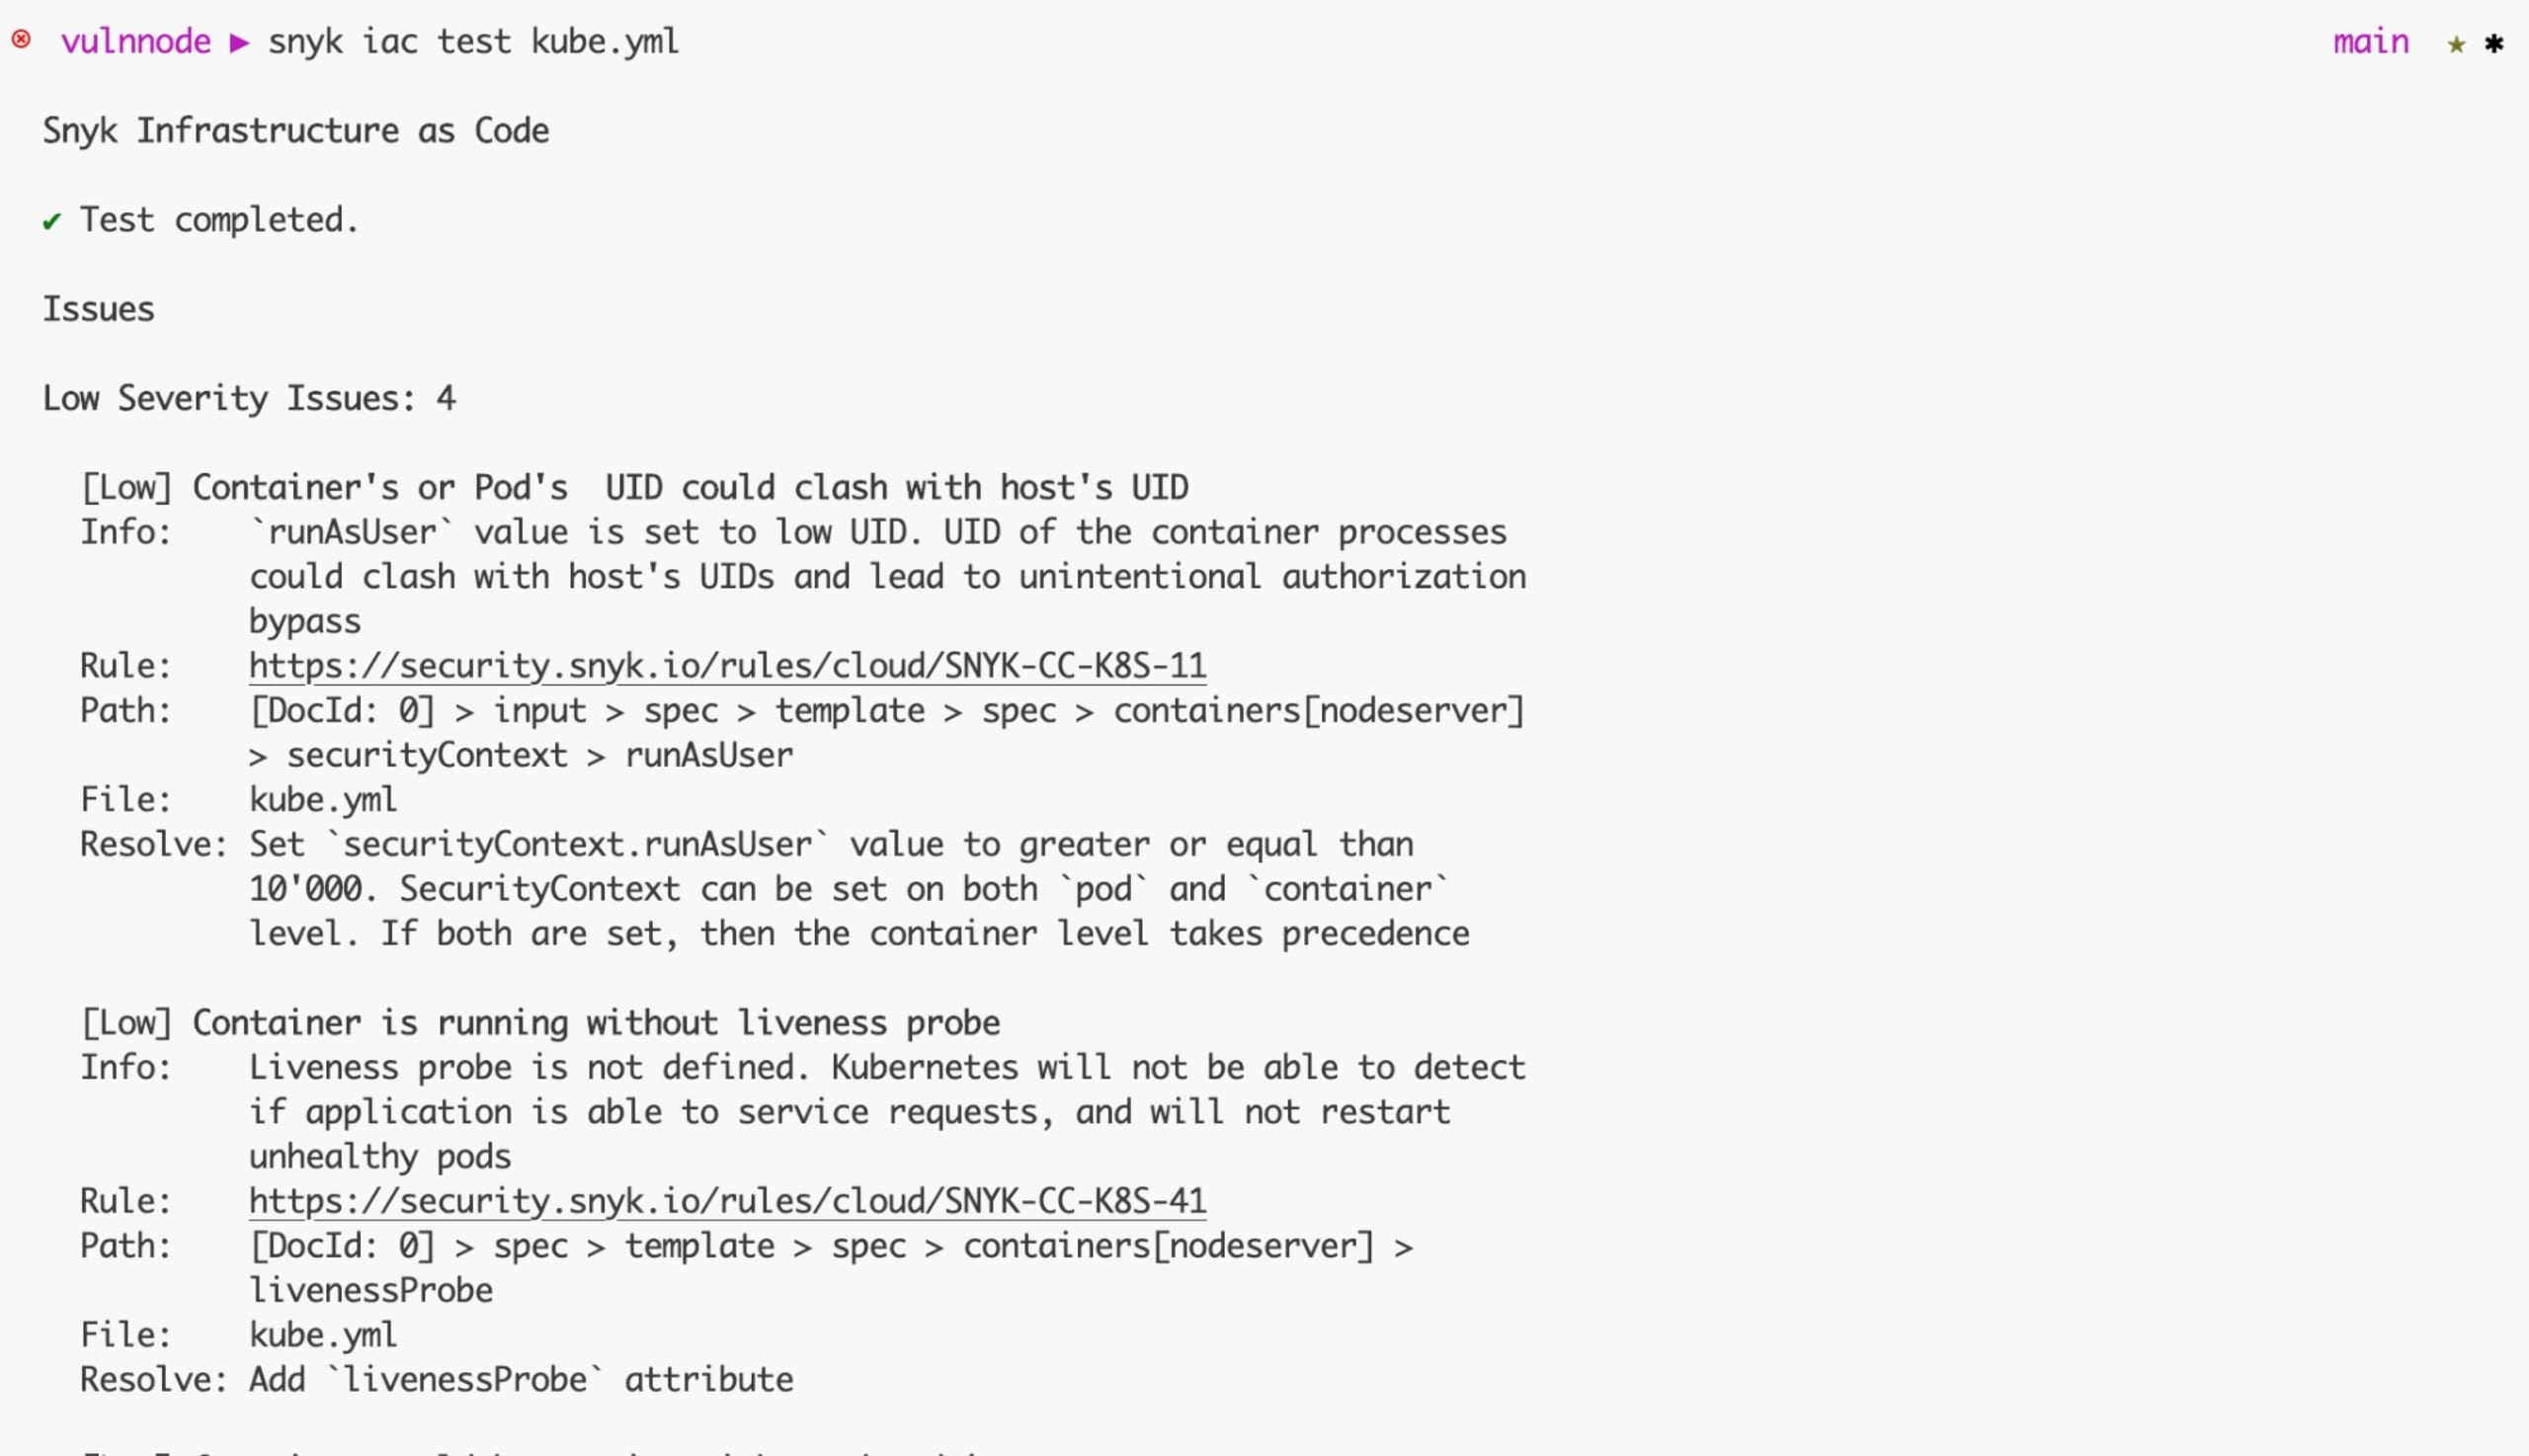
Scan the Kubernetes IaC file using the following:
You'll get an output similar to this:
Now that you've scanned the JavaScript project, look at how you can fix some of the issues you've identified.
Fixing security issues in your JavaScript project
Starting with the snyk test command, the Snyk CLI suggests that the identified issues in the output can be fixed by upgrading express from v4.17.1 to v4.18.2 and lodash from v4.17.4 to v4.17.21. Make the version update in your package.json and reinstall using npm install.
Run snyk test again after reinstalling, and you get an output like this:
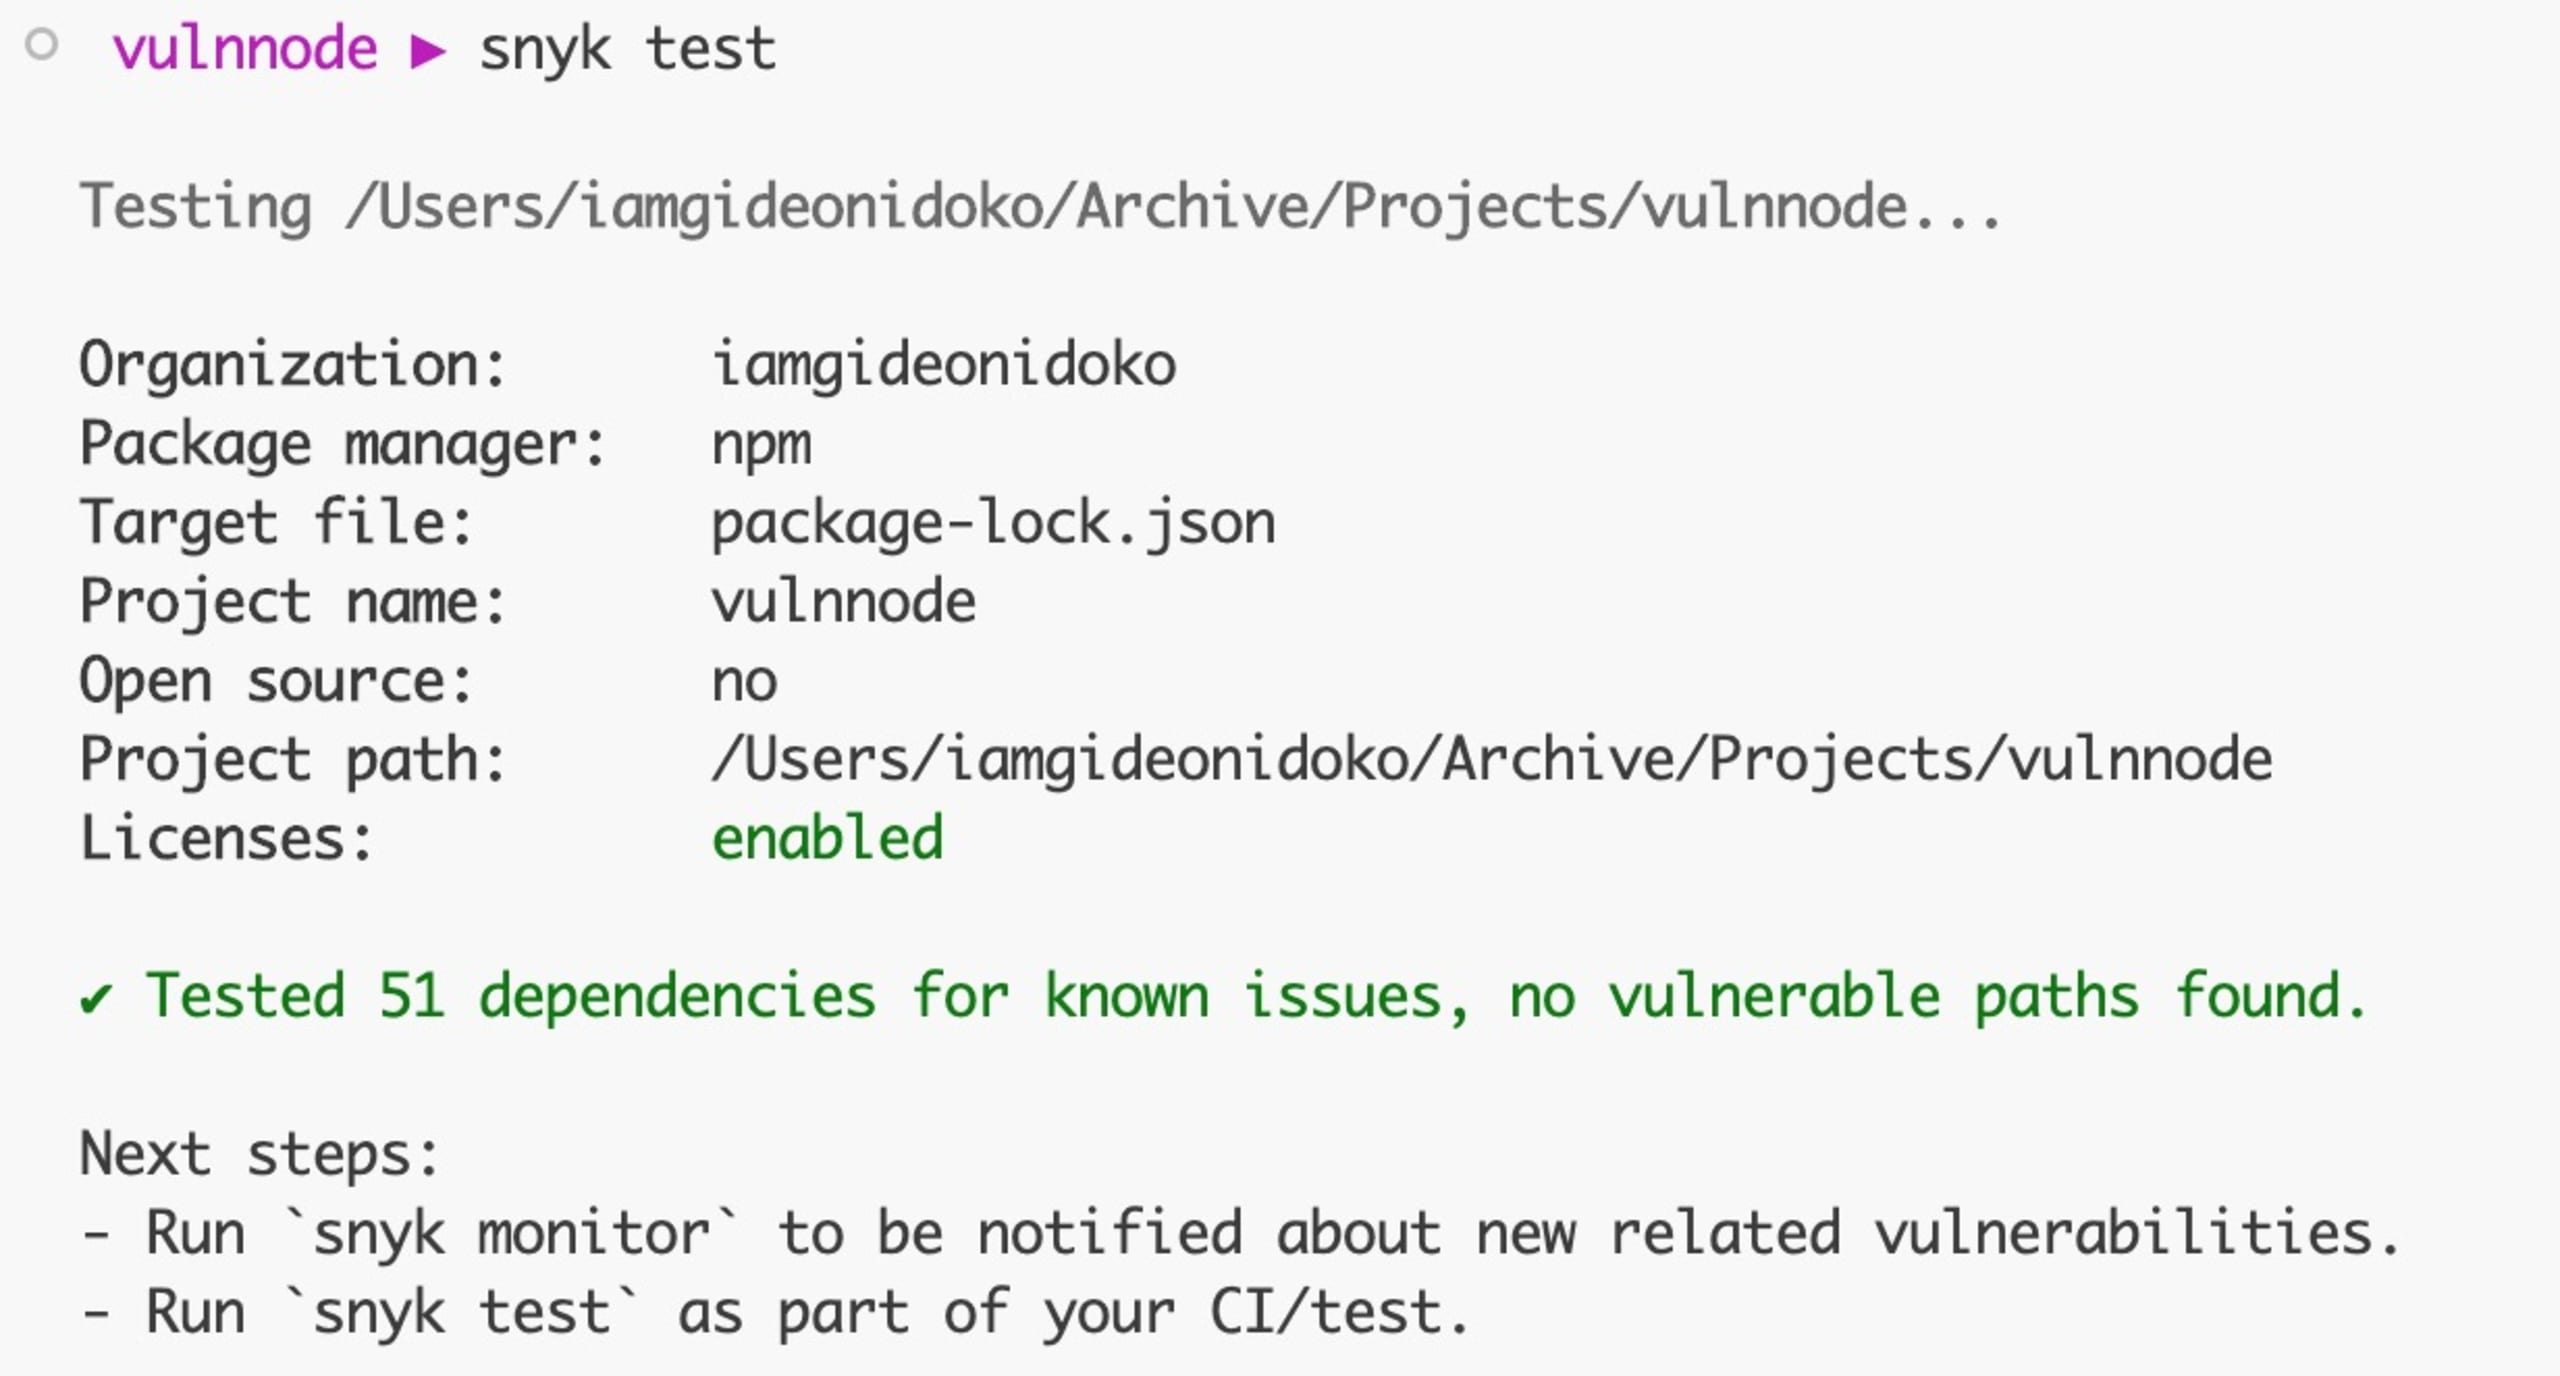
And that's all you have to do to resolve the vulnerabilities in the project. Note: If you connect your Git repository to Snyk via app.snyk.io, then Snyk will automatically create new pull requests with dependency updates that fix security issues in your package.json file manifest.
For the snyk container test command, the issues detected are a result of the app in the image and the base image used:
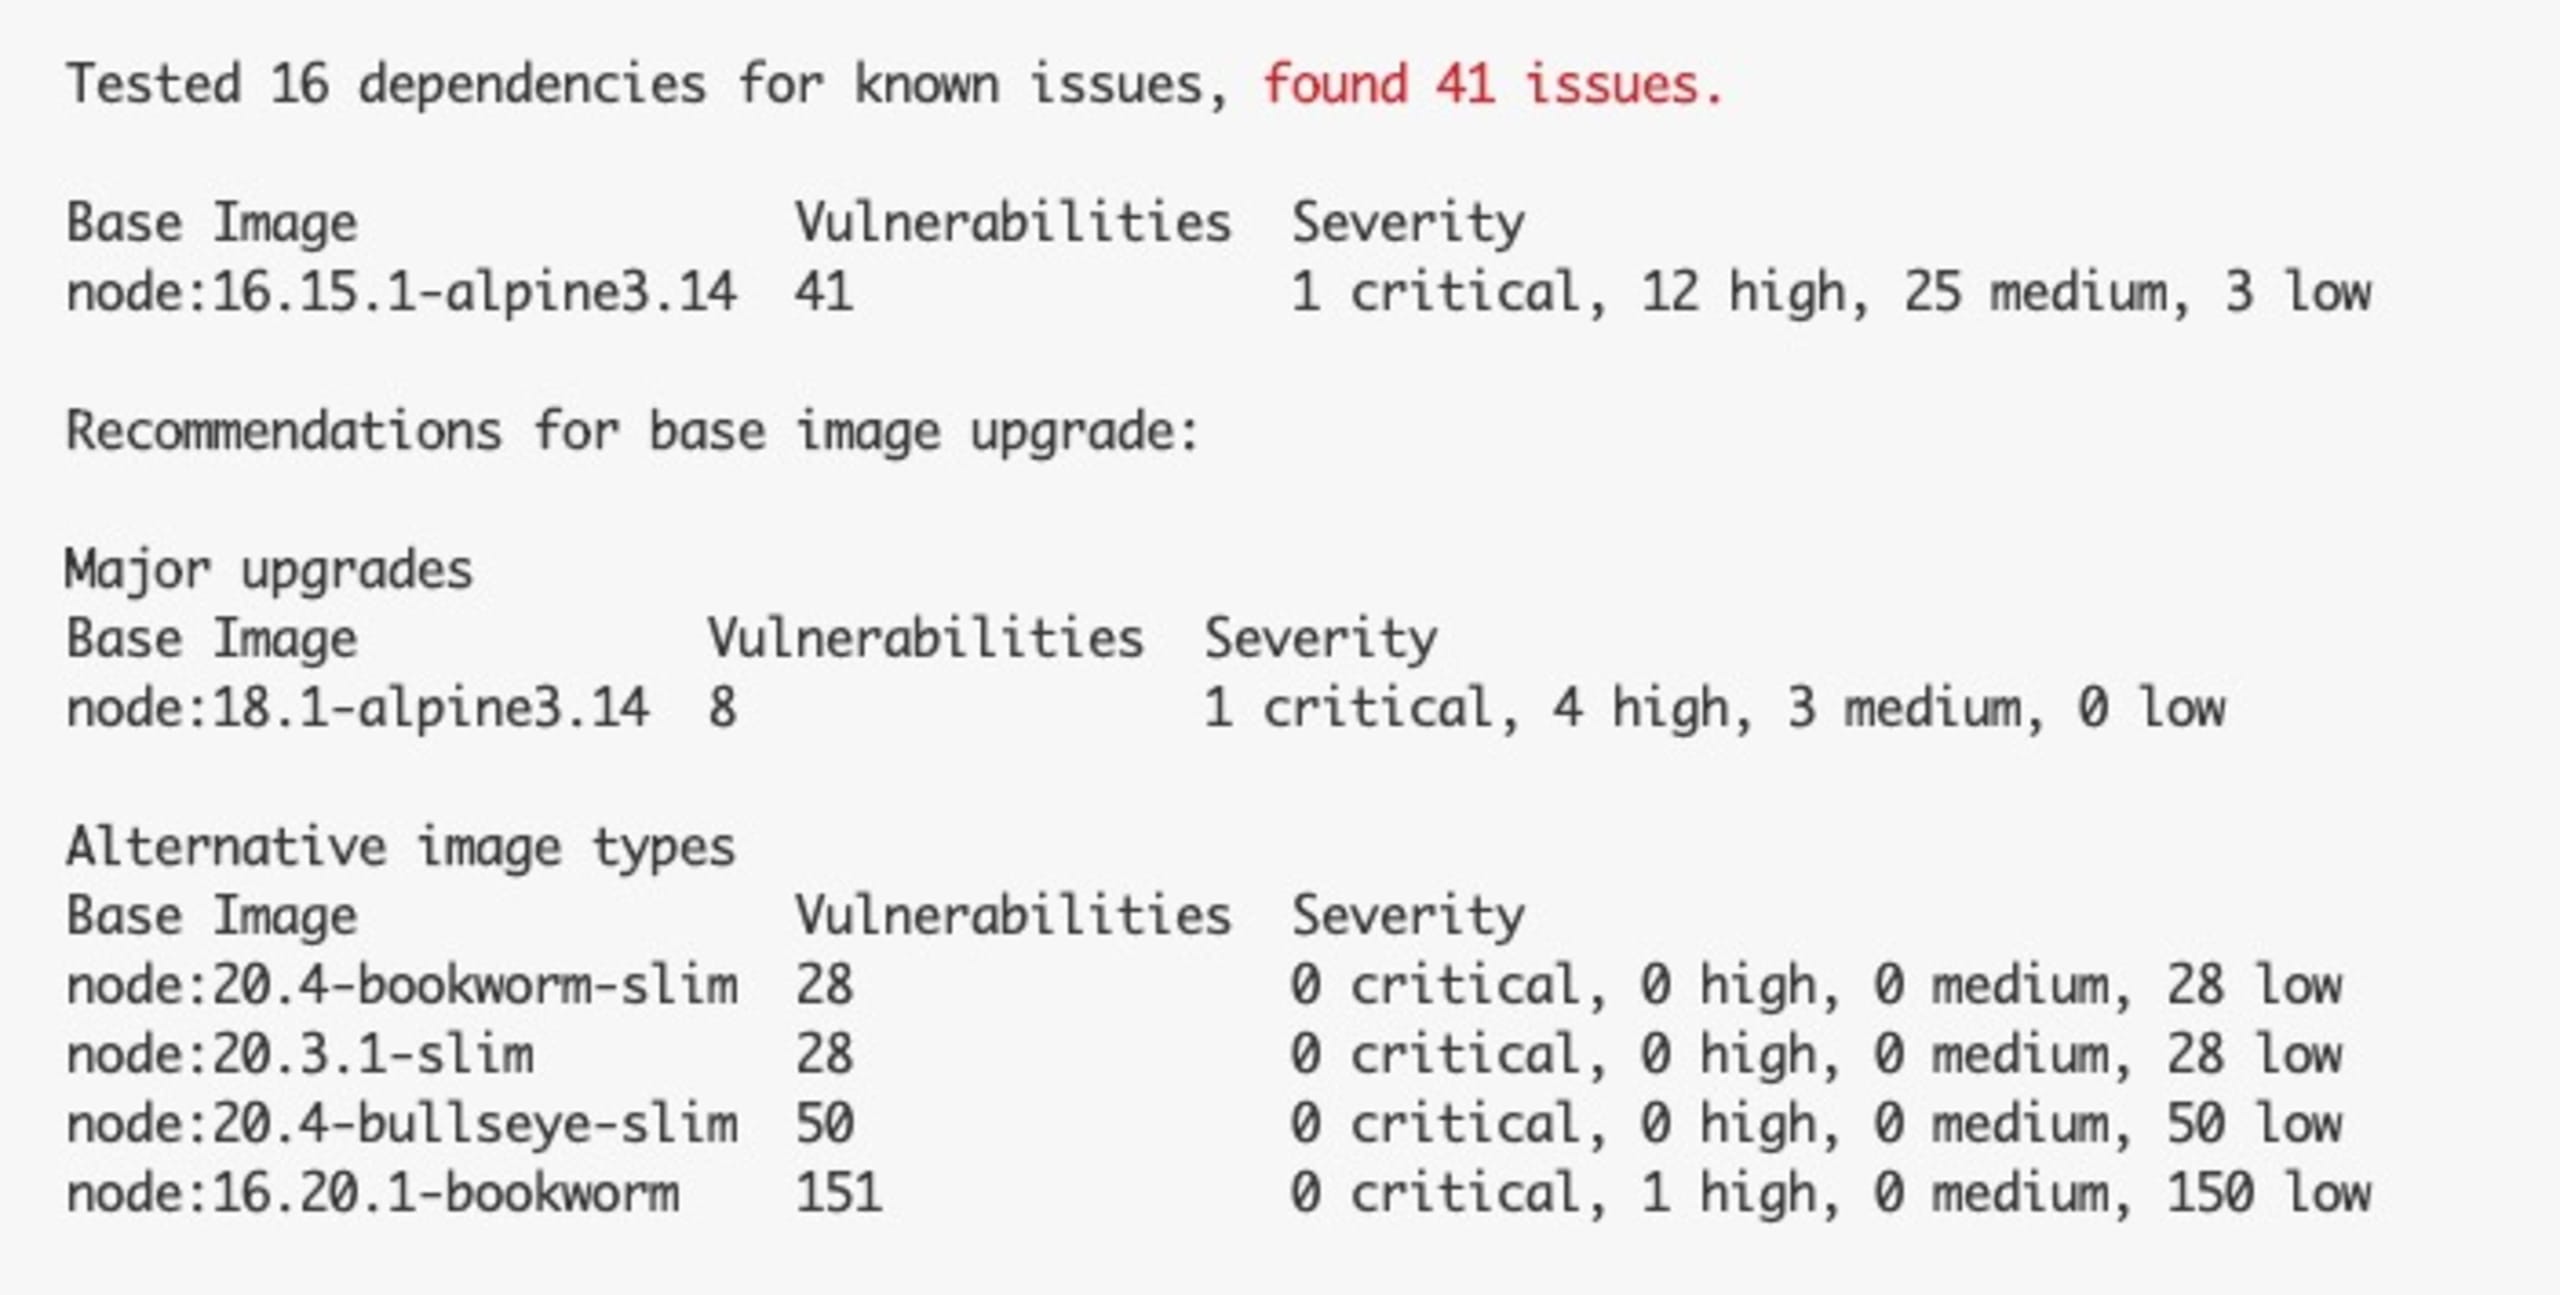
The current base image has one critical, four high, and three medium issues. It's advisable to quickly eliminate the critical and high issues as they may severely affect your app if exploited.
To fix the container issues, you can upgrade the base image in the Dockerfile to one of the suggested ones, like node:20.5-bookworm-slim:
Note: If you connect your Git repository to Snyk via app.snyk.io, then Snyk will automatically create new pull requests with Dockerfile updates that fix security issues for you to merge.
Rebuild the container image using the following:
Rerun the container test, and this time, you have an output like this:
This fix eliminates the critical and high issues, and the twenty-eight issues you currently have are all low priority, which is fine to work with.
Lastly, for the snyk iac test command, the detected issues are a result of some configurations that were not included in the kube.yml manifest file:
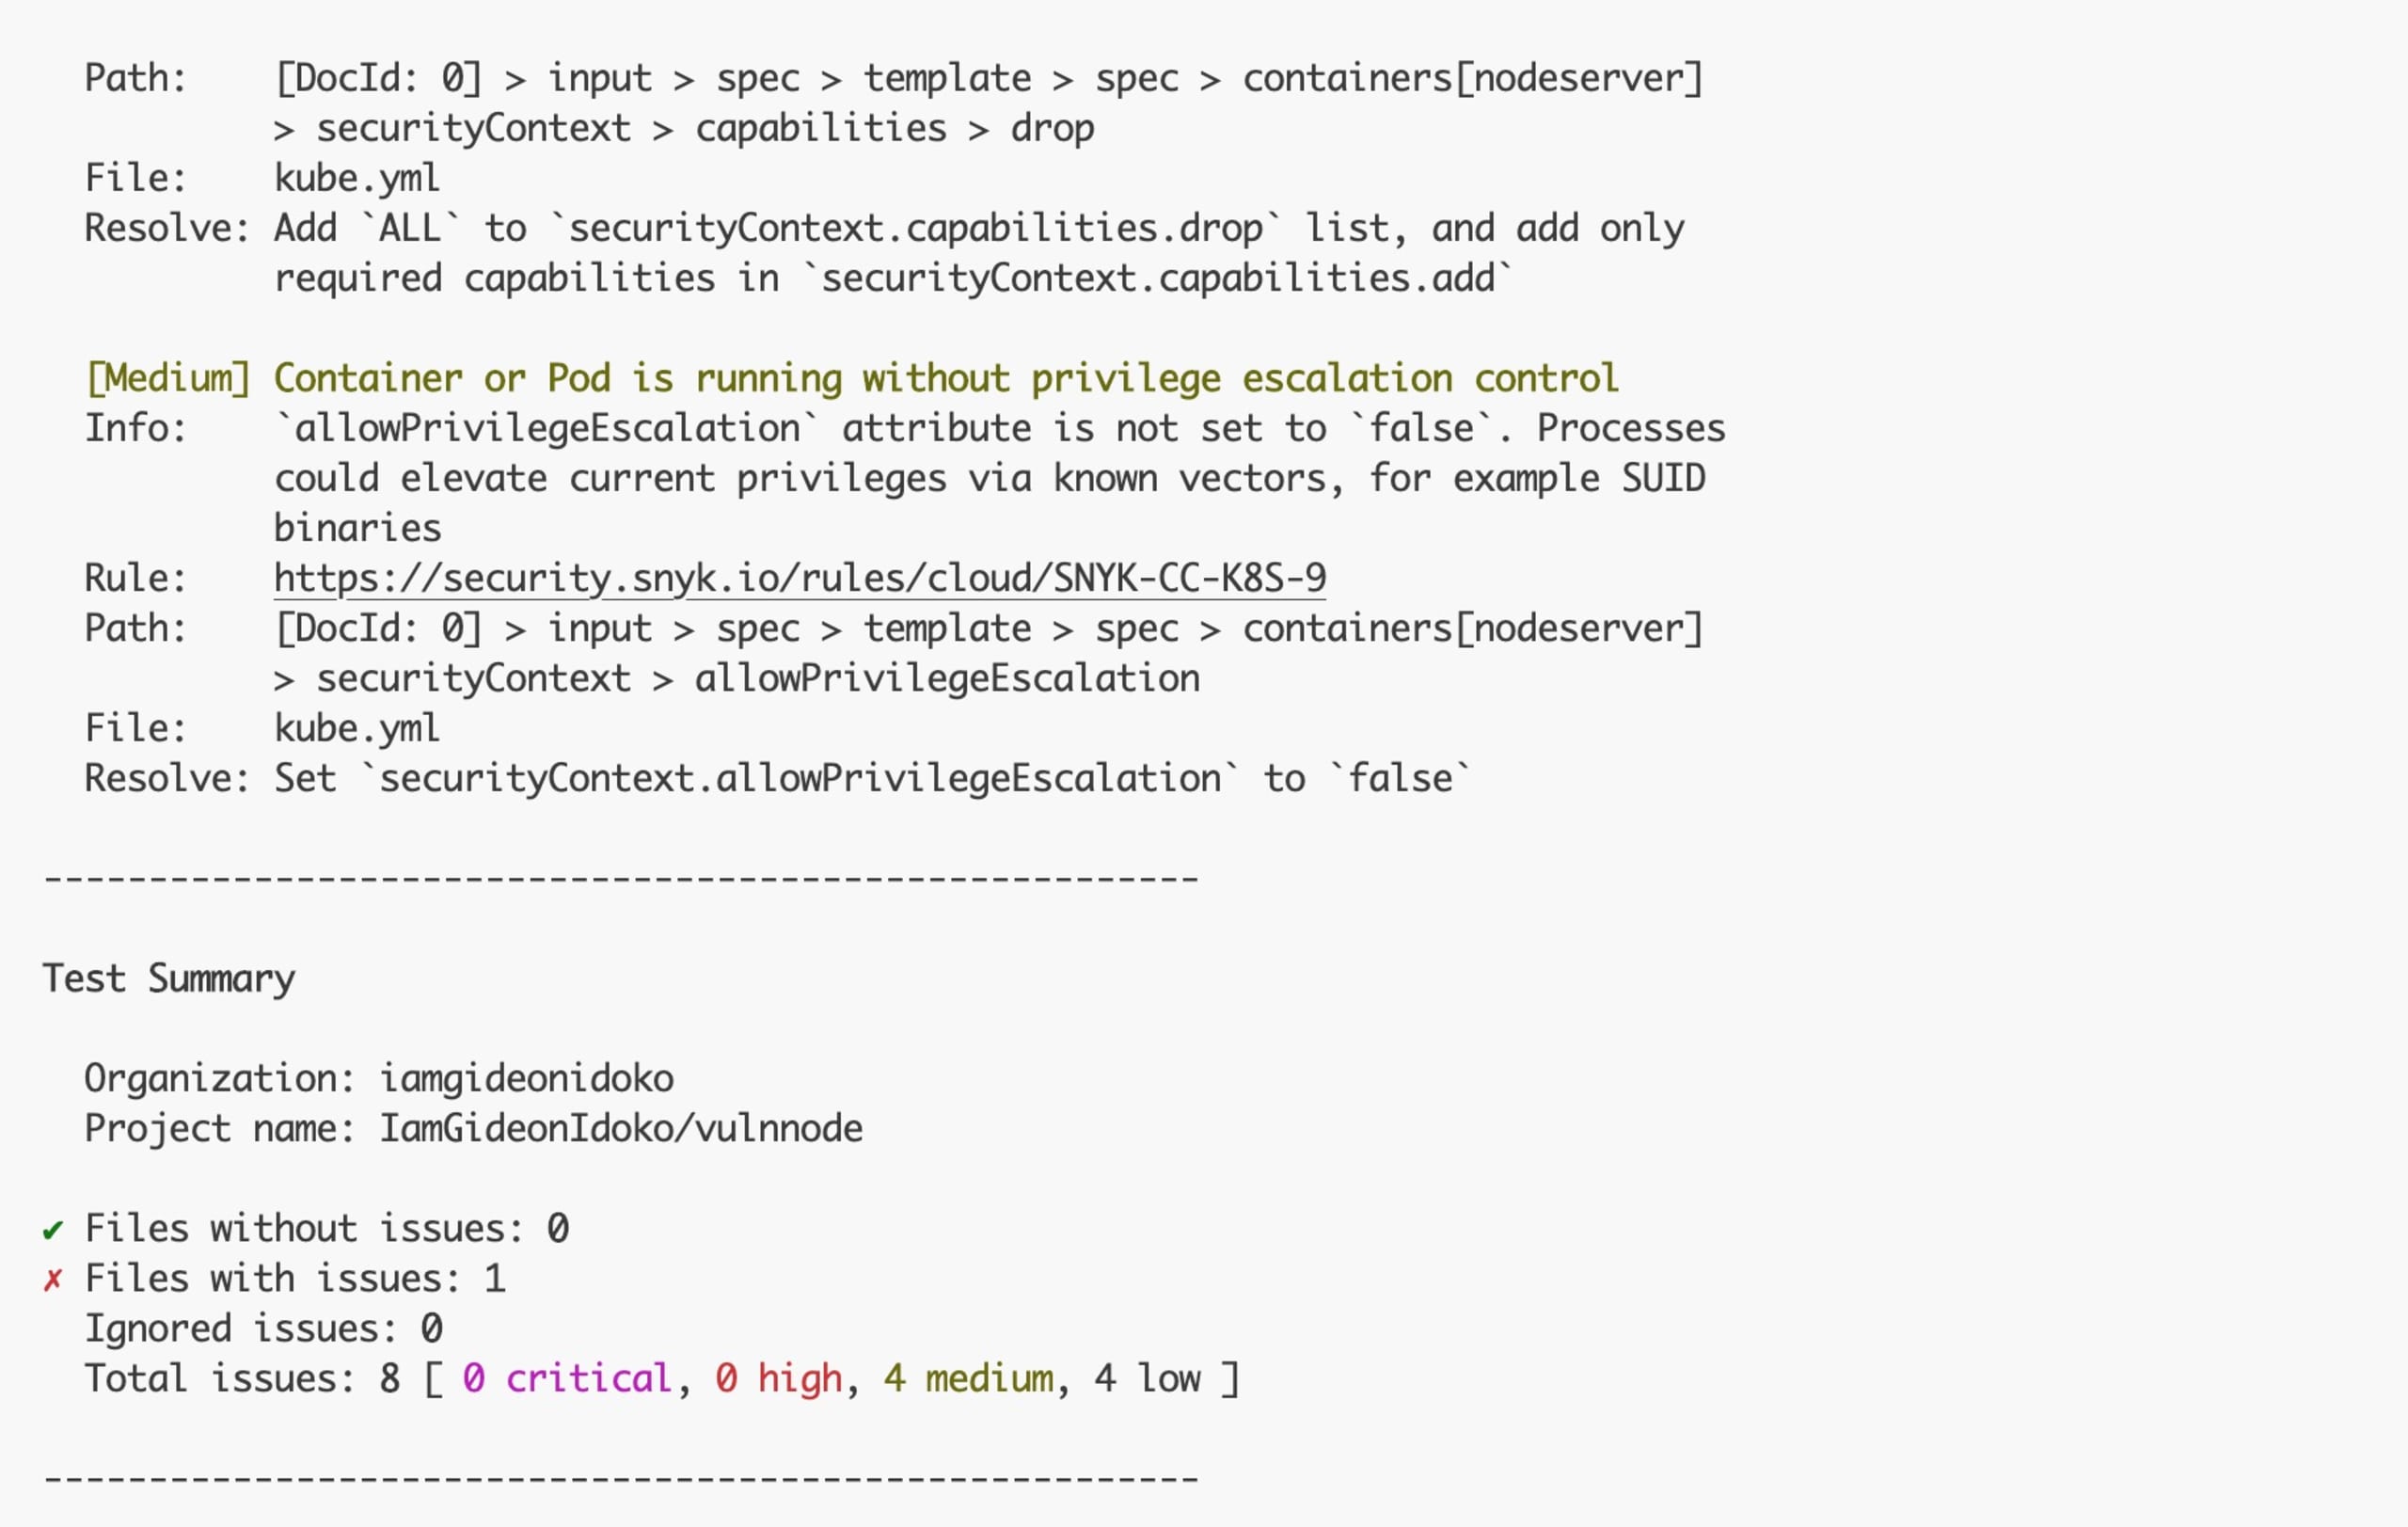
The issues here have medium priority. Attempt to fix two of them using the remediation suggested by the Snyk CLI. Open the kube.yml file and update the container:
Rerun snyk iac test kube.yml again, and you should get the following:
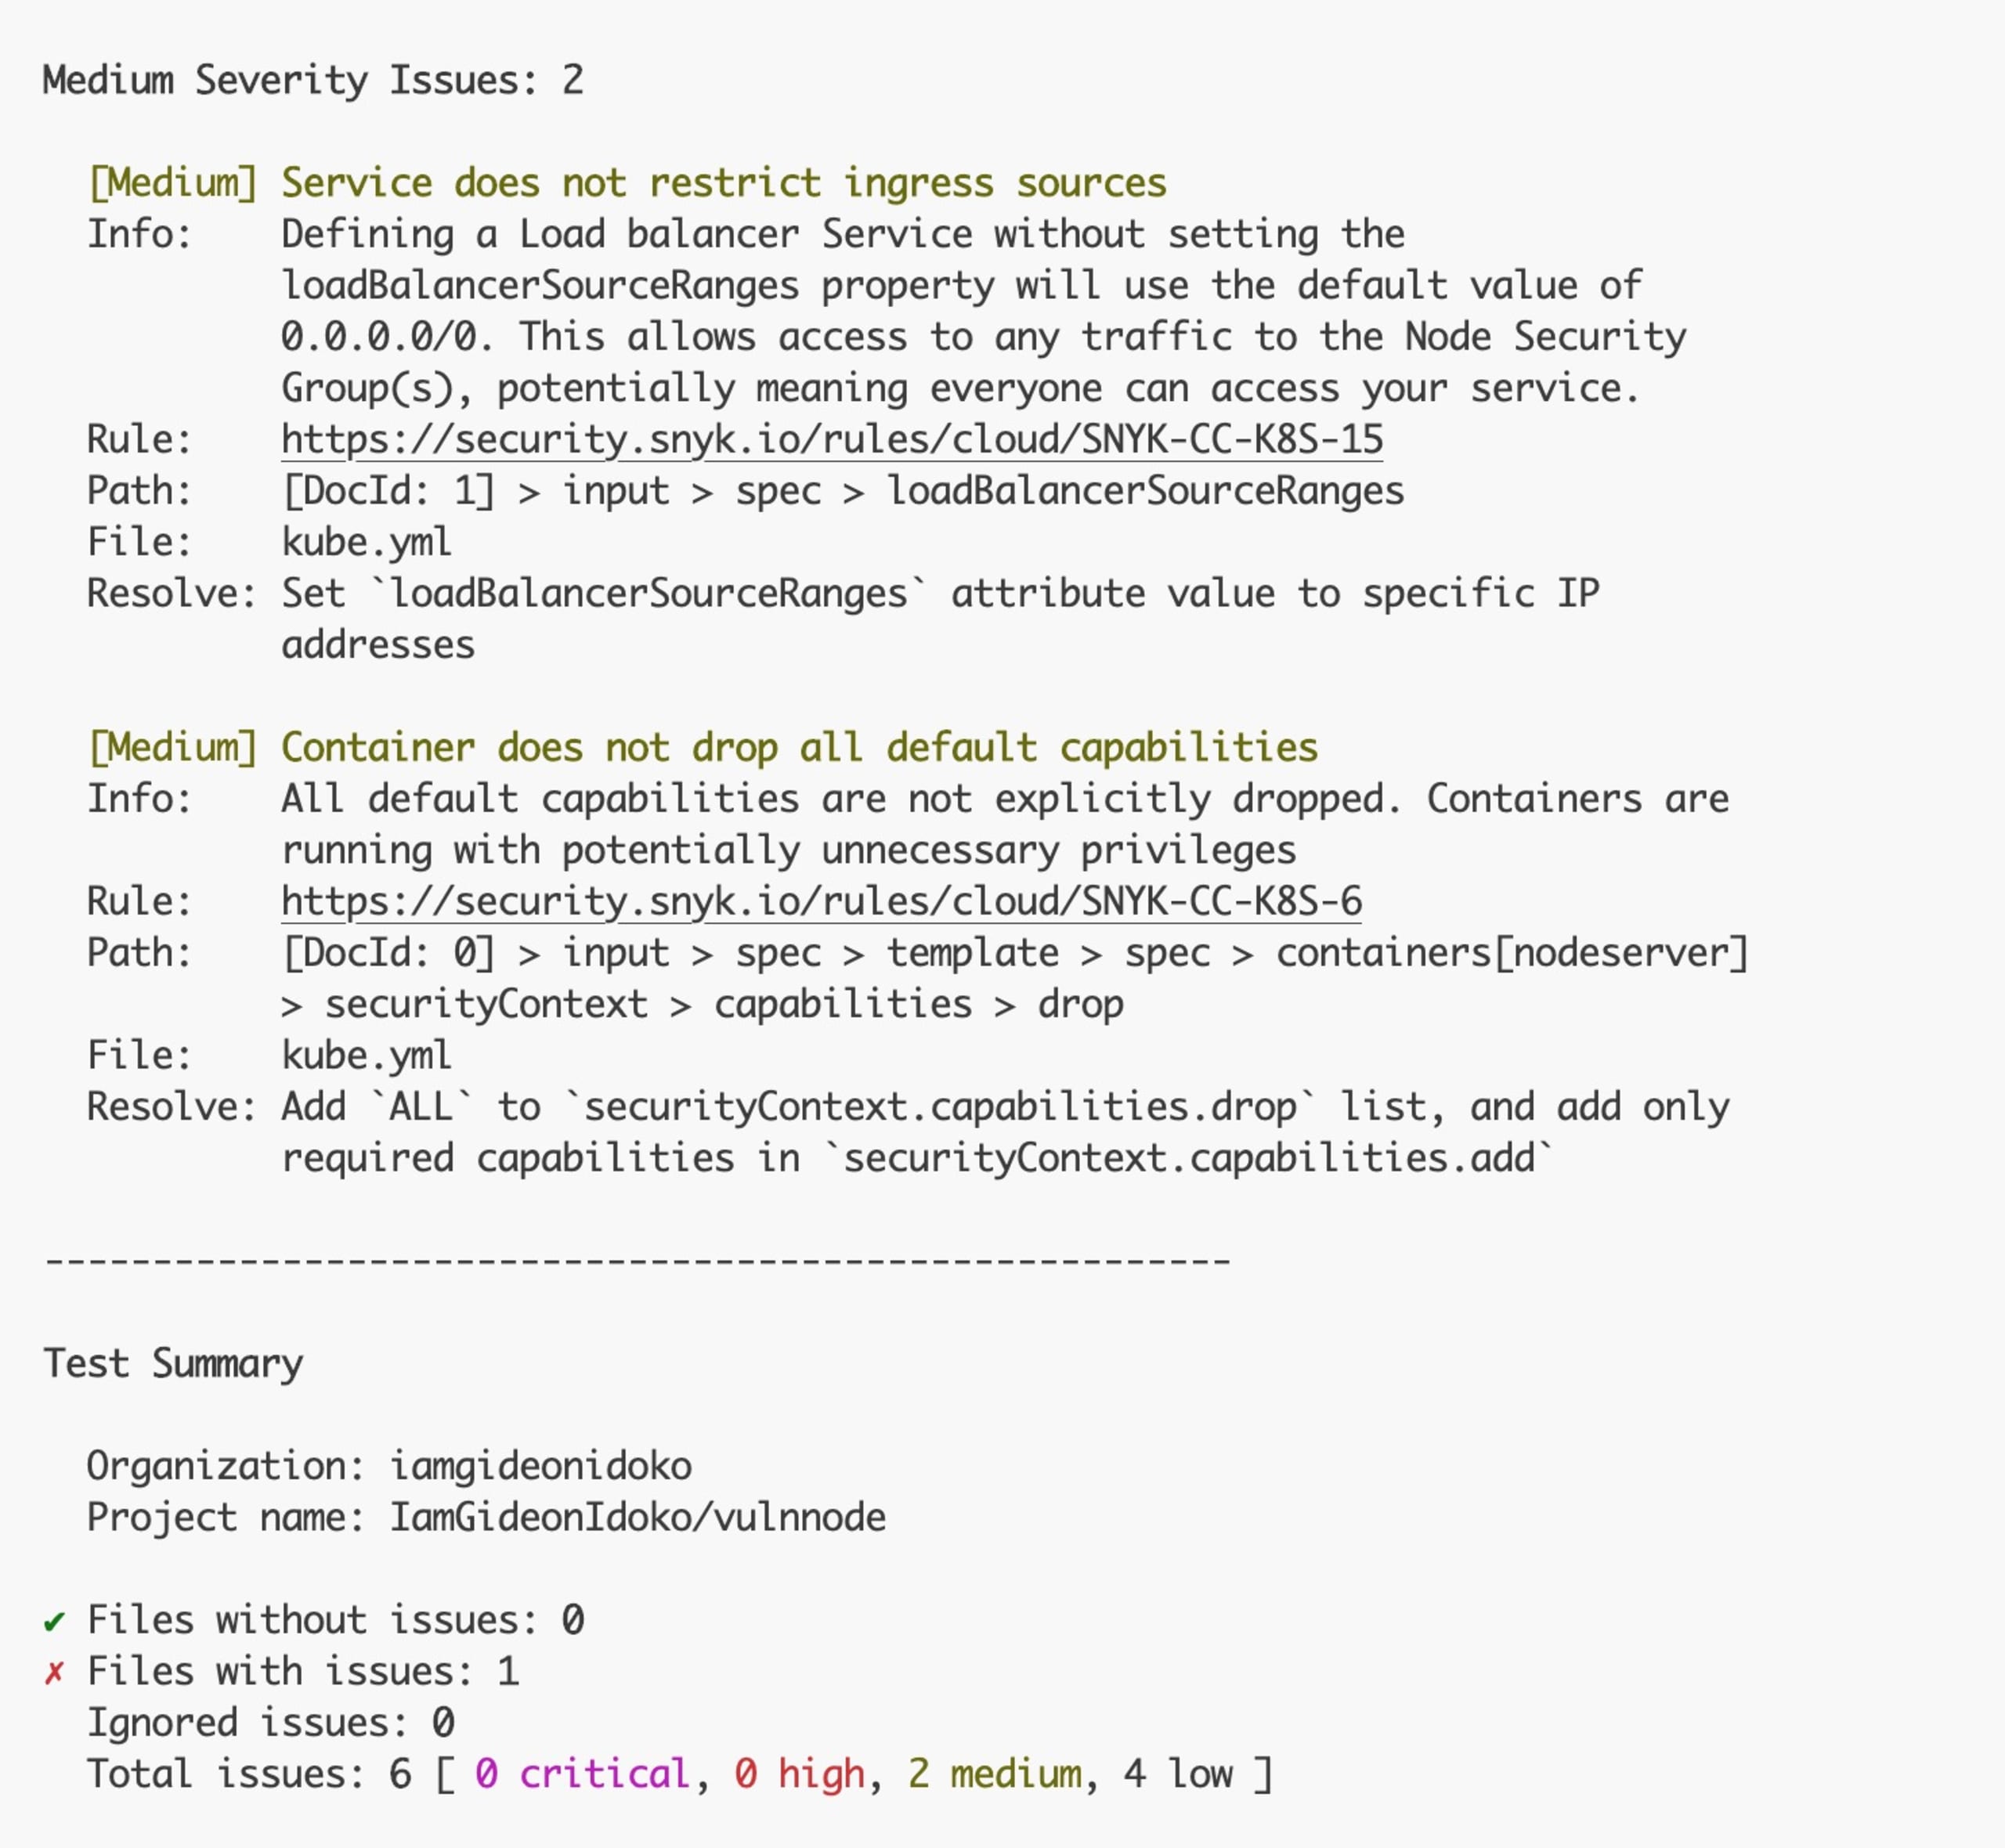
This reduced the issues to two medium ones that can be ignored.
Wrapping up
In this article, you learned about the process of securing your JavaScript apps by scanning them to identify vulnerabilities with the Snyk CLI.
Love the terminal? Now you can easily use the Snyk CLI to secure your code, applications, containers, and IaC files. The Snyk CLI is a formidable ally, enabling developers to safeguard their projects against potential threats while seamlessly integrating into their existing development workflow. Sign up for free today.
Start securing your JavaScript apps
Find and fix JavaScript vulnerabilities with Snyk for free.
No credit card required.
Or Sign up with Azure AD Docker ID Bitbucket
By using Snyk, you agree to abide by our policies, including our Terms of Service and Privacy Policy.