Kubernetes network policy best practices
Peter De Tender
December 21, 2022
0 mins readControlling and filtering traffic when containerizing a workload within Kubernetes Pods is just as crucial as a firewall in a more traditional network setup. The difference is that, in this scenario, those capabilities are provided by the Kubernetes NetworkPolicy API.
This article will explore Kubernetes NetworkPolicy by creating an example network policy and examining its core parameters. Then, we’ll look at some common NetworkPolicy use cases and learn how to monitor them using kubectl. Finally, we’ll discover how to implement Container Network Interface (CNI) using third-party Kubernetes extensions.
Why you shouldn’t shy away from Kubernetes network policies
Implementing network policies is critical to operating a Kubernetes environment. Without a configured network policy, all Pods within a cluster can communicate with each other by default. So, when our Pod contains sensitive data, such as a backend database holding confidential information, we must ensure that only certain frontend Pods can connect to it.
Alternatively, we can isolate network traffic across Pods in a development environment from those running in a production environment. Without network policies, all traffic moves freely to and from all points in the network.
Fortunately, configuring Kubernetes NetworkPolicy is a simple, effective, and holistic means for ensuring our network traffic flows only as intended.
Defining Kubernetes network policies
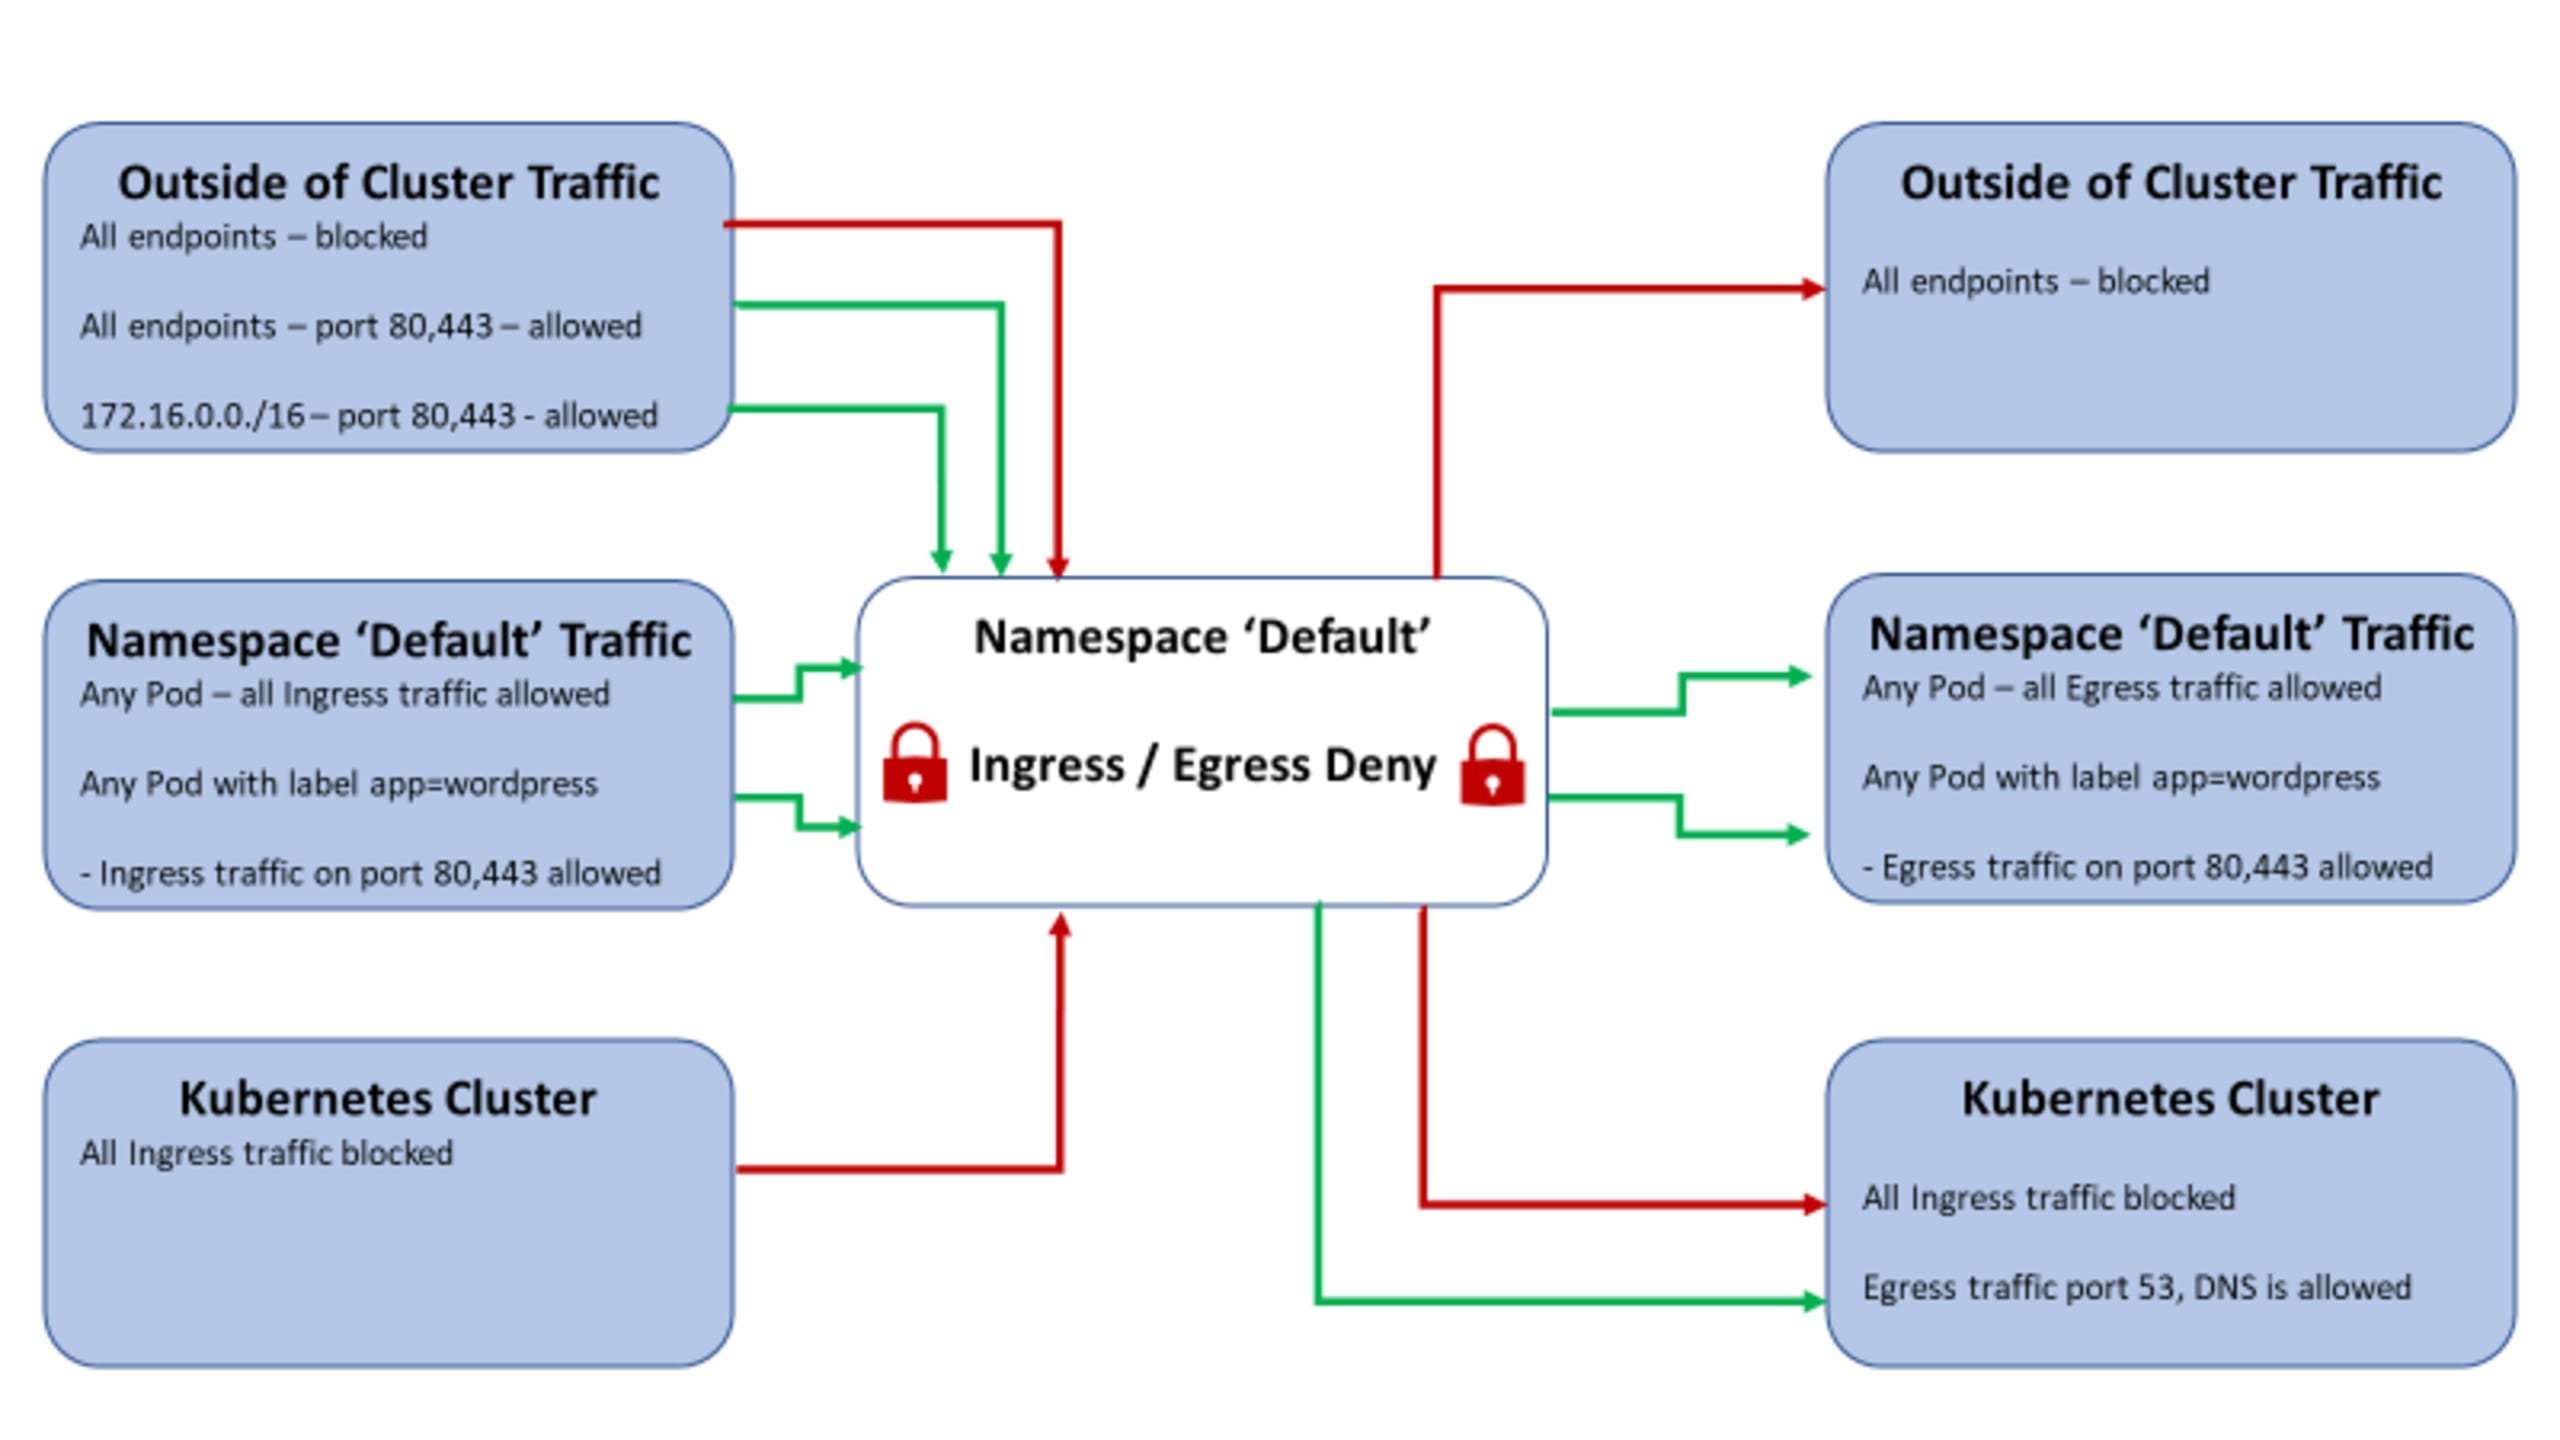
Let’s take a look at a sample NetworkPolicy. Consider a sample workload with a WordPress front end and MySQL database back end, running a collection of Pods containing both web and database services, all deployed within the Kubernetes default namespace. The company’s security protocols mandate that we isolate network traffic for specific workloads and allow the minimum necessary incoming and outgoing traffic to use these workloads.
This strategy involves the following conditions:
Blocking the default Kubernetes behavior that allows all traffic.
Ensuring that only Pods labeled
wordpressin thedefaultnamespace can communicate with one another.Allowing incoming (
ingress) connectivity from public internet on ports80/443and the172.16.0.0IP range.Only allowing the Pods labeled
wordpressto connect to the MySQL database Pods on port3306.Always allowing connectivity to the Kubernetes DNS service (port
53).Blocking all outgoing connectivity outside of the cluster.
The network diagram below illustrates how these rules might look.
For this example, we can either distribute the network policies across the policy definition files or combine all policies into a single YAML manifest file. Since our example uses one workload (webapp), using one rulebase definition file makes sense. However, since this example holds several ingress and egress connections, we could alternatively create individual configuration files for each connection within the cluster.
Let’s walk through several of the parameters used above to understand how they relate to the configuration and affect network traffic behavior.
API and metadata
In the first line of the YAML file below, we specify the networking API (networking.k8s.io) and its version (v1). We also define the kind of YAML file as NetworkPolicy, informing the Kubernetes API controller that we’re configuring network policies. The name and namespace items in the metadata section contain the name we give this ruleset and the namespace to which it’s linked.
The next portion of the YAML file contains the specifications (specs) section, where we can stipulate filters to which the network policy will apply.
The below segment features several vital parameters:
podSelector— Specifies which Pods are subject to the prescribed traffic policies. Our example uses the matchLabels parameter to ensure that the network policy applies to all Pods labeled app:wordpress. As a secondary result, the parameter excludes all other Pods from this network policy.policyTypes— Contains two categories:IngressandEgressIngress— Defines all incoming Pod/namespace/Pod collection trafficEgress— Defines all outgoing Pod/namespace/Pod collection traffic
Next, the ingress section of the network policy defines the types of permitted incoming traffic. The below section allows ingress on ports 443 and 80 from:
All Pods labeled
wordpressAll public internet traffic (
cidr: 0.0.0.0/0)All IP addresses within the range
172.16.0.0/16, which might represent a corporate IP range (a VPN, VLAN, or subnet).
The YAML snippet that enables the above traffic would look like this:
Finally, we detail the egress section with the outgoing traffic rules. We allow all outgoing traffic communication from Pods labeled webapp on ports 1433 (SQL) and 53 (DNS).
Specifying the webapp label ensures no other Pod can communicate with the SQL Server instances, eliminating all associated security risks. Similarly, the configuration allows port 53 to connect to all Pods in the cluster.
There is one more critical takeaway from this policy definition. Once we integrate network policy to control Pod connectivity, we need to configure the allow/deny settings in both directions. Allowing egress traffic from the front end without allowing ingress traffic to the back end will prevent communication.
The YAML snippet for this part of the traffic looks like the below example:
Applying Kubernetes network policies
We’ve now finished our sample YAML Network Policy manifest, which looks like this:
Now, we have to inject our file into the Kubernetes cluster. To do so, first, save this file as sample-network-policy.yaml.
Now, we apply the definition file similarly to most other Kubernetes configurations: using the kubectl command line interface (CLI).
Run the following command:

Validating and monitoring Kubernetes network policies
Similar to traditional firewall management, validating and monitoring Kubernetes network policies requires operational oversight. Occasionally, we must reevaluate existing network rules to decide whether they still apply to the associated workload.
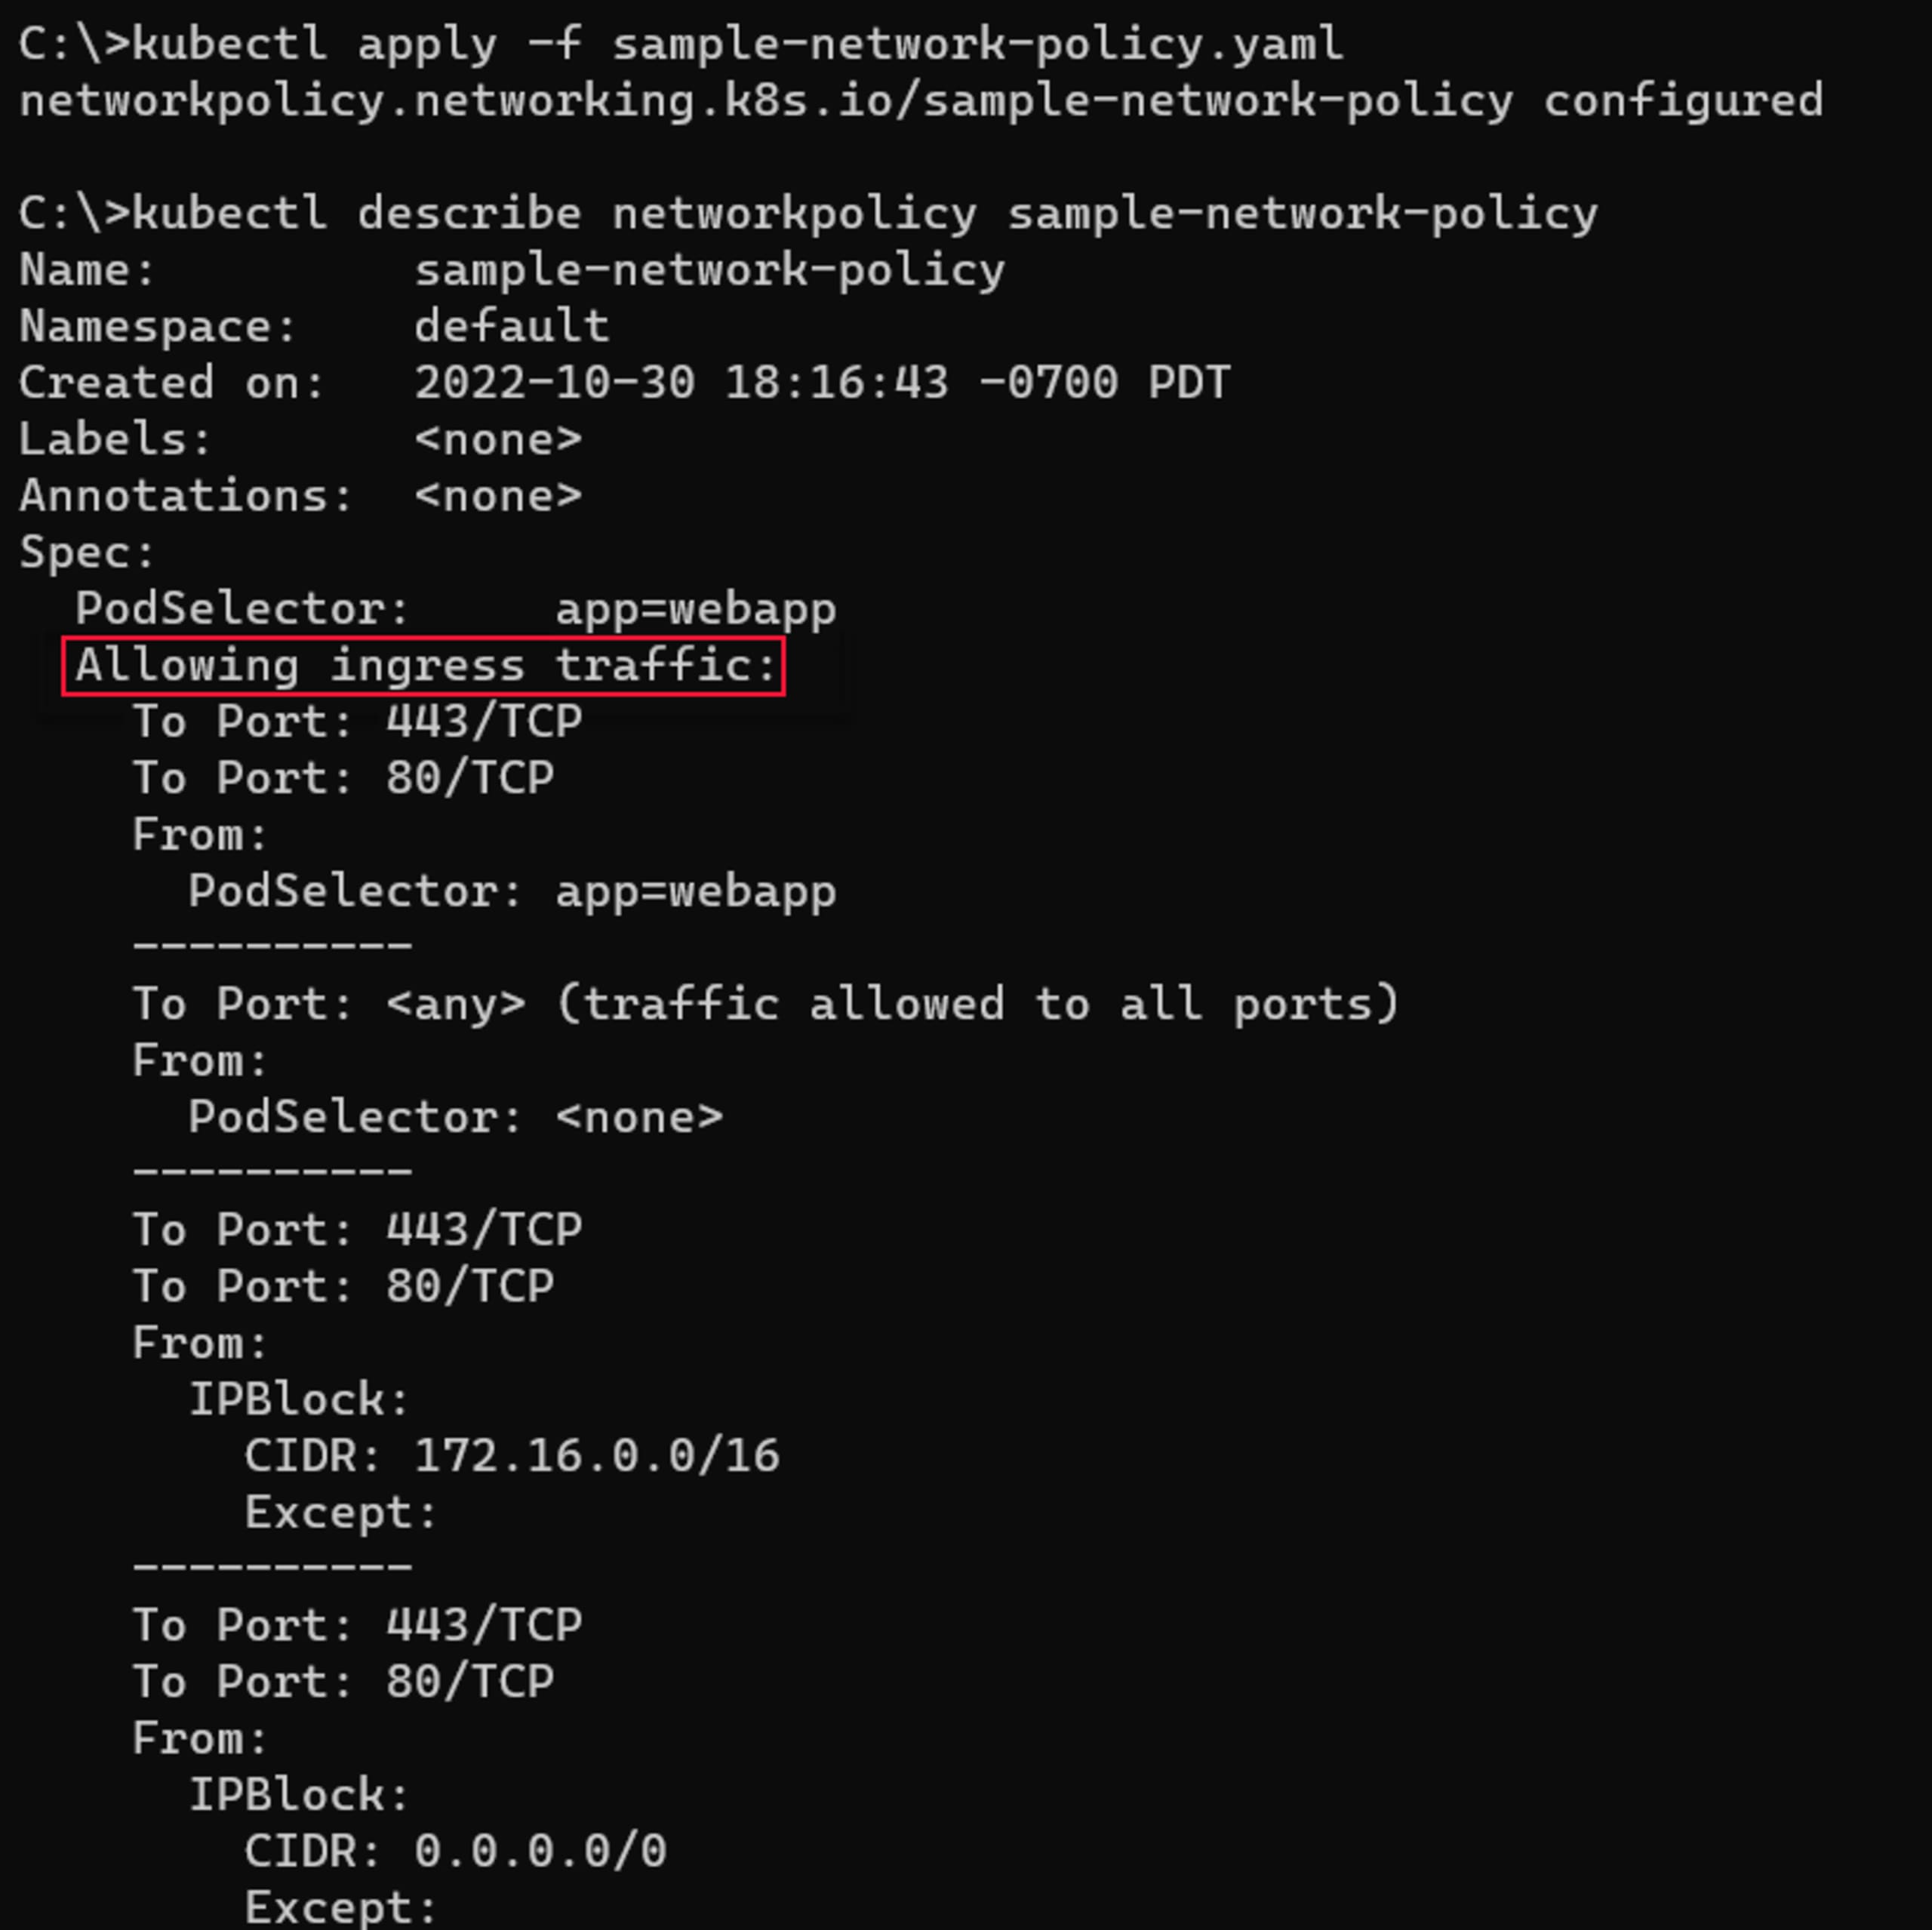
We may also need to validate the rulebase to troubleshoot traffic issues or investigate conflicts across different network policies. Fortunately, we can validate Network Policies using the kubectl CLI. Running the following command analyzes and monitors your current network policies:
Below is a sample output for the ingress policy type.
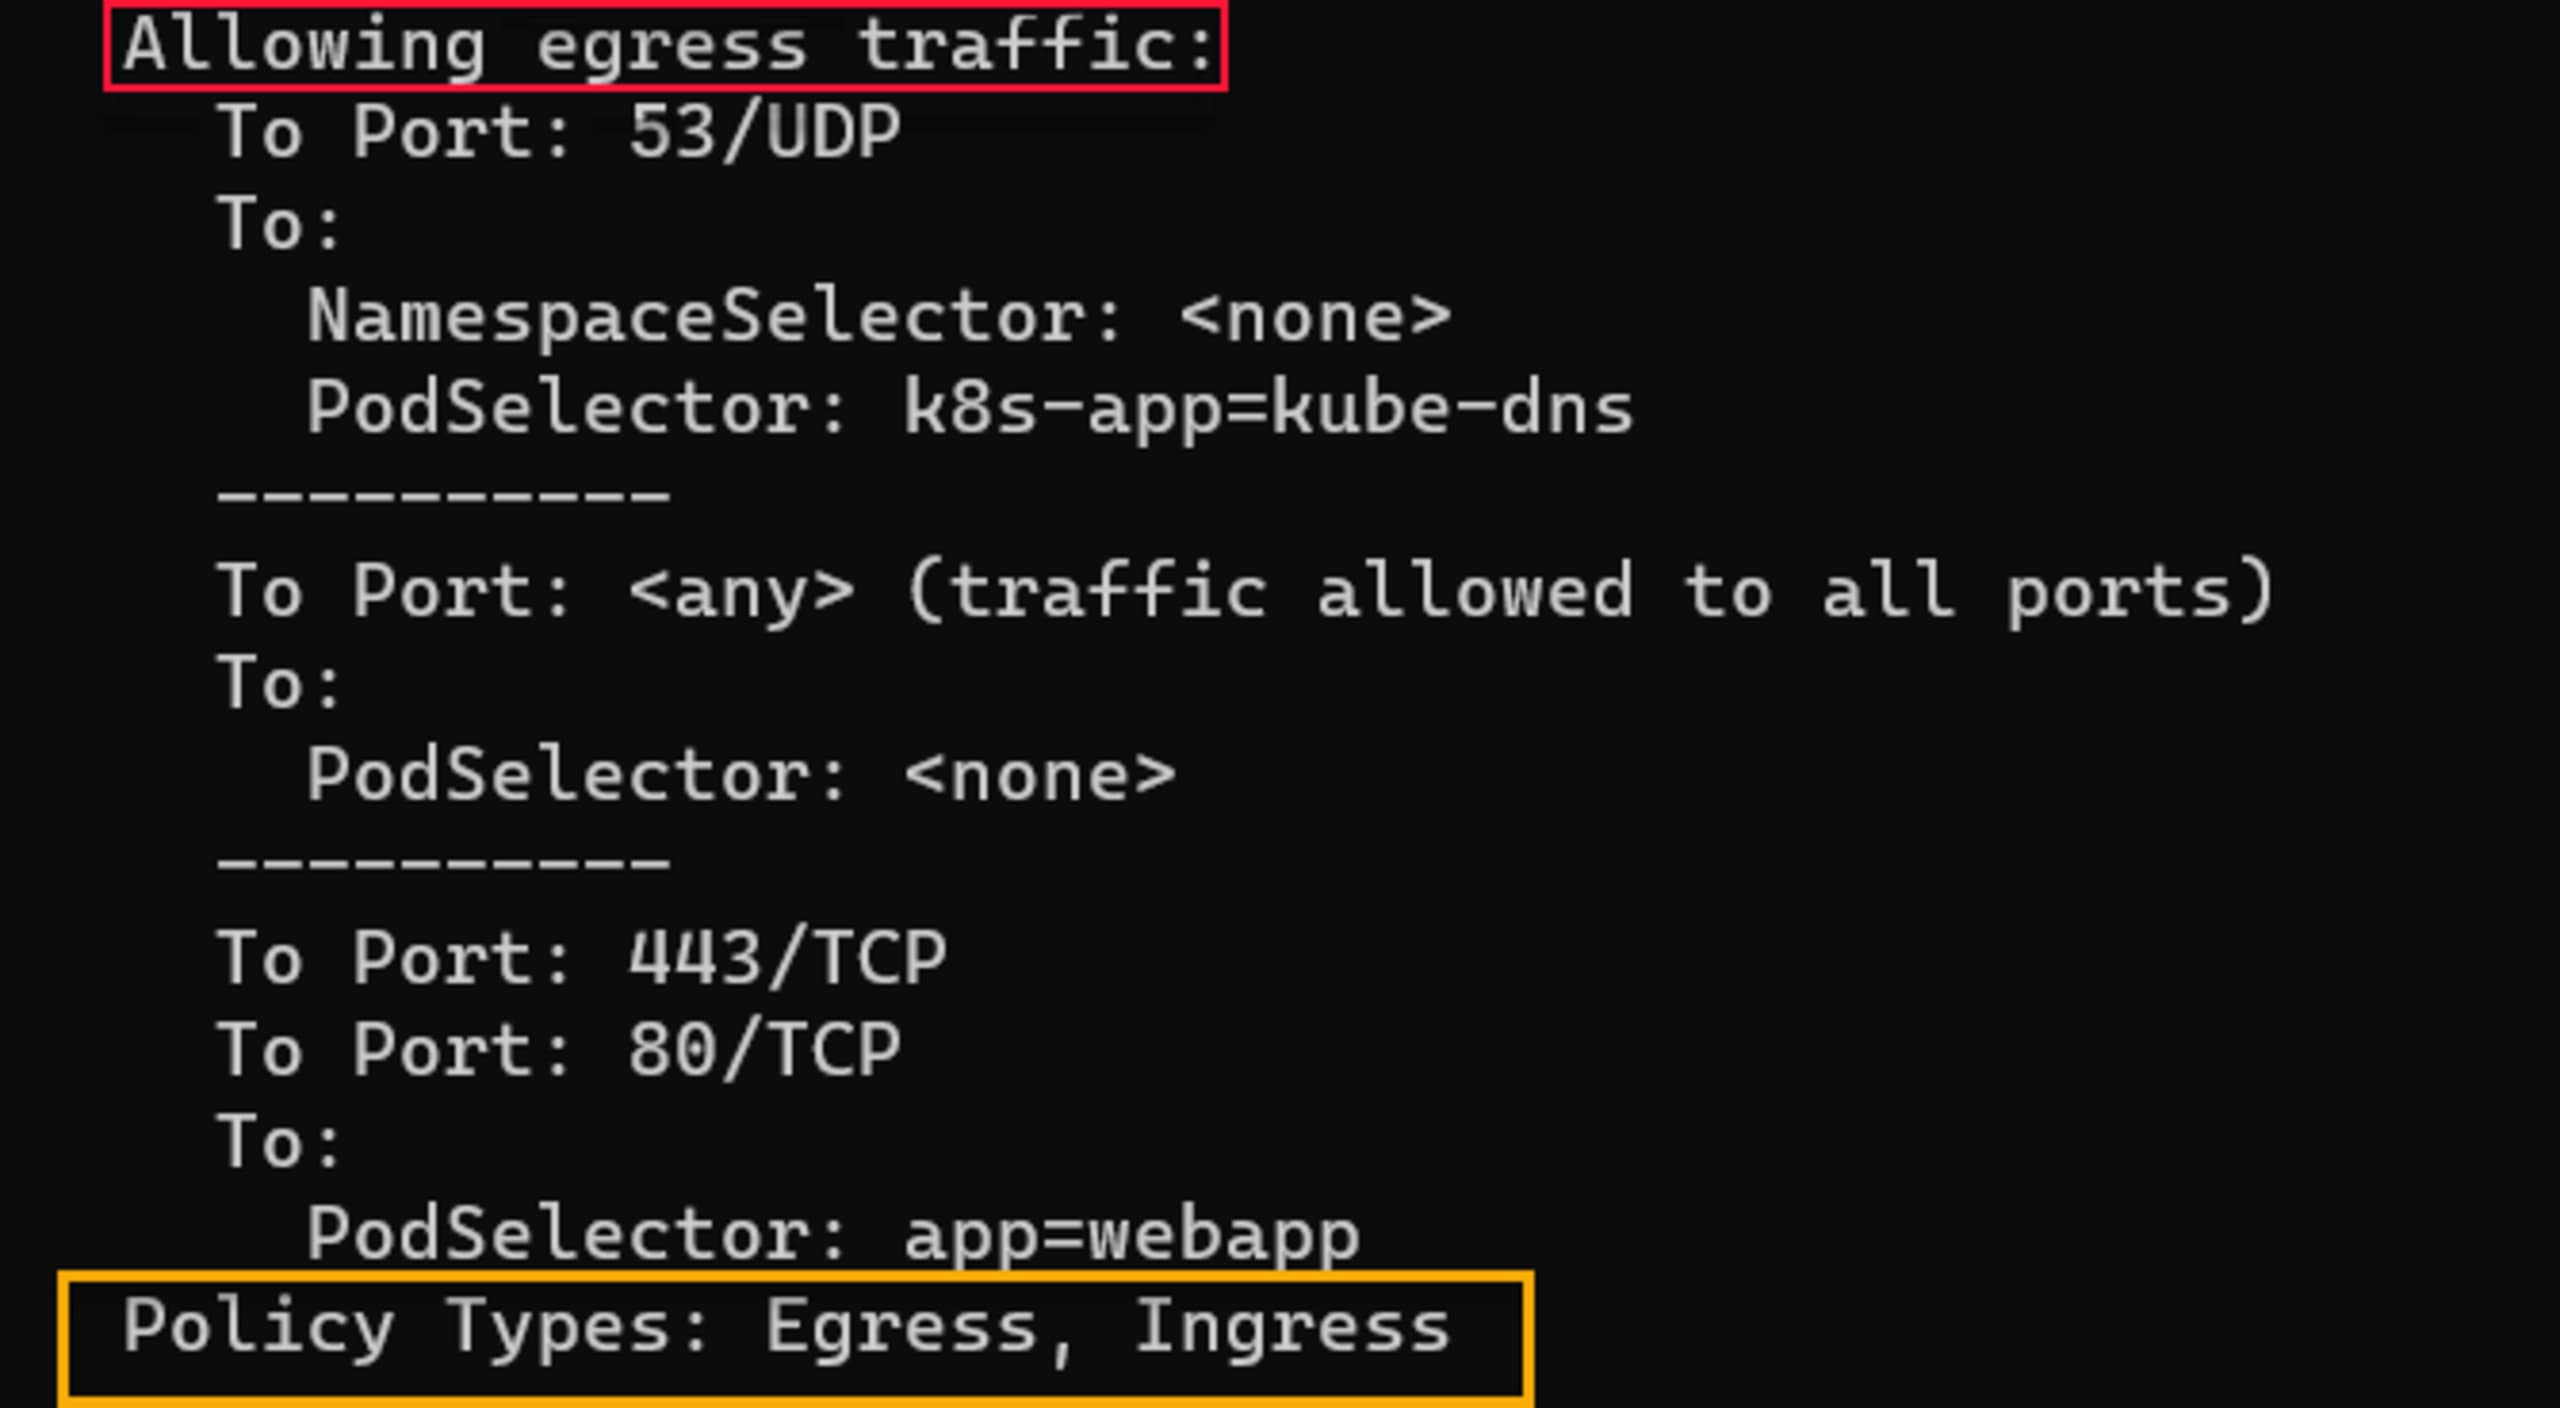
Additionally, this image shows a sample output for the egress policy type:
Best practices for applying Kubernetes network policies
As with any network security configuration, we should employ several best practices for our Kubernetes network policy:
Use the default
deny-allnetwork policy to ensure that only explicitly permitted communication occurs.Group Pods that must communicate with one another using the
PodSelectorparameter.Only allow inter-namespace communication when necessary.
Don’t allow unnecessary network communication — even within the Kubernetes cluster.
Use caution when allowing Pods within the cluster to receive non-cluster network traffic.
Denying outgoing public internet traffic might interfere with specific application updates or validation processes.
Kubernetes CNI plugins optimize network policy management
One of the benefits of CNI plugins is that they abstract away the implementation details of Network Policy, ensuring cluster administrators can choose the best solution for their needs without exposing the complexity of the underlying technologies.
However, default installations of Kubernetes do not have a preinstalled CNI plugin unless your distribution or provider has added one. This means that you’ll need to choose and install the plugin that best suits your needs. Additionally, even if your distribution has a default plugin, you may find that more aptly accommodates your requirements.
There is a multitude of CNI providers, and some of the most popular include:
Each plugin has certain unique capabilities, meaning that you might need to try out a few to decide which option best meets your network and network security requirements.
Conclusion
Configuring enterprise network topology with complex routing, traffic rules, and security integrations can be tedious. Fortunately, network policies can achieve in a Kubernetes environment what firewalls did best within a traditional infrastructure.
Of course, configuring network policies is only the first step in a process that requires occasional reassessment and maintenance. While the built-in kubenet plugin provides certain network capabilities for your policy management, other CNI plugins offer more advanced capabilities. Fortunately, the right policy and management combination ensures that your network traffic remains secure and efficient.
Additional Kubernetes security resources
Secure infrastructure from the source
Snyk automates IaC security and compliance in workflows and detects drifted and missing resources.