Developer driven workflows: Dockerfile image scanning, prioritization, and remediation

March 26, 2021
0 mins readWhen deploying applications in containers, developers are now having to take on responsibilities related to operating system level security concerns. Often, these are unfamiliar topics that, in many cases, had previously been handled by operations and security teams. While this new domain can seem daunting there are various tools and practices that you can incorporate into your workflow to make sure you’re catching and fixing any issues before they get into production. In this article, you will learn how to identify, prioritize and fix issues in your application’s container images using various tools and gain a better understanding of how those fixes can impact your applications at deployment.
The example application used in this article is available for you to follow along and experiment with if you like. It is on GitHub at https://github.com/snyk-snippets/dev-driven-workflows.
Table of Contents
Well-formed container images are crucial
The cornerstone of any container you deploy is largely defined by the Docker/OCI image that it is based on so it’s important to understand what a container image is and how it works.
What is a container image?
At its heart, an image is simply a collection of file system archives and metadata definitions, each containing a portion of the filesystem and environmental settings that define the starting state of a container. The layers are logically stacked with the contents of each applied to that of its predecessor–sometimes called its parent. Each layer is cryptographically hashed to ensure its integrity and the image keeps a manifest of them as well as its own hash called the image digest.

When a container is created, the file system that is presented to it is a unification of the image layers with an optional read-write layer applied on top. Any files written by the container are done in the read-write layer as the image layers themself are immutable. Changes to files that are pre-existing from the image layers are first copied to the read-write layer and then modified there–this is referred to as copy-on-write behavior.
What is a Dockerfile?
A Dockerfile is a simple list of instructions that outline what should go into each layer of a container image.
Dockerfile Example
In the following example, you can see the layers being built up starting from a node:14.1.0 base image and then each successive layer will consist of either the metadata or filesystem changes caused by the Dockerfile instructions on each line. This example is available in the above-mentioned GitHub repository and is named Dockerfile-initial.
If we were to run a docker build operation from this example Dockerfile, it would construct a layer consisting of the addition of the /usr/src/goof directory followed by another layer consisting of the new /tmp/extracted_files directory.
The next layer copies the contents of the build machine’s current directory–indicated by the . in the build command–including its subdirectories into the /usr/src/goof directory in the new layer.
The build continues with new layers adding on until the end of the file.
Each layer in an image builds upon its parent but once constructed the layer is immutable; even if we were to add a line to delete a file from a prior step, that file content would still be present in the hierarchy with the change to remove it just being the delta of that new layer. This is similar to the behavior of source code repositories like git where a commit to remove a file doesn’t remove it from the historical commits. Thus if a 1MB file is added to a layer and then removed in a subsequent layer, the image will still contain the 1MB even though it will be invisible to the container.
Compound RUN Statements
It is common to see compound statements with cleanup as their last section to keep transient files out of the layer’s filesystem. While our Dockerfile doesn't have one of these, here is an example representative of an often used pattern when installing OS level packages with apt, yum, etc.
We see a specific version of curl being installed on an ubuntu image and making sure none of the apt caches are stored in the layer.
Our Dockerfile example represents the imperative steps that were used to build and run this application before moving to containers and is not dissimilar to what you might see for legacy applications that were simply lifted-and-shifted into containers. It is ripe for optimization and hardening so let’s dive into it.
In addition to needing optimizations, this Dockerfile actually has an error in it that is causing a docker build to fail, let’s take a look at the issue and how we can use automation to help with fixes.
10 ways to optimize and secure your containerized application
1. Use a Dockerfile Linter
A common first step to improving our Dockerfiles is to use a linter. Linters statically analyse the contents of a file, and make suggestions about issues we might consider fixing. As mentioned above, we have a bug in the existing Dockerfile that is causing the build to fail.
Hadolint is a popular open-source linter for Dockerfiles that reads the steps and provides opinionated advice about their structure.
Running through the issues found:
Use COPY instead of ADD for files and foldersThis is valid for local non-archive file copying as outlined in Docker’s Dockerfile Best Practices, worth fixing but is not causing our build issue
Use 'cd ... || exit' or 'cd ... || return' in case cd fails.Technically true, but not really the problem here, skipping this for a moment.
Use WORKDIR to switch to a directoryAh ha! This is the cause. The impact of the
RUN cd /usr/src/goofline is encapsulated just to the layer that statement builds, in fact, that line is effectively a no-op as far as the image build is concerned. TheWORKDIRDockerfile command is what we should be using as it explicitly sets the current working directory from that point forward, including at runtime. The lack of this is why theRUN npm…line cannot find thepackage.jsonfile.Use arguments JSON notation for CMD and ENTRYPOINT argumentsAlso referred to as the “exec” form, there are varying opinions on this but Docker’s documentation does lean toward using the JSON notation here.
After cleaning up all of these issues, our new Dockerfile–named Dockerfile-hadolint-fixes in the sample repo–returns no linting issues and now builds successfully.
2. Run your linter as a commit hook to stop Dockerfile issues from creeping into your codebase
Lightweight tools like hadolint make excellent candidates for pre-commit hooks, stopping Dockerfile issues from creeping into your codebase. The following is a simple git script example that you can add to your repository at the path: .git/hooks/pre-commit. If you are new to git hooks, check out the Git-SCM documentation for more details.
Here’s an example of that hook running against the original Dockerfile before we applied any fixes.
Note: If you are testing this in our sample repo, make sure to copy Dockerfile-initial to Dockerfile and stage it in your repo in order to trigger the hook issue.
3. Iteratively test your image locally
We’ve done some work to get an image build, working through a build error, and fixing some bad practices as we did so. Now we need to make sure the image actually contains what is needed to run the application.
The “goof” example is a simple 2-tier application consisting of a Node.js frontend that depends on a MongoDB persistence backend. In order to run this application locally we are going to do the following:
Do a quick sanity check on the image with
docker run. (this actually is usually done iteratively as you work on your Dockerfile) The application will fail because it has no database to connect to but if you get that far you at least know the container is starting.Run a local Kubernetes cluster that can access the image you’ve built. This cluster can be any of a number of options, here are some popular ones:
Docker Desktop KubernetesJust enable this in the Docker Desktop dashboard and wait for it to start up.
Kubernetes in Docker (KinD)See the KinD quickstart to get started and make sure to load your image into the clusterAlso, if running KinD under Docker Desktop, you will need to set up your cluster with host mappings to match the NodePort of the goof-service. We’ve provided a sample
kind-config.yamlfile you can use in the sample repo.MiniKubeSee the MiniKube getting started document to get started and the handbook page on caching your image into the cluster
A remote Kubernetes clusterAny cluster that you may have available and can get images to should work fine too. You may have to push your image to a registry it can pull from so check with your cluster operations team if you are unsure how to do that.
Testing with Docker
While you work on the Dockerfile, you will want to make sure that the image is being constructed properly. The simplest way to do this is by occasionally running a container and doing spot checks on it.
For example, assuming we want to run the image we built earlier with the tag goof, we would use docker run --rm -it -p3001:3001 goof
This will create and start a container based on that image with port 3001 on your workstation bound to send traffic to 3001 in the container. The --rm simply tells Docker to remove the container after it is stopped and the -it runs it in an interactive mode with a tty so we can see the output and can issue a CTRL-Cto kill it.
You should get a bunch of output while the Node.js application tries to start up, including an error about not being able to connect to its database, and then the container will stop and be removed when the application exits. If you get anything else like errors about npm not being found then we know the image itself has issues.
Testing on local Kubernetes
We will be deploying the application using the manifest files which are found in the sample repo under the manifests folder.
goof-deployment.yaml
A full lesson on the Kubernetes APIs is outside the scope of this article but at a high level we are declaring two Deployments that will deploy and manage Pods in which our container and its database will run.
There is also a goof-services.yaml file we will deploy that exposes the pods via Kubernetes Services, allowing service discovery for that MongoDB instance.If you are running Kubernetes on your local machine with Docker Desktop, KinD or MiniKube, you will need to add imagePullPolicy: Never to the goof container spec like this:
If you are using a remote cluster then this is not necessary but you will need to push your image to a registry and change the image: tags in these yaml files accordingly. Check with your cluster operators if you have questions.
Assuming you have your Kubernetes cluster running and your kubectl config is set up, all you need to do next is run kubectl apply -f manifests/ and wait for the pods to enter the Running status by checking kubectl get pods.
Finally, we test the application by opening a browser to:
Docker Desktop or KinD: http://localhost
MiniKube run
minikube service goofand use the first URL it gives youOtherIf an external IP is listed from
kubectl get service goof, then use that, or try the IP of one of your cluster nodes on port 32301. Otherwise, consult your cluster operator for help.
You should see something like this in your browser:
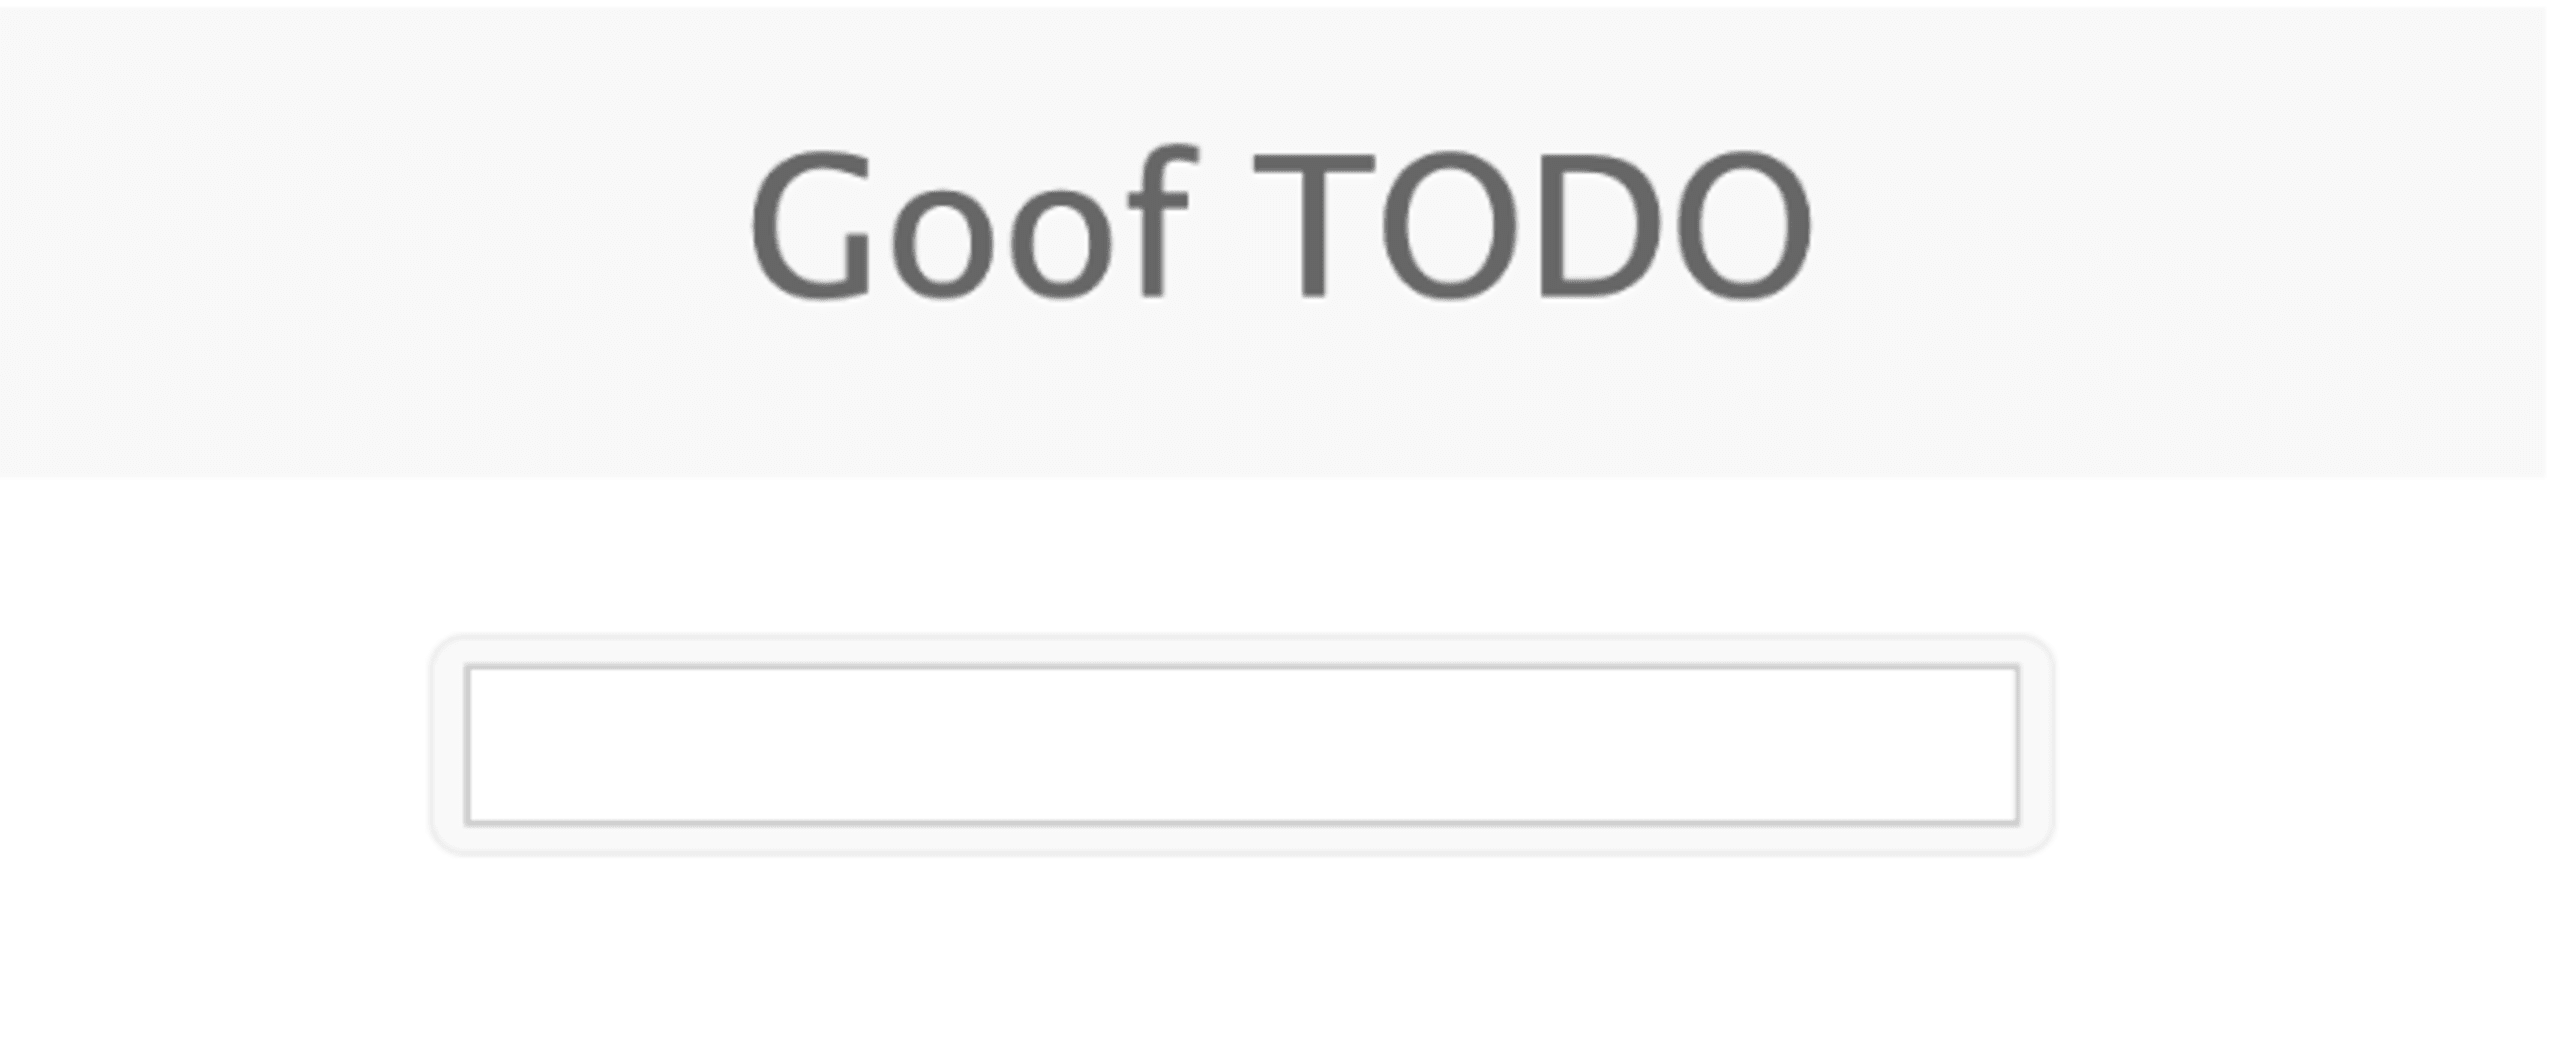
Feel free to add a TODO note and save it by pressing Enter. If everything is working, it should be added to a list on the page.
Rinse and repeat: Iteratively practice local development and testing
Now that it’s up and running, you can continue to iteratively develop on your app, rebuild the image and push it to your cluster. There are probably hundreds of ways to do this process depending on the type of app you are building and the Kubernetes distribution you are using but they all will generally look something like this workflow:
Changes to code are made
A new image is built using the
docker buildcommand and/or your language’s toolingThe image is pushed to the cluster or registry (if needed)
The running Kubernetes pod is updated to use the new image. To do this, I usually just delete the running pod and let the cluster spawn a new one from the new image but you can also use
kubectl set imageto do the same as long as the new image has a new tag name.Test the new pod when it’s up and ready
More image hardening
Other than fixing some bugs in the original Dockerfile, we haven’t really addressed the security of it. Now that we have a way to run and test our application let’s start looking at some of the more interesting security issues our image presents.
4. Do not default to the root user in your image
If you jump into our application container and check, the node process is actually running as the root user.
Even though the process is running inside a container with a Linux process namespace isolating it from the rest of the host, it is still not a good idea to run as UID 0 for a few reasons. The usual issues that come up are due to misconfigurations at deployment time such as mounting a host volume into the container that exposes more information than intended. The user in the container will have the same privileges on that filesystem as they would for the same UID on the host. For example, if the host’s /etc directory is mounted into the container, a root owned process in that container will have full access to read and write to any file in the host’s /etcfolder.
Remember how we mentioned that layers are immutable and removing a file in a layer doesn’t actually remove the contents from it’s parent layers? An example of when that fact can be exploited is if a contained process can read the host’s container image layer files because someone mounted the /var/lib/docker path into the container. This is the path under which all of those layers are available so a malicious process would just need to start searching for exploitable software in all of those layers. (or /var/lib/containerd or wherever your container runtime stores them,) Fortunately, the maintainers of the official node images already have created a node user for us with a UID of 1000. To use it we simply need to add a line containing USER 1000 in our Dockerfile. We use the UID instead of the name of the user because some tools, Kubernetes for instance, cannot map an image’s default user name to it’s UID before starting the container and might need to do so in order to enforce policies about root users. We’ll be seeing this kind of policy enforcement in play a little later in the document.
If the base image you chose does not have a user pre-created you will also need to create one by adding the requisite RUNline–i.e. adduser–and then this USERline to switch to that UID. Take care to set file ownership and permissions in your image as needed in order for your application to run as this new user. Also, it’s a common practice to have executables and other files owned by root but readable and executable by users. This provides a method of prevention from an errant or malicious process from modifying them at runtime.
After building the image and updating the pod, things are looking much better.
5. Enforce root user controls at deployment time
Now that the image is changed to run as a non-root user, let’s make sure it stays that way by changing the Kubernetes deployment manifest to enforce it.First, I’m going to run our goof-deployment.yaml file through the Snyk IaC scanner.
As you can see, there are several issues and, sure enough, one of the medium-severity ones is that the container is running without root user control.Fixing this is simple, just add runAsNonRoot: true to the securityContext of either the pod:spec or container:spec. I prefer the pod level as it will apply to all containers in the pod unless they override it explicitly. If another container gets added to this pod, the setting will automatically be applied there as well.
Now we are protected from anyone reverting the image back to running as a root user because the deployment will fail when they test it. In the sample repo, the manifests/good-deployment.yaml-nonroot has this change applied to it.
6. Specify a user at runtime (when appropriate)
The eagle eyed among you may have noticed that the second deployment, the goof-mongo one, already has the securityContext in it and that it also is specifying a UID.
The reason we are adding the runAsUser field there is because we are running the unaltered official mongo base image from Docker Hub so we don’t have another Dockerfile where we would be setting that USER line. We are trusting that the official mongo image UID will not change. For our goof application image, since we have control over that UID via the Dockerfile, there is no benefit to declaring it again in the deployment manifest and doing so would violate the DRY software principle.
It is worth noting that the Docker Hub mongo image documentation does not (at the time of this writing) mention this user or UID. In order to find it, I ran docker run --rm -it mongo id to verify that it was, indeed, running as root. Then I ran docker run --rm -it --entrypoint cat mongo /etc/passwd and saw mongodb:x:999:999 at the bottom of the file. Cursory testing showed that running as that user works but in a real-world situation you would want to do more research before using an undocumented change like this.
7. Drop capabilities if your application doesn’t need them
While we’re looking at that IaC scan, the other medium-severity issue reported that we are running our container with the default set of capabilities. Our application is simple, it has no reason to call any kernel-level functions like changing file ownership or to control aspects of the host’s networking. We can lock things down by telling the container runtime to drop all of these capabilities. This is another example of making things just that much harder for any malicious actor that potentially breaks into our container. To do this, we simply add a block to our container spec to “drop all” capabilities.
Apply the new manifest and re-test the application. In the sample repo, the manifests/good-deployment.yaml-nonroot-dropcapabilities file has these changes applied to it.
Again, you’ll see that the goof-mongo deployment also has the same change already applied to it as the database also has no need for such capabilities.
Kubernetes securityContext settings can be complicated, for more details on them check out our CheatSheet: 10 Kubernetes Security Context settings you should understand.
Note that the Snyk IaC scan turned up several other low-severity issues–not pictured above–and they should be addressed, but they would be out of scope for this article.
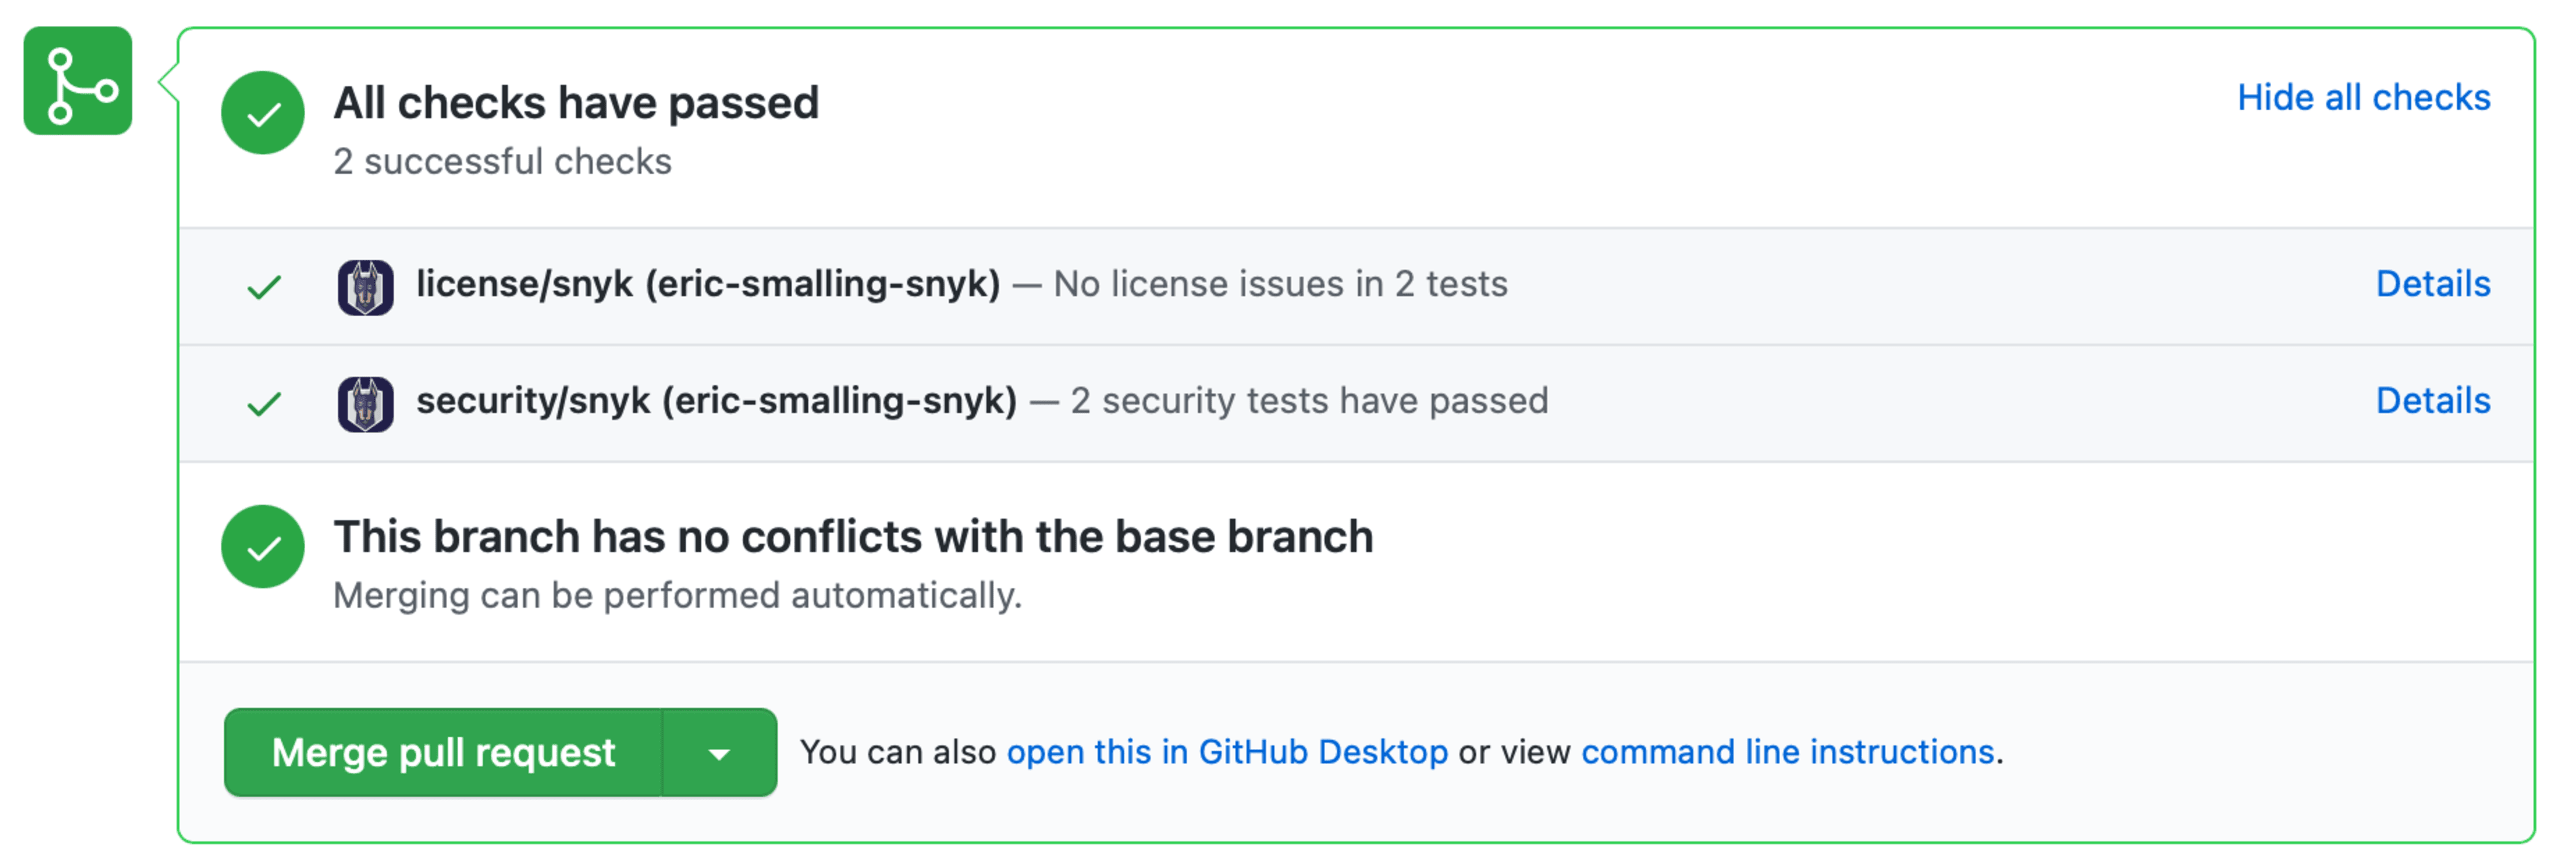
At this point I’m going to commit and push my changes to GitHub as I’ve fixed the build issue and I don’t want to pile up any more changes into one commit. Because I have Snyk already monitoring my GitHub repository, upon opening a Pull Request from my branch into main, we get a quick vulnerability scan against the changes I’ve applied to the Dockerfile. In this case, no security vulnerabilities–or licensing issues–were added by my changes so the tests are showing they passed.
We’ll merge these changes now but this brings us to the next topic on our path to securing our image: vulnerability scanning.
8. Use an image vulnerability scanner
Now that the outstanding configuration-based security issues are handled, let’s turn our attention to the part of the image that we don’t directly control, the packages we inherit from the base image itself or packages we might add. In order to get visibility on what potential exploits are possible in our image we will run a vulnerability scanner against it to look for any known CVEs in packages installed in it.
Running a Snyk Container scan finds 825 issues in this image at various severity levels.
The report shows that all of them are coming in from the node:14.1.0 base image we are building on top of. This makes sense since we are not installing any additional packages via apt-get or similar means in our Dockerfile.
When we have this many issues, it’s often easier to prioritize things by looking at the corresponding Snyk web console. Since my repository is already being monitored, let’s look at the scan that was triggered by the pull request merge we just performed.

Here we see a prioritized table of the vulnerabilities found, weighted by metrics such as CVSS score, exploit maturity, and the current availability of fixes. In addition, both the CLI and web reports show recommendations of alternative base images that have fewer known vulnerabilities.
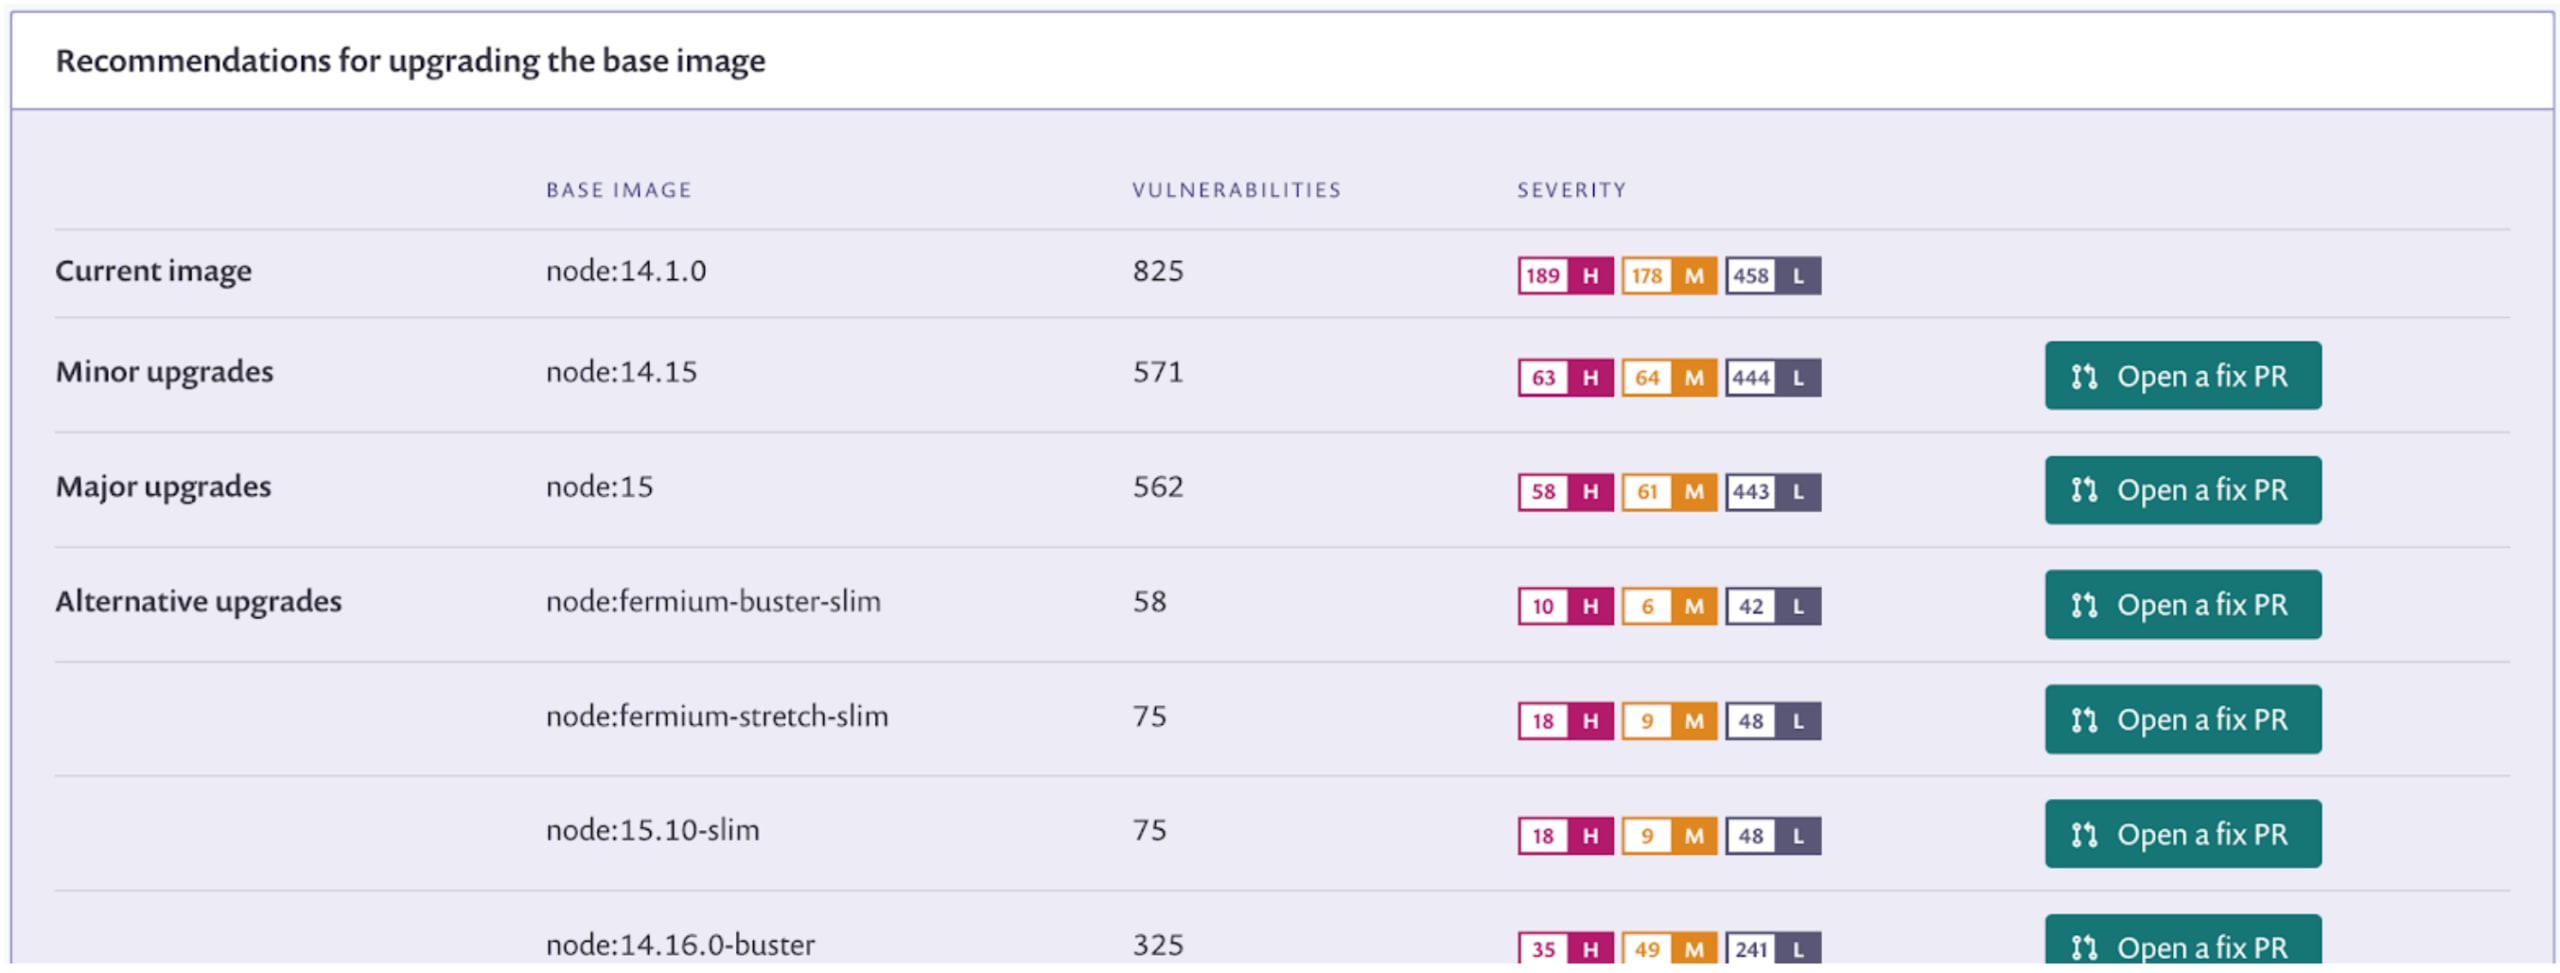
In this case, upgrading our base image to the node:fermium-buster-slim option looks like the best and most compatible option. Note that “slim” tagged images are stripped down so be sure to test for compatibility in case your application is using packages that are not included in them.
We could make this change in our code but the web UI also provides an automated fix feature via the “Open a fix PR” button next to each of the recommendations so let’s use that.
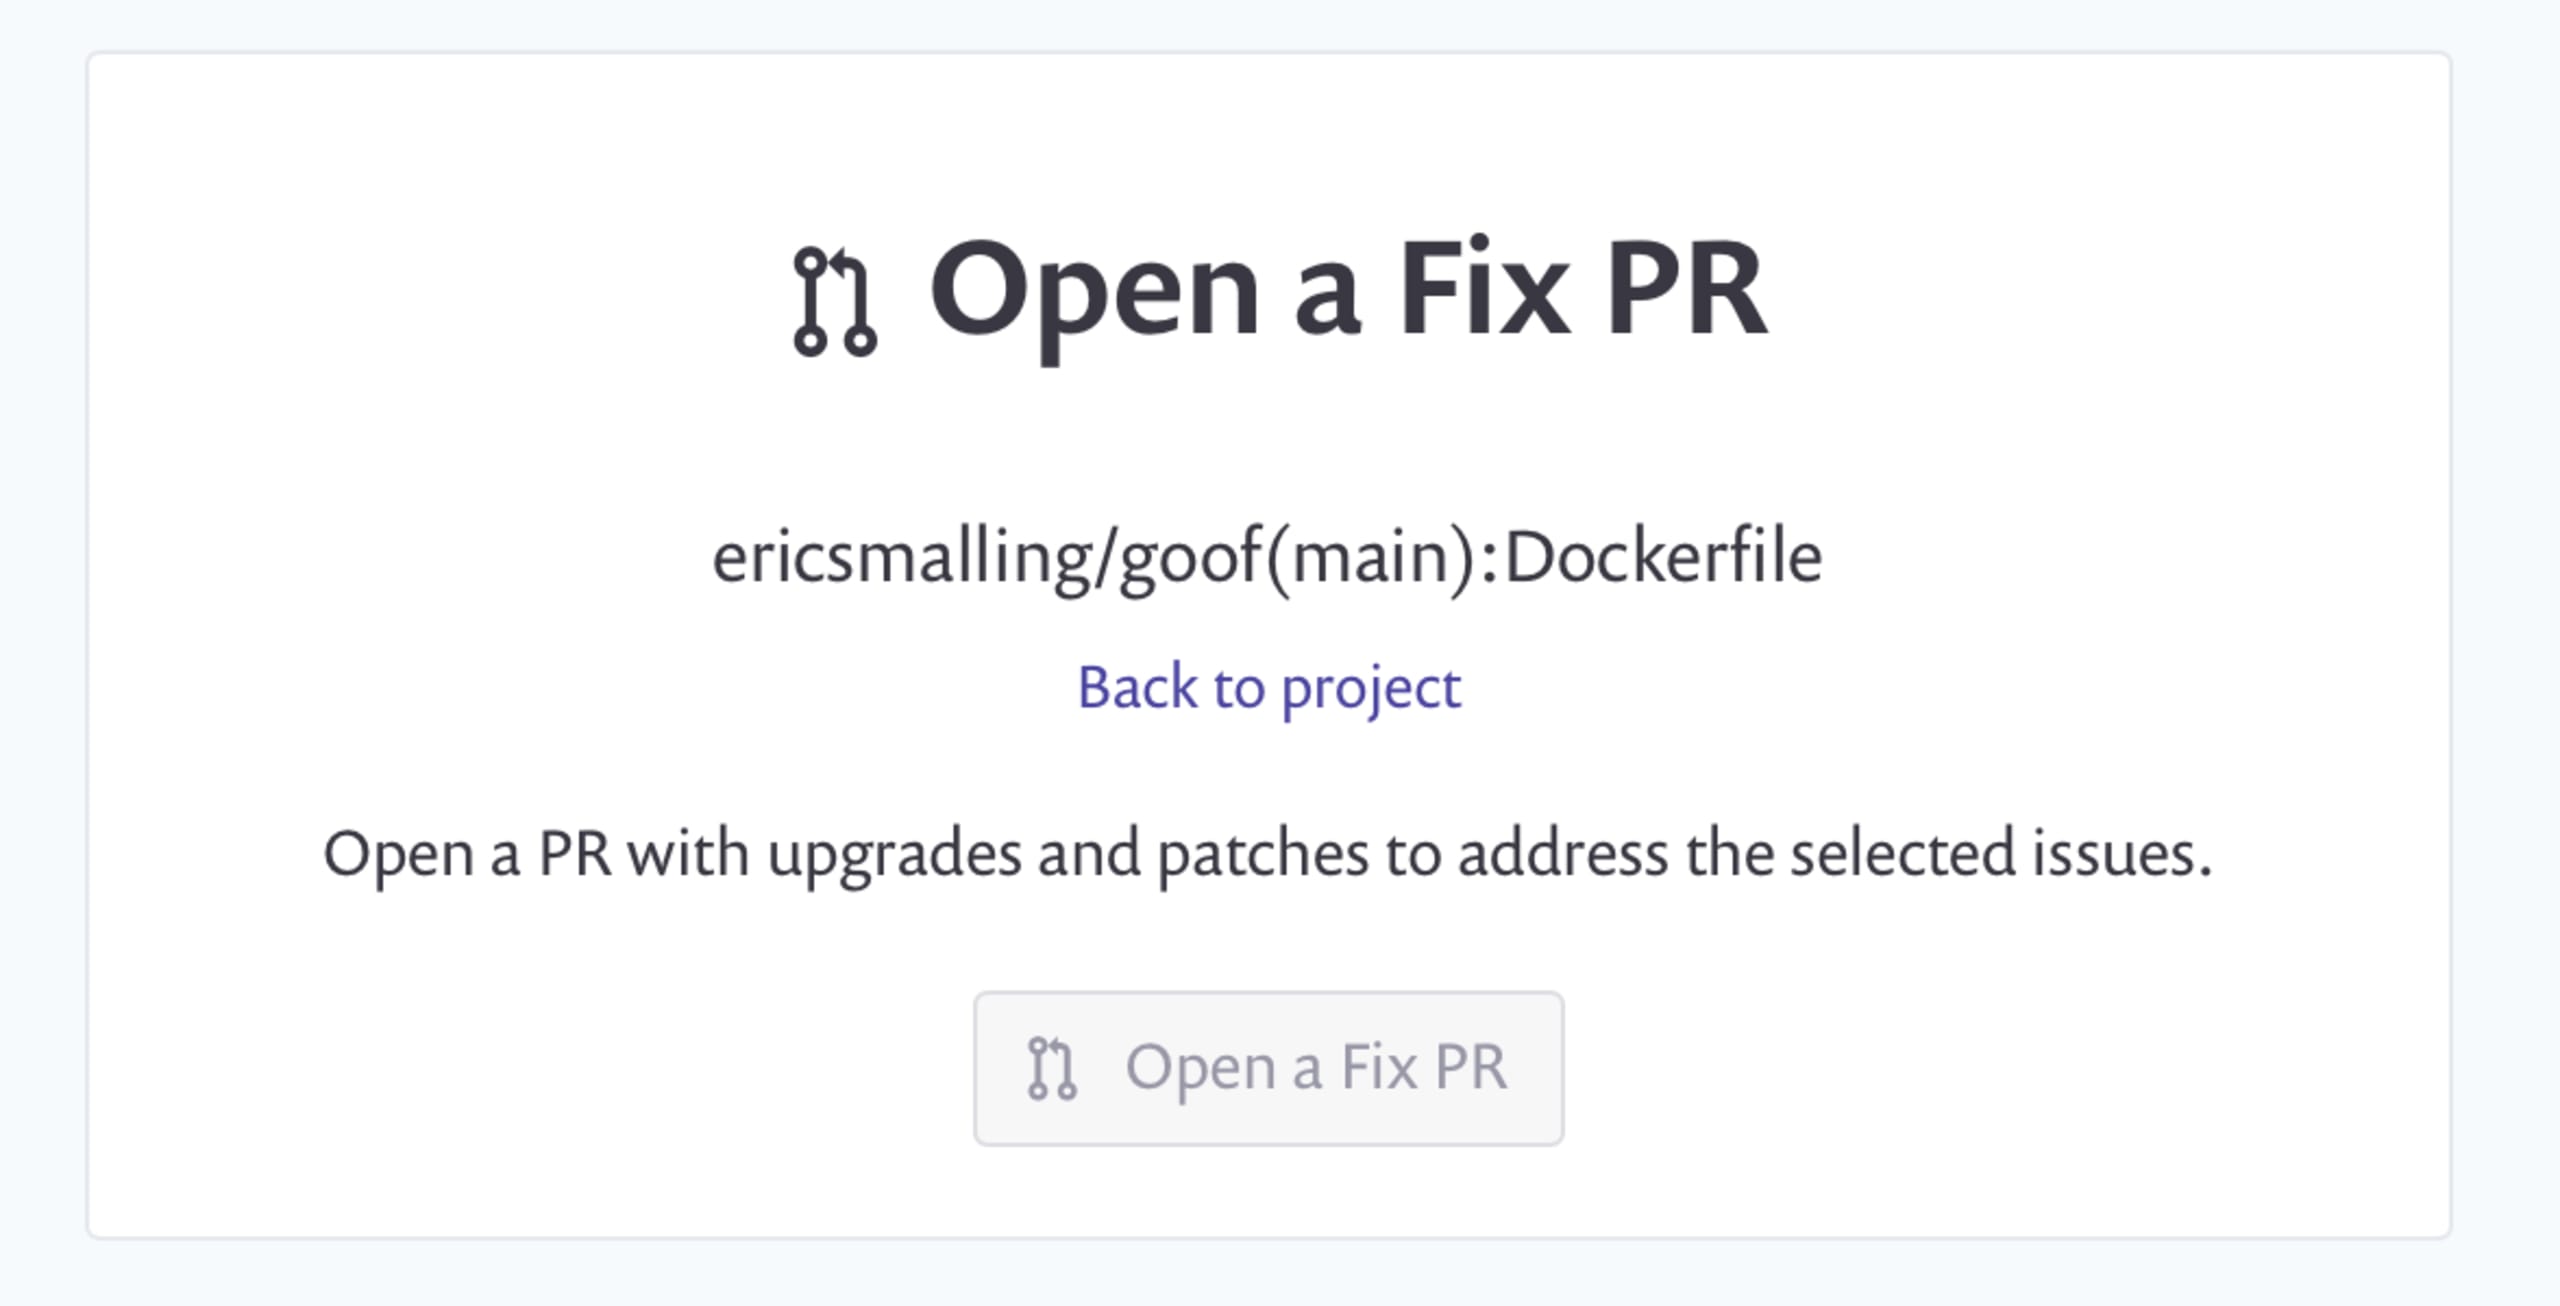
A confirmation message page will come up detailing the change being made. You are then taken straight to the GitHub pull request page.
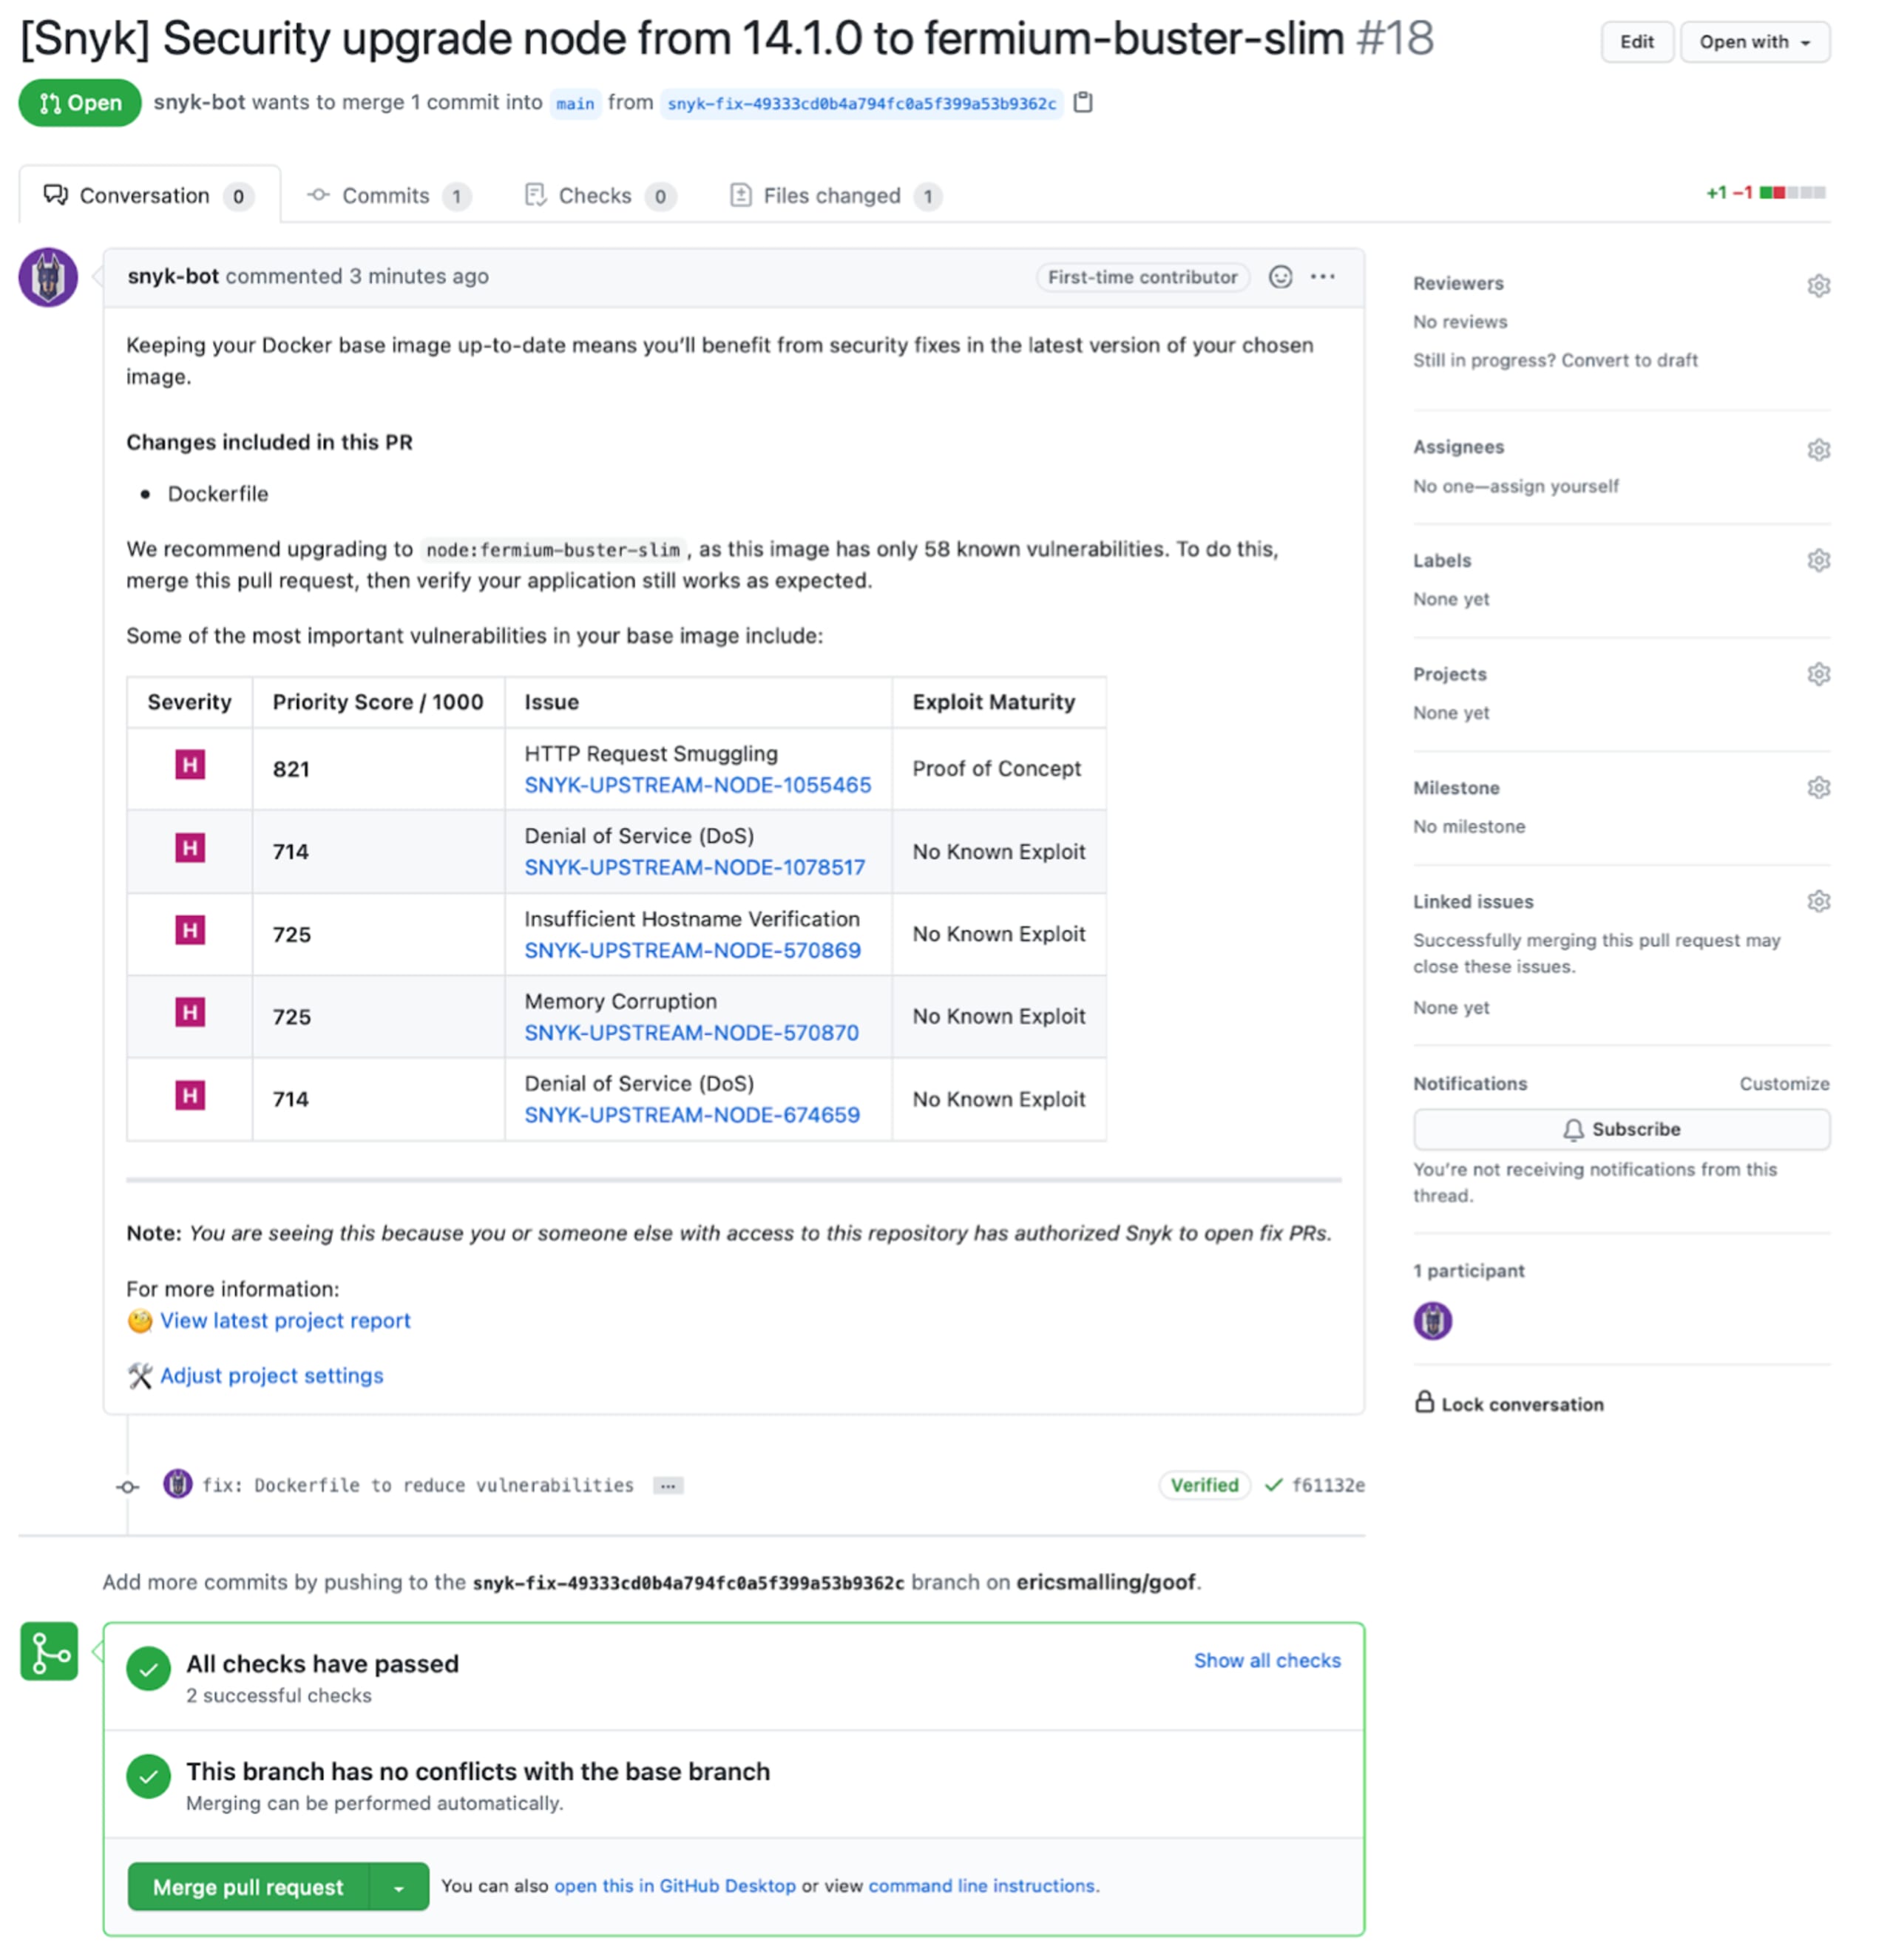
In a real-world scenario, this pull request would go through the same code review and application testing processes that any other change would be subject to. For now, we’ll go ahead and merge this change.
Pulling these changes down to my local git repository and rebuilding and scanning my image we see that our vulnerability count has reduced to 58! Also, by switching to the smalling “slim” base image, our overall size has dropped from 1.03GB to just 261MB!
9. Consider even more aggressive image slimming
A core tenant of the container paradigm is to minimize the environment that a process runs in. We’ve come a long way slimming down and securing our image but we are still packing up a lot more than we need for the production deployment. We could start picking apart our image trying to eliminate all extraneous files and packages that the debian base distribution is including but there are some easier answers… with some trade-offs.
Alpine based images
One of the simplest solutions is to look at a different base OS that is focused on security and small size: Alpine. Alpine based images are renowned for their small footprints, mainly because they have very few pre-installed packages. This is a good thing from a security perspective since files that don’t exist cannot be exploited. Let’s reconfigure our Dockerfile to use the node:14-alpine base image.
As you can see, I’ve reordered a couple of things and moved the app into a different directory to fit the Alpine base image’s patterns. As predicted, building this version of our image drastically reduced its size.
Let’s see what the Snyk Container scan turns up for our new image:
No vulnerable paths found! That’s as good as it gets, folks!
So why wouldn’t we always use alpine base images? Quoting the Node image documentation:
The main caveat to note is that it does use musl libc instead of glibc and friends, so software will often run into issues depending on the depth of their libc requirements/assumptions. See this Hacker News comment thread for more discussion of the issues that might arise and some pro/con comparisons of using Alpine-based images.
In many cases, this is perfectly fine, especially for platforms like Node that are cross-compiled for it but there are times when the shift to a completely different set of low-level C libraries will break applications. For this reason, vulnerability scanners may not present Alpine as a recommendation to reduce vulnerability counts when they scan a glibc based one. Common cases where Alpine transitions fail are legacy applications that depend on pre-compiled libraries such as a Java application with JNI calls or a Go application using cgo. In any case, if you are switching to Alpine from some other Linux based image, make sure you do full functional and performance testing on your application as you are, in a sense, changing operating systems.
Distroless images
If Alpine is not viable, there is a project hosted by Google called Distroless which hosts images that are usually Debian based but are slimmed down to the bare minimum, often not even containing a shell to exec in with. These images are maintained by the Google Distroless team and details about them are available at their GitHub repository.
DIY Scratch-based Images
The scratch base image is not actually an image at all. It is a reserved token in the Dockerfile specification that starts your image build from a completely blank filesystem. No shell, no package manager, nothing at all. Anything you want to be added to this kind of image has to be copied in on your own. Usually, you will see scratch used as the final stage of a Dockerfile using multi-stage builds which are a feature that let you have multiple FROM lines, the last of which being the one that the final image is based upon. The most common form of multi-stage is to have a “build” stage where compilation happens and then the artifact produced is copied into the final stage. In the case of a scratchfinal stage, you would need to copy everything needed to run your executable. For this reason, it is not often you see this used with interpreted languages or those needing a runtime environment such as Node.js, Java, or Python. Languages that lend themselves well to this pattern are those that compile down to a single or small collection of files. C, C++, and Go applications are common users of scratch images.
10. Research Non-Dockerfile image builders
Throughout this document, we’ve focused on the Dockerfile based image building process which is, by far, the most widely used image building tool. There are, however, other ways to build images that do not use Dockerfiles. Some of the more popular include Bazel, jib and scripted Buildah. Docker themselves also support other build scripting techniques via the BuildKit project which is an optional builder packaged with the docker client.
Wrapping up and further reading links
The example we went through is fairly simple given the nature of JavaScript being an interpreted language. If, however, you are working with languages that have more clearly defined compilation vs runtime phases, you should take a look at the above mentioned multi-stage Dockerfiles where you can continue to do builds in your Dockerfile but still keep your compiler and source code out of the final image you deploy.
For further information on running Node.js in containers, check out 10 best practices to containerize Node.js web applications with Docker. We also have a version of that document for Java applications: 10 best practices to build a Java container with Docker.
Developer-first container security
Snyk finds and automatically fixes vulnerabilities in container images and Kubernetes workloads.
If you are running RedHat’s alternative container tools, check out our blog post on Command line tools for containers—using Snyk with Buildah, Podman, and Skopeo
Finally, as mentioned above, the security context APIs for Kubernetes can be challenging to set up, 10 Kubernetes Security Context settings you should understand goes over them and will help you make secure choices that work for your application. One powerful option available through these settings is the ability to force your container to run in a read-only mode. This can be excellent protection against malicious modification to your container filesystem. Read more about it in this cheatsheet.
Want to dig further into Docker images? Adam Gordon Bell has an excellent blog deep-diving into how images are constructed. Also, during the 2nd Docker Community All-Hands webinar, a few Docker Captains had excellent talks on Docker images:
Image-building Best Practices - Michael Irwin
Understanding the Design of Images - Brandon Mitchel
buildx bake adoption --push - Kevin "CrazyMax" Alvarez
We hope this guide has helped you better understand how container images work and how you can use tools to help you secure and maintain your containerized applications.