How to secure an S3 bucket on AWS?

July 12, 2024
0 mins readAmazon Web Services (AWS) Simple Storage Service (S3) has become a cornerstone in the world of cloud storage. It offers scalability, high availability, and performance, making it a go-to choice for businesses of all sizes. However, as with any cloud service, security is paramount. This is where the question of "how to secure an S3 bucket" comes into play.
Securing your S3 buckets is not just about protecting your data from unauthorized access. It's also about ensuring compliance with various security standards and regulations. A single security misconfiguration can lead to data breaches, resulting in financial loss and damage to your company's reputation.
Securing your S3 buckets on AWS is an essential step in cloud security. In this blog post, we'll discuss practical steps to ensure your S3 buckets are secure and compliant with best practices. We'll cover topics such as understanding S3 bucket vulnerabilities, best practices for S3 bucket security, and how to automate S3 bucket security with Snyk.
Understanding S3 bucket vulnerabilities
While offering a robust and scalable storage solution, S3 buckets can also be a potential security risk if not properly configured and monitored. Let's examine some of the common S3 bucket vulnerabilities and the potential consequences of an exposed S3 bucket.
Misconfigured bucket permissions
One of the most common vulnerabilities with S3 buckets is misconfigured permissions. This occurs when an S3 bucket is unintentionally left open to the public, allowing anyone to access, download, or even delete the data stored within.
For example, a bucket policy that allows public access might look like this:
In the above policy, the Principal field is set to *, which means anyone, and the Action field is set to s3:*, which means any action. This is a clear example of a misconfigured bucket permission.
Unencrypted data
Another common vulnerability is storing data in S3 buckets without encryption. This means that if an attacker gains access to the bucket, they can easily read the data. AWS provides options for both server-side and client-side encryption to help protect your data. It's important to ensure that sensitive data is encrypted at rest in your S3 buckets.
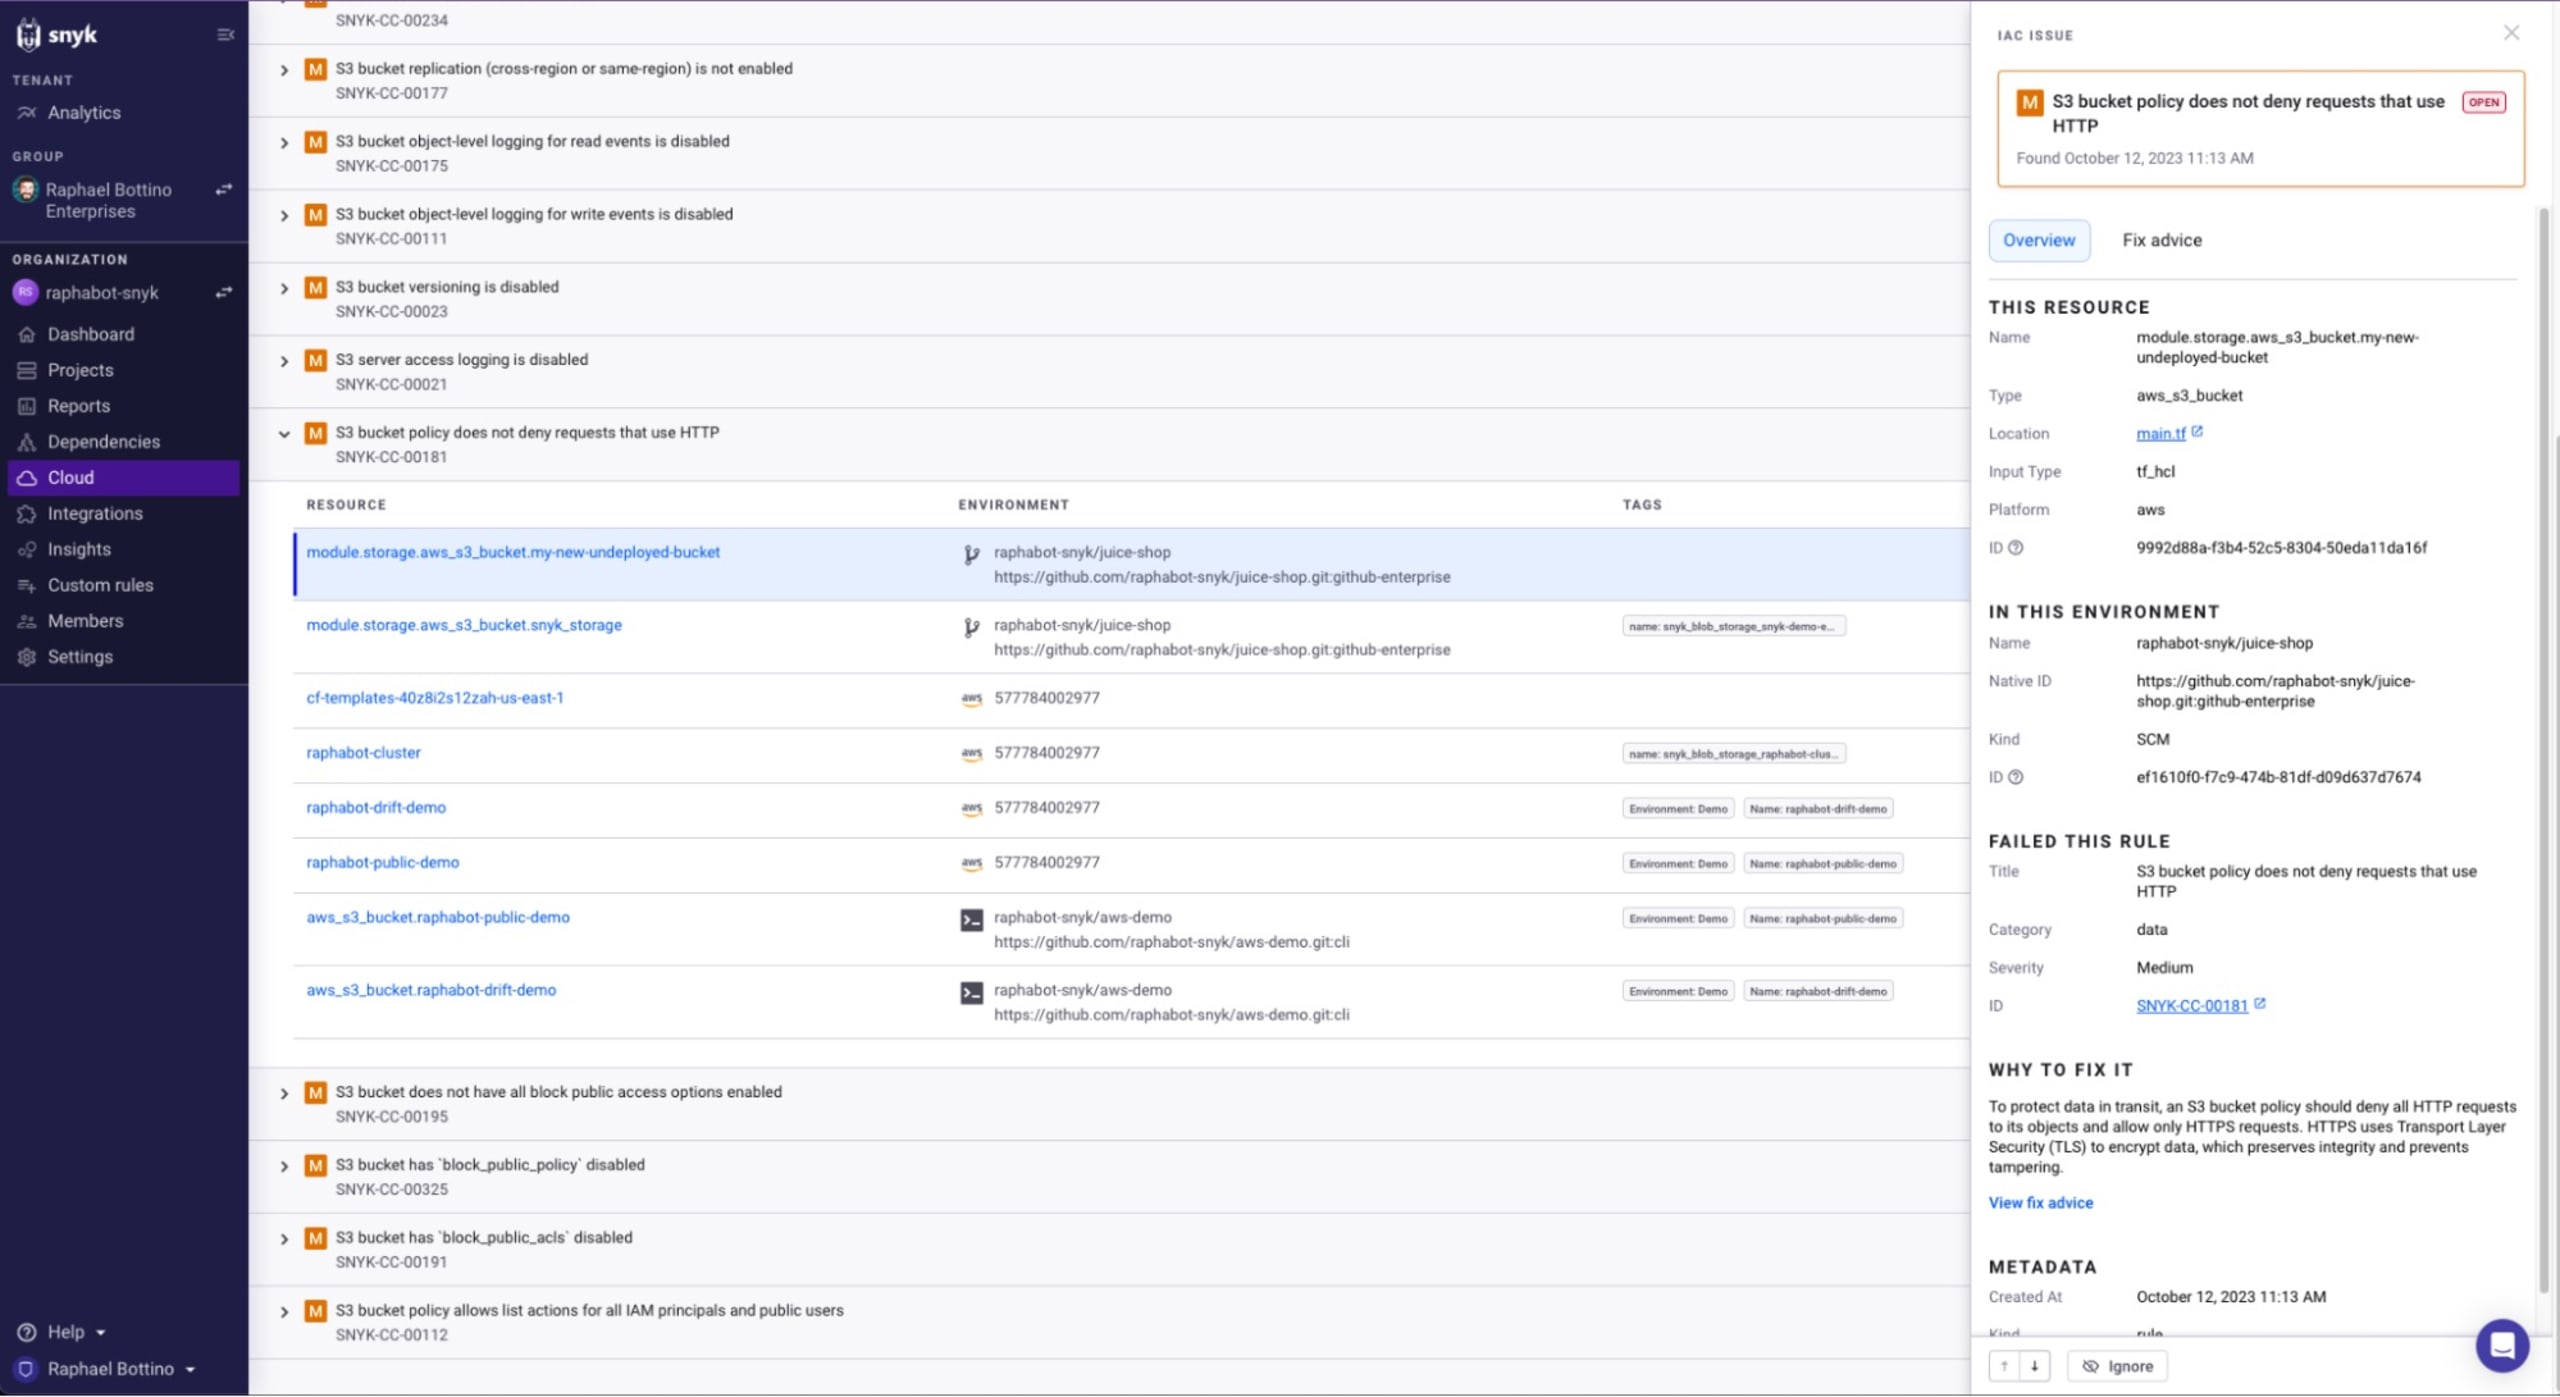
Snyk can help you find cloud misconfigurations in your Terraform and other supported cloud definition files. For example, it can detect a cloud misconfiguration in which the S3 bucket policy does not deny requests that use HTTP:
Lack of logging and monitoring
Without proper logging and monitoring, it can be difficult to detect unauthorized access or changes to your S3 buckets. AWS offers services like CloudTrail and CloudWatch to help with this, but they need to be properly configured and actively monitored. Without these measures in place, it's easy to miss signs of a potential security breach or unauthorized data access.
Best practices for S3 bucket security
The consequences of an exposed S3 bucket can be severe. Depending on the data stored in the bucket, exposure could lead to data breaches, loss of intellectual property, regulatory fines, and damage to your organization's reputation.
To avoid these vulnerabilities and secure your S3 buckets, it's important to follow best practices for S3 security, such as encrypting data, properly configuring bucket permissions, and setting up logging and monitoring. Tools like Snyk can also help identify cloud misconfiguration and guide you to fix security vulnerabilities in your cloud infrastructure.
Securing your S3 bucket is a crucial step in ensuring the safety of your data. Here, we will delve into the best practices on how to secure an S3 bucket on AWS.
Ensuring proper bucket permissions
When it comes to securing an S3 bucket on AWS, one of the most crucial steps is ensuring proper bucket permissions. This involves understanding and implementing the principle of least privilege, using AWS Identity and Access Management (IAM) roles effectively, and using bucket policies to restrict access.
The principle of least privilege: Explanation and implementation
The principle of least privilege (PoLP) is a computer security concept in which a user is given the minimum levels of access necessary to complete his or her job functions. When applied to AWS S3 buckets, this means granting only necessary permissions to users, roles, or services that require access to your bucket.
Here's an example of how to secure an S3 bucket by implementing PoLP using AWS IAM:
In this policy, we're only allowing the root user of the specified account to read objects from my_secure_bucket. No other permissions are granted, adhering to the principle of least privilege.
Understanding and using AWS Identity and Access Management (IAM) roles effectively
AWS IAM roles are a secure way to grant permissions to entities that you trust. Instead of sharing security credentials, you can grant permissions to IAM roles. This is a more secure and scalable way to manage permissions in AWS.
Here's an example of how to secure an S3 bucket by using IAM roles effectively:
In this policy, we're granting all S3 permissions to the my_secure_role IAM role for my_secure_bucket. This way, we can assign this role to any entity that requires access to the bucket without sharing security credentials.
Tips for using bucket policies to restrict access
Bucket policies are a powerful tool for managing access to your S3 buckets. They allow you to create granular permissions and restrictions, which can help you secure your S3 bucket effectively.
Here are some tips on how to secure an S3 bucket using bucket policies:
Use conditions to restrict access based on IP address.
Explicitly deny access to sensitive operations like
s3:DeleteObject.Use the
NotActionelement to deny all actions except those specified.
For more in-depth findings and recommendations on securing your S3 buckets, create a free Snyk account. Snyk offers a wealth of free educational resources and free tools to help you secure your cloud infrastructure effectively.
Enabling default encryption
One of the most effective ways to ensure the security of your S3 buckets is by enabling default encryption. From 2023, objects stored in S3 buckets are automatically encrypted.
Here's how you can do it:
Navigate to the AWS Management Console and open the Amazon S3 console.
In the Bucket name list, choose the name of the bucket that you want to enable default encryption for.
Choose the Properties tab.
In the Default encryption section, choose Edit.
Choose Enable.
In the Encryption type list, choose an encryption method.
Choose Save changes.
Another option is to utilize the AWS CLI to enable default encryption:
The above command line example shows how to enable default encryption using AWS CLI.
Choosing between AWS-managed keys (SSE-S3) and customer-managed keys (SSE-KMS)
When it comes to how to secure an S3 bucket, you have two main options for encryption keys: AWS-managed keys (SSE-S3) and customer-managed keys (SSE-KMS).
AWS-managed keys (SSE-S3) are the simplest choice. When you use SSE-S3, Amazon handles key management and key protection for you. This is a good option if you want to avoid the complexity of managing encryption keys yourself (such as rotating keys, managing permissions, and auditing key usage).
On the other hand, customer-managed keys (SSE-KMS) give you more control and flexibility. With SSE-KMS, you can create and manage your own encryption keys and control the policies that determine how these keys can be used. This is a good option if you have specific compliance requirements that require you to manage your own keys.
The above command line example shows how to enable default encryption using a customer-managed key.
Utilizing secure transport policies
When it comes to cloud security, one of the most effective ways to secure data in transit is by enforcing HTTPS. HTTPS encrypts the data between your browser and the server, making it harder for anyone to intercept and view your data. In this chapter, we will focus on how to secure an S3 bucket by enforcing HTTPS for data in transit and setting up bucket policies to deny non-SSL requests.
To enforce HTTPS on your S3 bucket, you will need to update your bucket policy. Here is a sample bucket policy that enforces HTTPS:
In this policy, we are denying all S3 actions ("Action": "s3:*") when the request is not made over HTTPS ("aws:SecureTransport": "false"). Replace your-bucket-name with the name of your S3 bucket.
Implementing access logging and monitoring
When it comes to understanding how to secure an S3 bucket, one of the key aspects is to implement robust logging and monitoring. This will provide visibility into the activities within your S3 buckets and enable you to detect any potential security threats or breaches. In this section, we will cover how to enable and configure access logging for S3 buckets, utilize AWS CloudTrail for monitoring API activity, and set up alarms for suspicious activities using Amazon CloudWatch.
It’s important to point out that S3 bucket encryption (such as SSE-S3) incurs a cost increase and isn’t free.
Access logging is an essential part of securing an S3 bucket. It records all requests made to your S3 bucket and stores the logs in another S3 bucket. Here's how you can enable and configure it:
Navigate to the AWS Management Console and open the Amazon S3 console.
In the Bucket name list, choose the name of the bucket that you want to enable logging for.
Choose the Properties tab.
In the Logging section, choose Edit.
In the Destination bucket for logs section, enter the name of the bucket where you want to store the logs.
(Optional) In the Target prefix section, you can add a prefix. This is useful if you want to store logs from different buckets in the same destination bucket.
Choose Save changes.
In the above command, logging.json is a file with the following content:
Utilizing AWS CloudTrail for monitoring API activity
AWS CloudTrail is a service that enables governance, compliance, operational auditing, and risk auditing of your AWS account. It provides the event history of your AWS account activity, including actions taken through the AWS Management Console, AWS SDKs, command line tools, and other AWS services.
To enable CloudTrail for your S3 bucket, follow these steps:
Open the CloudTrail console.
Choose Trails, and then choose Create trail.
For Trail name, type a name for the trail.
To apply the trail to all regions, select Yes to ensure you capture events from all regions.
Under Management events, choose Read/Write events to select which management events you want to log. For focusing solely on Data Events, you can opt not to configure these or select None.
Data events configuration:
Scroll down to the Data events section.
Click on Add S3 bucket. Specify the S3 bucket for which you want to log data events.
You can choose to log Read, Write, or All data events. If your goal is comprehensive monitoring, select All.
Specify the S3 bucket where you want the CloudTrail logs to be delivered.
For S3 bucket, choose an existing bucket or create a new one to store your CloudTrail logs.
Choose Create.
You can also use the AWS CLI to create a trail:
Setting up alarms for suspicious activities using Amazon CloudWatch
Amazon CloudWatch is a monitoring and observability service built for DevOps engineers, developers, site reliability engineers (SREs), and IT managers. CloudWatch provides you with data and actionable insights to monitor your applications, understand and respond to system-wide performance changes, optimize resource utilization, and get a unified view of operational health.
To create an alarm that sends an Amazon SNS message when the alarm changes state, you can use the put-metric-alarm command as follows:
In this command, an alarm is set up to monitor the number of objects in the my-bucket bucket. If the number of objects exceeds 1000 in a 5-minute period, an SNS message is sent.
Implementing these steps will significantly enhance the security of your S3 buckets. Remember, securing an S3 bucket is not a one-time task but a continuous process that requires regular monitoring and updating. For further assistance in securing your cloud infrastructure, consider using Snyk IaC, a powerful tool that helps you find and fix security vulnerabilities in your cloud infrastructure.
Regularly auditing S3 buckets
Regular auditing of your S3 buckets is another important step in ensuring the security of your AWS resources. This process involves the use of specific tools and services, as well as a periodic review of bucket permissions and public exposure.
There are several tools and services that can assist you in auditing your S3 buckets. AWS provides a few built-in services that can be leveraged for this purpose.
AWS Trusted Advisor: This tool provides real-time guidance to help you provision your resources according to AWS best practices. Trusted Advisor checks help optimize your AWS infrastructure, increase security and performance, reduce overall costs, and monitor service limits.
AWS Config: This service provides a detailed view of the configuration of AWS resources in your AWS account. This includes how the resources are related to one another and how they were configured in the past so you can see how the configurations and relationships change over time.
In addition to AWS built-in tools, tools such as Snyk IaC can provide additional security checks and cloud misconfiguration findings.
Periodic review of bucket permissions and public exposure
Regularly reviewing your S3 bucket permissions is a crucial part of "how to secure an S3 bucket". This involves checking who has access to your buckets and what level of access they have.
You should also review the public exposure of your buckets. S3 buckets can be configured to allow public access, but this should be avoided unless absolutely necessary.
If public access is required, ensure that you have additional security measures in place, such as bucket policies that only allow specific IP addresses to access the bucket.
Regular auditing and reviewing of your S3 buckets is a key part of maintaining a secure AWS environment. By using the tools and practices outlined in this post, you can ensure that your S3 buckets are secure and your data is protected.
Automating S3 bucket security with Snyk
Curious how to secure an S3 bucket using Snyk IaC? Snyk provides an automated solution to detect and remediate misconfigured S3 buckets, thus making your cloud environment more secure and resilient.
Snyk's cloud security features
Snyk's cloud security features offer a comprehensive solution to secure your cloud environment. It provides continuous security monitoring, identifies misconfigurations, and offers automated remediation. This makes Snyk an ideal tool for DevOps and Security teams looking to automate their cloud security processes.
Automating detection and remediation of misconfigured S3 buckets with Snyk
Misconfigured S3 buckets can lead to data breaches and unauthorized access. Snyk can help automate the detection and remediation of such misconfigurations. Leveraging Snyk Infrastructure as Code (IaC) and its comprehensive security rules, organizations can significantly enhance their security posture with minimal manual intervention.
Step 1: Importing IaC projects into Snyk
The first step involves importing your Infrastructure as Code projects into Snyk. This process enables Snyk to scan your infrastructure configuration files, including Terraform, Kubernetes Manifests, AWS CloudFormation, and more, for potential security issues.
Navigate to your Snyk dashboard and select Projects.
Click on the Add projects dropdown and choose your Source Control Manager (SCM), such as GitHub.
Select the repositories containing your AWS infrastructure configurations and add them to Snyk for scanning.
Consider the following S3 bucket definition of a Terraform v4 file named s3.tf:
If you scan this file using snyk iac test s3.tf it will report permissive ACL configuration that you should watch out for in terms of S3 bucket security. Similarly, the Snyk UI will report the findings if you use the Snyk app.
Snyk automatically re-tests your projects once a week, ensuring continuous security monitoring.
Step 2: Identifying and remediating misconfigurations
Snyk's IaC scanning capabilities extend to various AWS resource types, including aws_s3_bucket and aws_s3_bucket_policy. Upon scanning, Snyk identifies misconfigurations, such as non-encrypted S3 buckets or buckets without adequate public access blocks, and reports them along with:
Severity levels of issues.
A snippet of the vulnerable code.
Detailed remediation advice.
For S3 buckets, Snyk can detect issues like enabling public access, which could lead to data breaches. By following Snyk's remediation advice, you can quickly address these issues.
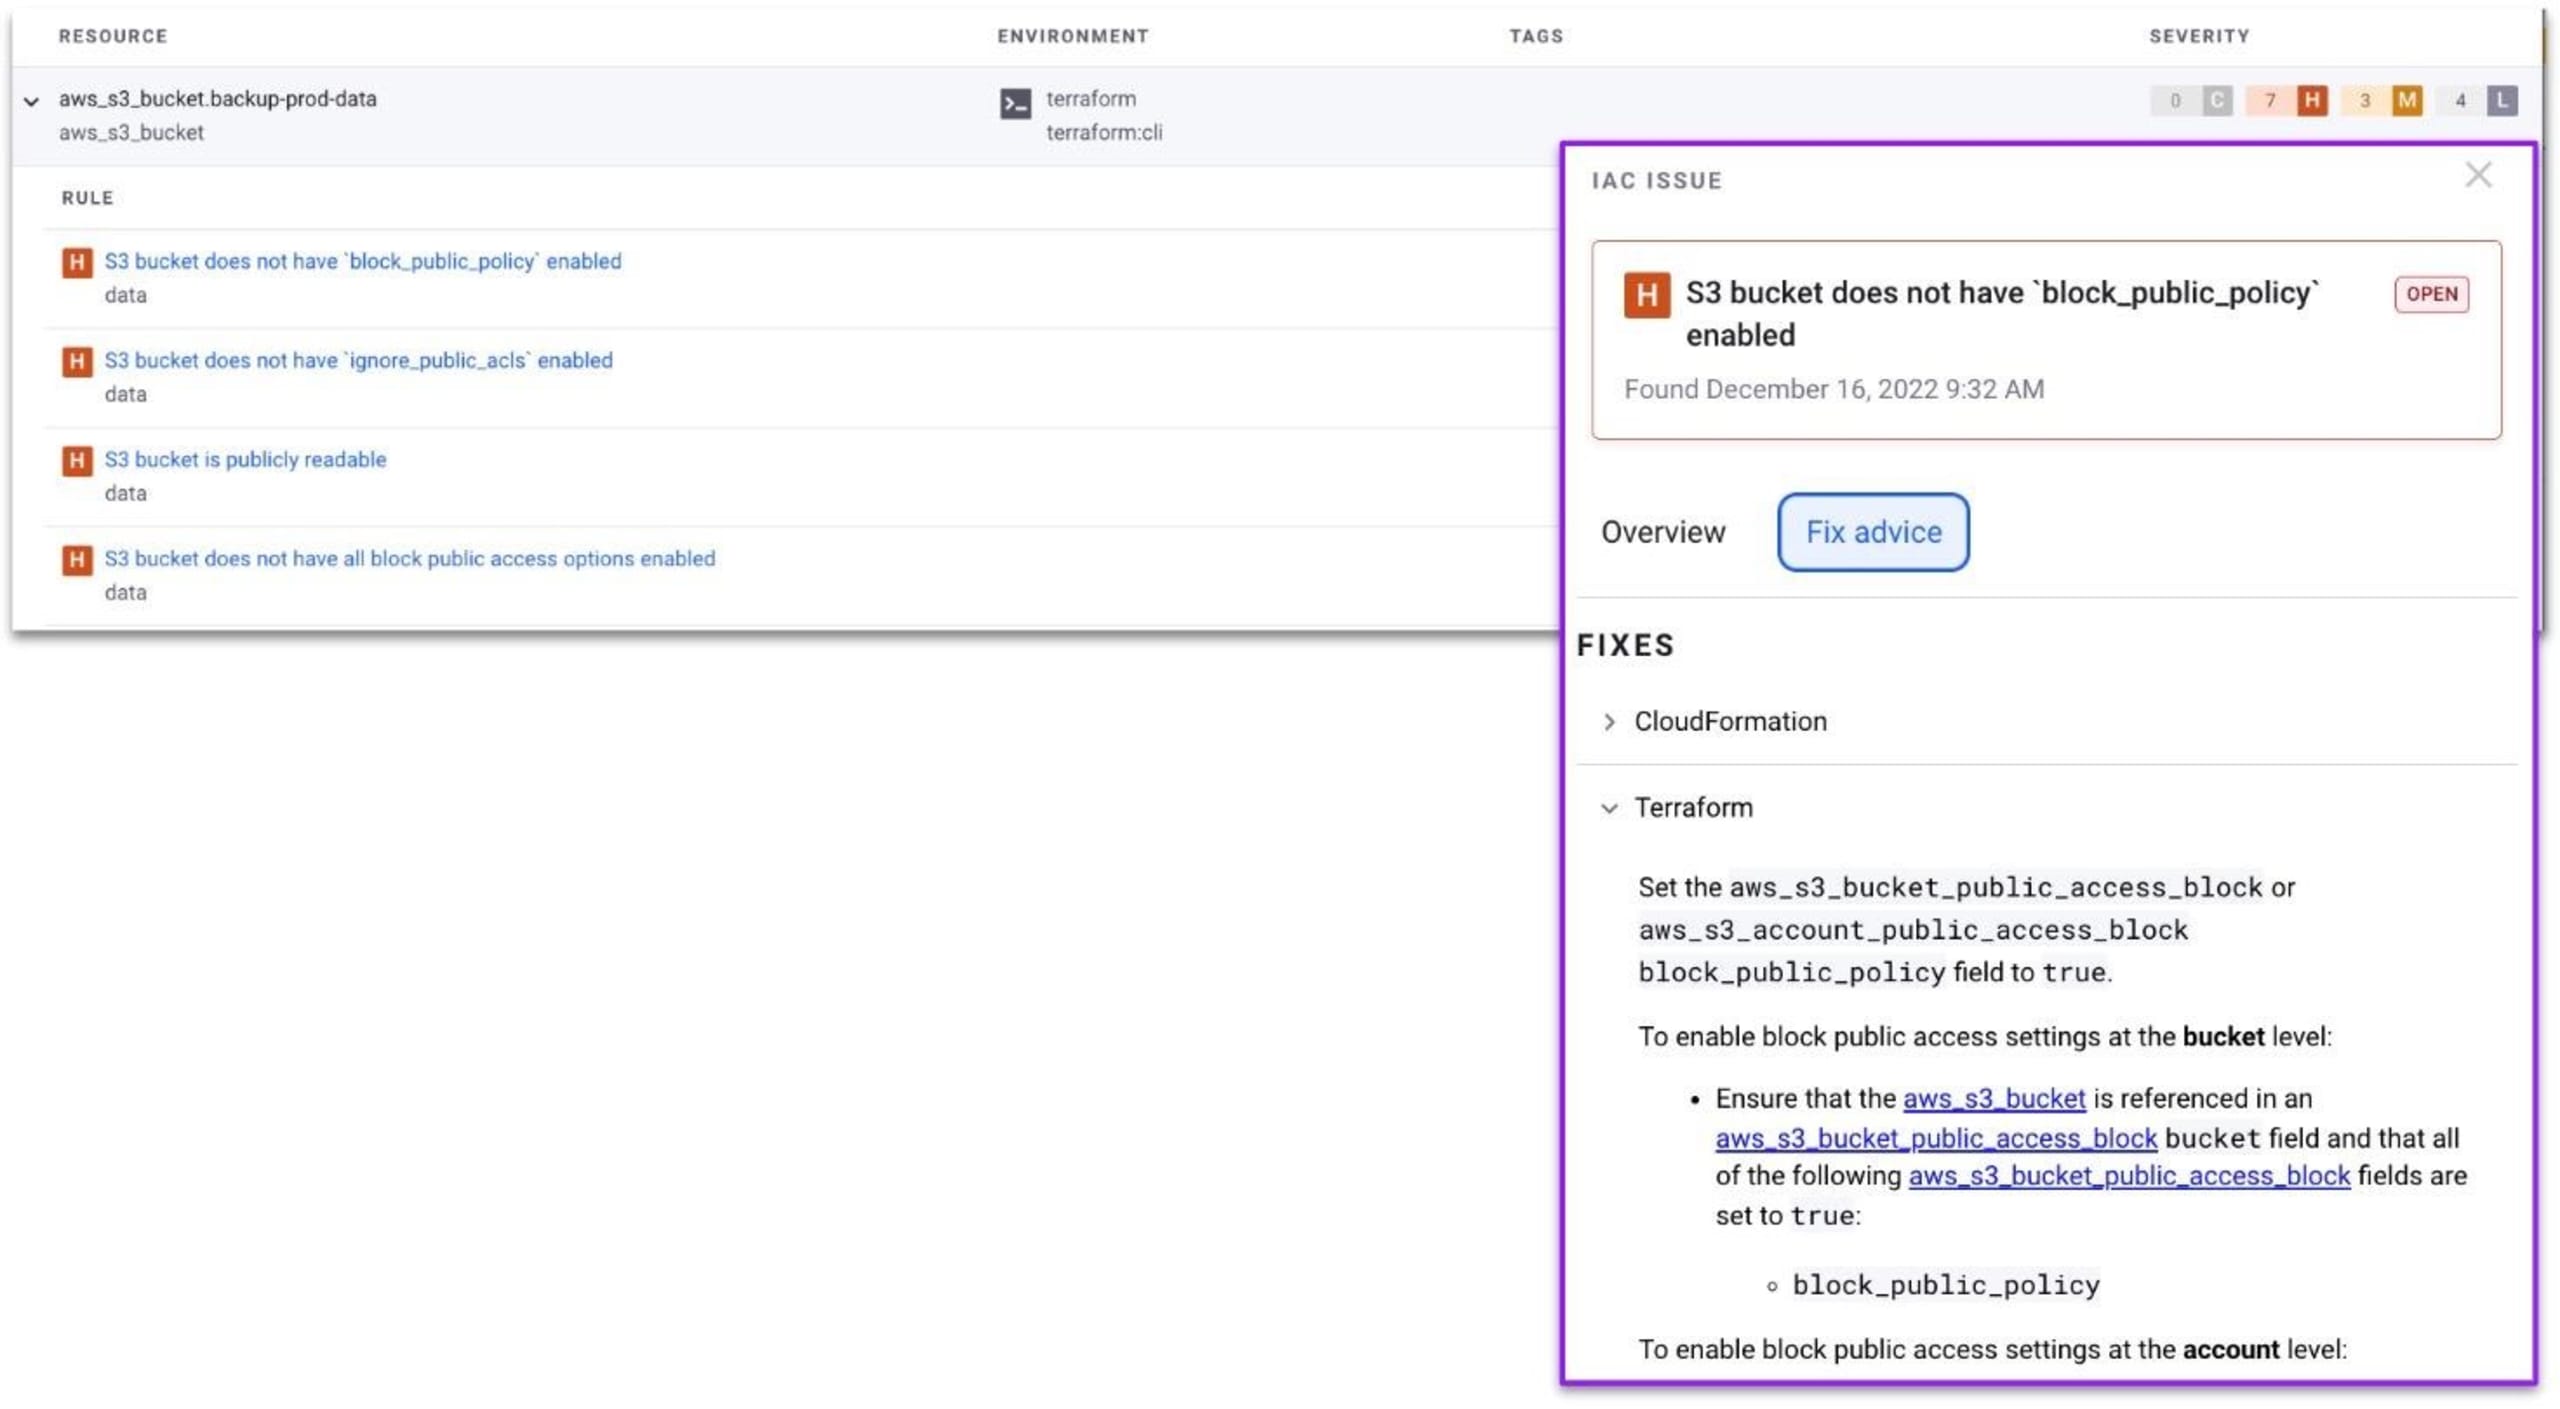
When you view imported infrastructure as code configuration files from SCMs like GitHub or Bitbucket, Snyk will provide you with visual indications of cloud misconfigurations that could become a security breach, such as the following S3 bucket configuration that doesn’t restrict public bucket access control.
Step 3: Continuous monitoring and remediation
Snyk not only detects issues but also offers guidance on fixing them, significantly reducing the time and effort required for remediation. With Snyk's recurring tests and integration with your CI/CD pipeline, you can ensure ongoing security of your AWS environment against misconfigurations.
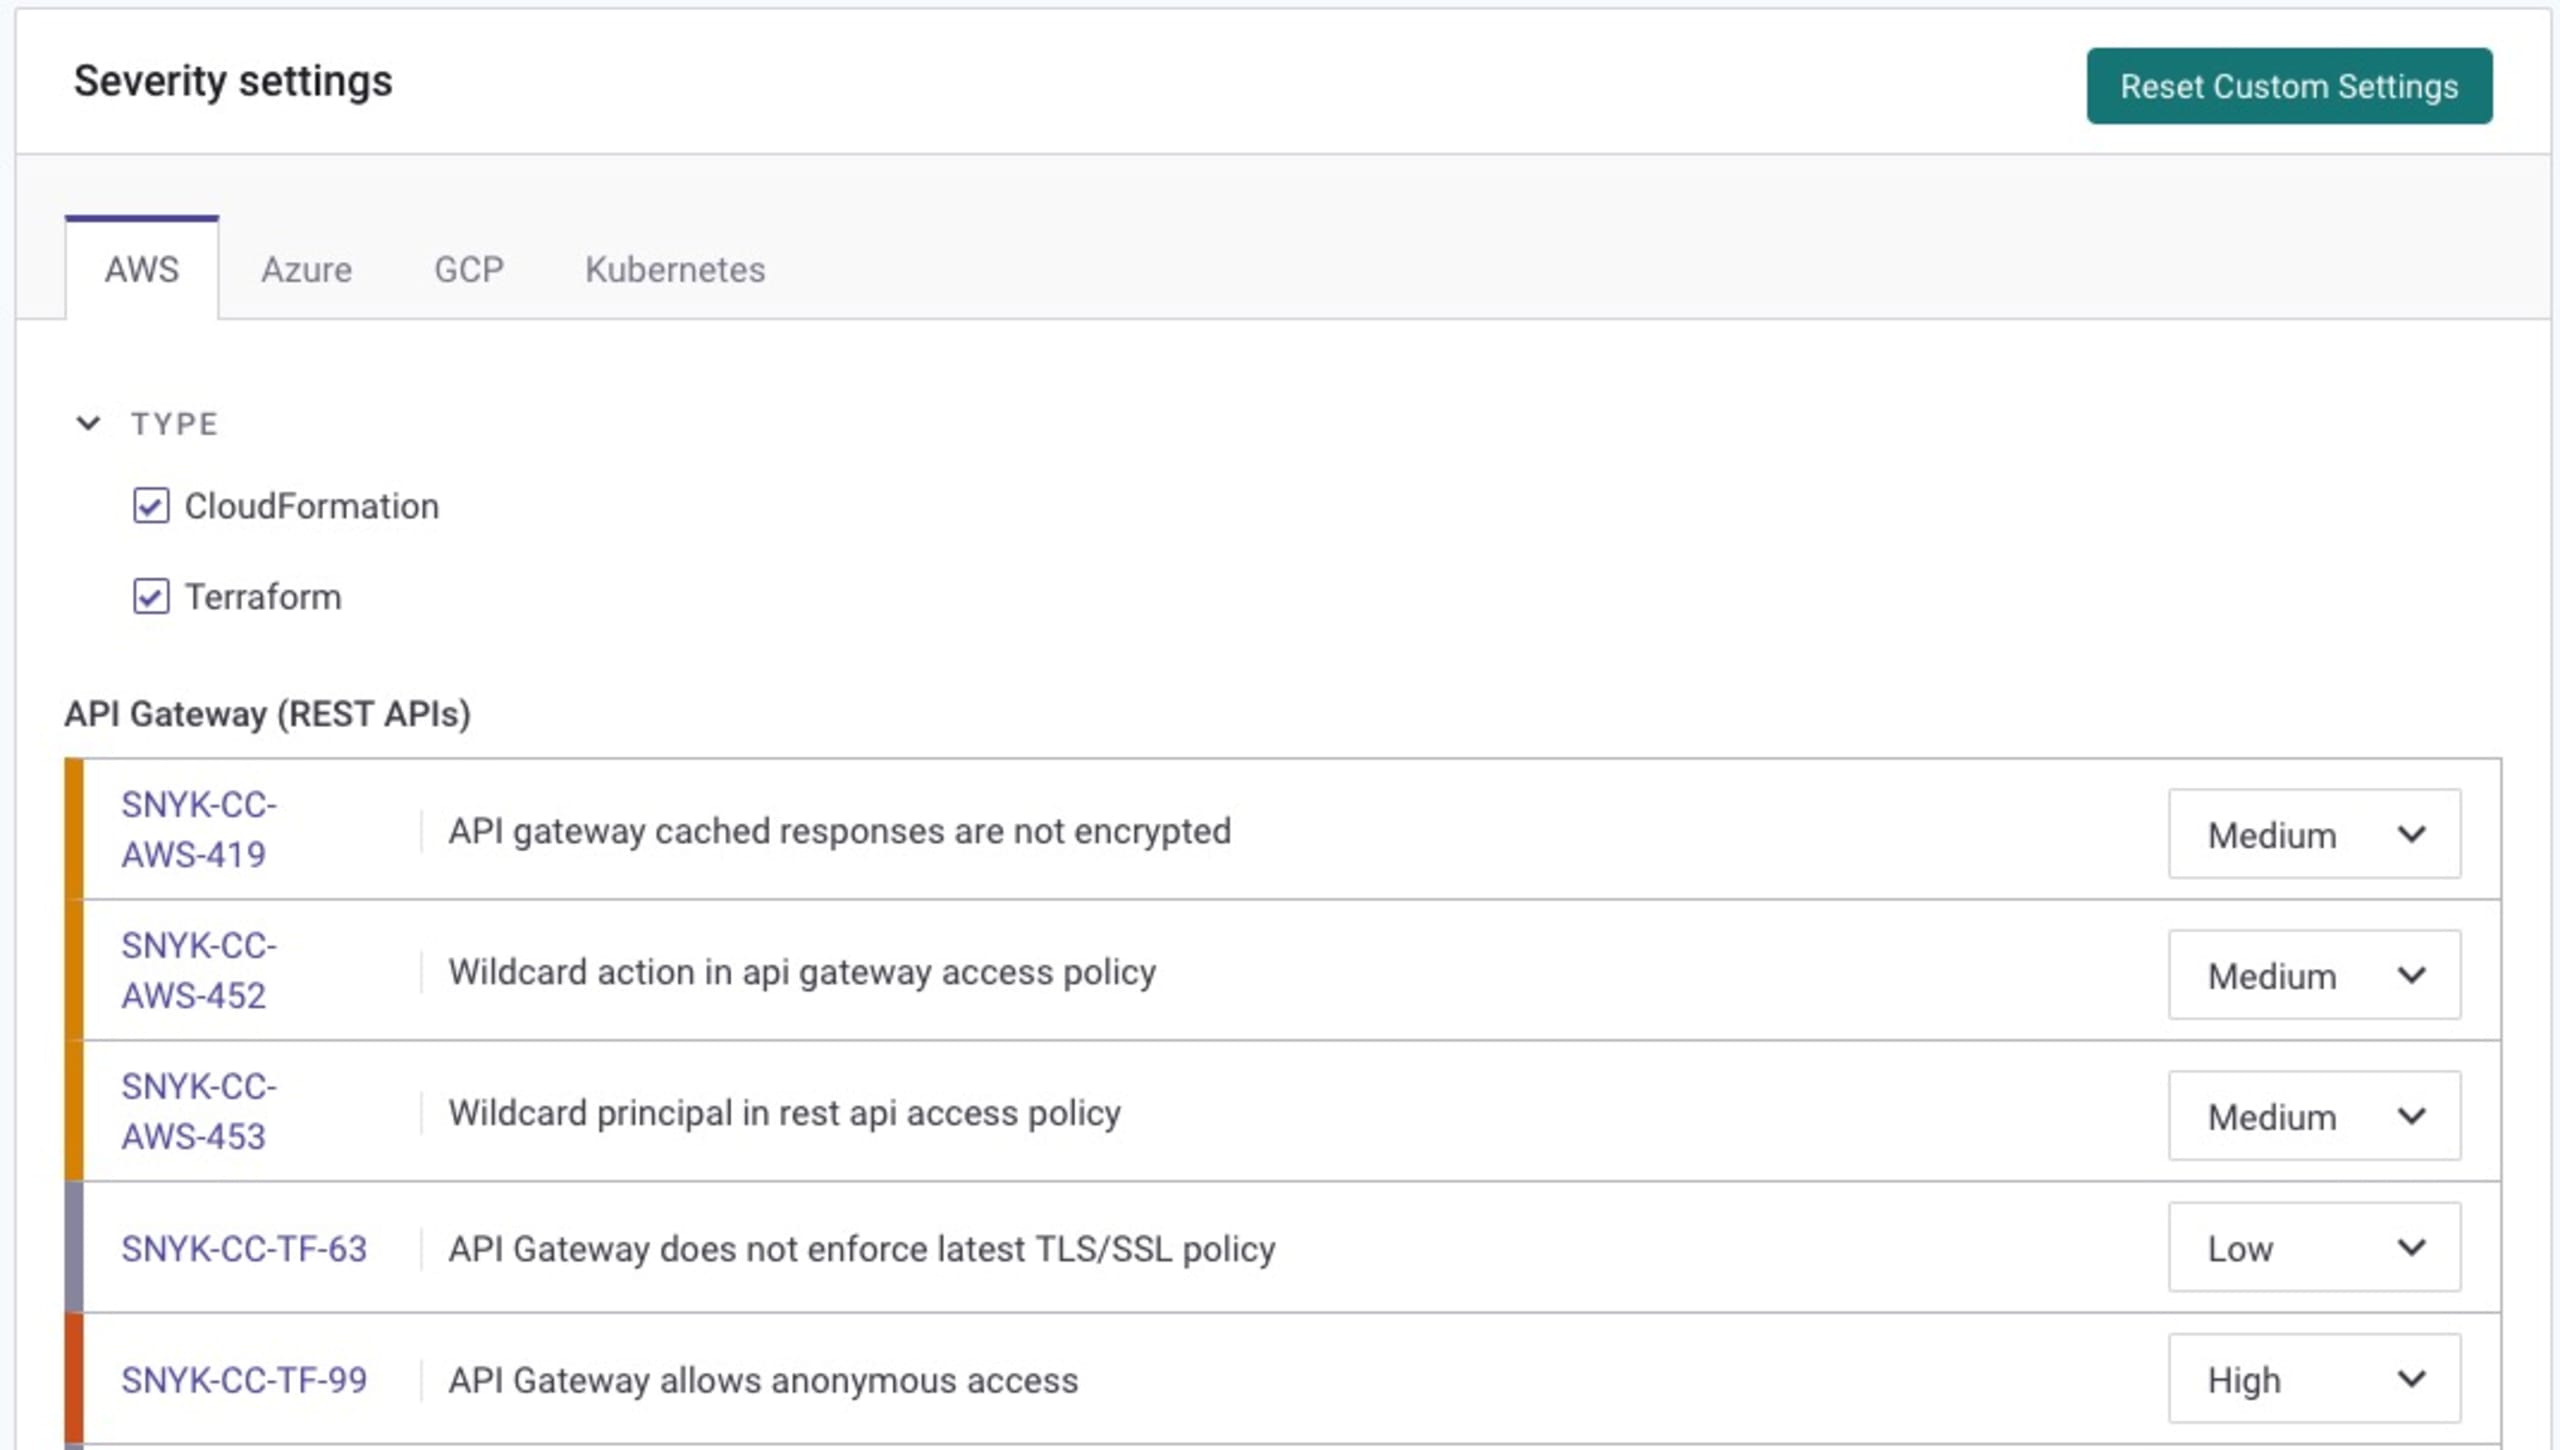
Security teams can also further configure the severity settings for reported cloud misconfigurations to allow you a custom-tuned infrastructure as code security policy per your team needs and security posture:
By integrating Snyk with your AWS environment, you enable a proactive security posture, automating the detection, monitoring, and remediation of misconfigurations in your S3 buckets and other AWS resources. This integration not only bolsters your security but also streamlines compliance and governance across your cloud infrastructure.
What's next for AWS S3 bucket security?
The security measures we've discussed, such as enabling bucket versioning, using bucket policies, and encrypting data, are not just best practices — they're necessary steps to ensure the safety of your data. Implementing these measures can significantly reduce the risk of unauthorized access to your S3 buckets.
As we wrap up our discussion on how to secure an S3 bucket, it's important to remember that security is an ongoing process. The landscape of cloud security is constantly evolving, and staying updated is crucial. To help you continue your journey in securing your AWS S3 buckets, here are some additional resources that you might find useful:
Snyk Learn lesson on SSRF vulnerabilities: Server Side Request Forgery (SSRF) is a common security vulnerability that can impact your cloud infrastructure. Understanding how SSRF vulnerabilities work can help you better secure your S3 buckets. Snyk's Learn lesson on SSRF vulnerabilities provides a comprehensive overview of this topic.
AWS documentation on S3 bucket security: AWS provides extensive documentation on how to secure an S3 bucket. This includes best practices, tutorials, and detailed explanations of security features. It's a valuable resource for anyone looking to enhance their S3 bucket security.
Securing your S3 buckets doesn't have to be a daunting task. Tools like Snyk can help you secure your S3 buckets and maintain the security of your applications. So, don't wait until it's too late. Start securing your S3 buckets today. Remember, the best defense is a good offense. And in the world of cloud security, that means proactively securing your S3 buckets before they become a target.