Building a secure GraphQL API with Node.js
Lawrence Eagles

March 29, 2022
0 mins readGraphQL provides security straight out of the box with validation and type-checking. However, it doesn’t fully address security concerns around APIs. In this article, we’ll learn how to secure GraphQL APIs by building a simple Node.js application using Fastify and GraphQL.
According to its official documentation, GraphQL is a graph query language for APIs and a runtime for fulfilling those queries with our data. GraphQL gives a clear description of the data in our API and enables us to create fast and flexible APIs while giving clients complete control to describe the data they need. Like REST, GraphQL operates over HTTP, so it is database agnostic and works with any backend language or client.
Fastify is a plugin-based, highly efficient, and exceedingly performant Node.js framework suitable for building fast HTTP servers. Inspired by Hapi and Express, Fastify offers a more developer-friendly and better-performing alternative with low overhead.
Fastify supports GraphQL using the Mercurius plugin. The Mercurius plugin is a configurable GraphQL adapter for Fastify, and we will learn more about it in the subsequent sections.
Let’s start with the prerequisites.
Prerequisites
The following are the prerequisites for this article:
Node.js version 12 or above
Basic knowledge of JavaScript
Basic knowledge of GraphQL
Getting started
To begin, we need to create a basic Node.js server.
Create a starter project by making a project folder, and from this folder, run the code below in the command-line interface (CLI). This will bootstrap our application and install the necessary dependencies.
This project uses a specific version of Mercurius. To install it, run the following command:
Next, we enable the ES6 modules to use the standard JavaScript module system instead of commonJS by adding "type": "module", to our package.json file.
Then, we update the NPM scripts with a command to start the Node.js server by opening the package.json file and editing the scripts section as follows:
Note that the --es-module-specifier-resolution=node snippet is required to enable interoperability between the ES module and Node’s commonJS modules.
Now, create an src directory in the root directory. In the src directory, create a graphql folder containing a schema.js and a resolvers.js file. Add the following code to the schema.js file:
Now, add the following code to the resolvers.js file:
We will update the schema.js and add the resolvers.js file in the subsequent section. But, we need to create them now, using some boilerplate code, because they are needed for our server to work correctly.
In the src directory, create an index.js file containing the following code:
The code above creates a primary Fastify server and registers the Mercurius plugin with the options: schema, resolvers, graphiql, and queryDepth.
Now we can start the server by running npm run dev. The output is as follows:
We can now see that our server is working. In the next section, we’ll start building our blog APIs with GraphQL.
Building a secure slog API with Fastify and GraphQL
There are several different strategies to secure an API. Such strategies include:
Authentication and authorization: Authentication is about confirming a user is who they claim to be, while authorization is about permissions. Authentication determines whether a user can log in and, subsequently, remembers that user. Authorization determines what permissions are assigned to an identified user, which regulates whether they can perform operations such as create, read, update, or delete.
Masking errors: Withholding the exact information of a server error to prevent unintentionally providing the client with details that may expose the server’s vulnerabilities.
Query depth limit: Specifying a maximum depth for GraphQL queries. Deeply nested queries are dangerous because they are resource-demanding and expensive to compute. Consequently, they can crash our APIs.
Sanitizing and validating inputs: Use standard web security techniques to prevent users from sending malicious data. We will leverage the built-in GraphQL validation in our application.
This article builds and secures our APIs with the above strategies by using Mercurius and the Mercurius Auth plugin.
For our purposes, the Mercurius Auth plugin has two principal features. First, it enables us to define custom auth directives on fields in our schema. Auth directives are strings that are used as identifiers for protected fields in our schema.
In addition, it allows us to apply custom auth policies to these protected fields when making a GraphQL request.
We start by creating mock data. In the src directory, create a data folder containing an index.js file with the code below:
Next, we set up our schema by replacing the boilerplate code in the schema.js file with the following code:
We created our GraphQL schema in the code above and defined auth directives for the user and users fields. In a moment, we will apply custom policies to these protected fields.
Now, we add our resolvers by replacing the boilerplate code in the resolvers.js file with the following code:
The code above contains resolvers to handle the user, users, and login queries.
Finally, we must add a custom auth policy by registering our Mercurius Auth plugin. To do this in the index.js file in the src directory, we add the following code below the register auth policy comment, found on line 19:
In our custom policy above, the authContext method retrieves the user token in the headers, while the applyPolicy method contains custom policies for authentication and authorization.
Also, when a user fails an authentication or authorization, we throw an error with a generic message such as “An error occurred. Try again!” This message appears in lieu of returning a detailed server error message to the user, which can potentially expose any existing server vulnerabilities.
With this, our work is complete. We will test our APIs in the next section.
Testing the API
First, we start our server by running npm run dev from the root directory. Next, we retrieve the GraphQL playground from http://localhost:4500/playground.
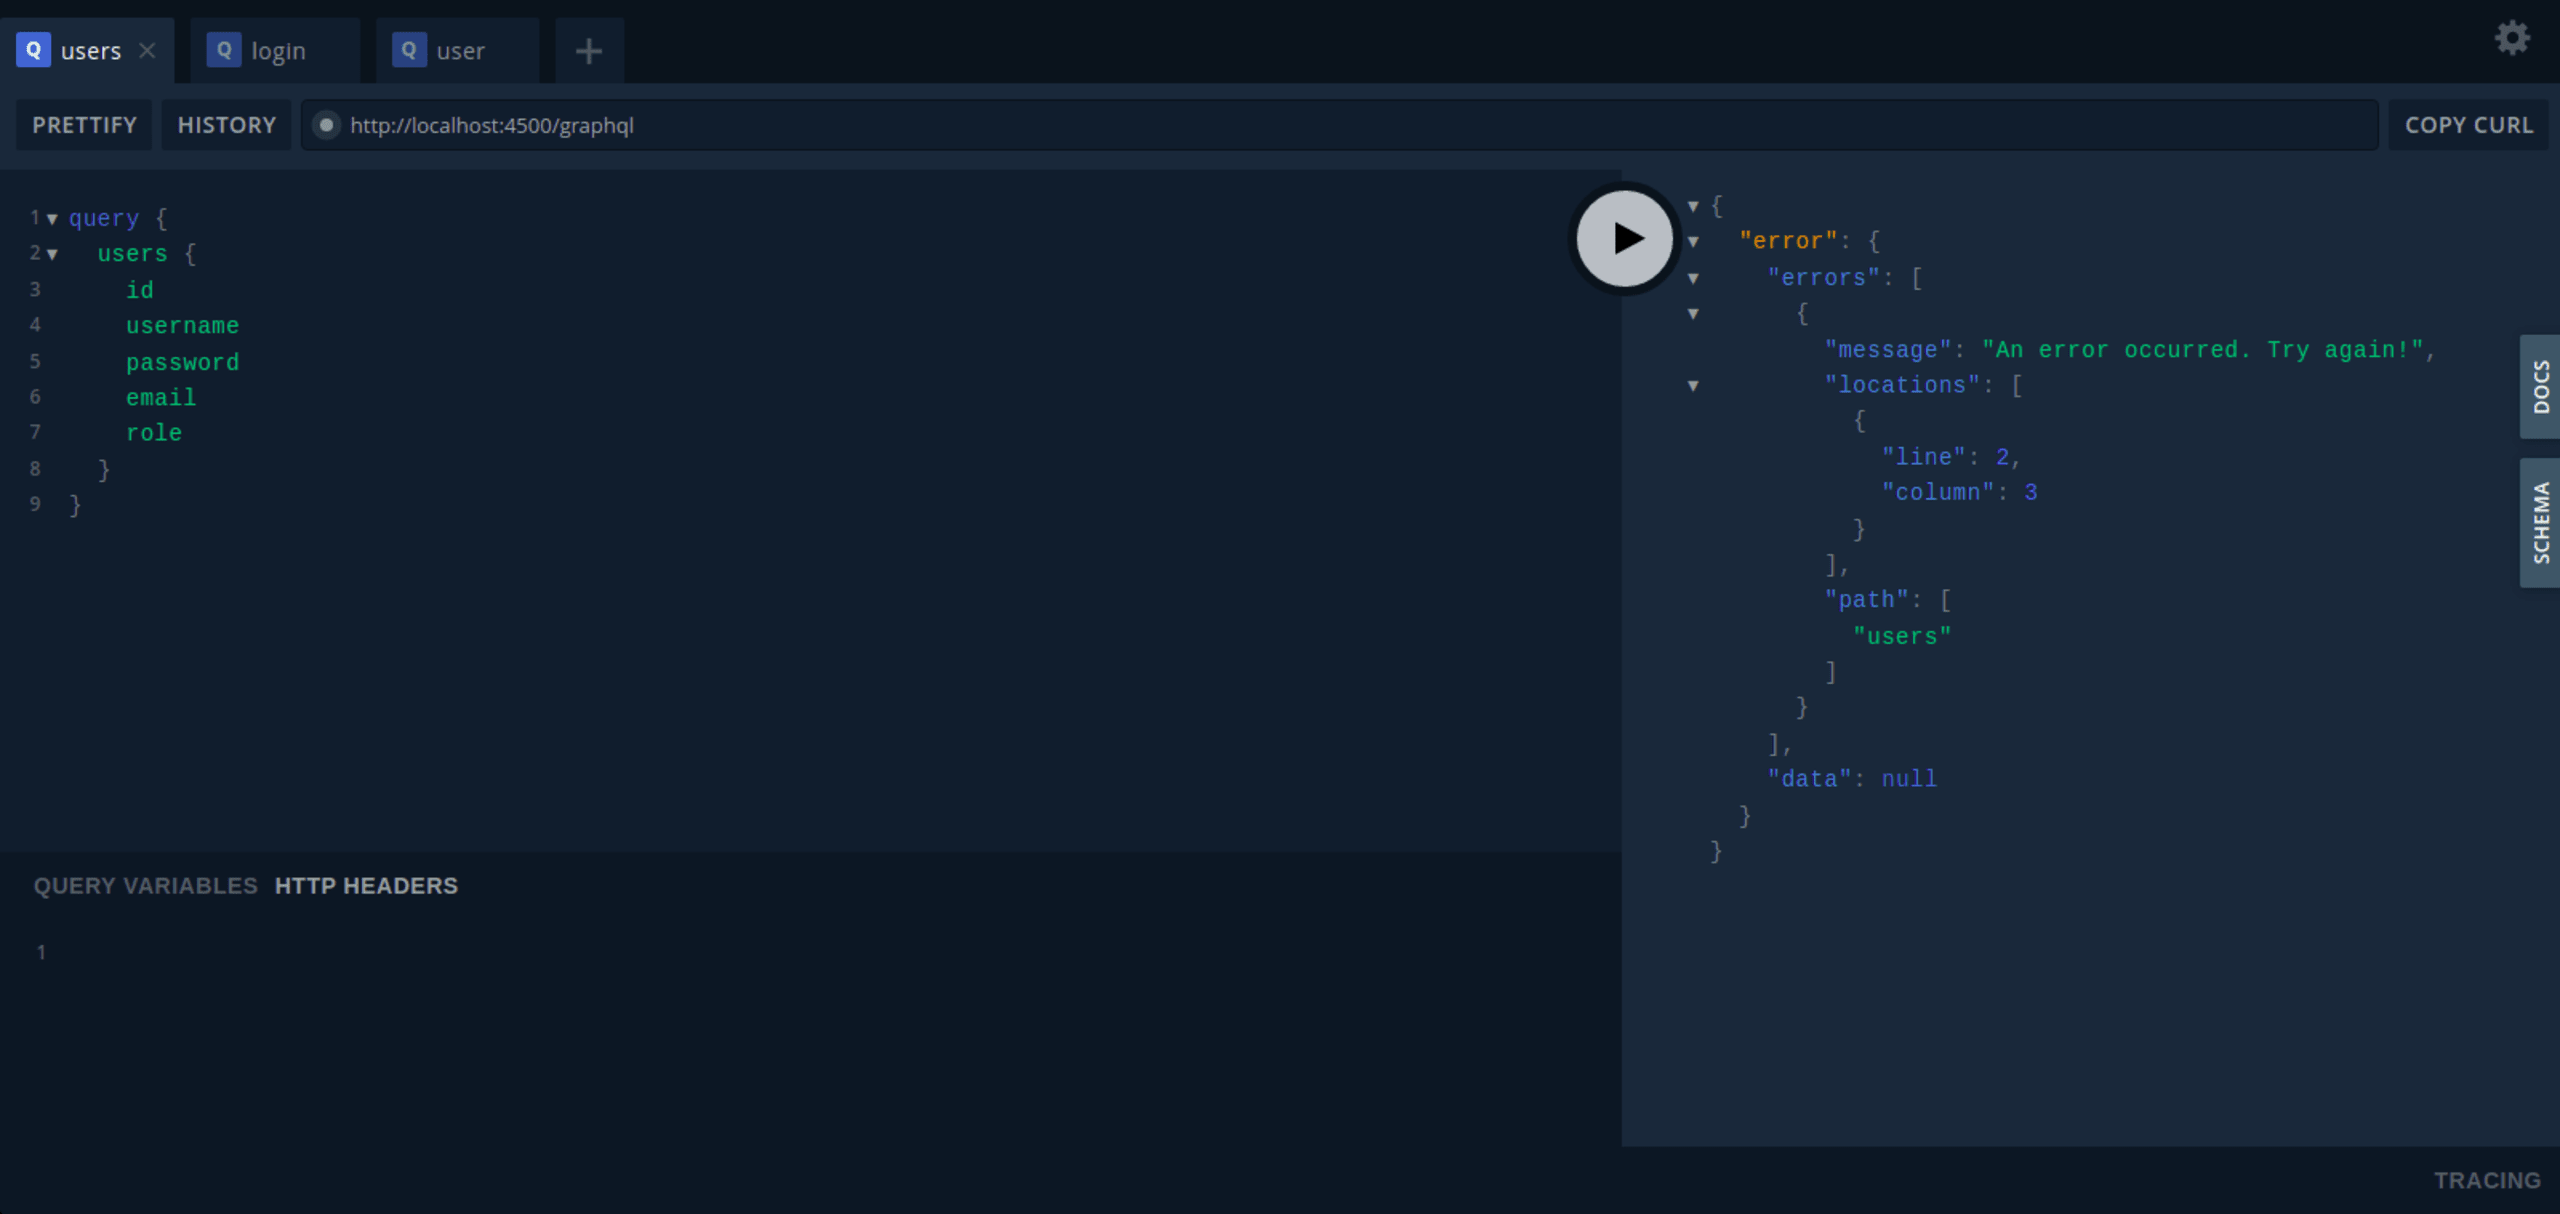
Now, when we query any protected API, like users or user, we get an error as shown below:
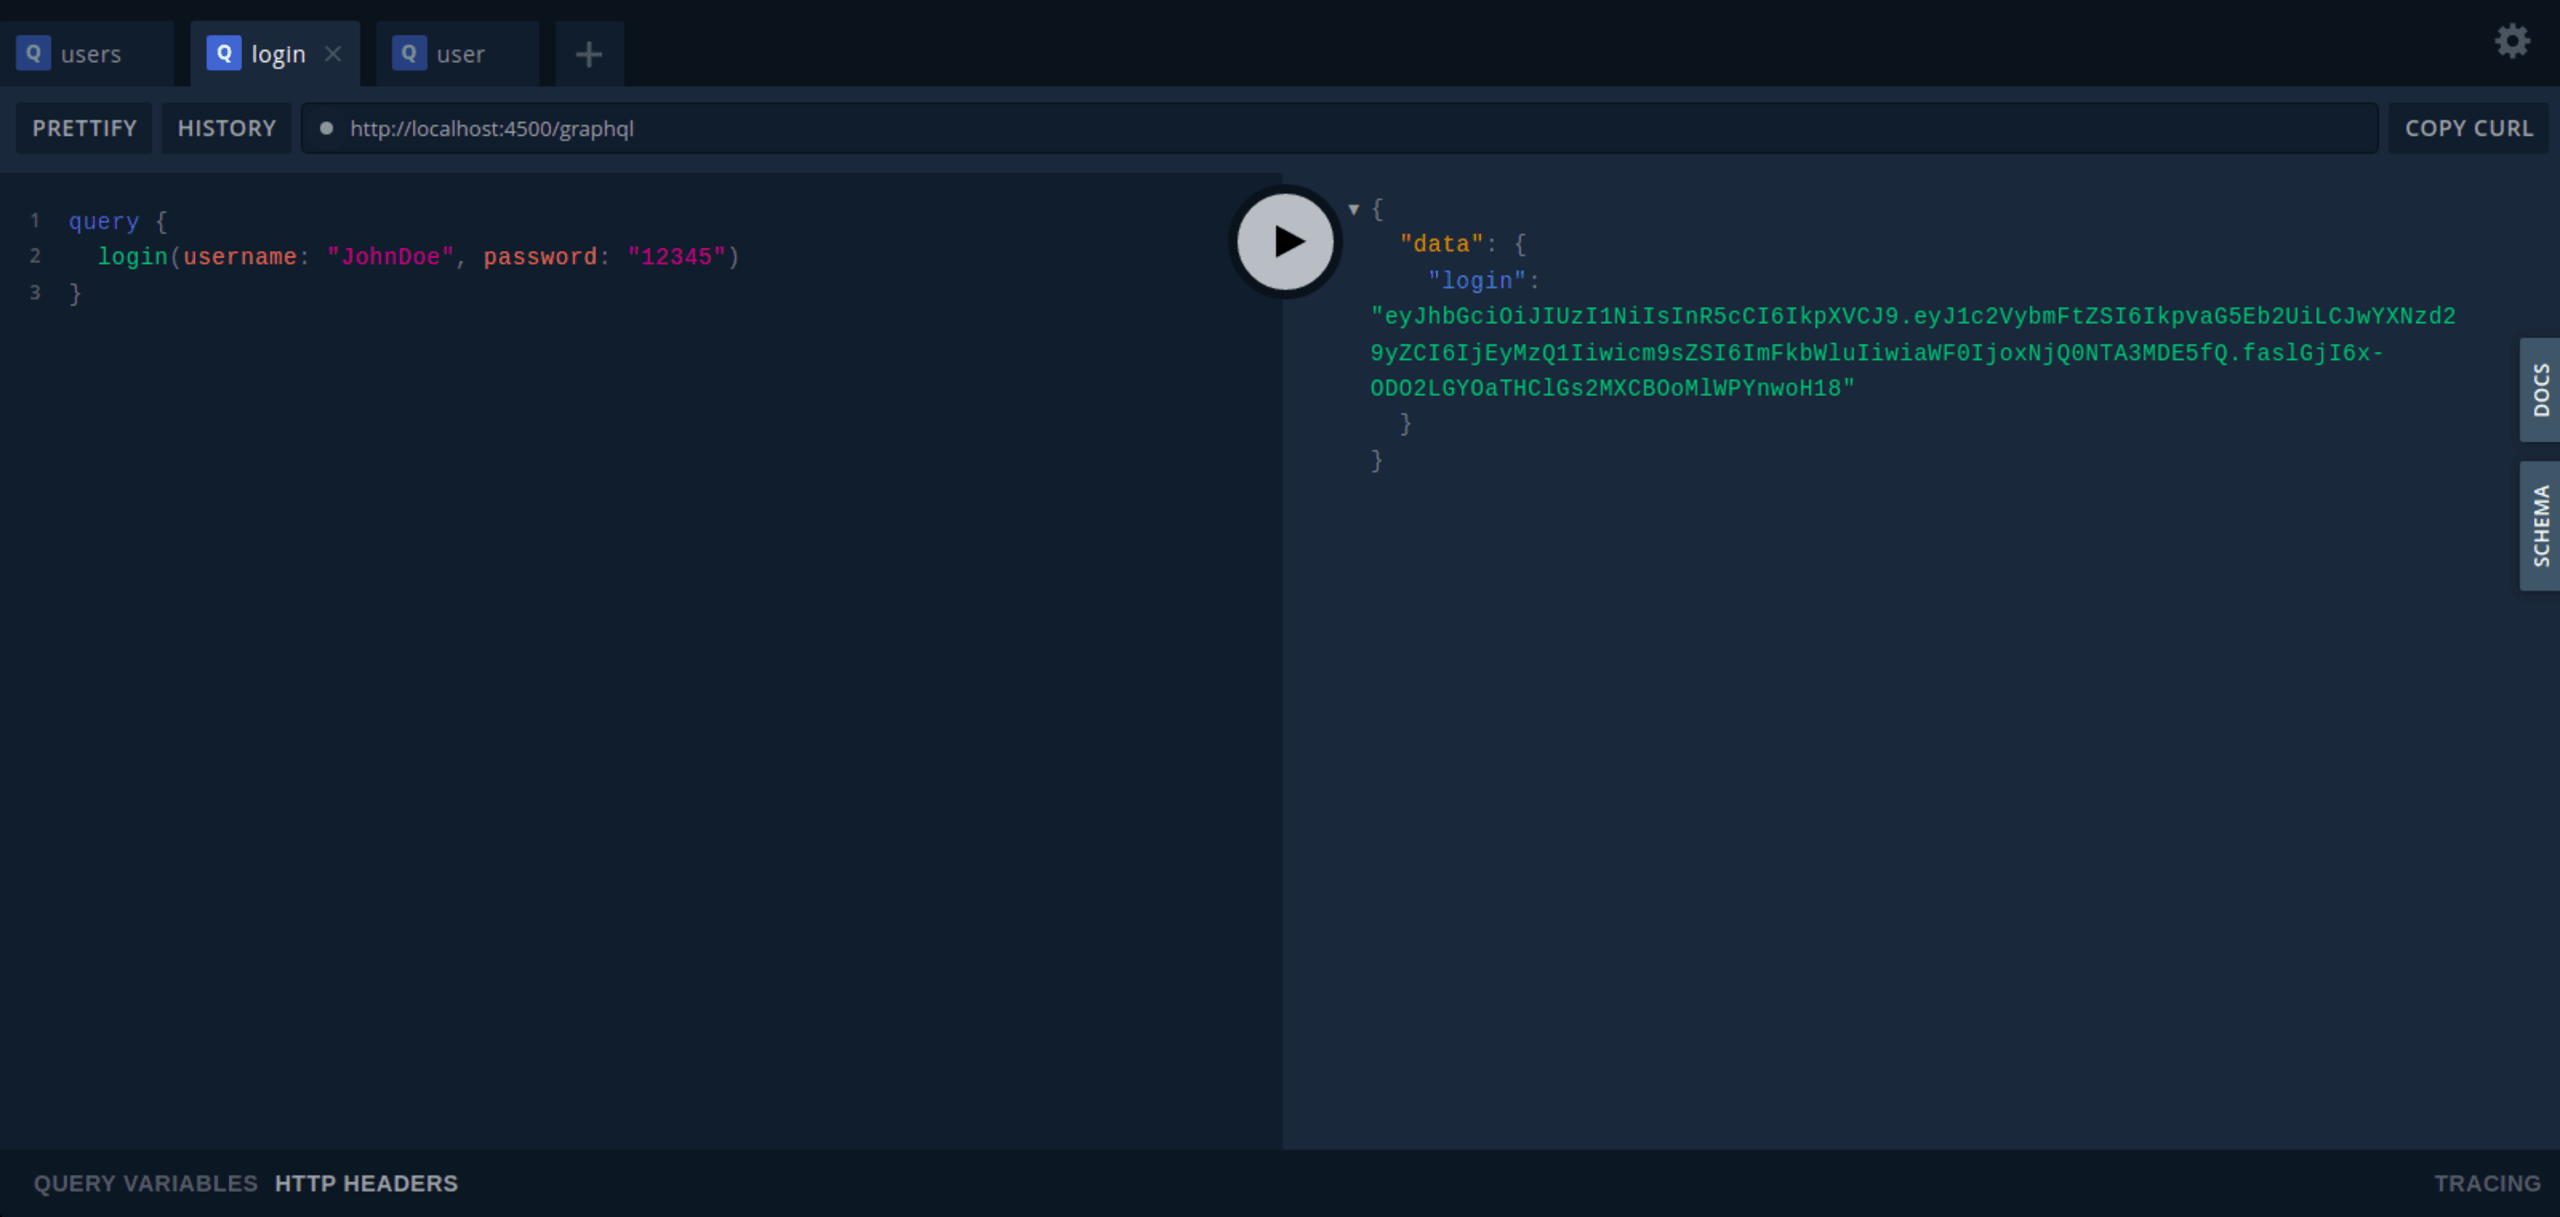
So, for our query to be successful, we must authenticate ourselves. Let’s log in to get a token.
To log in, open a new tab in the playground and run the following query:
If the query is successful, a token is generated and returned as shown in the image below.
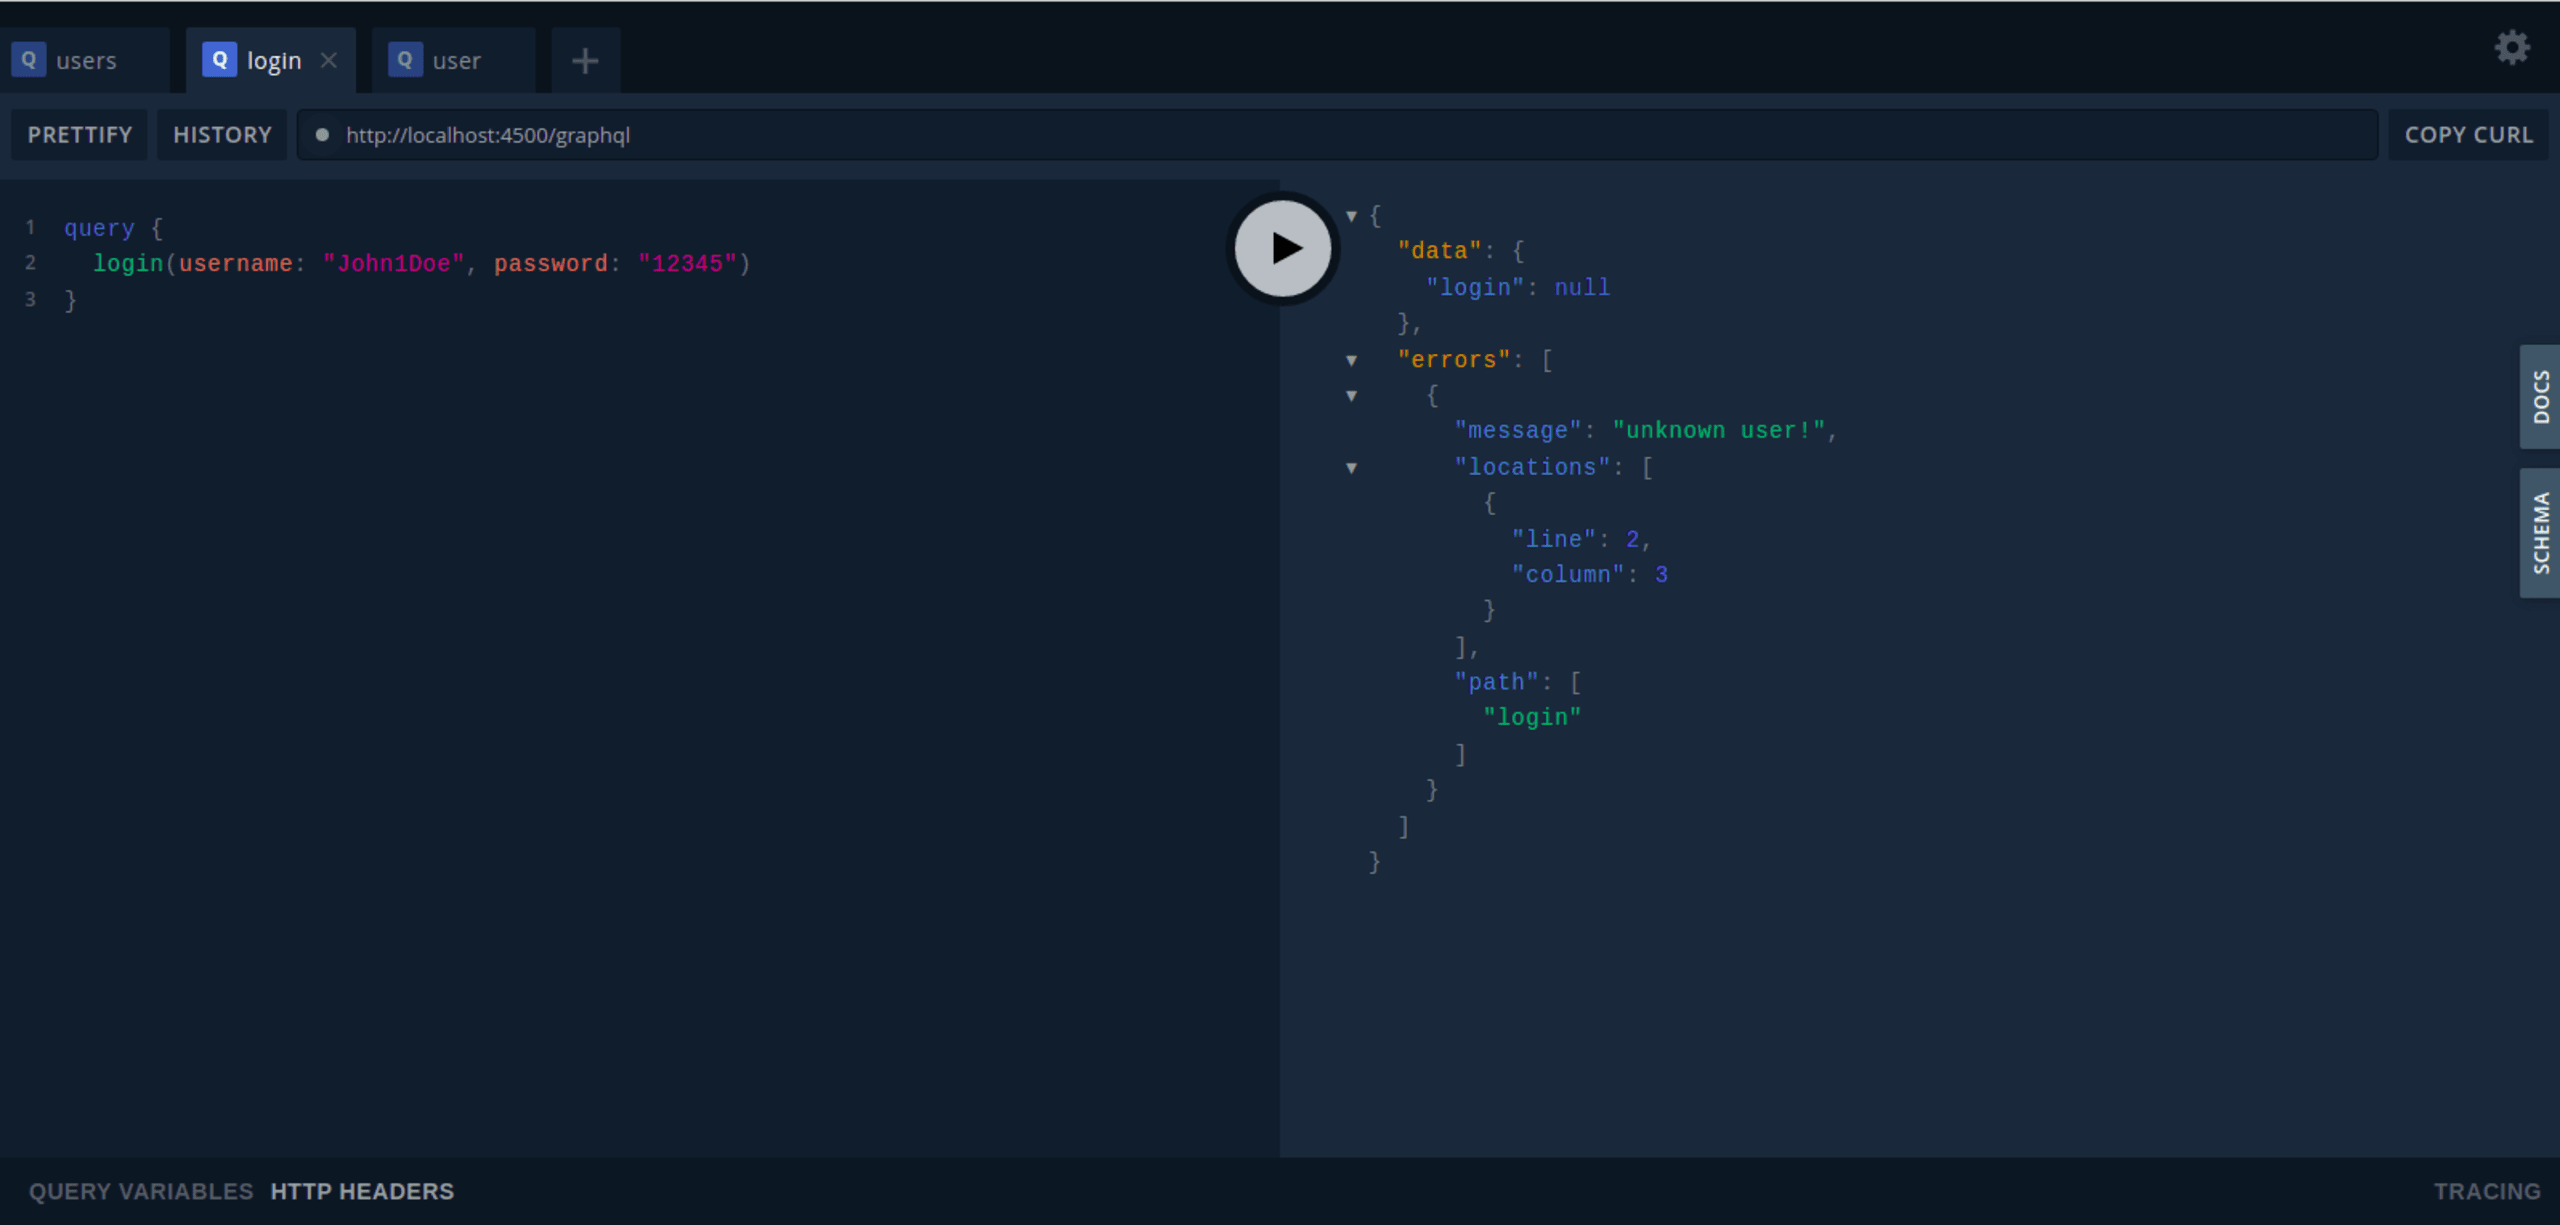
Note that the user data used to log in is already in the index.js file in the data directory.
Attempting to login with user data not in that file (such as username: “John1Doe”) results in an error, as shown below:
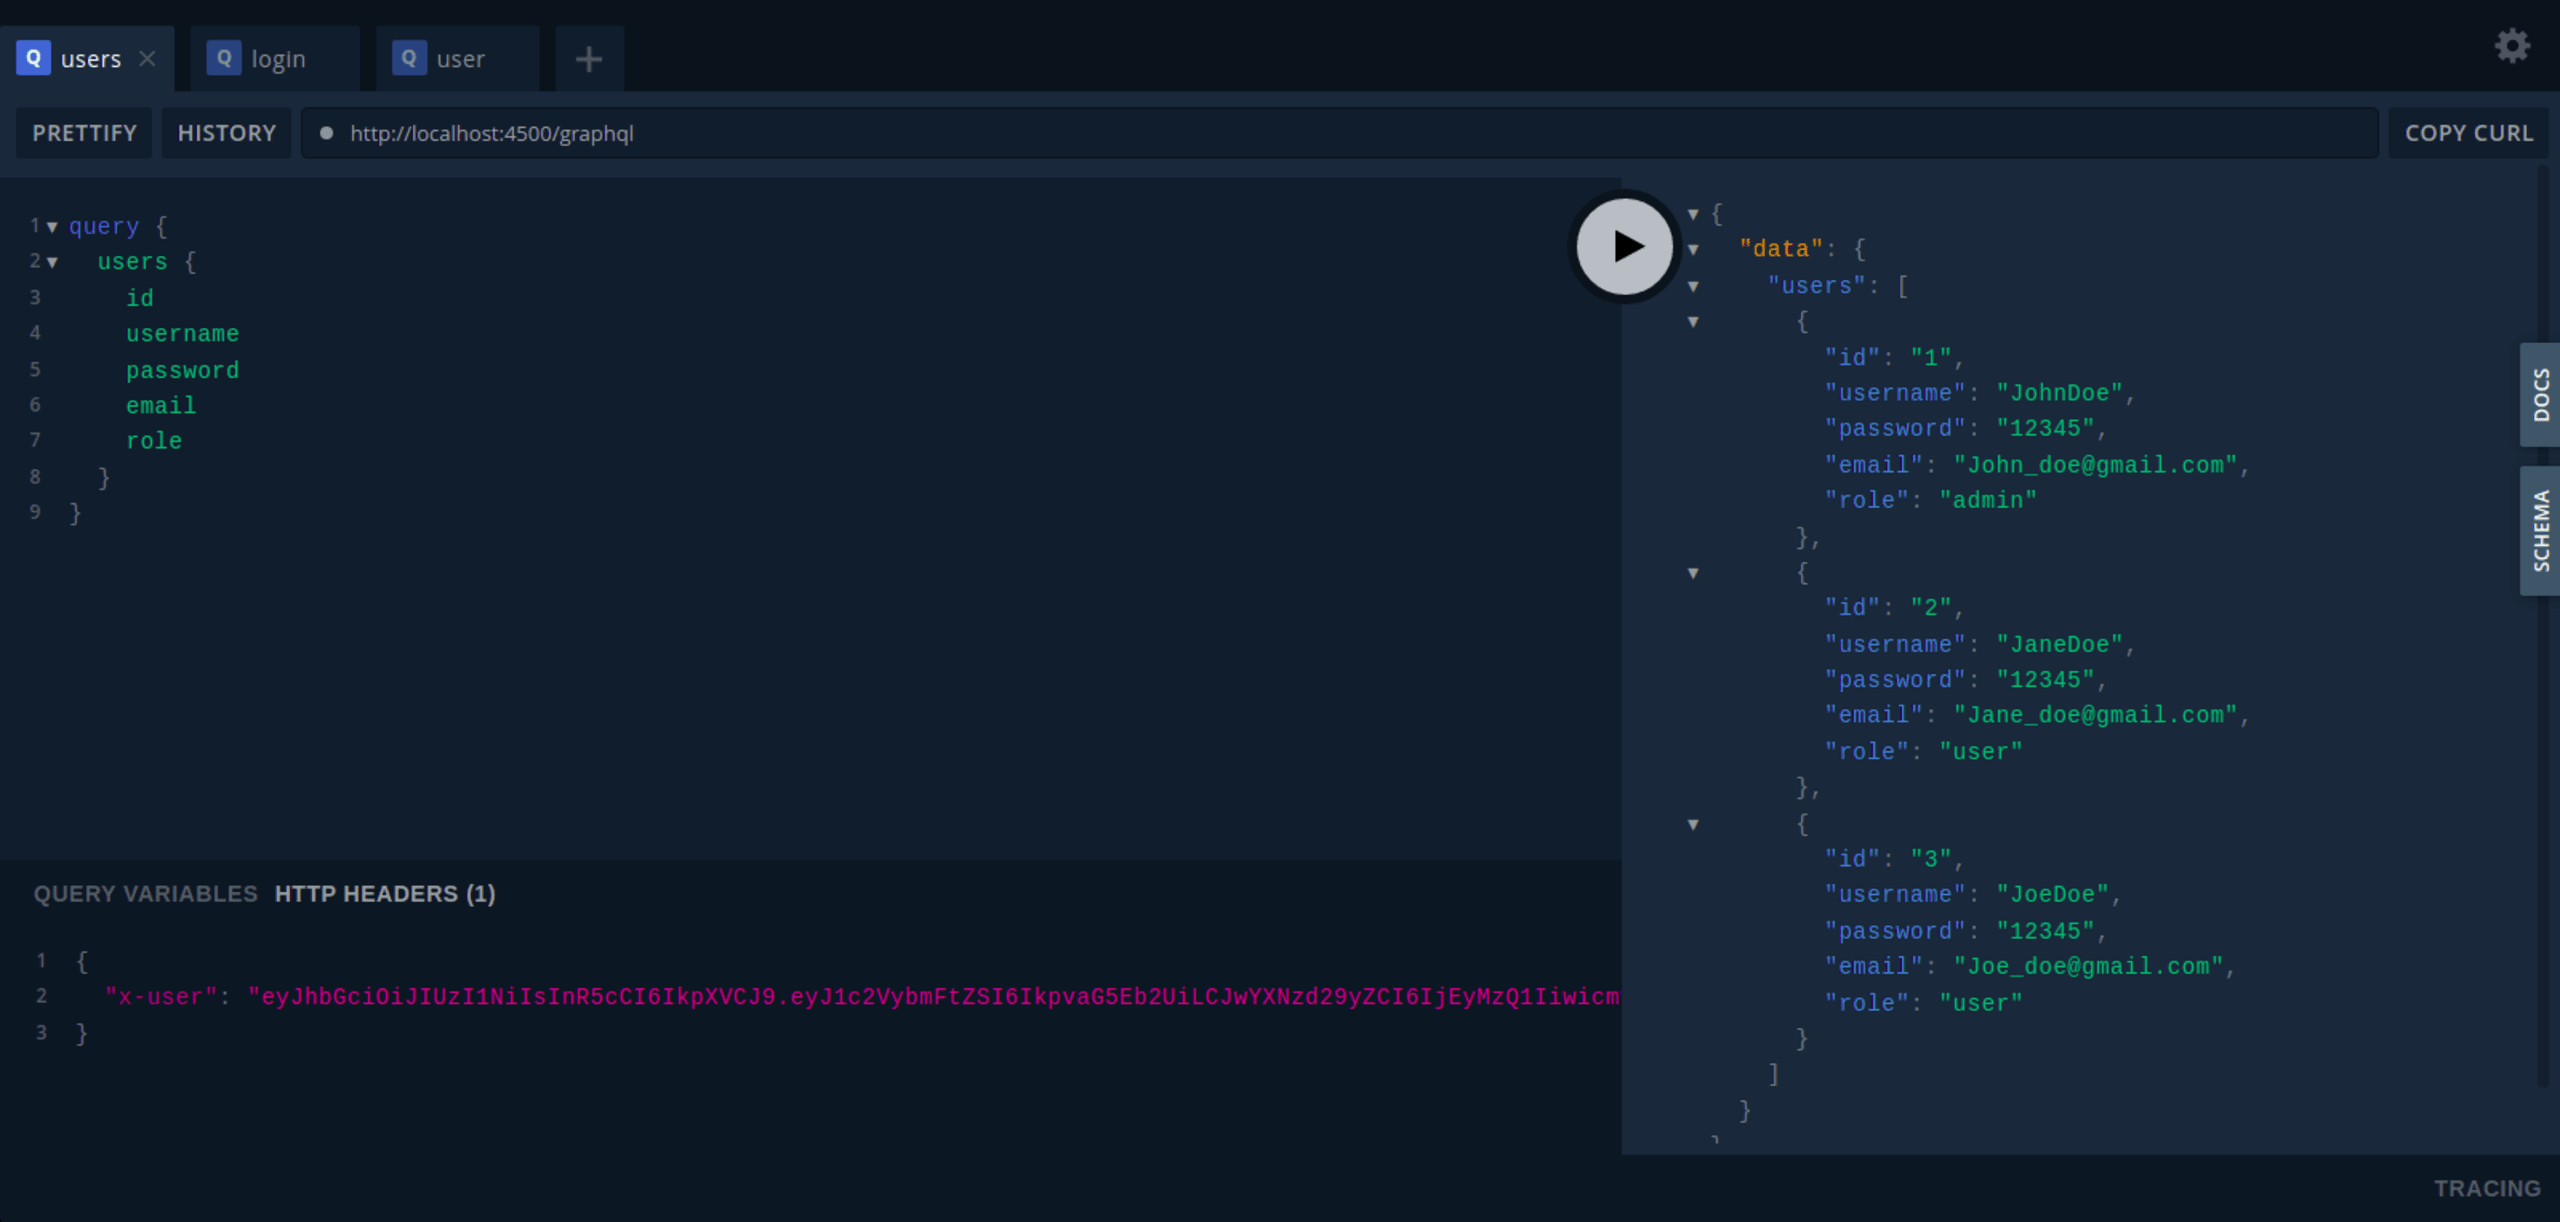
Now, by passing our token in the headers as x-user, we can successfully query our protected APIs, as shown below. Make sure to copy the token received from the login query and use the value for x-user.
users query
Here is a sample users query:
Add your token as the value of the x-user HTTP header parameter, as shown below:
This results in the following output:
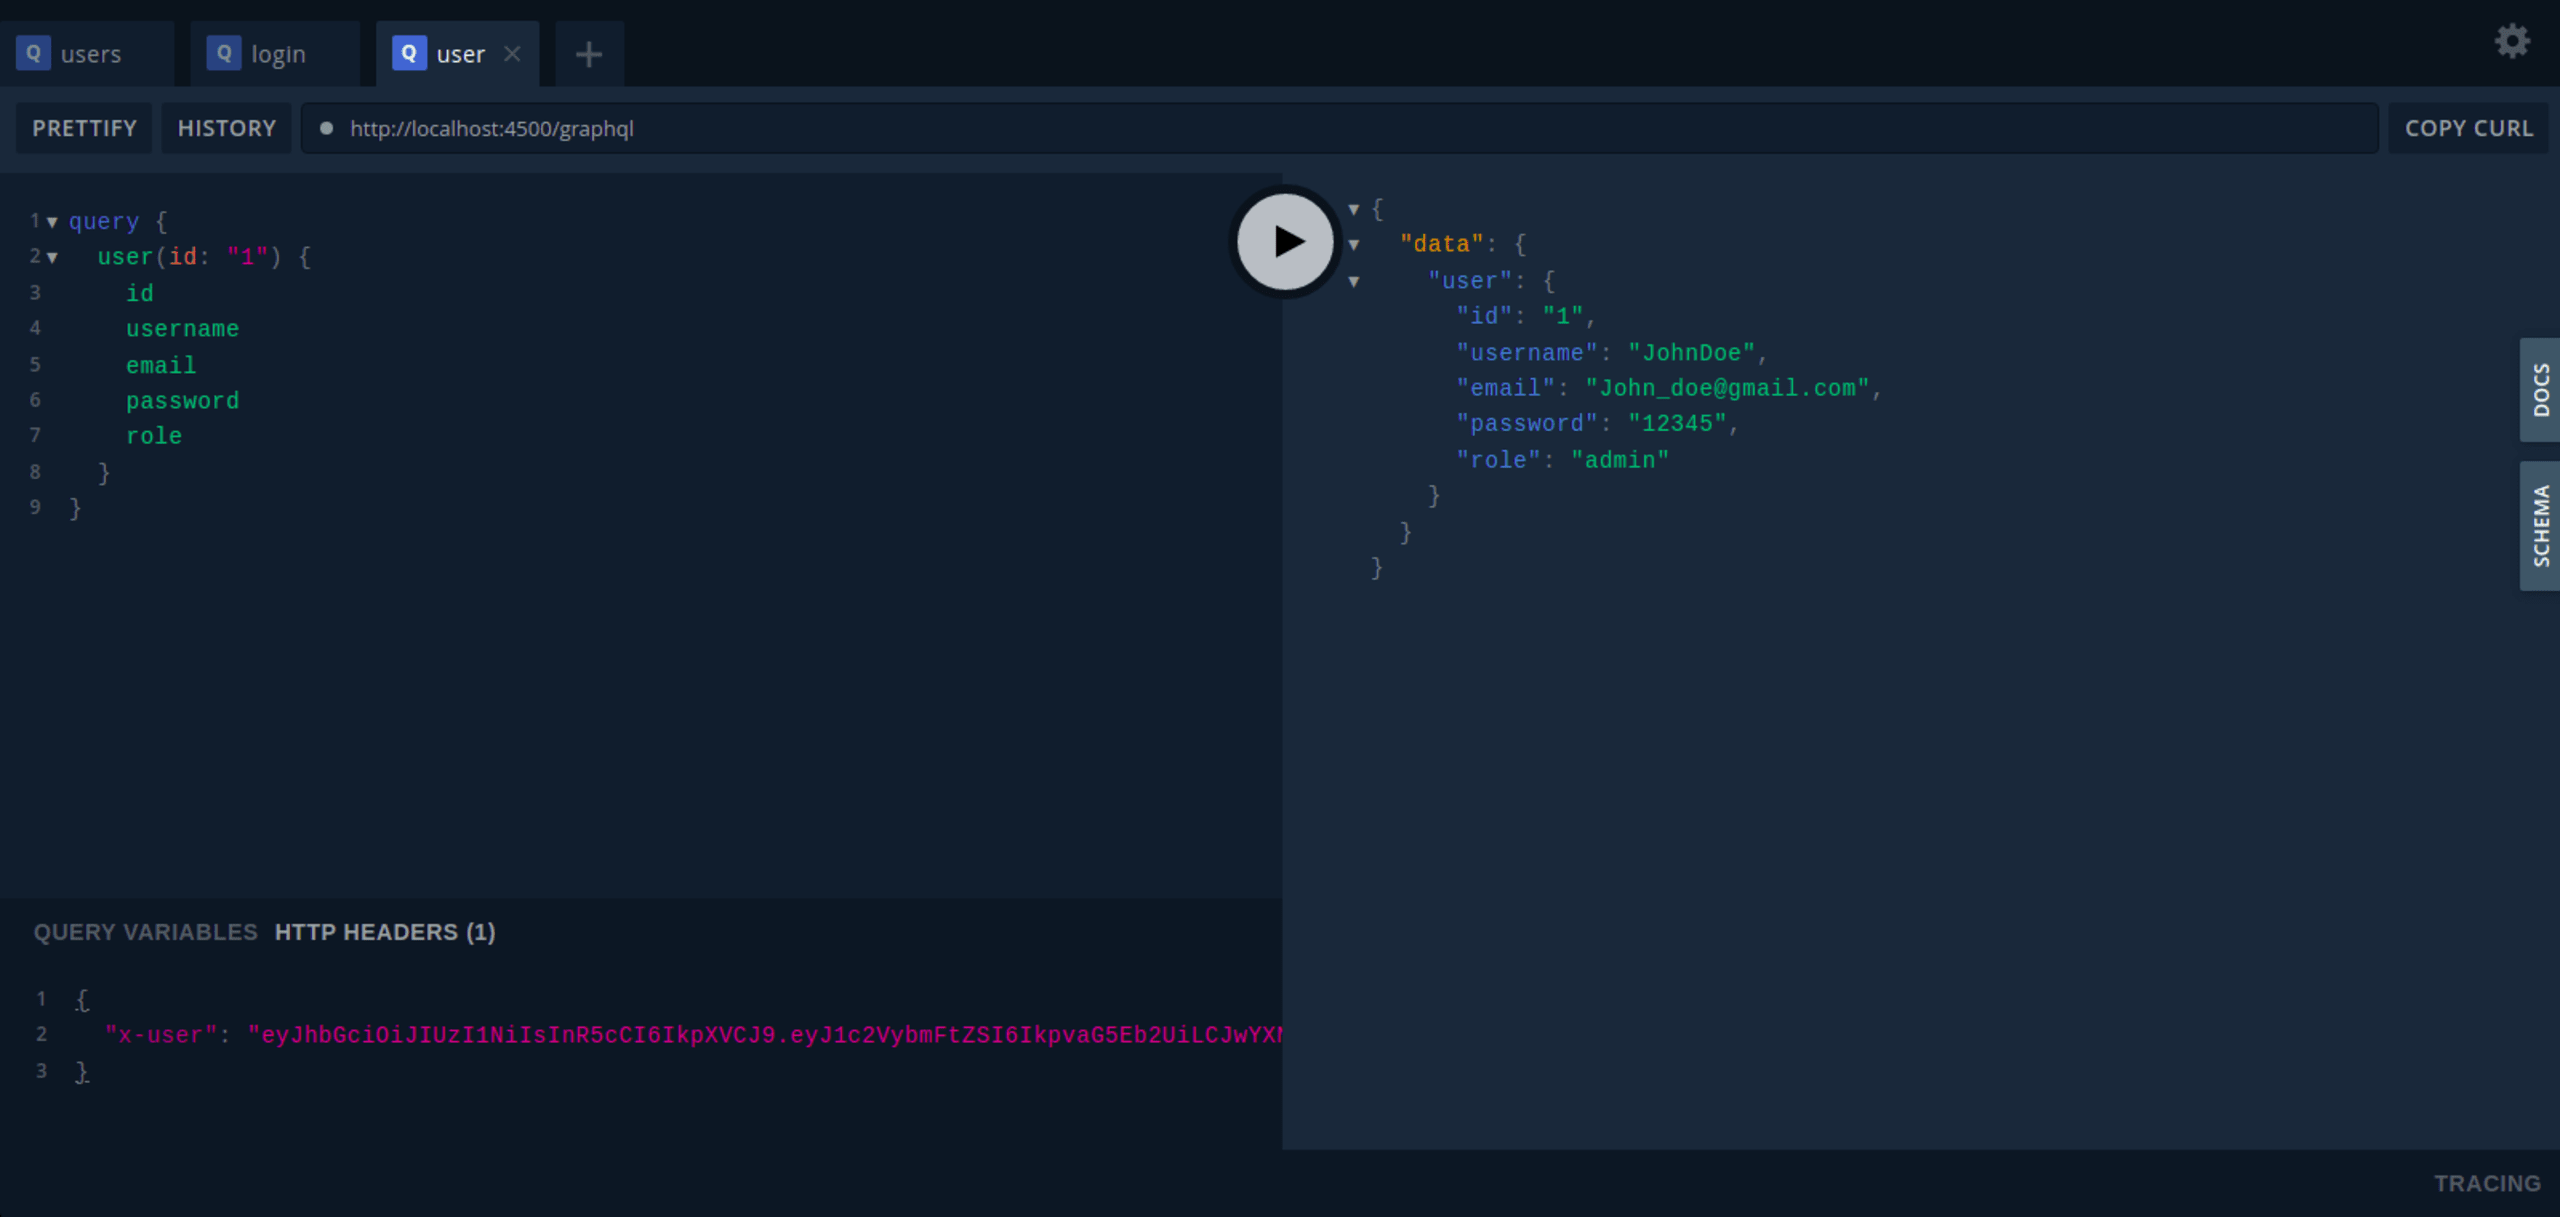
user query
Here is a sample user query:
Add your token as the value of the x-user HTTP header parameter, as shown below:
This results in the following output:
Conclusion
In this article, we discovered how easy it is to secure GraphQL APIs by using Fastify and GraphQL to build a simple Node.js application.
As discussed, GraphQL comes with some built-in security, such as validation and type checking. However, the flexibility and power that enable users to request data at will means that security should always be a principal concern.
This article also reviewed some strategies for securing GraphQL APIs. These are authentication and authorization, query depth limit, masking errors, and sanitizing and validating inputs.
These security strategies are tremendously successful, but we can add extra security by implementing other methods, such as query timeouts and rate limits, which specify the frequency with which a client can query an API in each period.
Get started in capture the flag
Learn how to solve capture the flag challenges by watching our virtual 101 workshop on demand.
Try our free online JavaScript code checker tool to see how the Snyk code engine analyses your code for security and quality issues.