Using Pulumi to automate the Snyk Kubernetes integration for containers
Pas Apicella
February 9, 2022
0 mins readWe have all heard of the term infrastructure as code (IaC), however code in this context is not really code in the sense of a programming language. IaC usually refers to the configuration of infrastructure via tools like Terraform, CloudFormation, Kubernetes YAML, or Azure Resource Manager templates, which is really the definition of how the infrastructure will be created. These configurations don’t allow the flexibility and power you get from a modern programming language, so IaC is code, but not usually that kind of code.
In this blog post, we will walk through the process of using Pulumi, a new open source tool that allows developers to build code in multiple languages like JavaScript, Typescript, Python, and Go to create all that is required to configure the Kubernetes integration in Snyk Container.
Snyk Kubernetes integration overview
Snyk integrates with Kubernetes, enabling you to import and test your running workloads and identify vulnerabilities in their associated images and configurations that might make those workloads less secure. Once imported, Snyk continues to monitor those workloads, identifying additional security issues as new images are deployed and the workload configuration changes.
What is Pulumi?
Pulumi is an open source IaC tool that utilizes the most popular programming languages to simplify provisioning and managing cloud resources.
Founded in 2017, Pulumi has fundamentally changed the way DevOps teams approach the concept of infrastructure as code. Instead of relying on domain-specific languages, Pulumi enables organizations to use real programming languages to provision and decommission cloud native infrastructure.
Pulumi supports the following programming languages:
Python
JavaScript
Go
TypeScript
.NET languages (C#, F#, and VB)
How to install Snyk Kubernetes integration with Pulumi
Now the fun part! We’re going to go step-by-step through setting up Pulumi and kicking off our automations. Here are the steps we’ll take:
Prerequisites
You’ll need to have a Business or Enterprise account with Snyk to use the Kubernetes integration. If you don't have one, you can sign up for a free, 14-day Business trial.
We will be deploying to Google Cloud, so you will need an account. If you don't have an account, sign up for free here. In either case, follow the instructions here to connect Pulumi to your Google Cloud account.
This example assumes that you have the
gcloudCLI on your path. This is installed as part of the Google Cloud SDK.Ensure you have Python 3, a Pulumi Account, and the Pulumi CLI.
Note that Pulumi requires that Python 3 be the default in your environment. You may need to create an alias if you have Python 2 installed along with Python 3. To verify this, run the following command and ensure you are running the latest version of 3.x:
1❯ python --version
2Python 3.9.9
Step 1: Set up a Kubernetes integration ID from the Snyk app
Log into Snyk and select the organization where you want to automatically set up the Kubernetes integration. It can be an empty organization or an existing one with projects. For this example, ensure that the Kubernetes integration is not already configured in whichever organization you choose.
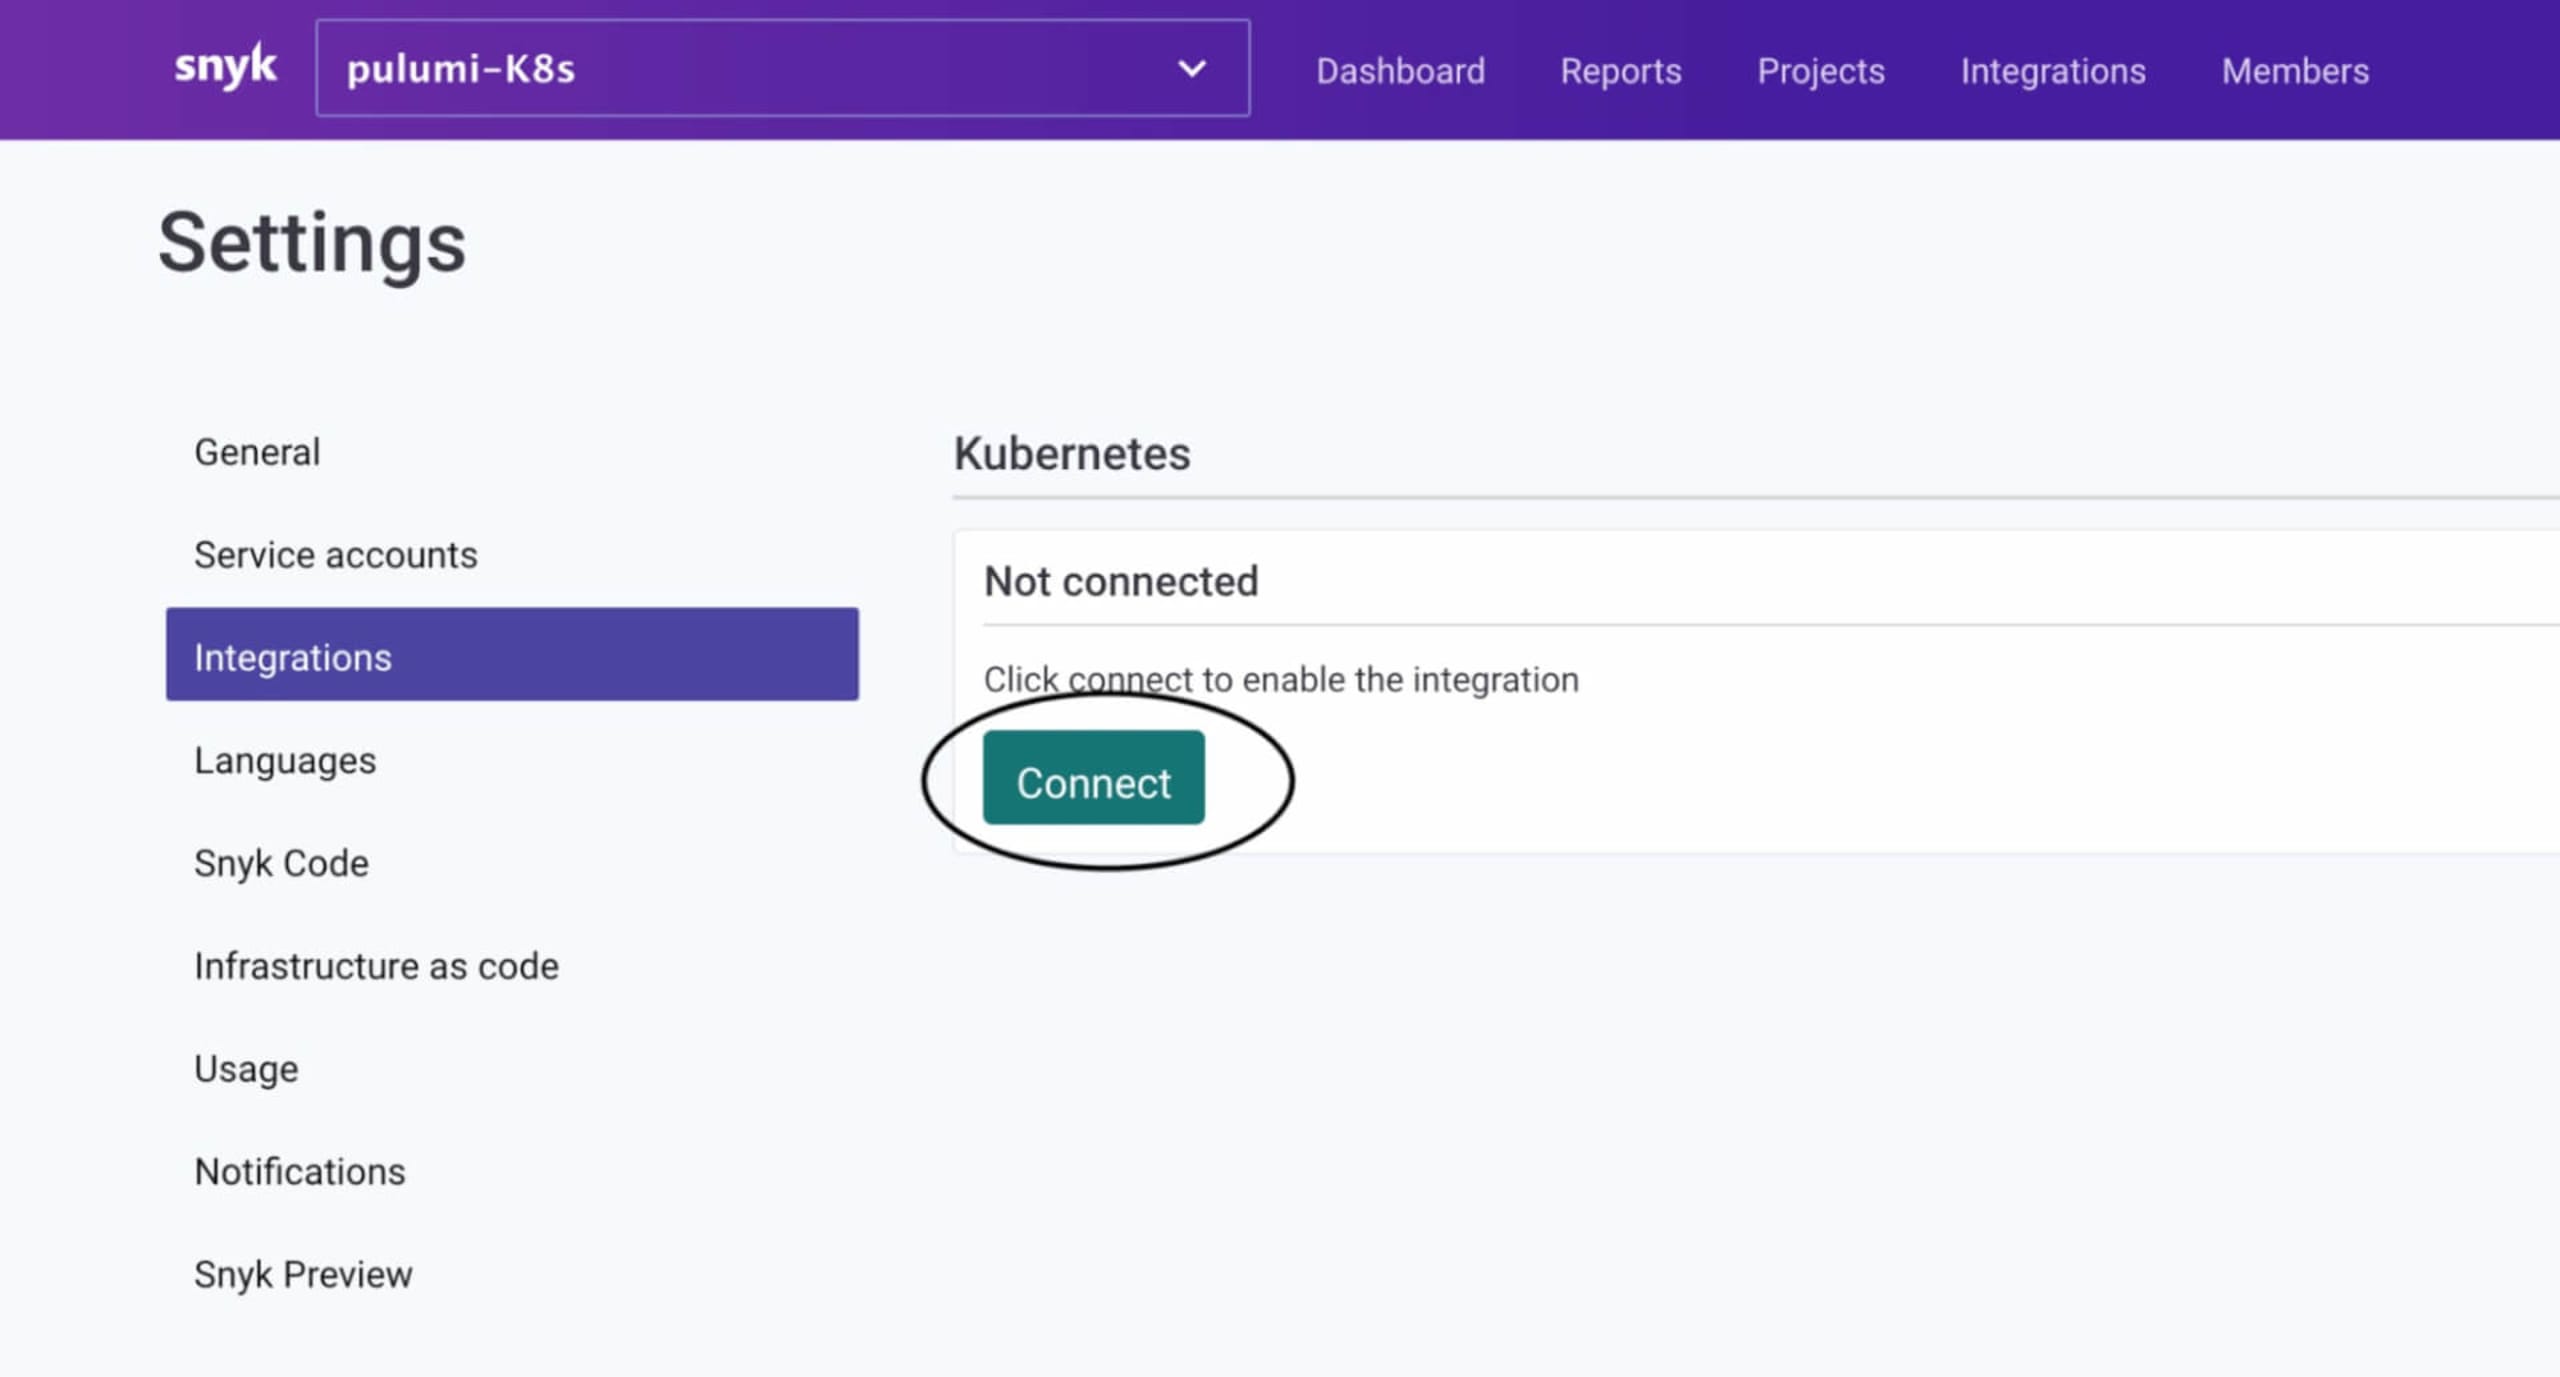
Then click on Integrations > Kubernetes > Connect. If you don’t have a Business or Enterprise Snyk account, you won’t be able to do this step.
Make note of the Integration ID, as we will need it shortly.
That's it! You now are ready to set up our Snyk Kubernetes integration demo using Pulumi infrastructure as code. Pulumi will do the following:
Create a GKE cluster
Deploy the Snyk controller into the cluster0
Set up the Snyk Kubernetes integration for auto import of K8s workloads into Snyk
Deploy a sample workload into the
applesnamespace as per our Rego policy file
Step 2: Clone the sample repository
Clone the following demo GitHub repo as shown below:
1$ git clone https://github.com/papicella/snyk-kubernetes-integration
2Cloning into 'snyk-kubernetes-integration'...
3remote: Enumerating objects: 18, done.
4remote: Counting objects: 100% (18/18), done.
5remote: Compressing objects: 100% (14/14), done.
6remote: Total 18 (delta 8), reused 14 (delta 4), pack-reused 0
7Receiving objects: 100% (18/18), 8.76 KiB | 4.38 MiB/s, done.
8Resolving deltas: 100% (8/8), done.
After cloning this repo, cd into it and run the next set of commands…
Step 3: Authenticate to Google Cloud
Authenticate to Google Cloud using local authentication to deploy this demo. There are other ways to configure Pulumi with Google Cloud, but this is the easiest way for this demo:
1$ gcloud auth loginStep 4: Create a new Pulumi stack
Create a new stack, which is an isolated deployment target for this example. Use dev as the example:
1$ pulumi stack init devStep 5: Set the required Pulumi configuration variables
In many cases, different stacks for a single project will need differing values. For instance, you may want to use a different size for your Google CloudCompute Instance, or a different number of servers for your Kubernetes cluster between your development and production stacks.
The key-value pairs for any given stack are stored in your project’s stack settings file, which is automatically named Pulumi.<stack-name>.yaml. You can typically ignore this file, although you may want to check it in and version it with your project source code.
Add the following configuration variables to our stack as shown below:
1$ pulumi config set gcp:project [your-gcp-project-here] # Eg: snyk-cx-se-demo
2$ pulumi config set gcp:zone us-central1-c # any valid GCP zone here
3$ pulumi config set password --secret [your-cluster-password-here] # password for the cluster
4$ pulumi config set master_version 1.21.6-gke.1500 # any valid K8s master version on GKE
By default, your cluster will have 3 nodes of type n1-standard-1. This is configurable, so if we'd like to choose 5 nodes of type n1-standard-2, you could run these commands:
1$ pulumi config set node_count 5
2$ pulumi config set node_machine_type n1-standard-2
Finally, we need to configure the required Snyk Kubernetes integration settings, which are used to automatically set the Snyk Kubernetes integration into our cluster for us. We need our Kubernetes integration ID and our Snyk organization ID. In this example, they are the same:
1$ pulumi config set snyk_K8s_integration_id K8S_INTEGRATION_ID #same as ORG_ID at the moment
2$ pulumi config set snyk_org_id ORG_ID # your Snyk ORG ID under settings
This shows how stacks can be configurable in useful ways. You can even change these after provisioning.
Once this is done you will have a Pulumi.dev.yaml file with the following:
1config:
2gcp-K8s-integration-demo:master_version: 1.21.5-gke.1302
3gcp-K8s-integration-demo:node_count: "3"
4gcp-K8s-integration-demo:node_machine_type: n1-standard-2
5gcp-K8s-integration-demo:password:
6    secure: AAABsomesecret+EnF1p4w==
7gcp-K8s-integration-demo:snyk_K8s_integration_id: yyyy1234
8gcp-K8s-integration-demo:snyk_org_id: yyyy1234
9gcp:project: snyk-cx-se-demo
10gcp:zone: us-central1-c
Step 6: Deploy everything with pulumi up
Deploing everything with the pulumi up command provisions all the Google Cloud resources necessary for the Kubernetes integration with Snyk, including your GKE cluster itself and Snyk controller Helm chart. It then deploys a Kubernetes deployment running a Spring Boot application:
1$ pulumi upThis will show you a preview, ask for confirmation, and start the process of provisioning your Snyk Kubernetes integration demo:
1$ pulumi up
2Previewing update (dev)
3
4View Live: https://app.pulumi.com/papicella/gcp-K8s-integration-demo/dev/previews/1db6492c-ae23-4e87-abf0-41e09fb62177
5
6    Type                                                              Name                          Plan
7+   pulumi:pulumi:Stack                                               gcp-K8s-integration-demo-dev  create
8+   ├─ kubernetes:helm.sh/v3:Chart                                    snyk-monitor                  create
9+   │  ├─ kubernetes:core/v1:ServiceAccount                           snyk-monitor/snyk-monitor     create
10+   │  ├─ kubernetes:networking.k8s.io/v1:NetworkPolicy               snyk-monitor/snyk-monitor     create
11+   │  ├─ kubernetes:rbac.authorization.k8s.io/v1:ClusterRole         snyk-monitor                  create
12+   │  ├─ kubernetes:rbac.authorization.k8s.io/v1:ClusterRoleBinding  snyk-monitor                  create
13+   │  └─ kubernetes:apps/v1:Deployment                               snyk-monitor/snyk-monitor     create
14+   ├─ gcp:container:Cluster                                          pulumi-gke-cluster            create
15+   ├─ pulumi:providers:kubernetes                                    gke_k8s                       create
16+   ├─ kubernetes:core/v1:Namespace                                   snyk-monitor                  create
17+   ├─ kubernetes:core/v1:Namespace                                   apples                        create
18+   ├─ kubernetes:core/v1:ConfigMap                                   snyk-monitor-custom-policies  create
19+   ├─ kubernetes:core/v1:Service                                     springboot-employee-api       create
20+   ├─ kubernetes:core/v1:Secret                                      snyk-monitor                  create
21+   └─ kubernetes:apps/v1:Deployment                                  springboot-employee-api       create
22
23Resources:
24    + 15 to create
After about five minutes, your cluster will be ready with the Snyk controller installed and a sample workload deployment auto-imported into your Snyk organization:
1Do you want to perform this update? yes
2Updating (dev)
3
4View Live: https://app.pulumi.com/papicella/gcp-K8s-integration-demo/dev/updates/1
5
6 Type Name Status
7+ pulumi:pulumi:Stack gcp-K8s-integration-demo-dev created
8+ ├─ kubernetes:helm.sh/v3:Chart snyk-monitor created
9+ │ ├─ kubernetes:core/v1:ServiceAccount snyk-monitor/snyk-monitor created
10+ │ ├─ kubernetes:networking.k8s.io/v1:NetworkPolicy snyk-monitor/snyk-monitor created
11+ │ ├─ kubernetes:rbac.authorization.k8s.io/v1:ClusterRole snyk-monitor created
12+ │ ├─ kubernetes:rbac.authorization.k8s.io/v1:ClusterRoleBinding snyk-monitor created
13+ │ └─ kubernetes:apps/v1:Deployment snyk-monitor/snyk-monitor created
14+ ├─ gcp:container:Cluster pulumi-gke-cluster created
15+ ├─ pulumi:providers:kubernetes gke_k8s created
16+ ├─ kubernetes:core/v1:Namespace snyk-monitor created
17+ ├─ kubernetes:core/v1:Namespace apples created
18+ ├─ kubernetes:core/v1:Service springboot-employee-api created
19+ ├─ kubernetes:core/v1:ConfigMap snyk-monitor-custom-policies created
20+ ├─ kubernetes:core/v1:Secret snyk-monitor created
21+ └─ kubernetes:apps/v1:Deployment springboot-employee-api created
22
23Outputs:
24 kubeconfig: "[secret]"
25
26Resources:
27 + 15 created
28
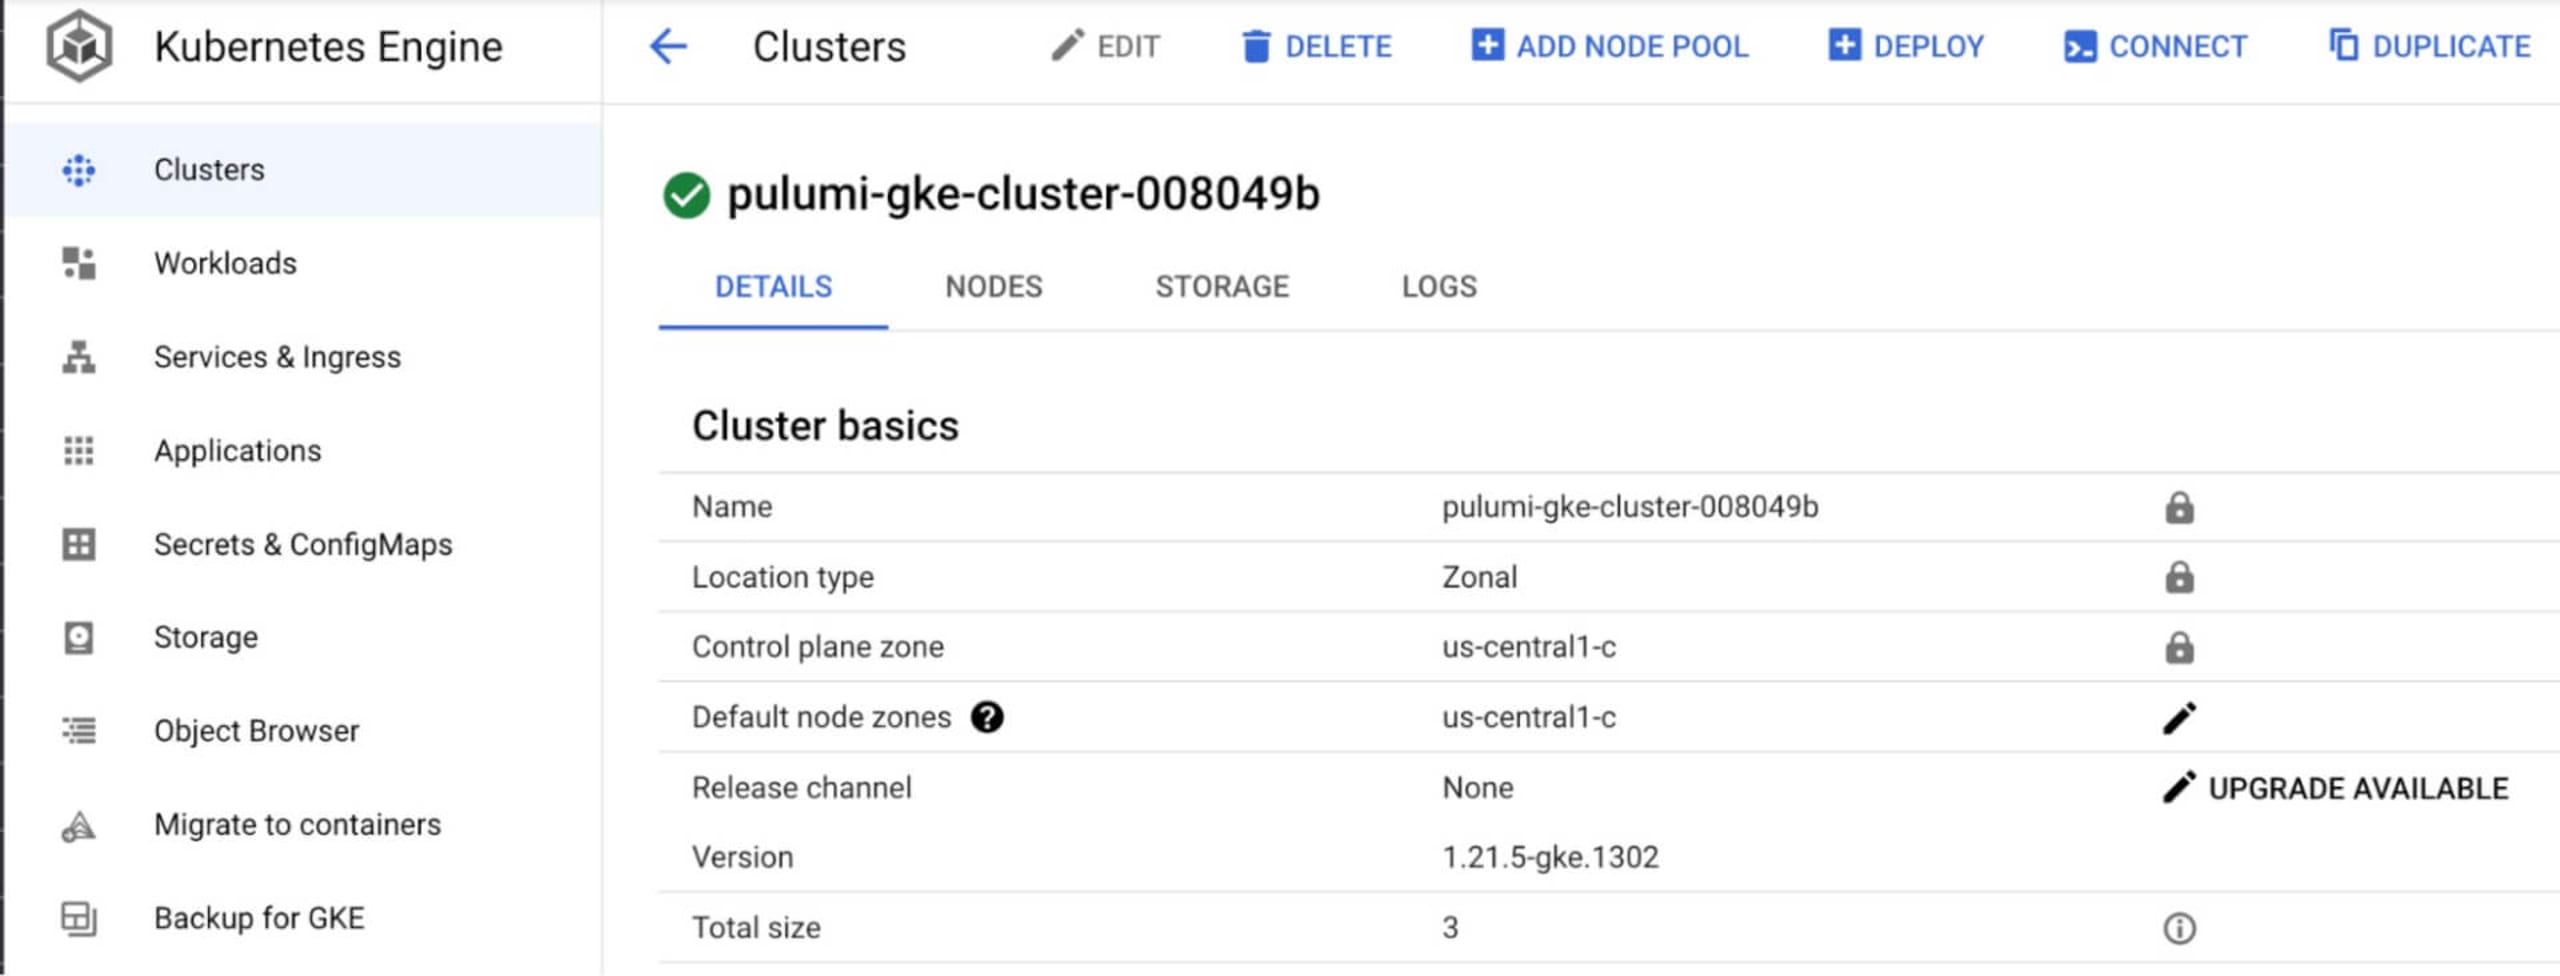
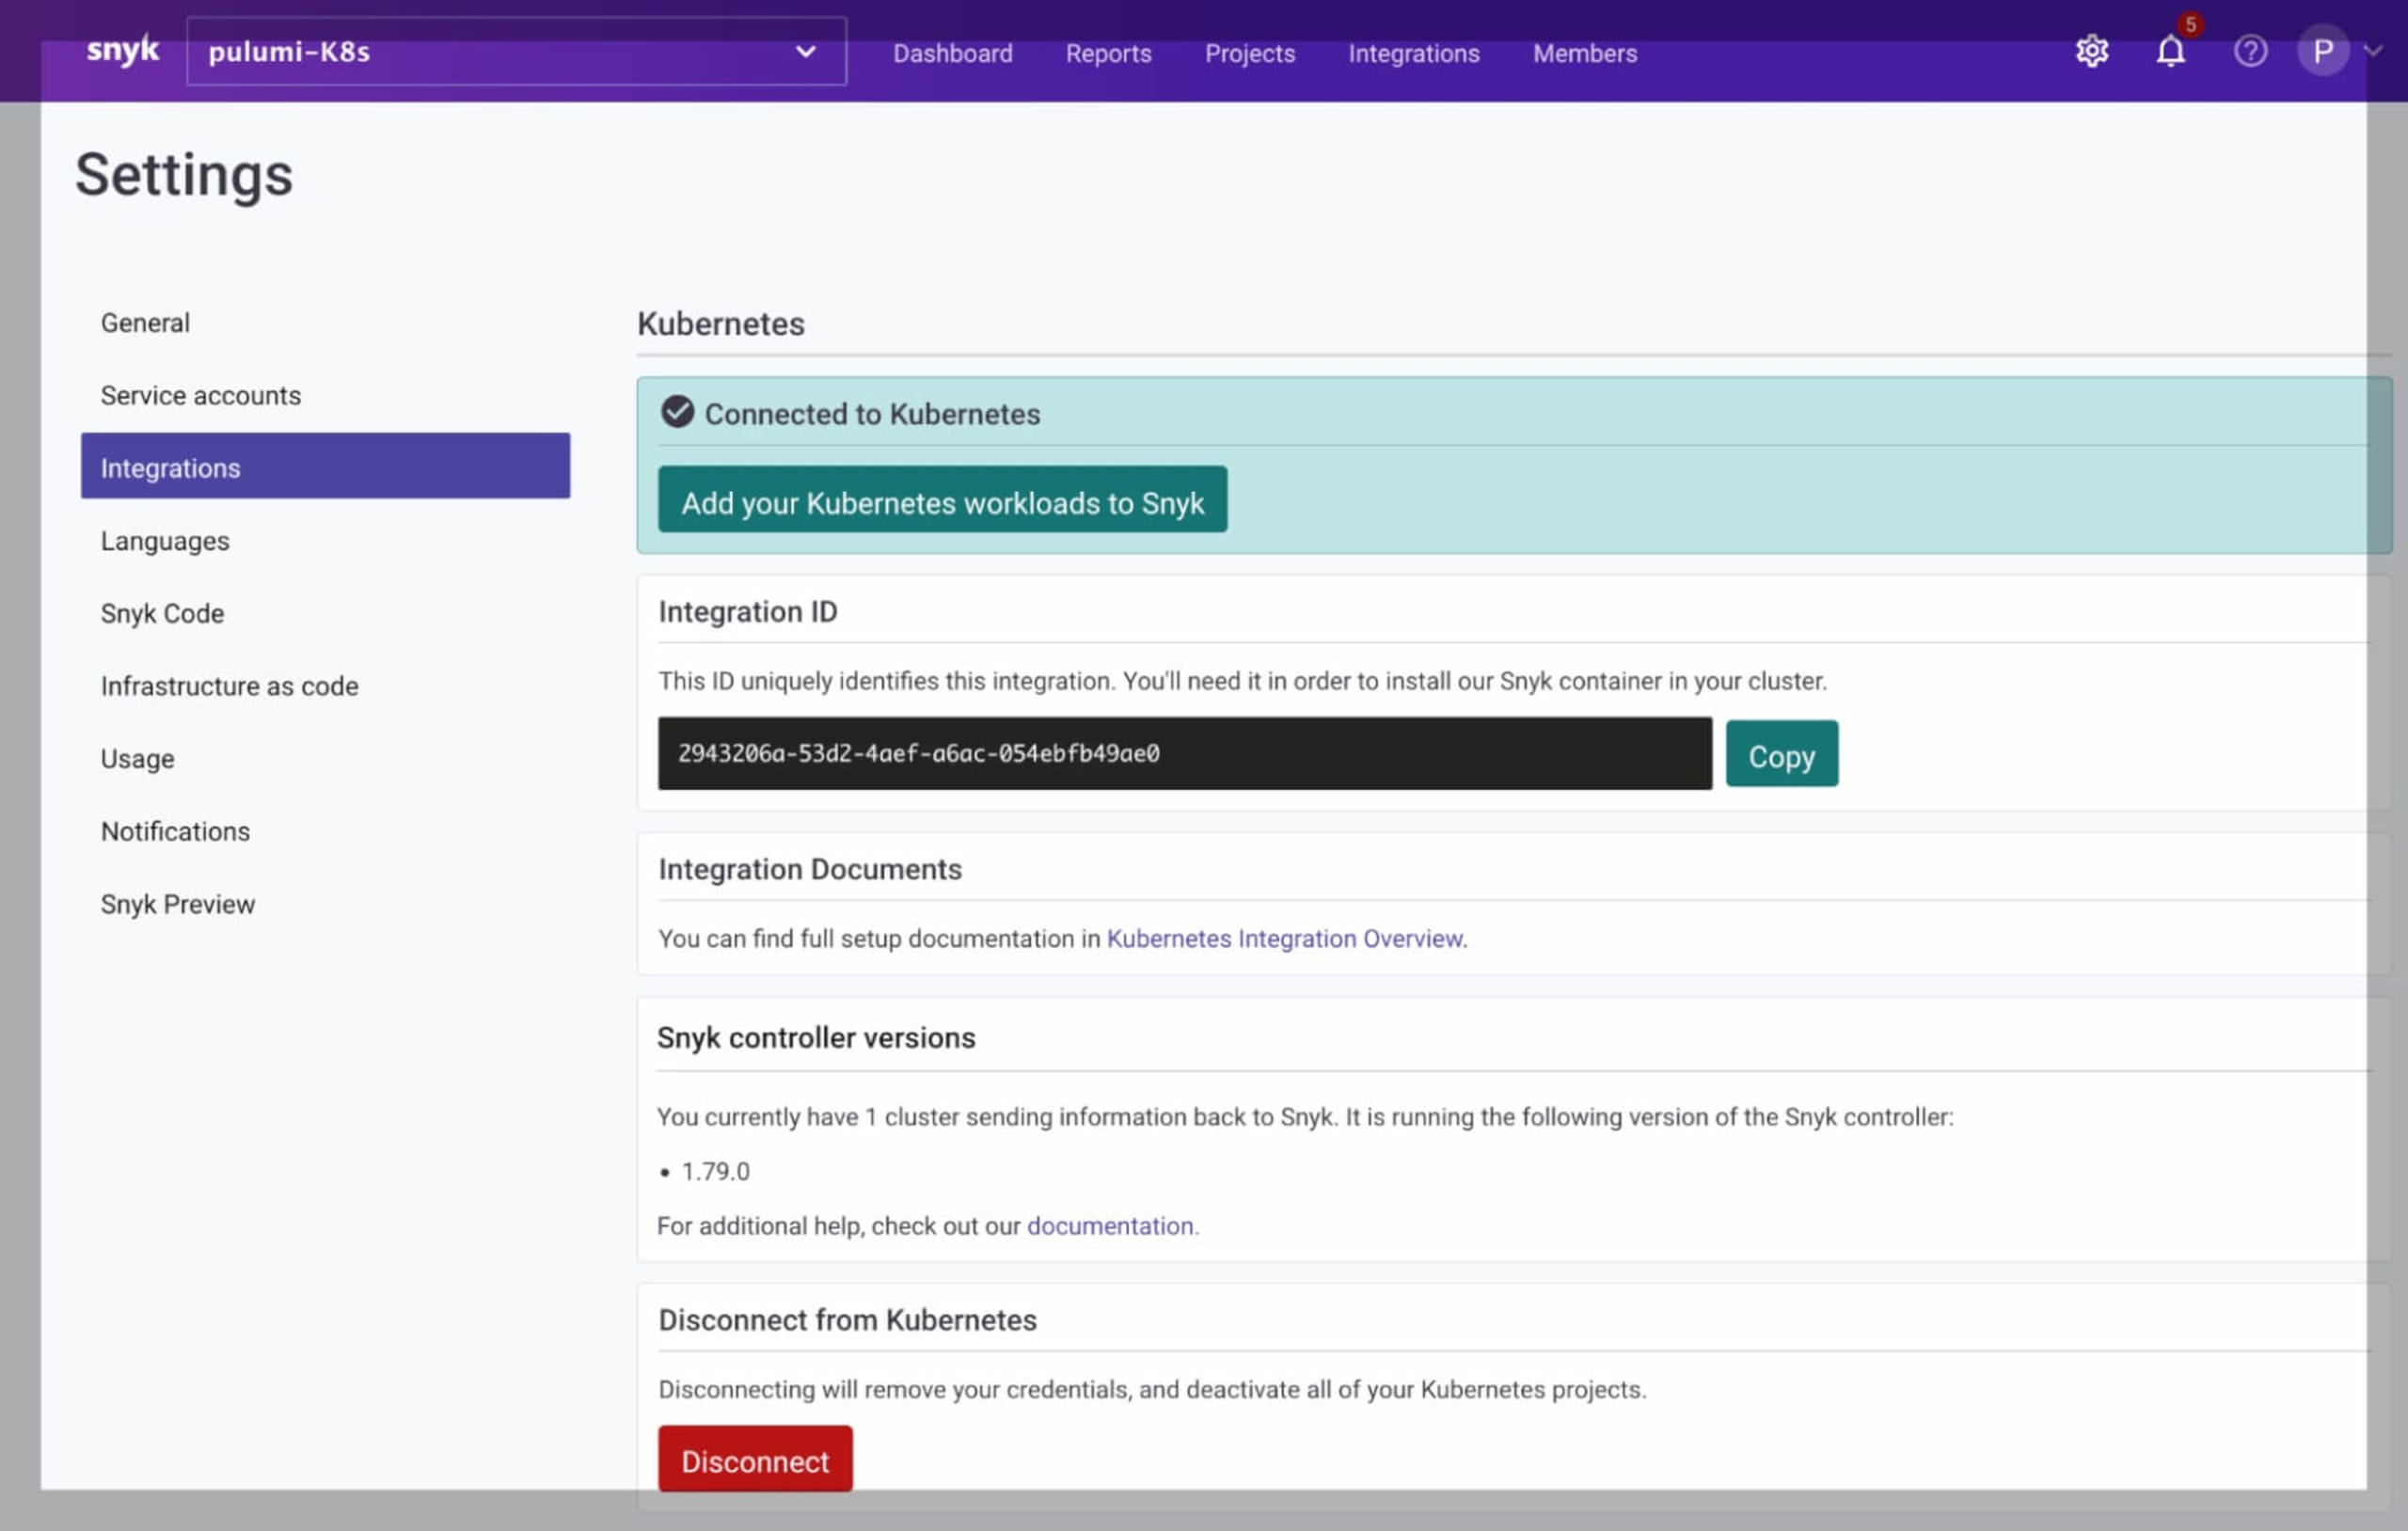
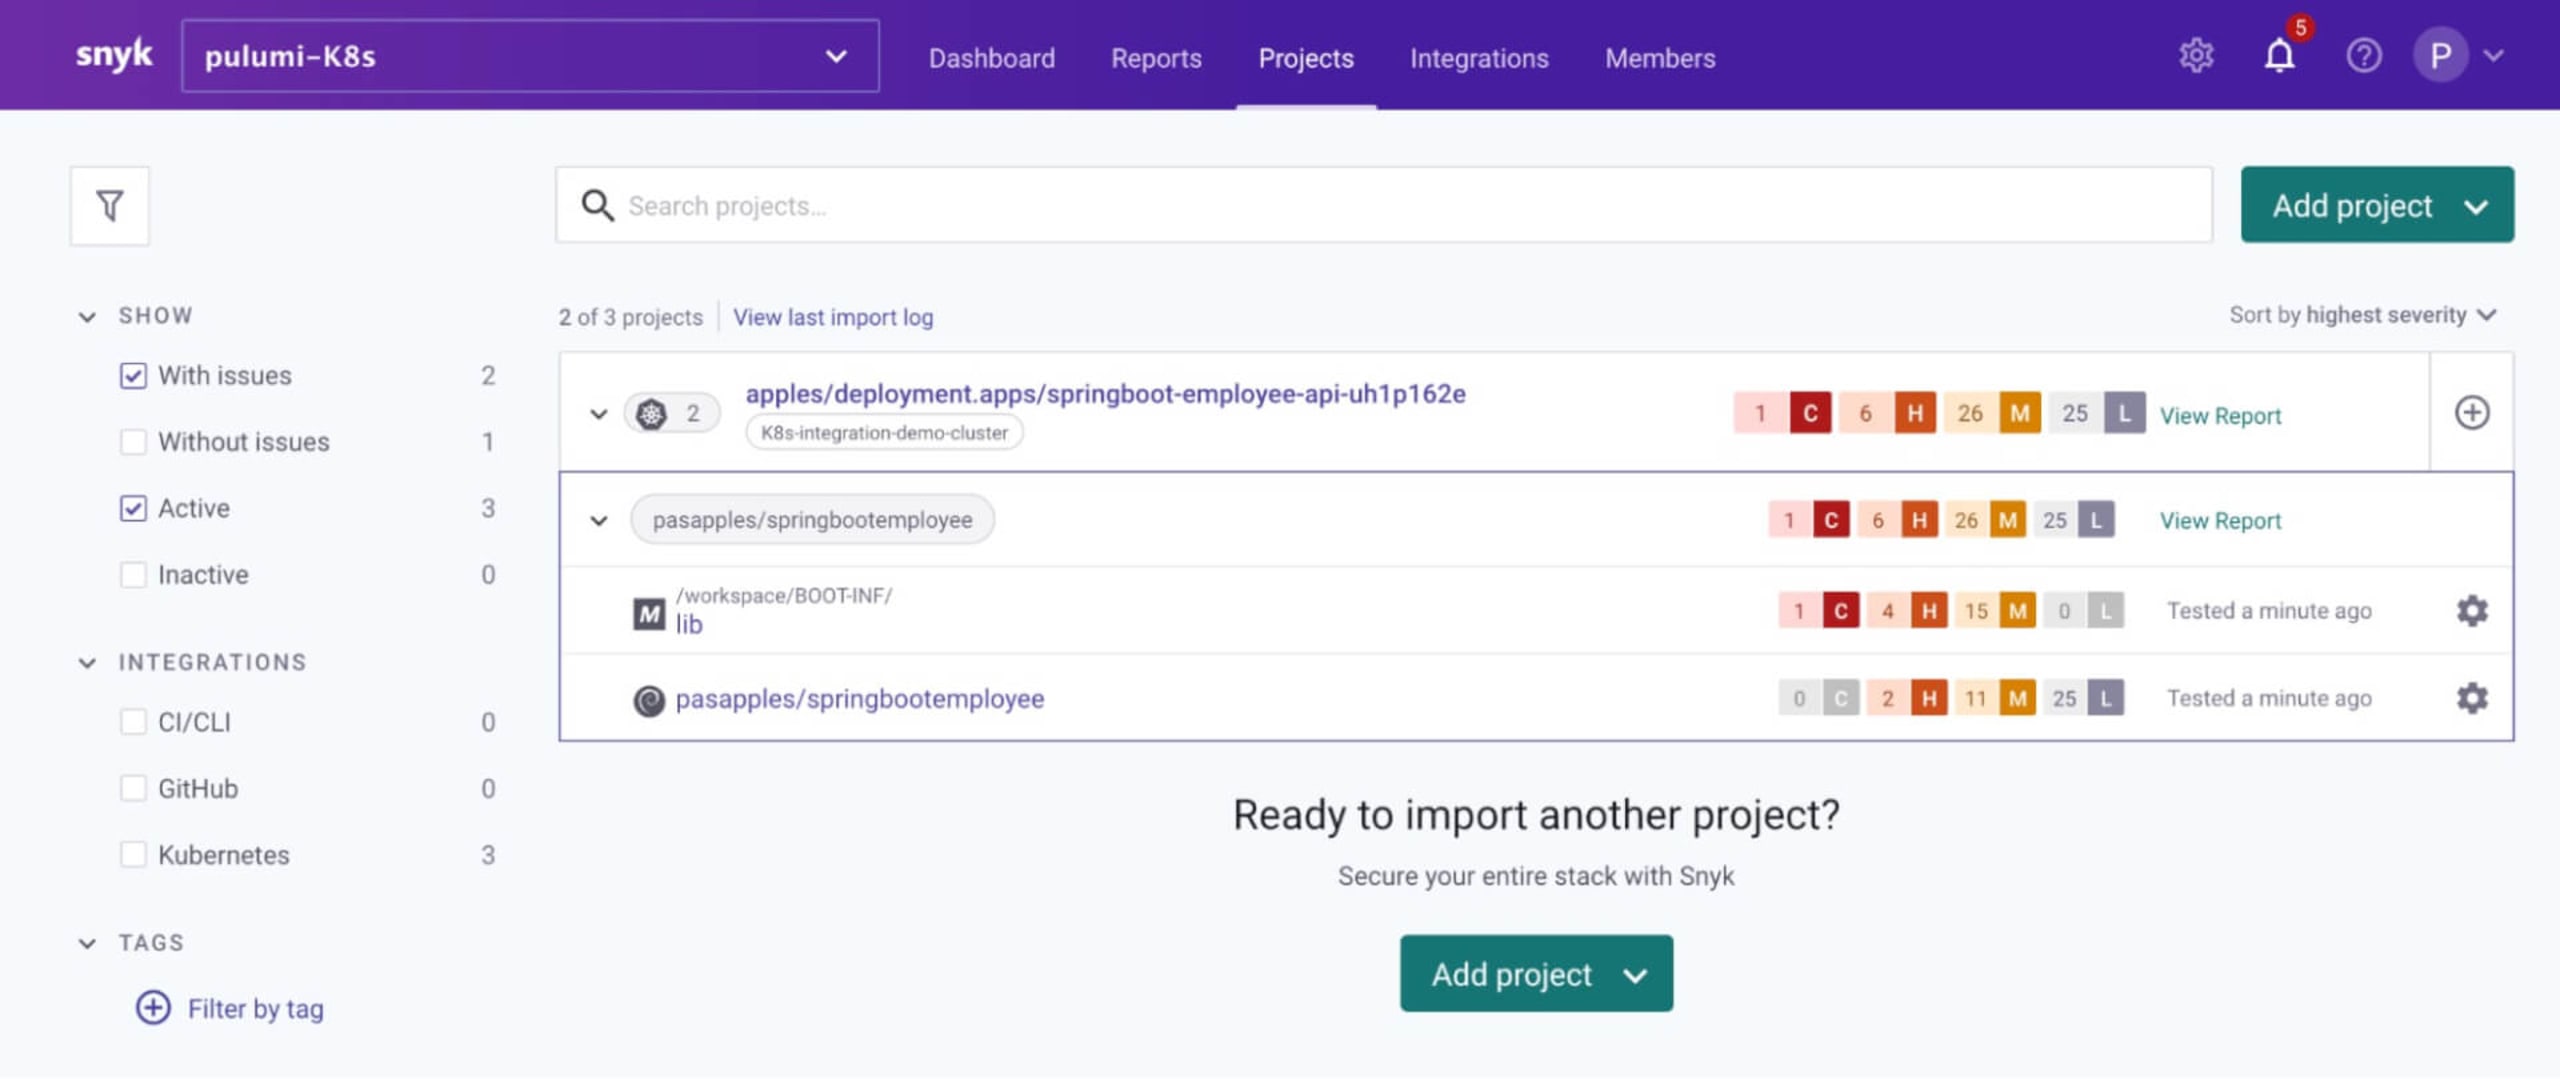
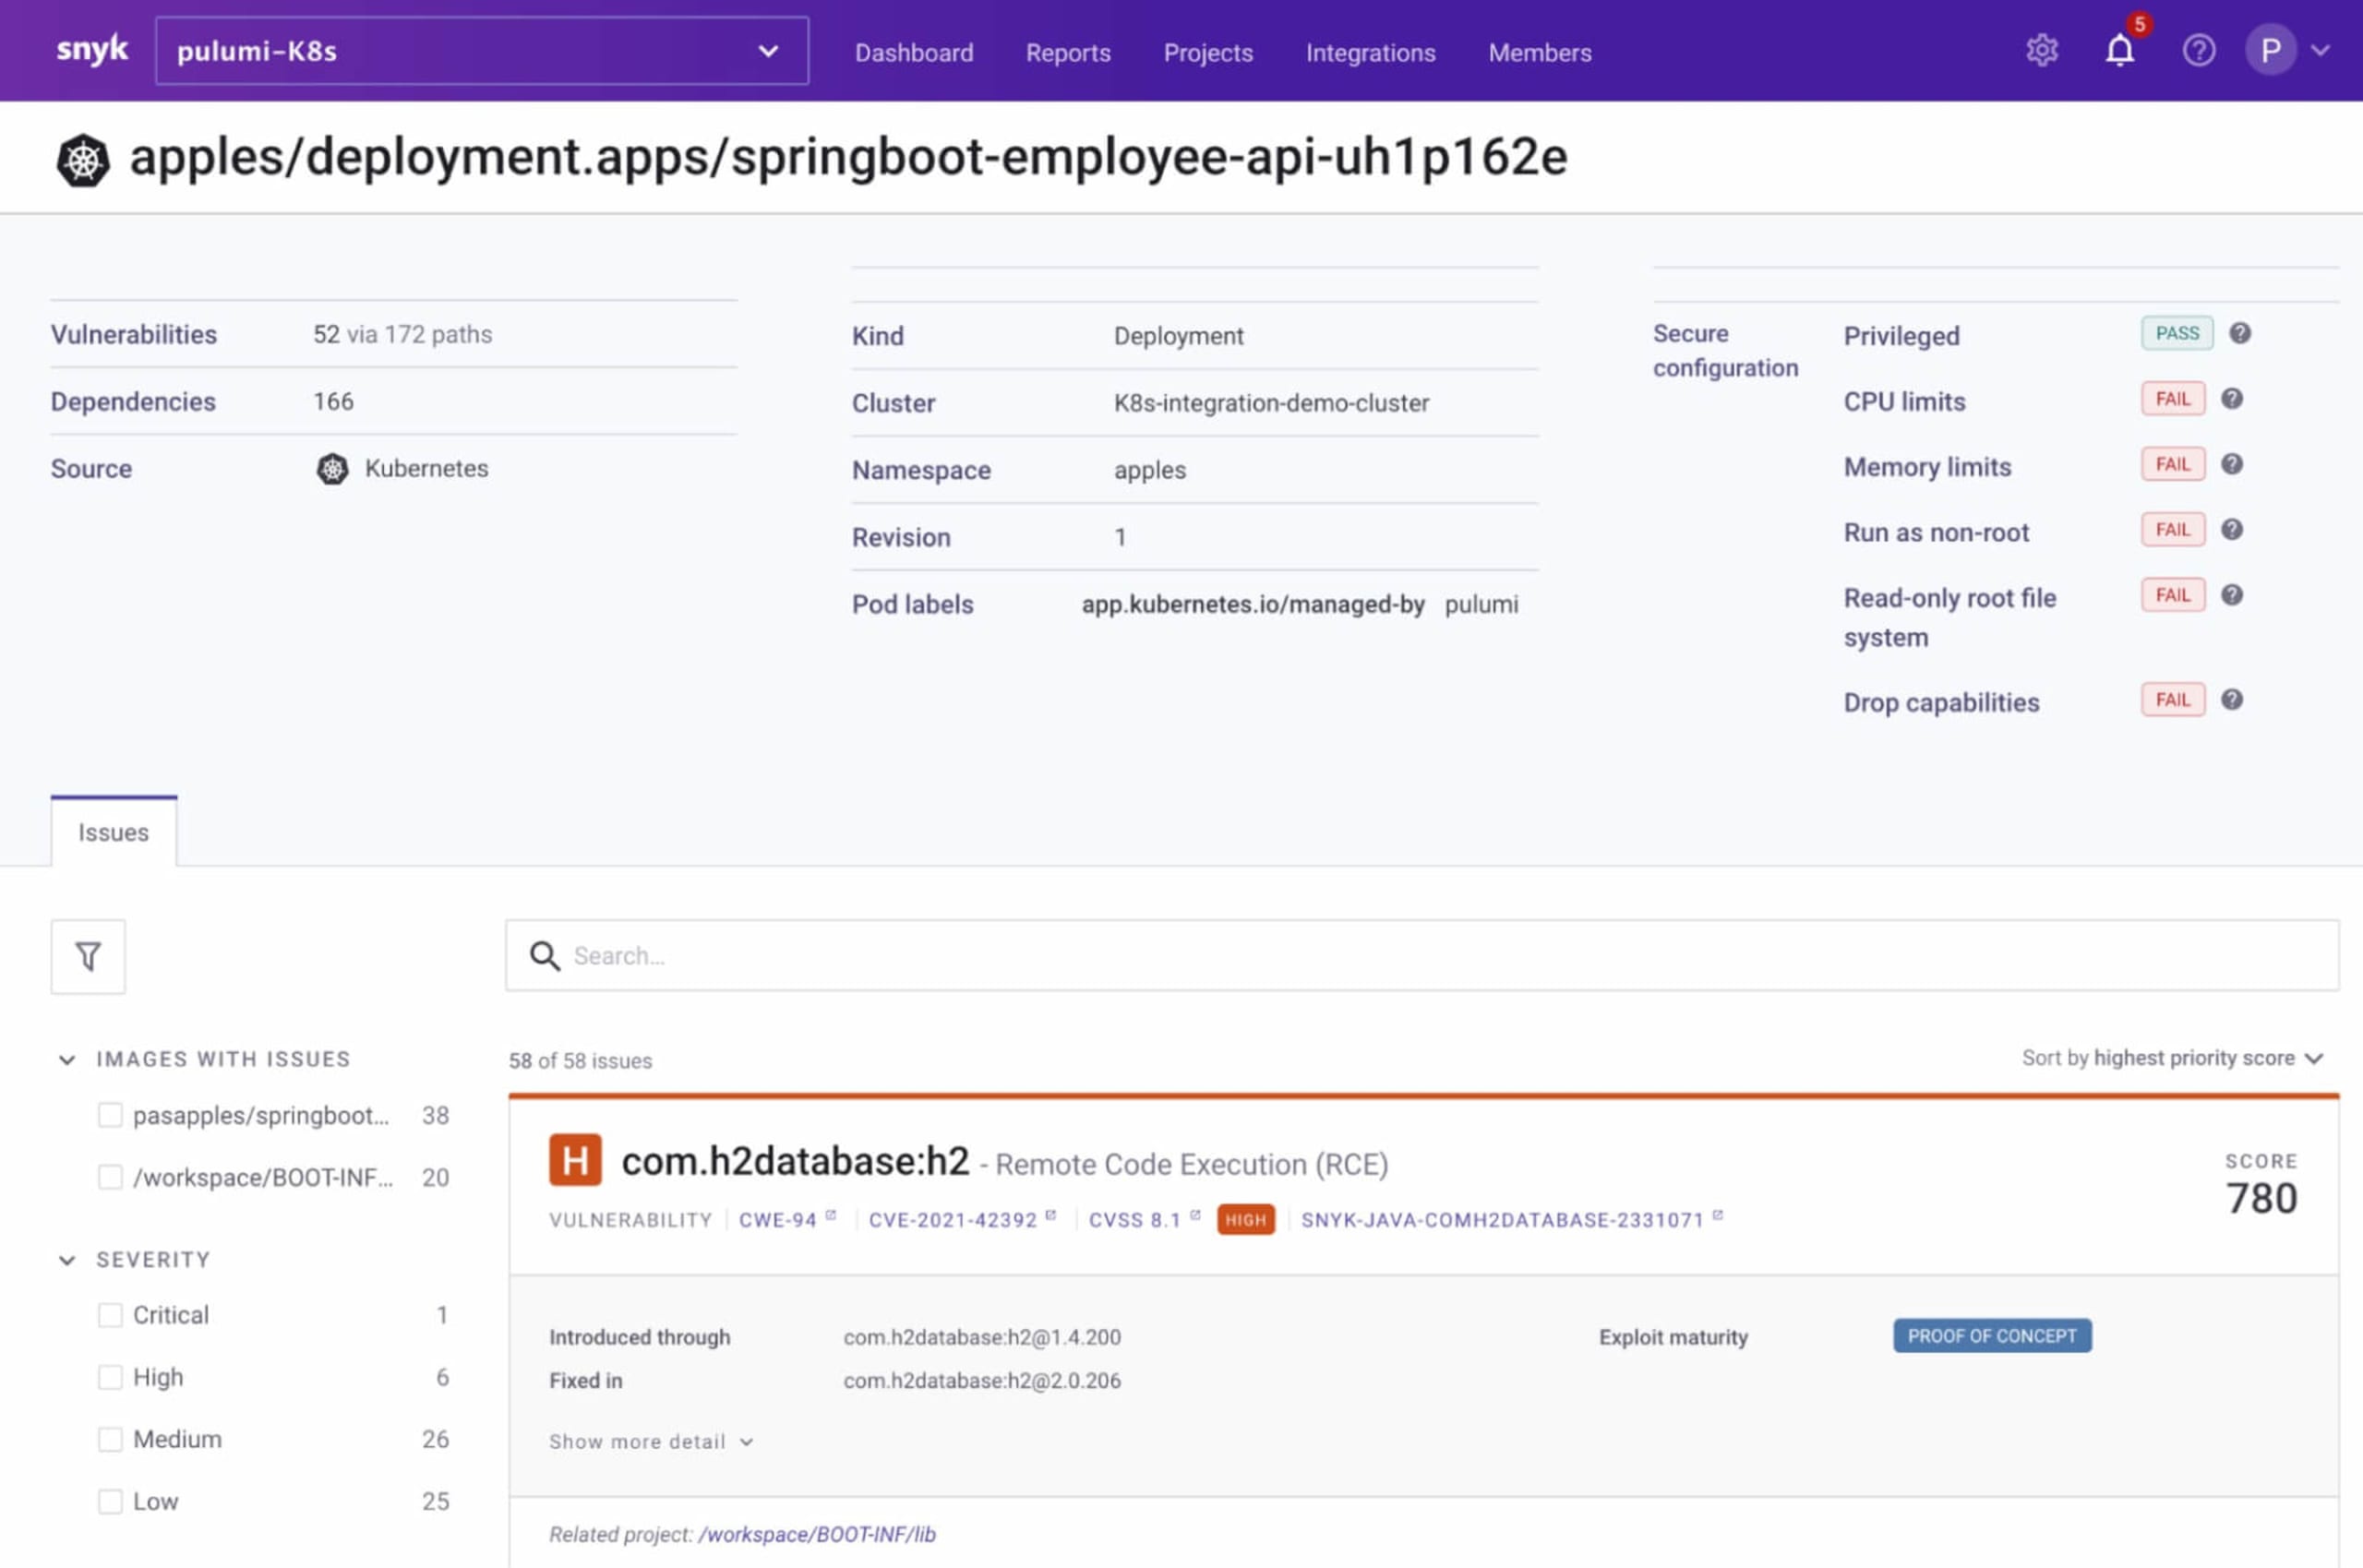
29Duration: 6m28sBelow are some screenshots to verify everything was created as expected.
The GKE cluster created on Google Cloud:
The Snyk Kubernetes integration automatically configured:
The sample workload automatically imported from the apples namespace:
Exploring the configuration
Let’s take a close look at the Python file__main__.py and understand how the Snyk Kubernetes integration was installed and configured for us.
The Rego policy file used by the Snyk controller is currently hardcoded to only import workloads from the apples namespace as long as they are not of typeCronJob or Service. This can be changed in __main__.py and used as an external file rather than hardcoded in the Python code:
1snyk_monitor_custom_policies_str = """package snyk
2orgs := ["%s"]
3default workload_events = false
4workload_events {
5input.metadata.namespace == "apples"
6    input.kind != "CronJob"
7    input.kind != "Service"
8}""" % (SNYK_ORG_ID)
Here is the Python code to install the Snyk controller using its Helm chart. Notice that we have specified the repository to fetch the Helm chart, provided the Snyk organization ID as well as the custom policy file above. All of these are required to install the Snyk controller into the GKE cluster and integrate it with Snyk.
1# Deploy the snyk controller using it's helm chart
2snyk_monitor_chart = Chart(
3    "snyk-monitor",
4    ChartOpts(
5        chart="snyk-monitor",
6        version="1.79.0",
7        namespace="snyk-monitor",
8        fetch_opts=FetchOpts(
9            repo="https://snyk.github.io/kubernetes-monitor",
10        ),
11        values={
12          "clusterName": "K8s-integration-demo-cluster",
13          "policyOrgs": "{%s}" % (SNYK_ORG_ID),
14          "workloadPoliciesMap": "snyk-monitor-custom-policies"
15        }
16    ),
17    opts=ResourceOptions(provider=k8s_provider)
18)
The Python code also deployed a Spring Boot sample application into our apples namespace, which is what was auto-imported by the Snyk controller into Snyk App. The Python code to achieve that deployment is as follows:
1# deploy spring boot employee app
2
3"""springboot employee api container, replicated 1 time."""
4app_name = "springboot-employee-api"
5app_labels = { "app": app_name }
6
7springboot_employee_api = k8s.apps.v1.Deployment(
8            app_name,
9            metadata={
10              "namespace": "apples",
11            },
12            spec=k8s.apps.v1.DeploymentSpecArgs(
13                replicas=1,
14                selector=k8s.meta.v1.LabelSelectorArgs(match_labels=app_labels),
15                template=k8s.core.v1.PodTemplateSpecArgs(
16                    metadata=k8s.meta.v1.ObjectMetaArgs(labels=app_labels),
17                    spec=k8s.core.v1.PodSpecArgs(
18                        containers=[
19                            k8s.core.v1.ContainerArgs(
20                                name=app_name,
21                                image="pasapples/springbootemployee:cnb",
22                                ports=[k8s.core.v1.ContainerPortArgs(
23                                  container_port=8080
24                                )]
25                            )
26                        ]
27                    ),
28                ),
29            ),
30            opts=ResourceOptions(provider=k8s_provider)
31)
Step 7: Retrieve the Kubernetes config
From here, you may take this config and use it either in your ~/.kube/config file, or save it locally and plug it into the KUBECONFIG envvar. All of your usual Google Cloud commands will work too, of course.
For instance:
1$ pulumi stack output kubeconfig --show-secrets > kubeconfig.yaml
2$ KUBECONFIG=./kubeconfig.yaml kubectl get po -n apples
3NAME                                                READY   STATUS    RESTARTS   AGE
4springboot-employee-api-fyrj9hr2-66d8456f5f-hqqhx   1/1     Running   0          17m
The Snyk controller installed in the snyk-monitor namespace plus the config map and secret now managed by Pulumi shown using some kubectl commands:
1$ kubectl get all -n snyk-monitor
2NAME                              READY   STATUS    RESTARTS   AGE
3pod/snyk-monitor-db67744d-szl79   1/1     Running   0          8m52s
4
5NAME                           READY   UP-TO-DATE   AVAILABLE   AGE
6deployment.apps/snyk-monitor   1/1     1            1           8m53s
7
8NAME                                    DESIRED   CURRENT   READY   AGE
9replicaset.apps/snyk-monitor-db67744d   1         1         1       8m53s
10
11$ kubectl get secret -n snyk-monitor -l app.kubernetes.io/managed-by=pulumi
12NAME           TYPE     DATA   AGE
13snyk-monitor   Opaque   2      42m
14
15$ kubectl get configmap -n snyk-monitor -l app.kubernetes.io/managed-by=pulumi
16NAME                           DATA   AGE
17snyk-monitor-custom-policies   1      42m
Step 8: Destroy the whole setup
Once you are done, you can destroy all of the resources and the stack:
1$ pulumi destroy
2$ pulumi stack rm
In summary, you’ve learned how Pulumi can be used to install and configure the Snyk Kubernetes integration. This integration enables you to import and test your running workloads and identify vulnerabilities in their associated images and configurations that might make those workloads less secure.
More resources
Now that you have learned how easy it is to set up the Kubernetes integration with Snyk from the Python programming language with Pulumi, here are some useful links to get you started on your container security journey.
Kubernetes integration overview documentation
Automatic import/deletion of Kubernetes workloads projects documentation
Learn Rego with Styra’s excellent tutorial course
Secure infrastructure from the source
Snyk automates IaC security and compliance in workflows and detects drifted and missing resources.