The importance of verifying webhook signatures
Marcelo Oliveira
June 29, 2023
0 mins readWebhooks are a callback integration technique for sending and receiving information, such as event notifications, in close to real-time. Webhooks can be triggered by application events and transmit data over HTTP to another application or third-party API. You can configure a webhook URL and connect external participants to customize, extend, or modify workflows.
Webhooks may or may not be signed. However, for security purposes, it’s best practice to include a verifiable signature so the listener can confirm that the request comes from the expected webhook source.
Here are some examples of how webhooks are used today:
Notifications on a git-based version control platform when a developer has pushed code to the repository.
Notifications for when a user replies to a message thread on a messaging platform.
Notifications for a payment service confirming when a payment method is authorized for a retail purchase.
According to a Verizon report, supply chain attacks accounted for 62% of all system intrusion incidents in 2022. Throughout the software development life cycle, it’s crucial to maintain the security of all components and practices involved in development and deployment. If vulnerabilities are exploited, they can compromise the partners involved and disrupt the whole software supply chain.
To deal with these threats and maintain supply chain security, supply chain vendors enforce webhook signatures. For example, with CircleCI you can use webhook signatures to validate a secret and ensure only CircleCI — and not a malicious actor — calls your webhook. Travis CI also provides a signature HTTP header in their webhook verification process.
In this walkthrough, we’ll implement a GitHub webhook in Node.js that detects when users push code to a repository.
Prerequisites
To follow along, you will need to do the following:
Download and install Node.js and npm.
Install ngrok, a reverse proxy tool to open a secure tunnel from a public URL to your local Node.js app.
Install Postman, a platform that allows you to create HTTP requests and inspect the results easily.
Verifying webhook signatures using Node.js
Create a new folder in your local machine and a new file called webhook.js with the following code. Remember to replace the value of the repo constant with your local repository path:
1const http = require('http');
2const exec = require('child_process').exec;
3
4const repo = "C:\\Users\\your-user-name\\Documents\\GitHub\\webhook-test";
5
6http
7  .createServer((req, res) => {
8    req.on('data', chunk => {
9
10      const body = JSON.parse(chunk);
11
12      console.log(body);
13
14      const isMain = body?.ref === 'refs/heads/main';
15
16      if (isMain) {
17        try {
18            console.log('Push event detected. Pulling repository updates...');
19            exec(`cd ${repo} && git fetch && git pull`);
20            console.log('Git repository pulled successfully.');
21        } catch (error) {
22          console.log(error);
23        }
24      }
25      res.end();
26    });
27  })
28  .listen(8080);
Now, execute the following line in your terminal:
1node webhook.jsHere’s what we’re trying to accomplish with the webhook.js file:
The
repoconstant stores the path to the folder containing the repository we want to watch.The
createServerfunction starts an HTTP server in our machine at port 8080. The webhook app is now running and ready to receive requests at the http://localhost:8080 endpoint.Once the incoming request is handled, the body constant stores the bulk of the request. A request to our endpoint means that we’re receiving a notification from GitHub webhook to our local payload URL at http://localhost:8080, informing us that some user has pushed code to the repository we’re watching.
We want to ensure that the push has been made to the main branch specifically. To verify that, we parse the request JSON data into a body object and use the
isMainconstant to indicate whether the reference matches the main branch.If the request is accepted, we execute a command to change to the local repository. Finally, we execute the
git fetchandgit pullcommands to update it.
Simulating a malicious request with Postman
We’re designing the Node.js application to work with GitHub. However, before we use GitHub, let's simulate a malicious request with Postman to show how vulnerable our application is. This will help you to understand the importance of signatures.
Open the Postman app and configure a new HTTP POST request to our local payload URL http://localhost:8080.
In the Body tab, add the following code:
1{
2    "ref": "refs/heads/main",
3    "comment": "hi, I'm a malicious request..."
4}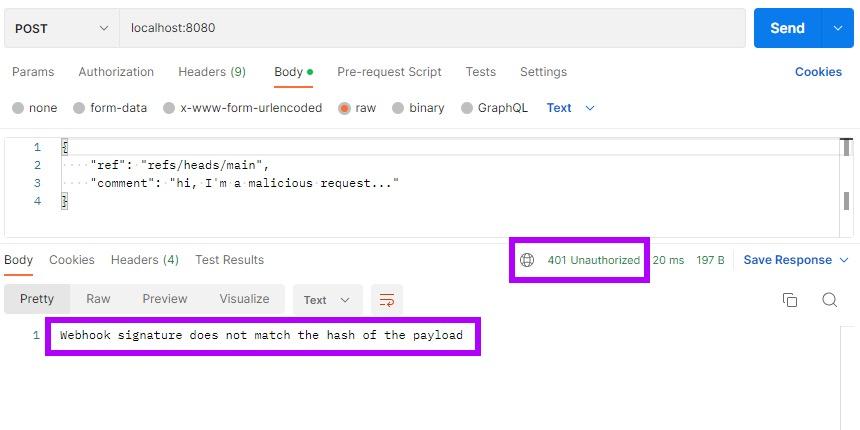
Hit Send. Open your terminal where the Node.js is running and note what happened:

As you can see, the Node.js app is accepting a request from a source other than GitHub, which is dangerous. We need to implement webhook signatures in our code so we can verify whether the requester is legitimate.
Configuring ngrok
In this scenario, we’re running the Node.js app locally. However, GitHub can't reach the http://localhost:8080 endpoint on your machine to send a webhook request. We can solve that by publishing the Node.js app on a public server. However, running and debugging Node.js on the development machine is easier than deploying it to a web server or the cloud, so we’re going to use ngrok. ngrok is a reverse proxy tool that opens a secure tunnel from a random public URL to your local webhook endpoint.
Open a terminal window on your machine and execute the following ngrok command to expose the local port 8080:
1ngrok http 8080ngrok will confirm it has exposed your local 8080 port through a secure tunnel with a random public URL:
1Forwarding https://<<YOUR-RANDOM-SUBDOMAIN>>.sa.ngrok.io -> http://localhost:8080Next, we’ll use the public ngrok subdomain above to configure a GitHub webhook.
Configuring a GitHub webhook
Visit GitHub’s create a new repository page and add a new repository to configure the webhook:

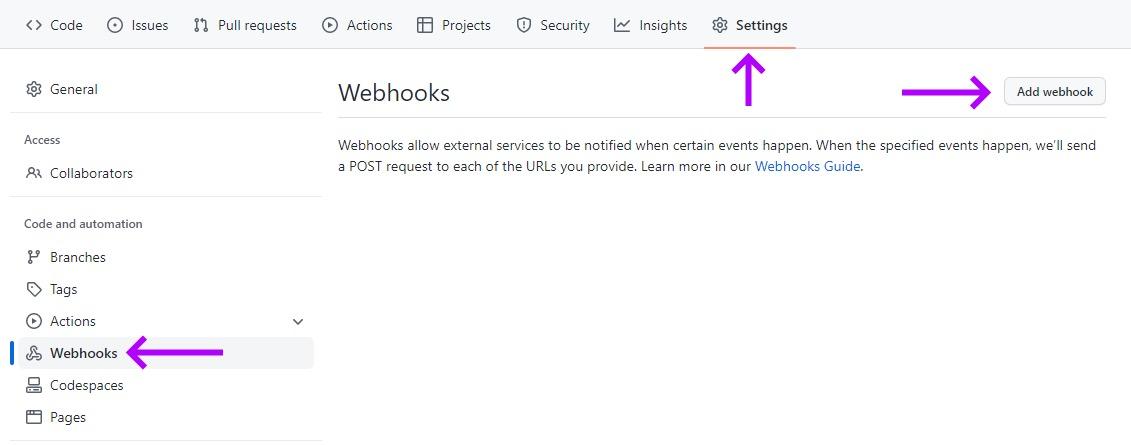
Click Settings on the top bar. Then, select the Webhooks action on the left list and click Add webhook:
This will open the Add webhook form, where we’ll configure a webhook for an event in which a developer has pushed code to the repository.
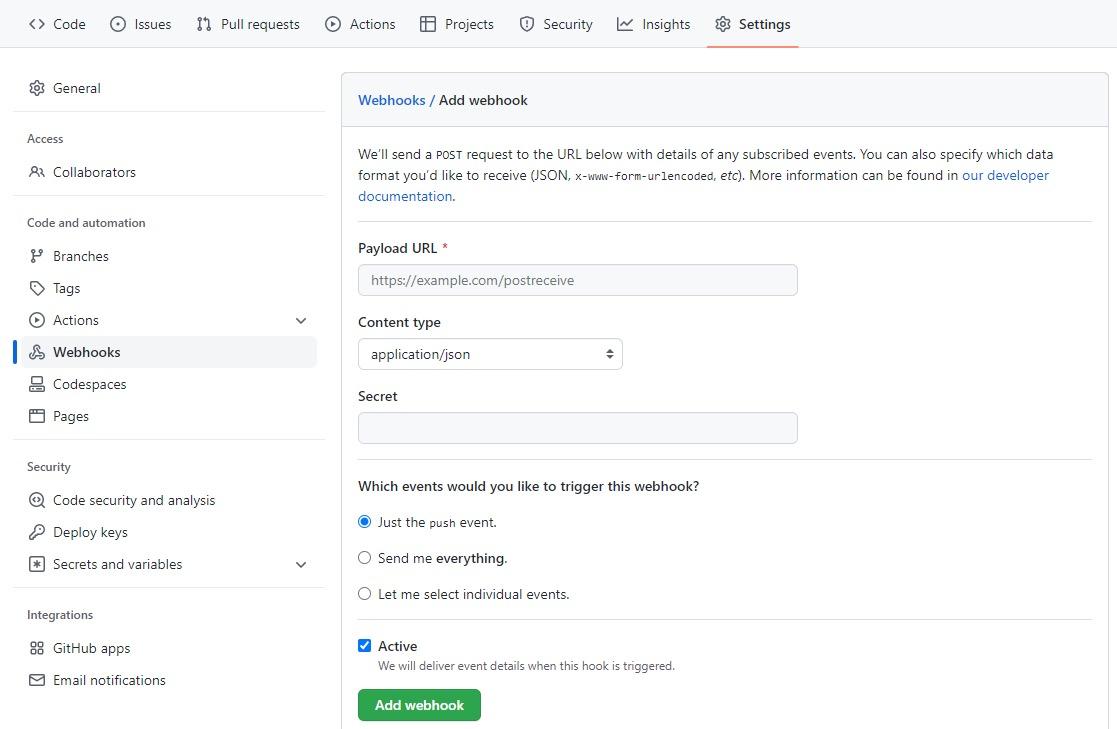
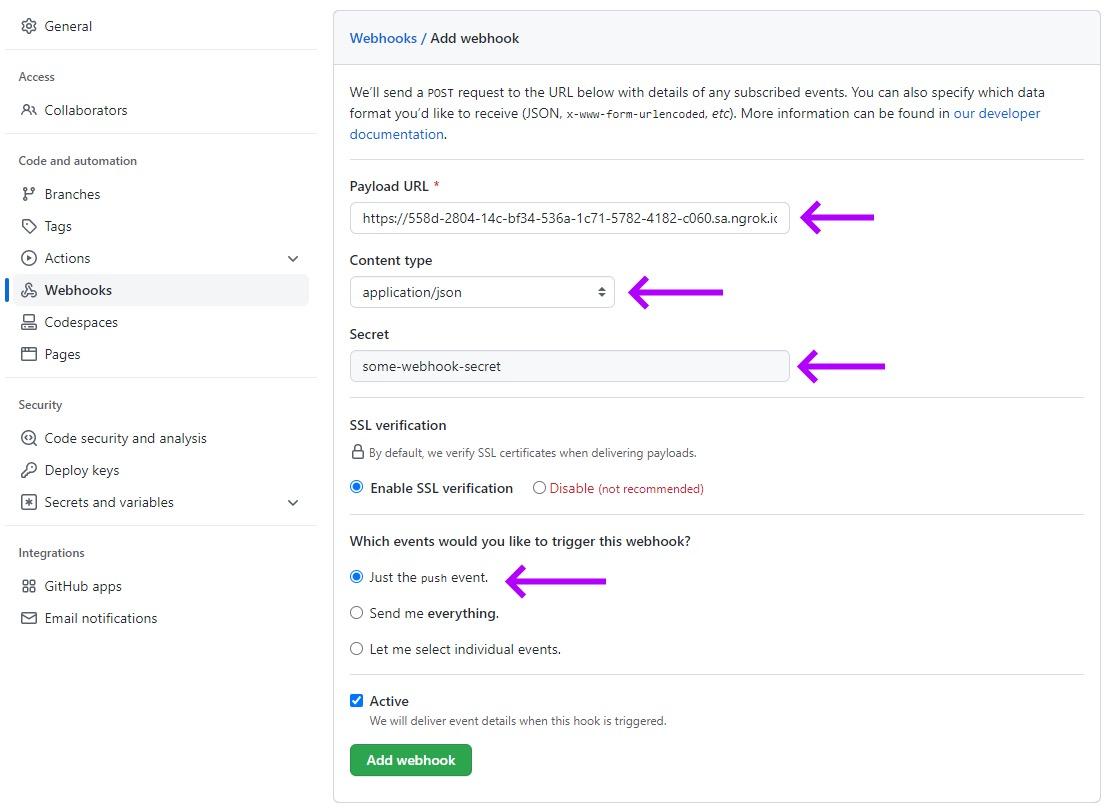
Now, fill out the form as follows:
In the Payload URL field, enter the ngrok address relative to the endpoint of your local Node.js application.
In the Content type field, select "application/json" to indicate that this is the type of content that GitHub will send to the endpoint.
In the Secret field, type "some-webhook-secret". Remember that in production, you’ll need stronger passwords or phrases to enforce security.
Under Which events would you like to trigger this webhook, select Just the push event. This will set the GitHub webhook up for a repository push action you can trigger to test verification.
Note: It is always advisable to enable Secure Socket Layer (SSL) verification in webhook configuration. By enabling SSL verification, organizations ensure that the data transmitted between systems is secure and cannot be intercepted by unauthorized parties.
Once you have filled out the form, click Add webhook.
Securing the webhook
We need to add the required Node.js crypto module to handle encrypted data. Add this line in the first block of the webhook.js file:
1const crypto = require('crypto');Next, declare a constant to hold the same secret string you configured in your GitHub webhook:
1const secret = 'some-webhook-secret';Note: It is never advisable to hard-code your secrets. This method is for demonstration purposes only.
At the beginning of the req.on function, we declare a constant to hold the value of the calculated SHA256 signature created with HMAC. Obtain the HMAC-SHA256 signature by running a cryptographic SHA256 hash function over the shared secret key and the value passed in by the GitHub request (represented here by the chunk parameter):
1    req.on('data', chunk => {
2
3      const hashAlgorithm = 'sha256'
4      const signature = Buffer.from(req.headers['x-hub-signature-256'] || '', 'utf8')
5      const hmac = crypto.createHmac(hashAlgorithm, secret)
6      const digest = Buffer.from(hashAlgorithm + '=' + hmac.update(chunk).digest('hex'), 'utf8')
Next, we declare the isAllowed constant inside the req.on event to indicate whether the x-hub-signature-256 header matches the signature we calculated. Use the crypto.timingSafeEqual function, which compares two variables without exposing timing information that could help an attacker guess one of the values:
1      const isAllowed = (signature.length === digest.length && crypto.timingSafeEqual(digest, signature));
2      if (!isAllowed) {
3        const msg = 'Webhook signature does not match the hash of the payload';
4        console.log(msg);
5        res.writeHead(401)
6        res.end(msg)
7        return;
8      }
In the code above, a match means that we can rest assured that the request is coming from GitHub and not a malicious actor. If the request doesn’t come from GitHub, it returns an HTTP 401 Unauthorized response.
Here are some best practices applied in this code, which you should implement when developing your webhooks:
When performing string operations to calculate the webhook signatures, always handle the payload as UTF-8, as the webhook payload may contain Unicode characters. Additionally, if you have expectations of how your data should appear, you can implement a validation method to ensure your received data appears as expected.
Some webhook providers (like GitHub) may include an
x-hub-signatureheader in the requests. Thex-hub-signatureheader is generated using SHA-1, which is considered a weak hashing algorithm, but it’s only included for backward compatibility. Whenever possible, use thex-hub-signature-256header, which is generated using the strong SHA-256 algorithm.Start the hash signature with
"sha256="using the secret of the request’s payload body.Instead of using a plain equal operator (
"=="or"==="), use a safe comparison method that reduces the chances of timing attacks. All modern languages and platforms have at least one of these safe methods. In this Node.js project, we’re using thecrypto.timingSafeEqualfunction.
You can grab the complete webhook.js code here.
For more detailed information, refer to the GitHub documentation on securing webhooks.
Testing the secured webhook endpoint
Since you modified the code, you should restart your local Node server. In your console, stop the node server with Ctrl+C (or Command+C in Mac) and execute the node webhook.js command again.
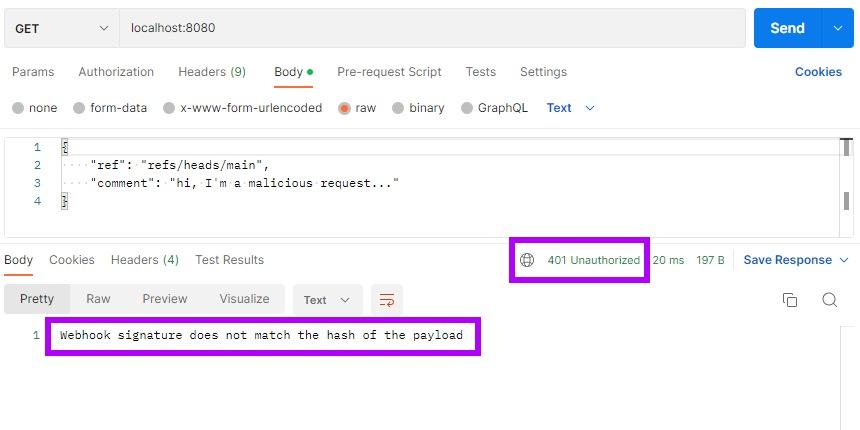
Then, go back to the Postman app and resend the request. Now, the Node.js app responds with an HTTP 401 Unauthorized code:
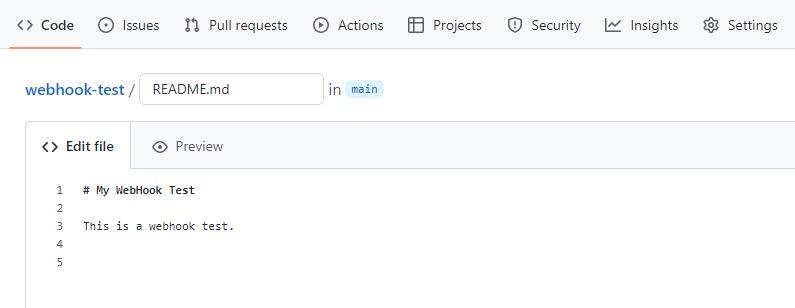
Open GitHub and add a README.md file if you haven’t already, or open it if you have. Then add or modify the text as below:
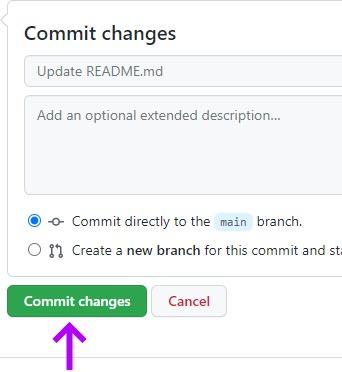
Finally, click Commit changes to push the changes to the repository’s main branch:
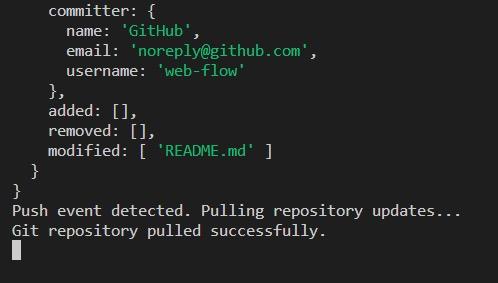
Now, go back to your Node.js terminal to confirm that the repository has been successfully fetched and pulled:
Conclusion
Webhooks allow communication between tools, providing real-time data when events occur. You can integrate them into systems to create flexible and extended collaborative workflows, which wouldn’t be possible when using APIs with predefined parameters.
Because they’re open by design, webhooks are vulnerable to security threats, so it’s essential to take appropriate measures to prevent supply chain attacks.
Webhook signatures are the recommended solution as webhook providers can configure secrets and generate signatures using strong hashing algorithms. Signatures are a simple and secure way to ensure that data communication between webhooks only occurs between verified and trusted partners.
Get started in capture the flag
Learn how to solve capture the flag challenges by watching our virtual 101 workshop on demand.
