Installing multiple Snyk Kubernetes controllers into a single Kubernetes cluster
Pas Apicella
August 15, 2022
0 mins readKubernetes provides an interface to run distributed systems smoothly. It takes care of scaling and failover for your applications, provides deployment patterns, and more. Regarding security, it’s the teams deploying workloads onto the Kubernetes cluster that have to consider which workloads they want to monitor for their application security requirements.
But what if each team could actually control which container images are scanned and for which workloads in particular? There could be multiple teams deploying to Kubernetes, each with unique requirements around what is monitored. This use case is best solved by allowing each team to set up their own Snyk Kubernetes integration and monitor the workloads they need to. Let’s take a look at how it works.
Snyk Kubernetes integration overview
Snyk integrates with Kubernetes, enabling you to import and continually test your running workloads to identify vulnerabilities in their underlying images, as well as any configurations that might make those workloads less secure. Once workloads are deployed, Snyk continues to monitor those workloads, identifying exposure to newly-discovered vulnerabilities, as well as any additional security issues as new containers are deployed or the workload configuration changes.
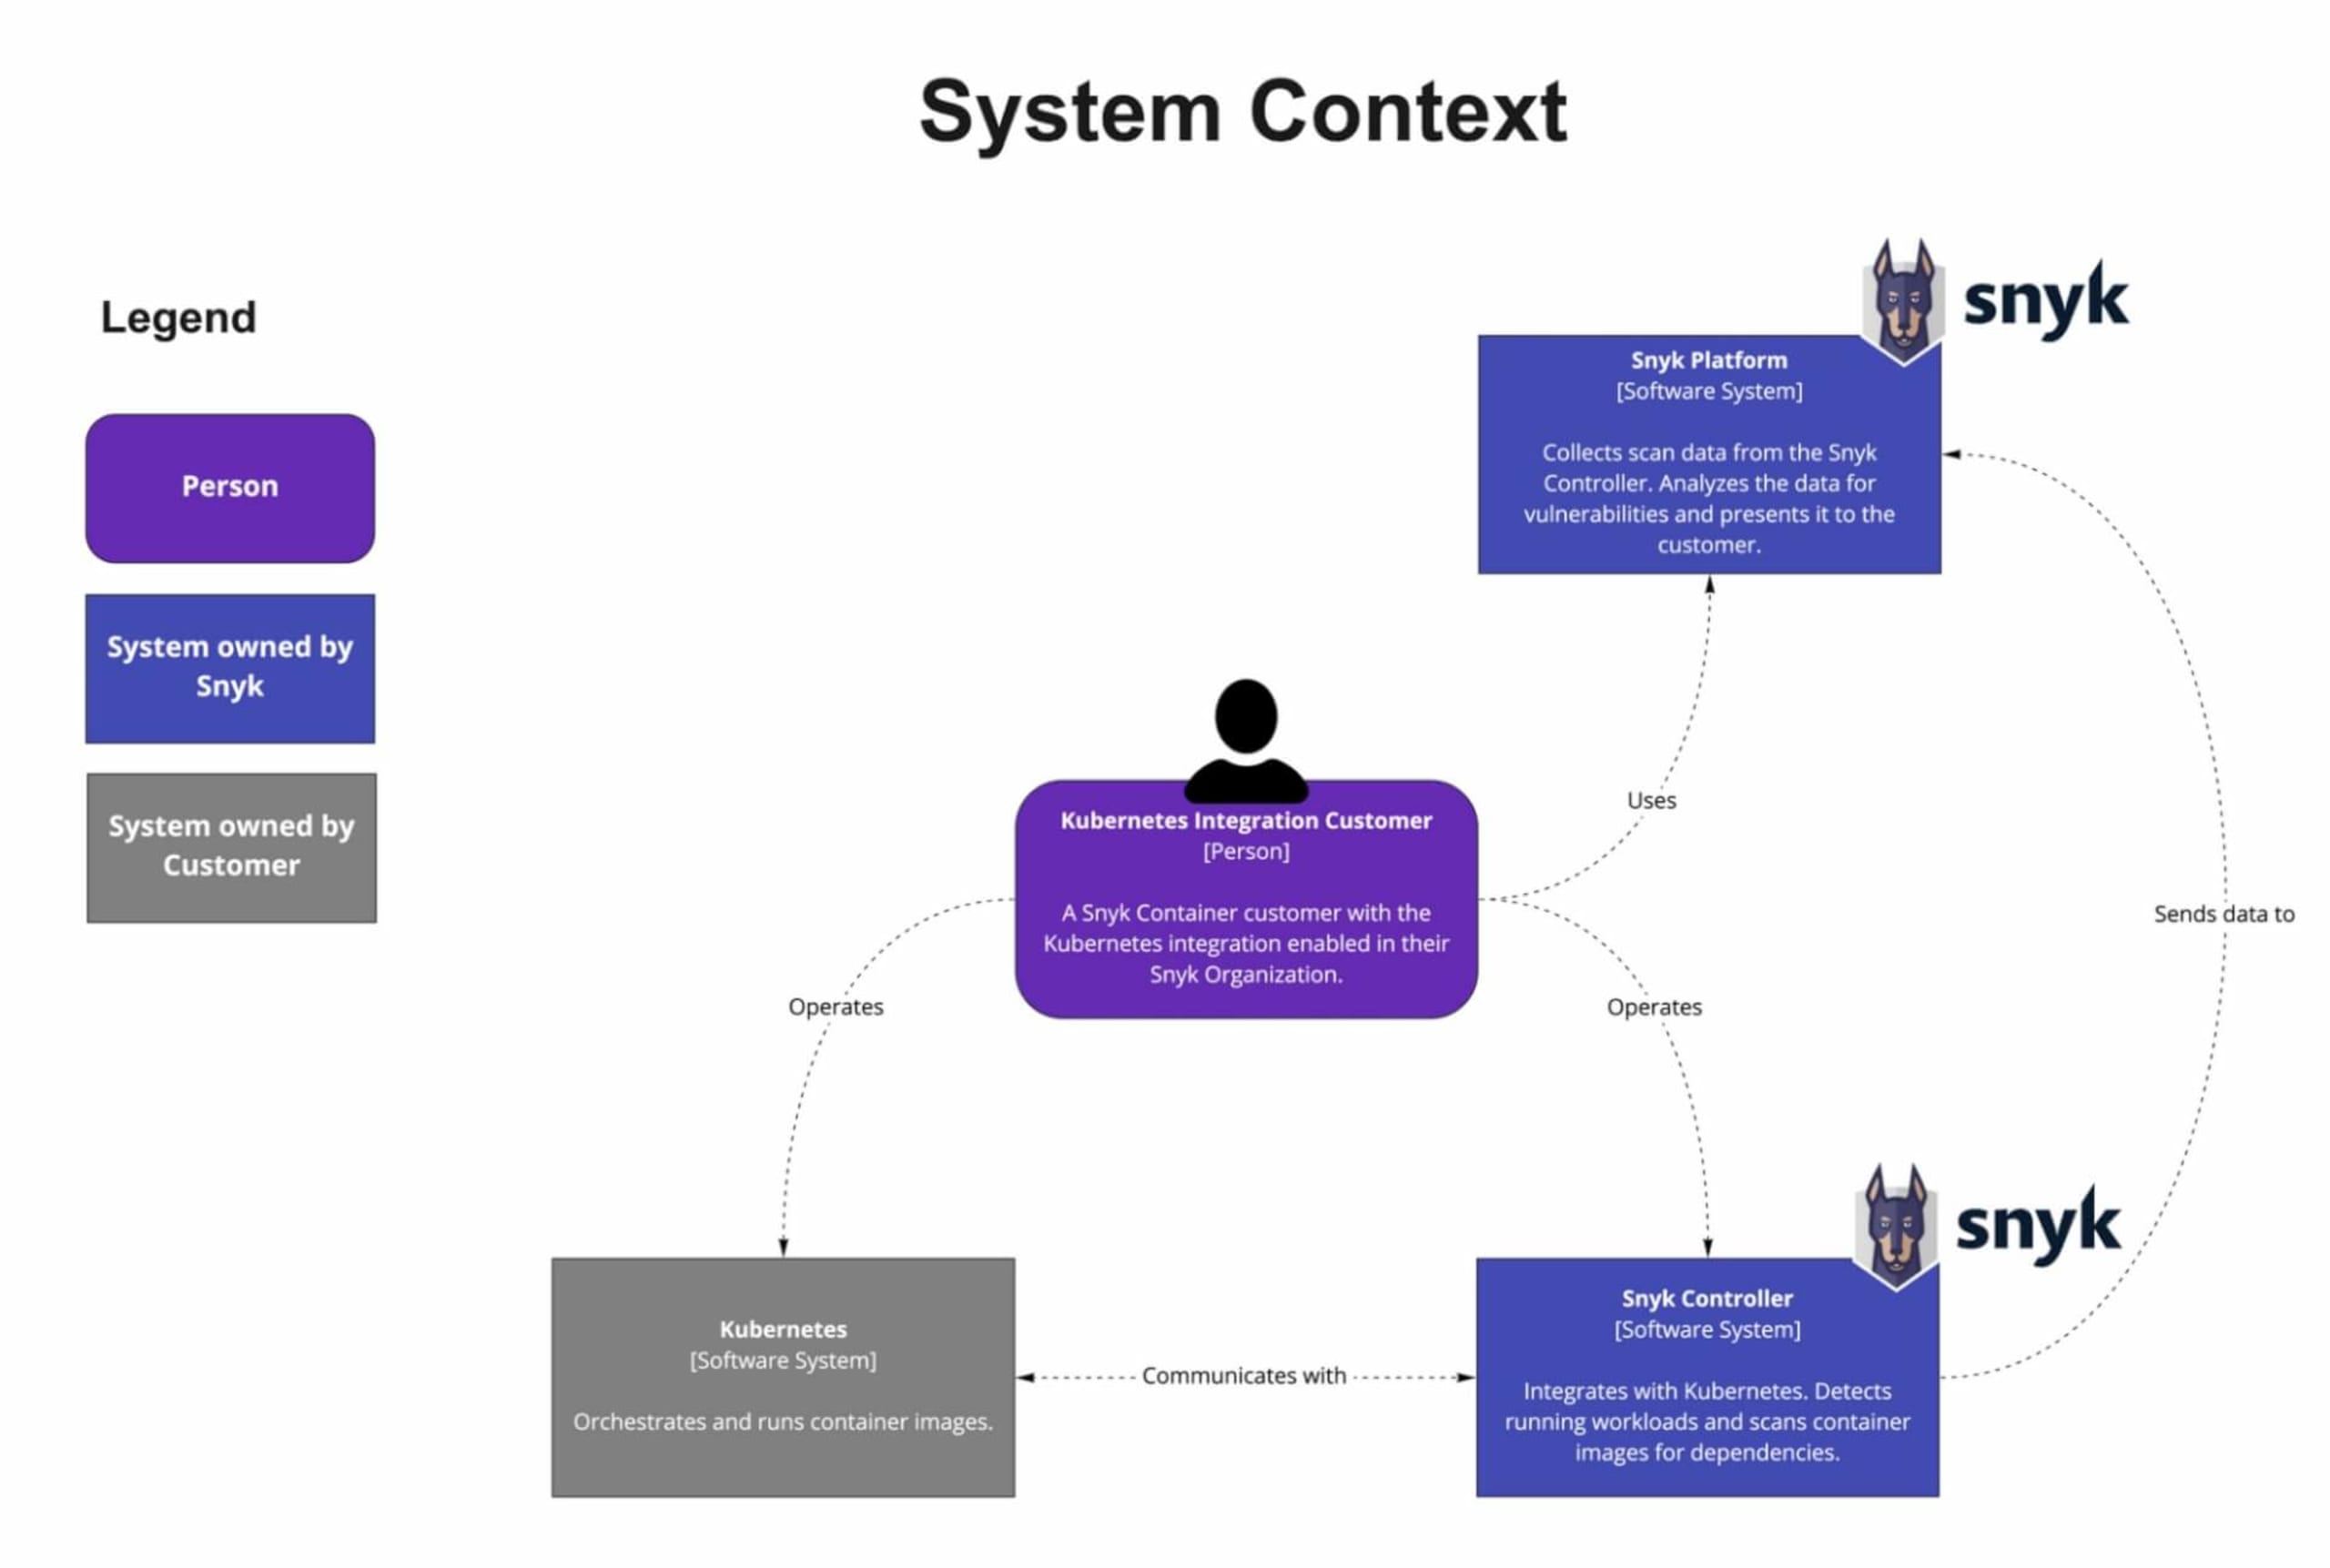
Kubernetes integration architecture diagram
How to install multiple Snyk controllers into a single Kubernetes cluster
Now the fun part! We’re going to walk through step-by-step instructions for setting up multiple Snyk Controllers in a single Kubernetes cluster. Here are the steps we’ll take:
Configure separate namespaces
Create a Snyk organization for each namespace
Install and configure
snyk monitorfor the first namespace (apples)Install and configure
snyk monitorfor the second namespace (bananas)Verify that deployed workloads are automatically imported via the policy
Deploy workloads to bananas that are auto-imported through a Rego policy file
Prerequisites
You’ll need to have a Business or Enterprise account with Snyk in order to use the Kubernetes integration. If you don’t have one of these, you can start a free trial of our Business plan. Even if you don’t want to try it yourself, I’d still encourage you to keep reading (skipping the code blocks) to learn how to install and manage multiple Snyk controllers in a single Kubernetes cluster.
A Kubernetes cluster such as AKS, EKS, GKE, Red Hat OpenShift, or any other supported flavor.
Step 1: Configure separate namespaces
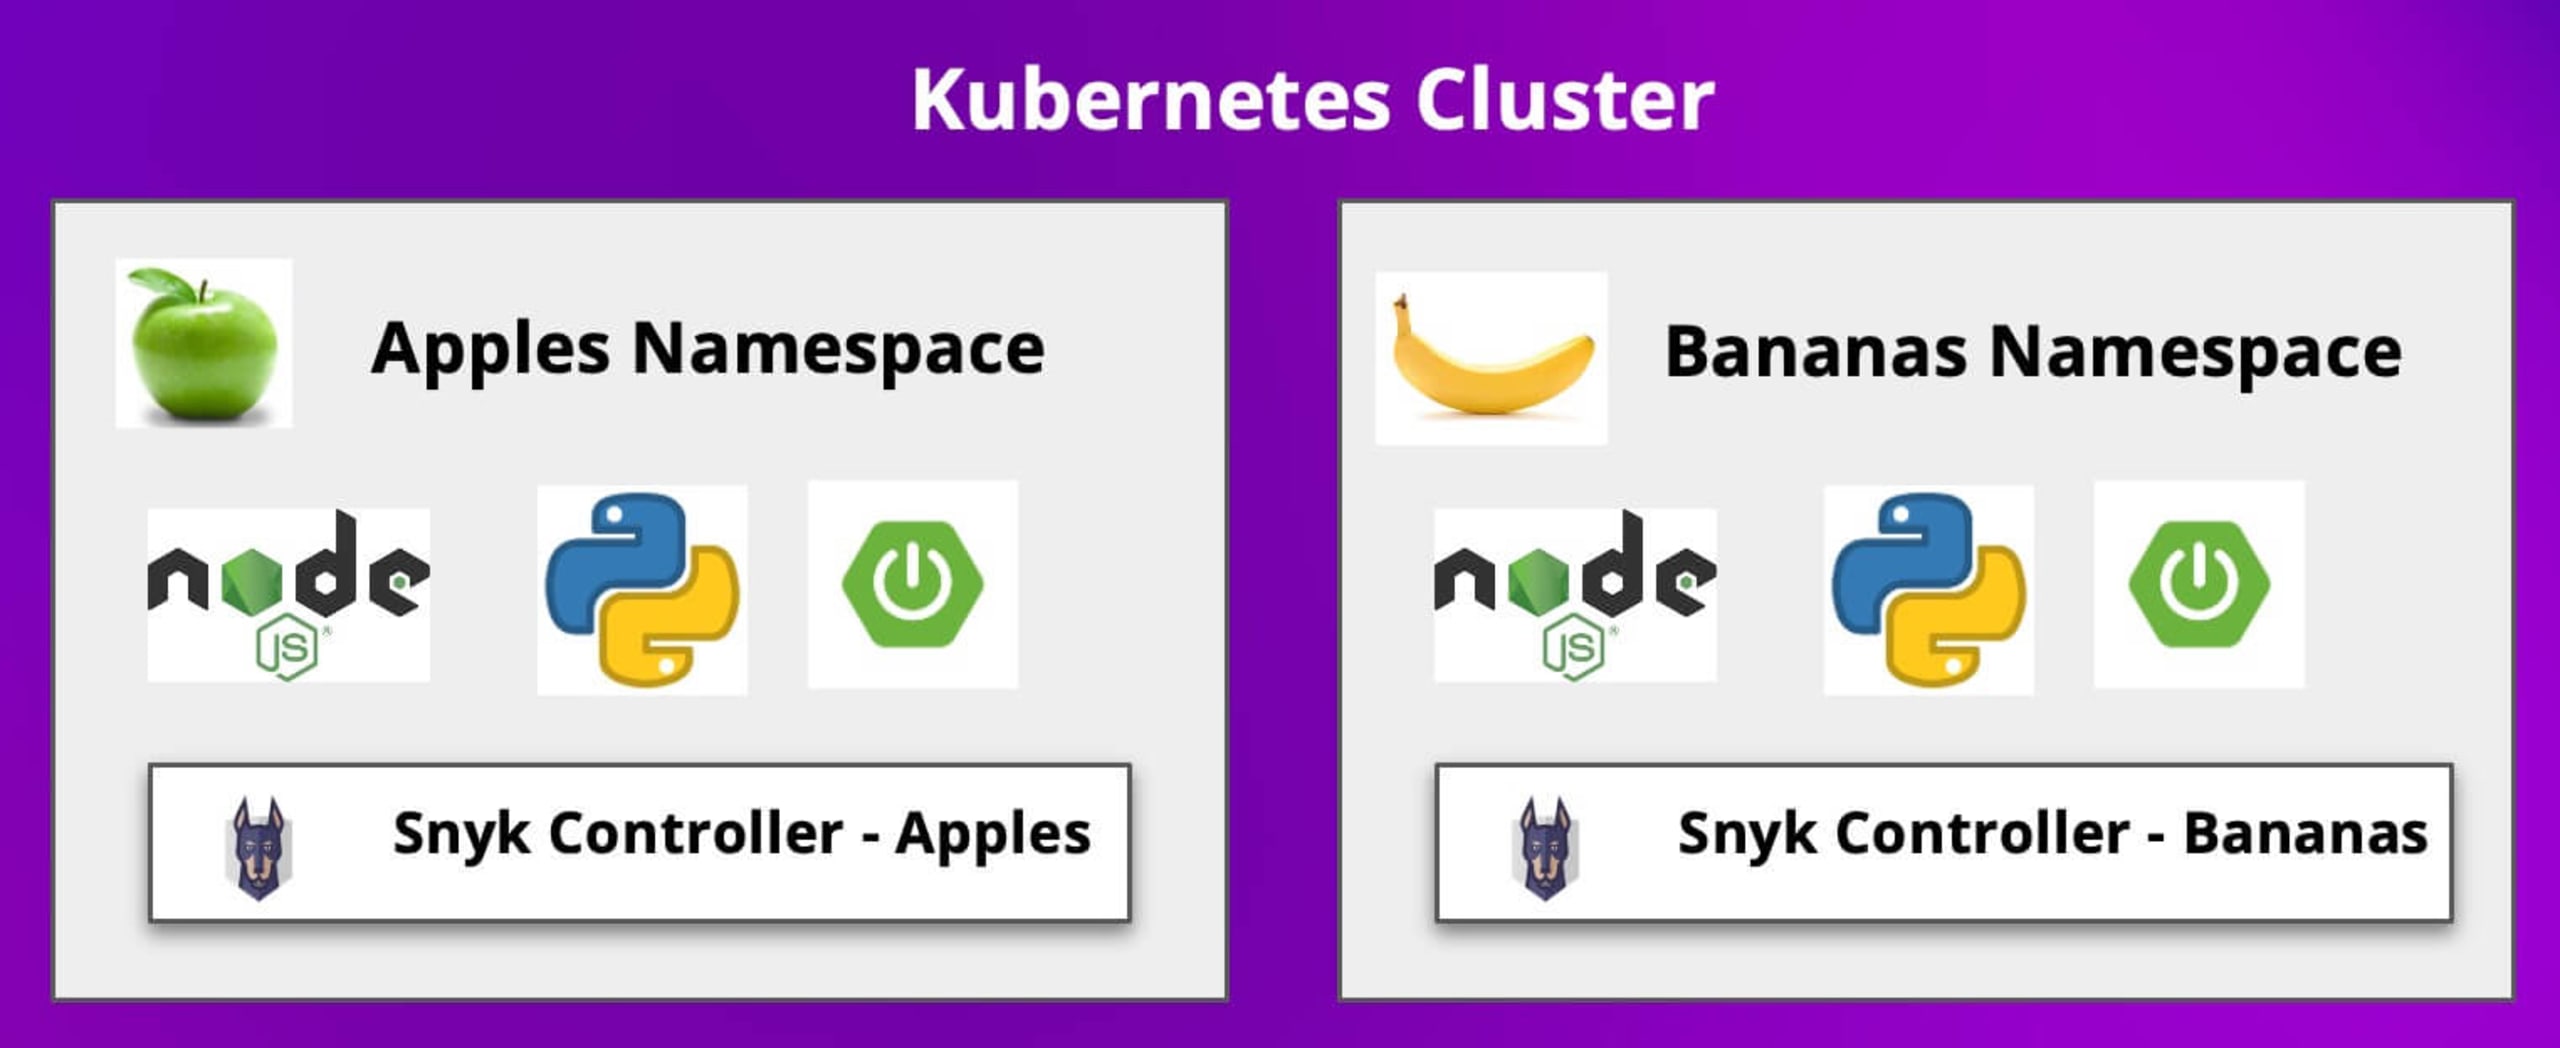
In this demo, I am using an Azure AKS service for my Kubernetes cluster. In this cluster we will install two Snyk controllers, each in their own namespace. One in the apples namespace, and one in the bananas namespace, as shown in the diagram below.
Go ahead and create the namespaces as shown below:
Step 2: Create a Snyk organization for each namespace
Using separate Snyk organizations allows us to separate the workload scanning, allowing feature teams to use their own separate organizations to have better control of the scanning of their workloads and images. You're free to use the same organization with each of the Snyk controllers that we deploy, but in this case we'll keep them distinct. In either case, the workloads will appear using a label we set when we install the Snyk controllers.
Our new organizations
One for the apples namespace:

One for the bananas namespace:

Once created you should see two empty organizations within the Snyk app. We will use them shortly.

For each organization, enable the Kubernetes integration by selecting the Integrations tab, selecting Kubernetes, and choosing Connect. Then refer to the Snyk Kubernetes documentation to complete the setup.
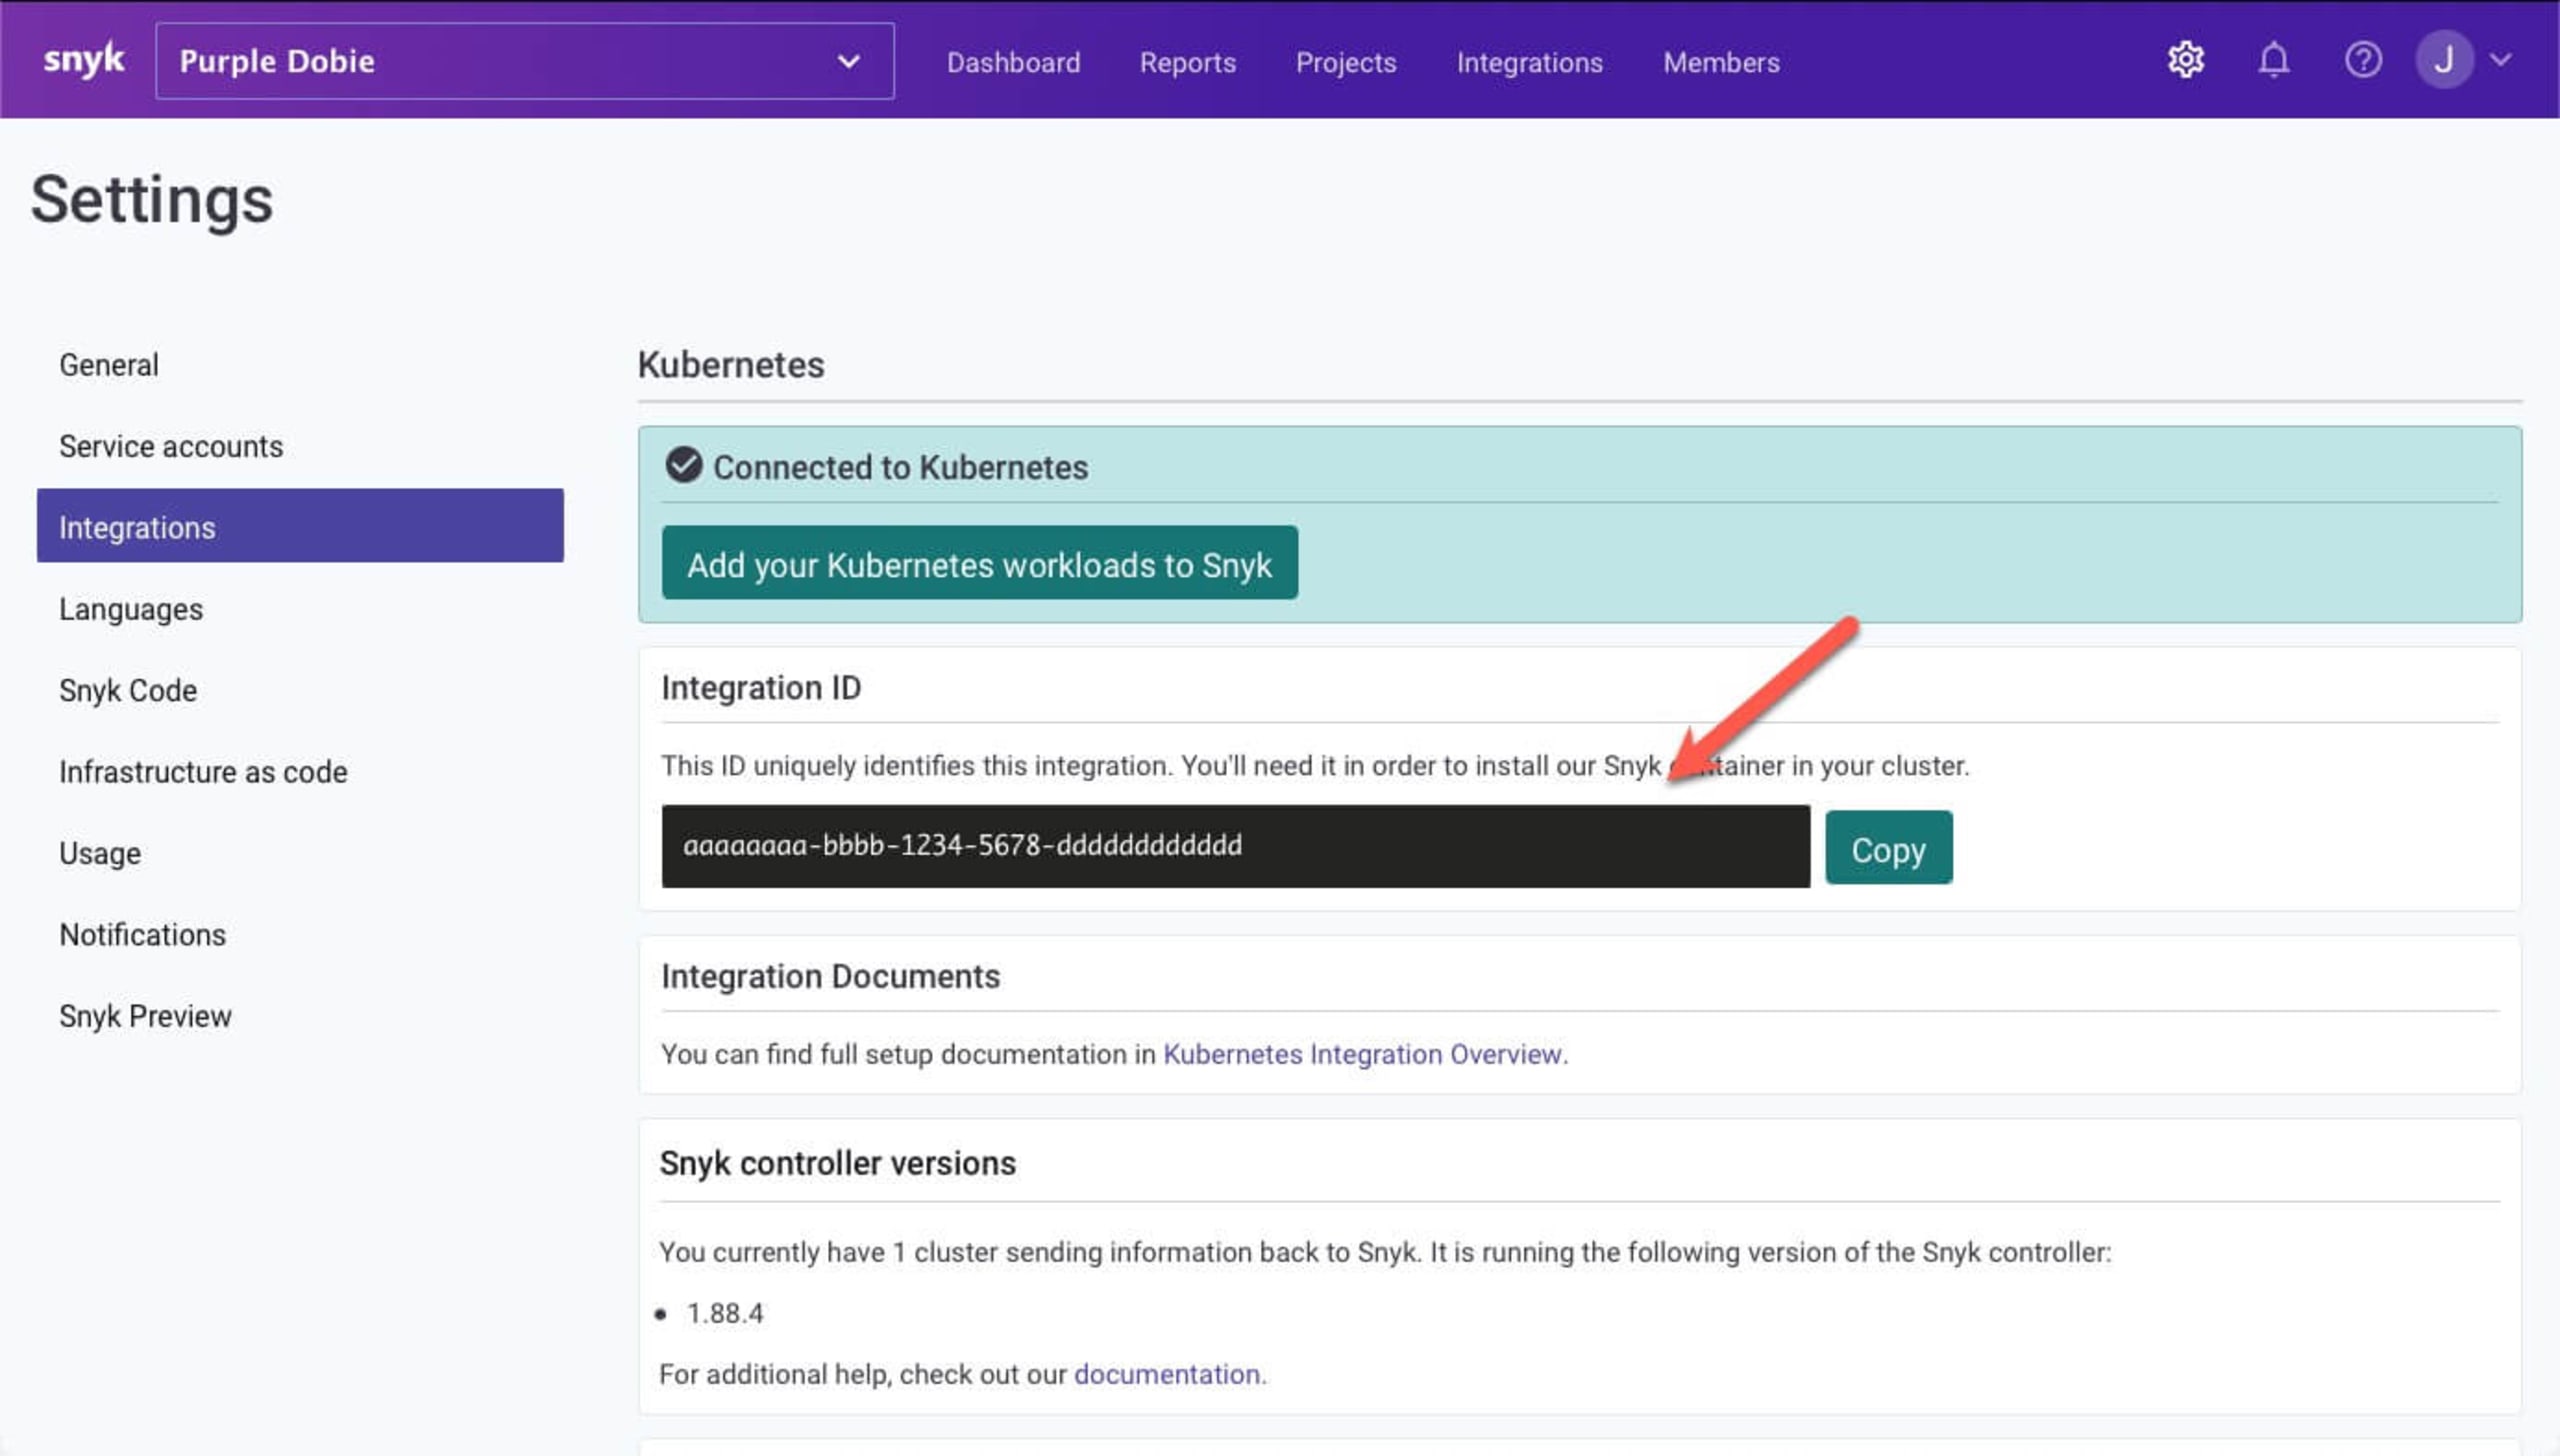
Please make a note of the Integration IDs for each Snyk organization's Kubernetes integration — you will need them soon. You can retrieve the Kubernetes Integration ID from the organization settings icon on the top navigation bar in Snyk , then by navigating to Integrations in the sidebar, and selecting the Kubernetes integration, as shown below.
Step 3: Install and configure snyk monitor for the apples namespace
Now that we have our organizations and integrations set up and connected to our cluster, we can configure the Snyk monitor, which we'll do from a terminal window.
We'll create a file to subscribe to workload events, define the criteria for our subscriptions, install Snyk's Helm chart for Kubernetes monitoring, and setup / start up the monitor
Create the registry file
In a terminal, create a directory for the apples organization and change to it:
Create a file called workload-events.rego with content as follows, replacing the <APPLES_INTEGRATION_ID> with the Integration ID of the apples org's Kubernetes integration.
From this Rego policy below, we are instructing the Snyk controller to import/delete workloads from the apples namespace only as long as the Kubernetes workload type is not a CronJob or Service. To learn more about the different workload types, consult the Snyk documentation.
workload-events.rego
Add the Snyk Helm charts to your repo
Access your Kubernetes environment and run the following command in order to add the Snyk Charts repository to Helm, we will need them when we install this Helm chart shortly.
Create the configuration for Snyk monitor and deploy the Helm chart
Using a Kubernetes secret allows us to run without leaking plain-text credentials. In these steps we'll create and use the secret as we deploy our configuration for the apples organization.
Create the snyk-monitor secret for the apples namespace, replacing the <APPLES_INTEGRATION_ID> with apples’ Snyk app Kubernetes integration ID. In this demo, we are using the public Docker Hub for our container registry which does not require credentials when accessing public images. For more information on using private container registries please follow the Snyk controller documentation.
Now create a configmap to store the Rego policy file for the snyk-monitor to determine what to auto import or delete from the apples namespace:
Next, install the snyk-monitor into the apples namespace, replacing <APPLES_INTEGRATION_ID> with apple's Snyk app integration ID in the command:
Note:Using the label “AKS K8s - Apples” is how you find the imported workloads in Snyk UI which you will see soon.
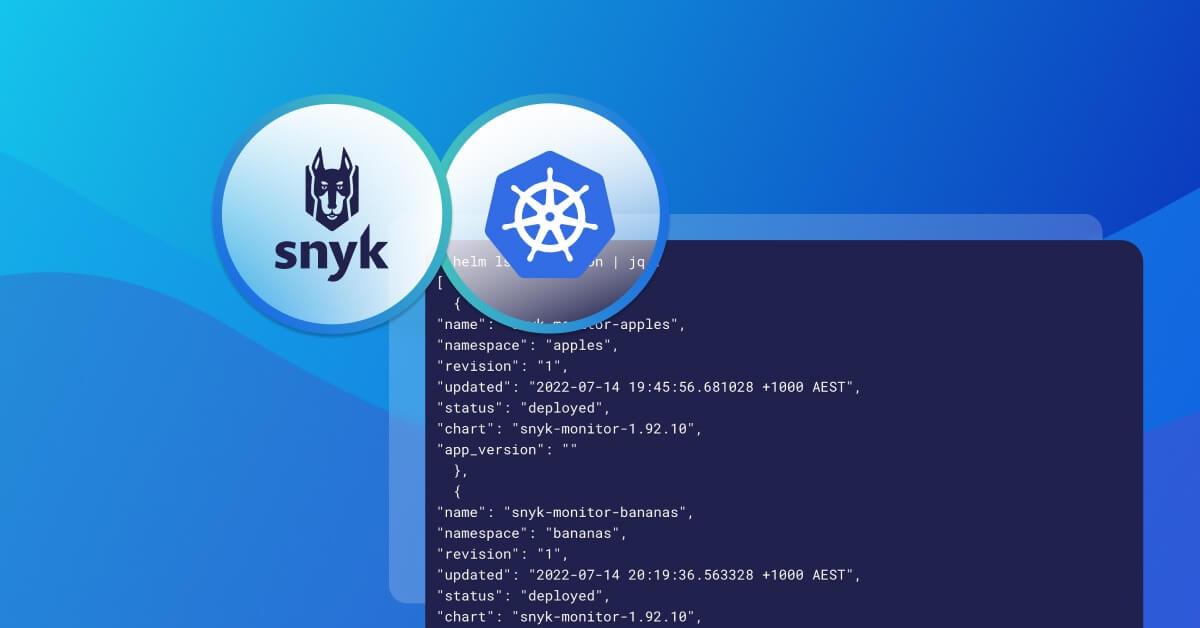
Finally, verify everything is up and running (this command assumes that you've got jq installed; if not, omit the | jq portion of the instruction):
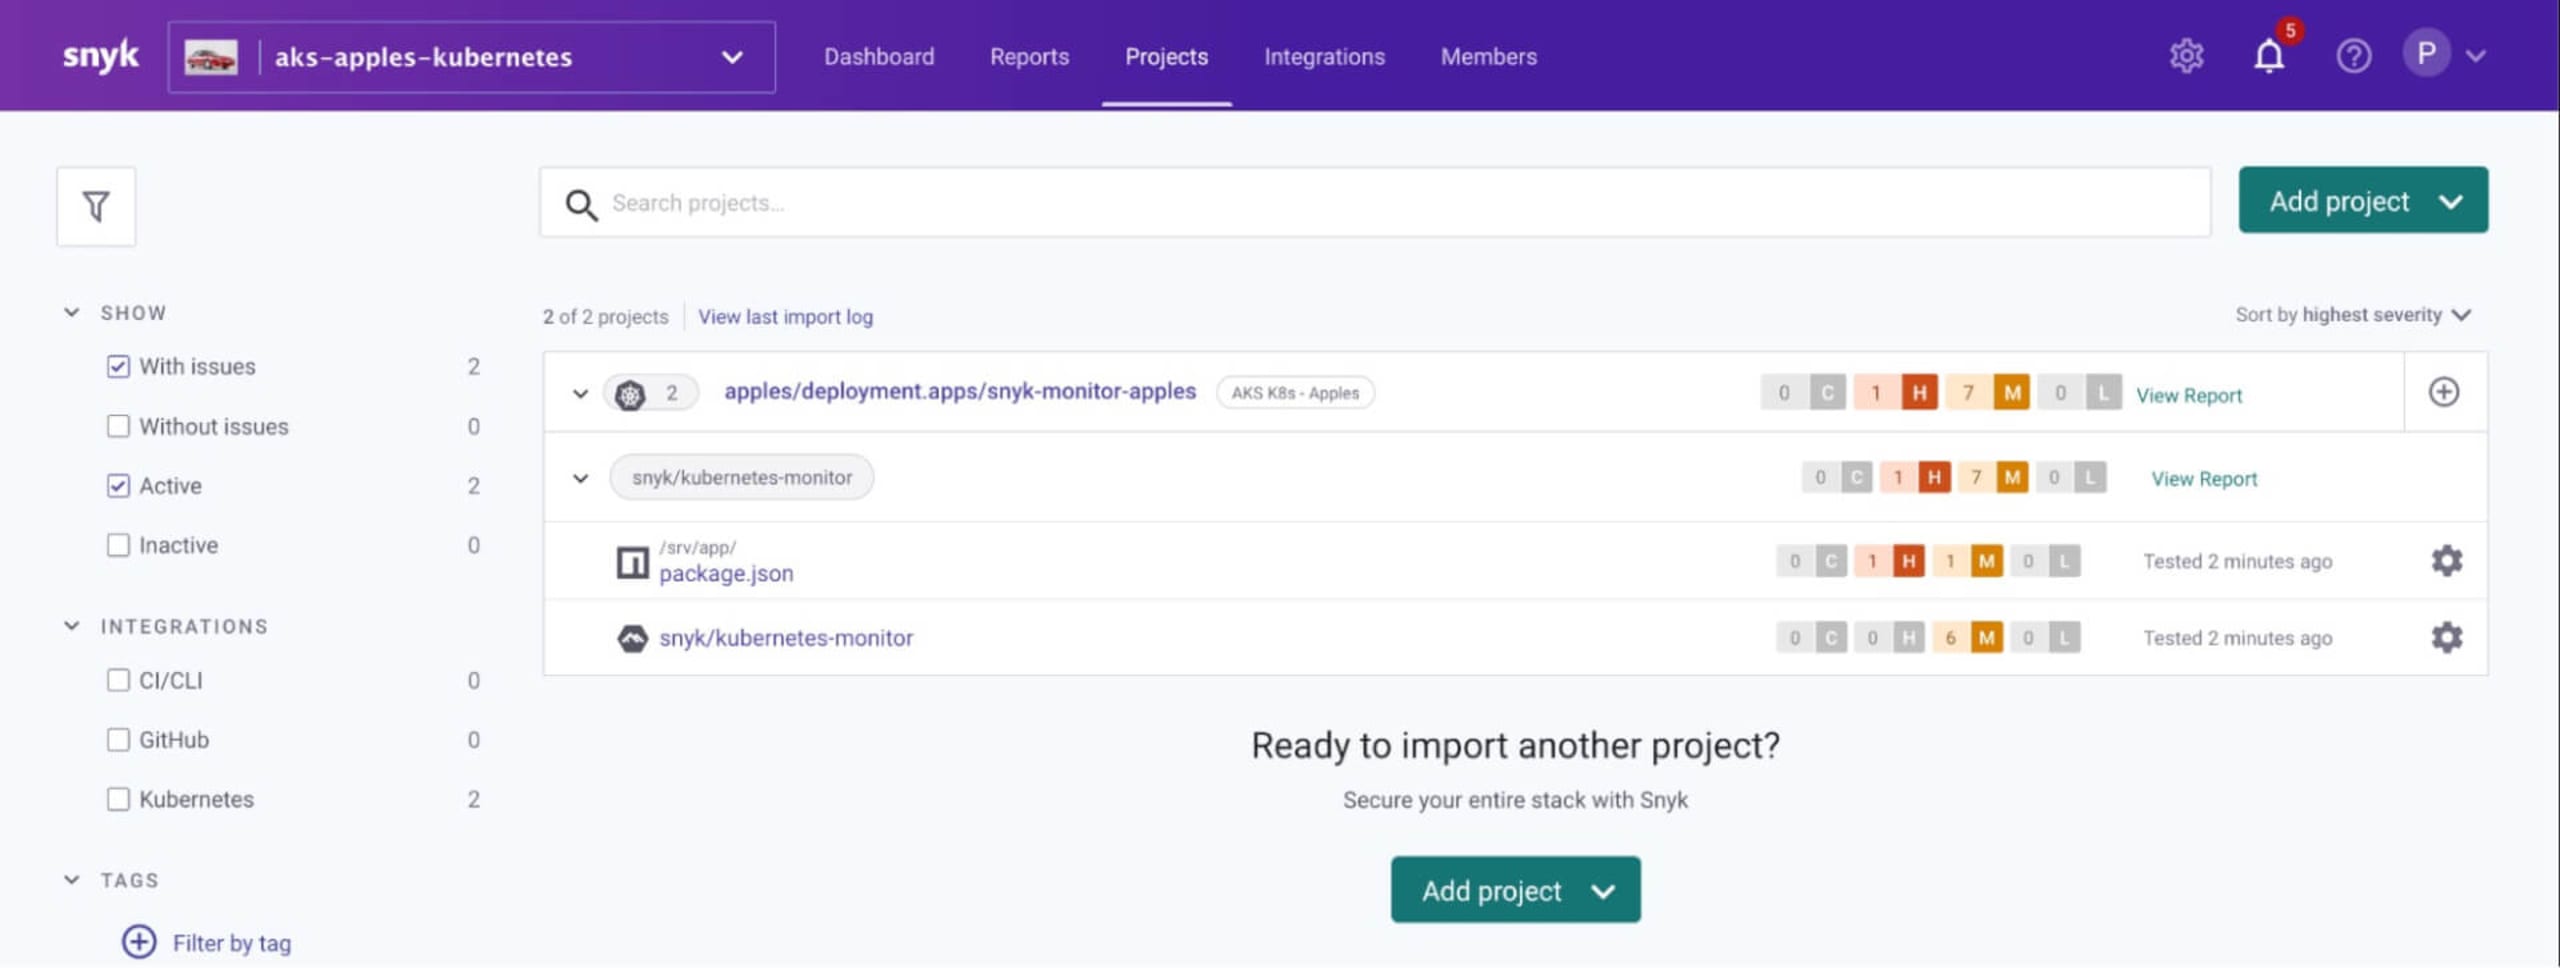
At this point, we have a Snyk controller installed in the apples namespace with its own unique name. Later we will show how this Snyk controller automatically imports workloads based on what we have configured as the workloads are deployed to the Kubernetes cluster’s apples namespace. For now, though, you may notice that if you refresh the projects page for the apples organization that it has scanned the Snyk monitor itself: that is because we told it to scan workloads of type Deployment in the apples namespace
Step 4: Install and configure snyk monitor for the bananas namespace
Create a directory called bananas and change to it:
Now create a file called workload-events.rego with content as follows, replace <BANANAS_INTEGRATION_ID> with bananas’ Snyk app Kubernetes integration ID:
Next, create the snyk-monitor secret for the bananas namespace, replacing BANANAS_INTEGRATION_ID with banana’s Snyk app Kubernetes integration ID:
Then, create a configmap to store the Rego policy file for the snyk-monitor to determine what to auto import or delete from the bananas namespace:
Install the snyk-monitor into the bananas namespace, replacing ¤BANANAS_INTEGRATION_ID> with bananas’ Snyk app Kubernetes integration ID:
Finally, verify everything is up and running:
Step 5: Verify that deployed workloads are automatically imported via the policy
Next, we will deploy workloads to our apples namespace to make sure that they are automatically imported. We'll start with a Spring Boot application which we will deploy to Kubernetes as shown below.
Create a file called springbootemployee-K8s.yaml with the following contents:
Then deploy it:
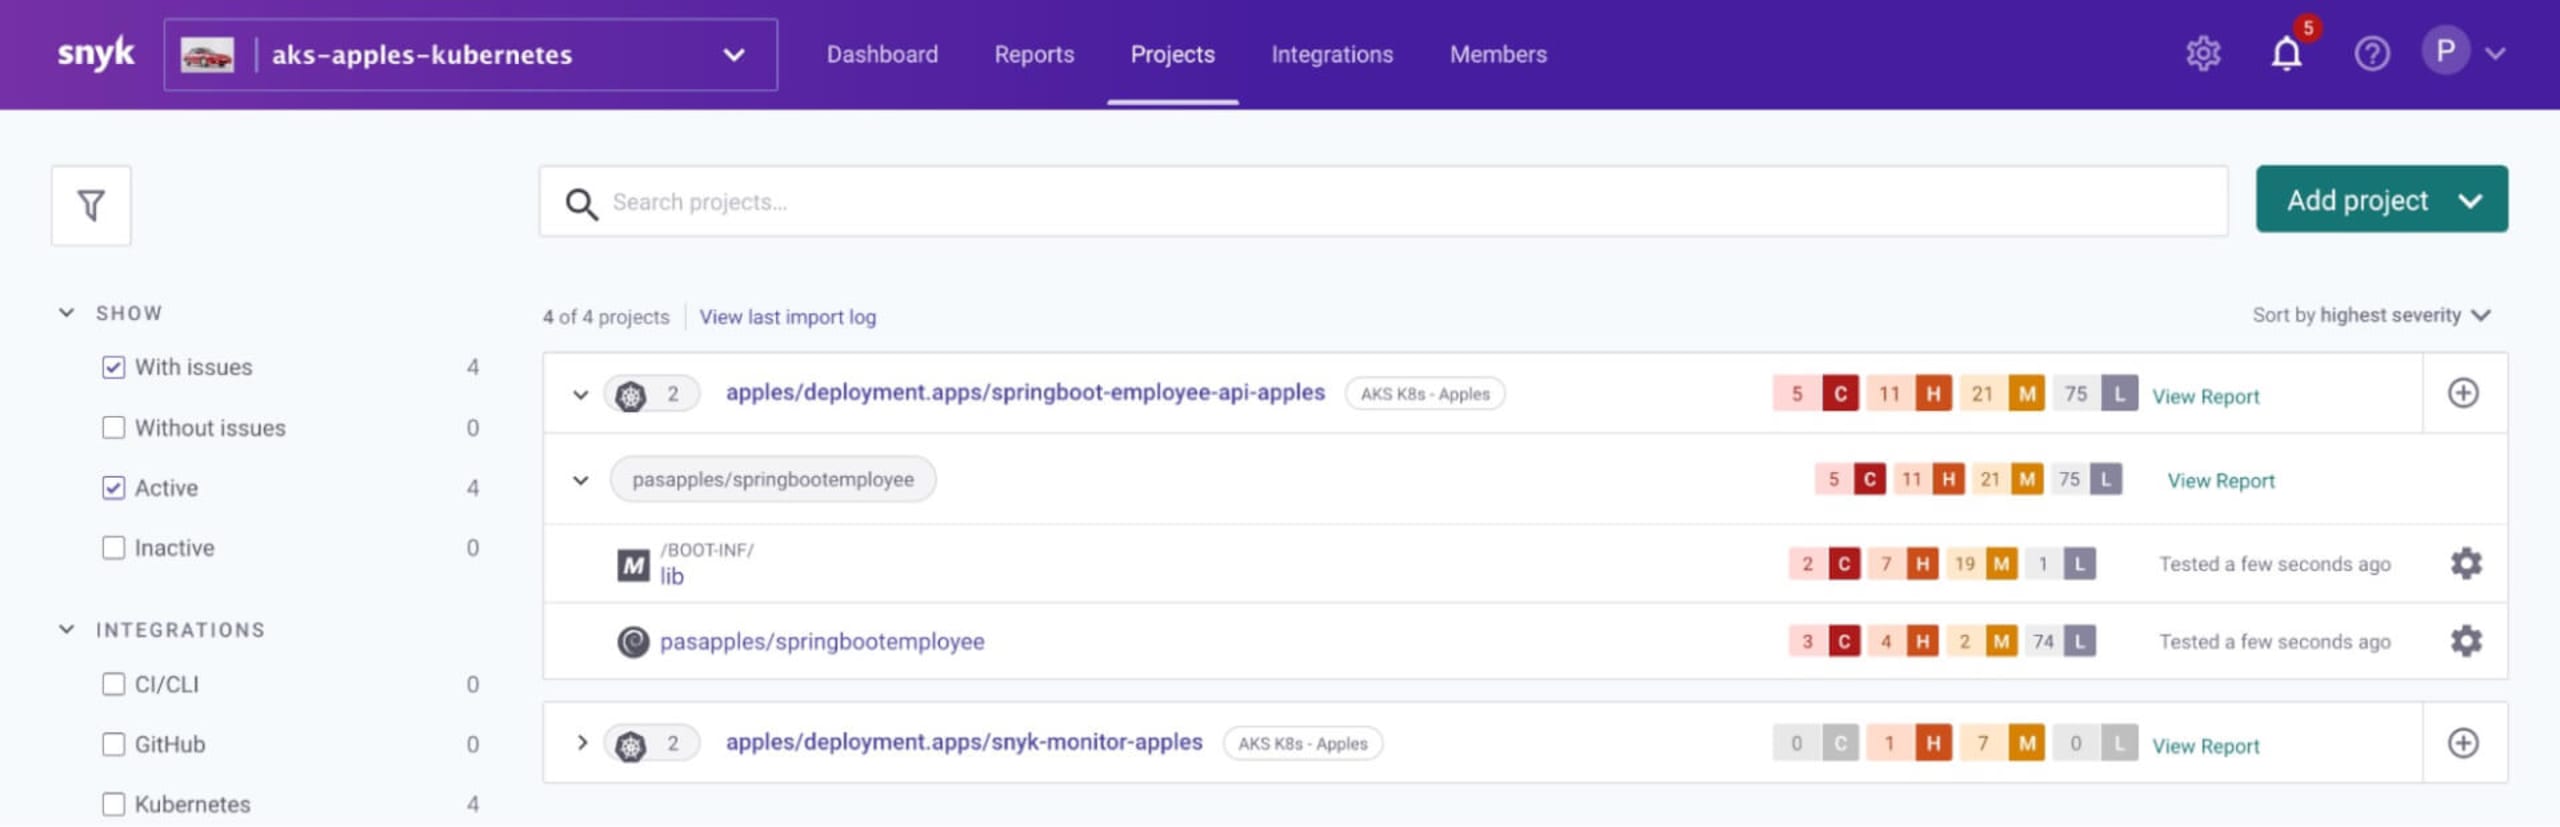
Verify that after a few minutes, the workload is scanned and is automatically imported into the Snyk apples organization in Snyk as instructed to do so by the Snyk controller in the apples namespace
Step 6: Deploy workloads to bananas — auto imported through Rego policy file
Create a file called snyk-boot-web-deployment.yaml with contents as follows
Deploy as follows:
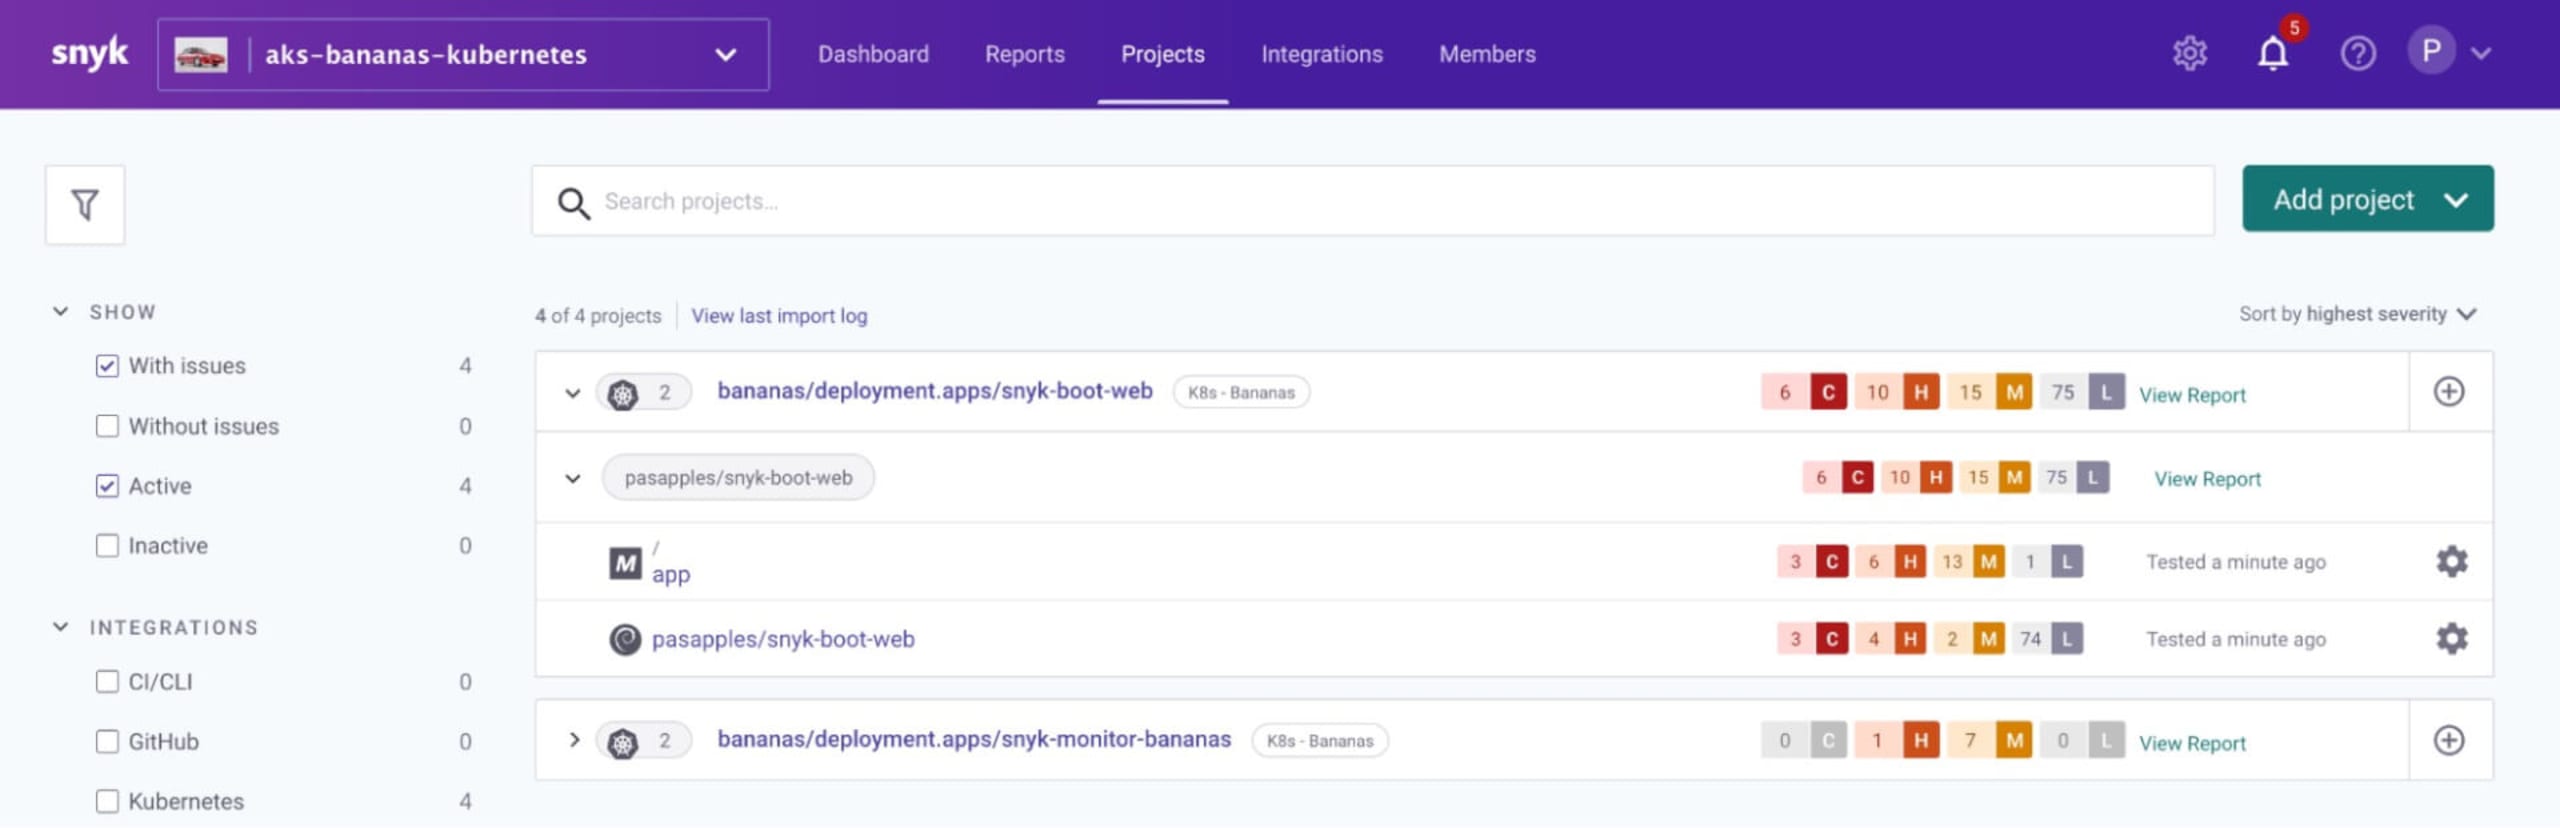
Verify after about 3 minutes that the workload is scanned and is auto imported into the Snyk bananas org in snyk app as instructed to do so by the Snyk controller in the bananas namespace
Bonus: viewing the logs for the Snyk controllers
Kubernetes configuration and YAML files can be somewhat tricky. If you run into issues setting up your monitors, it may be helpful to view the logs for each of the Snyk controllers, as shown in the following command snippets:
Apples Snyk controller
Bananas Snyk controller
Summary
In this blog we've shown how to deploy multiple Snyk controllers to a single Kubernetes cluster, each monitoring their own namespace. The controllers communicate with the Kubernetes API to determine which workloads (for instance the Deployment, ReplicationController, CronJob, etc. as defined in the Rego Policy File) are running on the cluster, find their associated images, and scan them directly on the cluster for vulnerabilities.
Feel free to try these steps out on your own Kubernetes cluster. To do so, start a free trial of a Snyk Business plan.
Resources to learn more
Now that you have learned how easy it is to set up the Kubernetes integration with Snyk, here are some useful links to help you get started on your container security journey
How to setup Snyk Container for automatic import/deletion of Kubernetes workloads projects
Learn Rego with Styra’s excellent tutorial course
Secure infrastructure from the source
Snyk automates IaC security and compliance in workflows and detects drifted and missing resources.