How to build a secure WebSocket server in Python
Kingsley Ubah
July 5, 2022
0 mins readTypically, when a web app needs something from an external server, the client sends a request to that server, the server responds, and the connection is subsequently closed.
Consider a web app that shows stock prices. The client must repeatedly request updated prices from the server to provide the latest prices. This approach is inefficient, as it constantly tears down the HTTP connection, and also less than ideal because the real-time price of a stock stored in the database might change while the app still displays the old price.
However, with bi-directional communication, the server can independently push new stock prices to the client every time the information updates. Engineers devised the WebSocket protocol to enable this type of persistent connection while avoiding the problems associated with the older methods of long-polling.
One popular choice for implementing WebSockets is the Socket.IO library. One of its main advantages is that this library is usable in various programming language environments, including Python. It also gives us a more straightforward and consistent API in both environments without needing to directly use the raw WebSocket APIs. Additionally, the library makes it easy to implement security measures like cross-origin resource sharing (CORS), user authentication, and payload size restriction.
This tutorial will explore building a secure WebSocket server in Python using python-socket.io and JavaScript Socket.IO client to connect our client to the server.
Creating a WebSocket server with Python
Installation and setup
To get started, you must have Python 3.x and its package manager, pip, installed on your machine. Fortunately, all recent Python versions include pip. If you don’t have Python, download the latest version for your system.
Now, let’s create some source files. First, create a folder to hold the example code. After that, install the python-socketio package using pip:
Then, create a new app.py file inside quick-socket. This is where you’ll put your socket server code.
Create a WebSocket server in Python
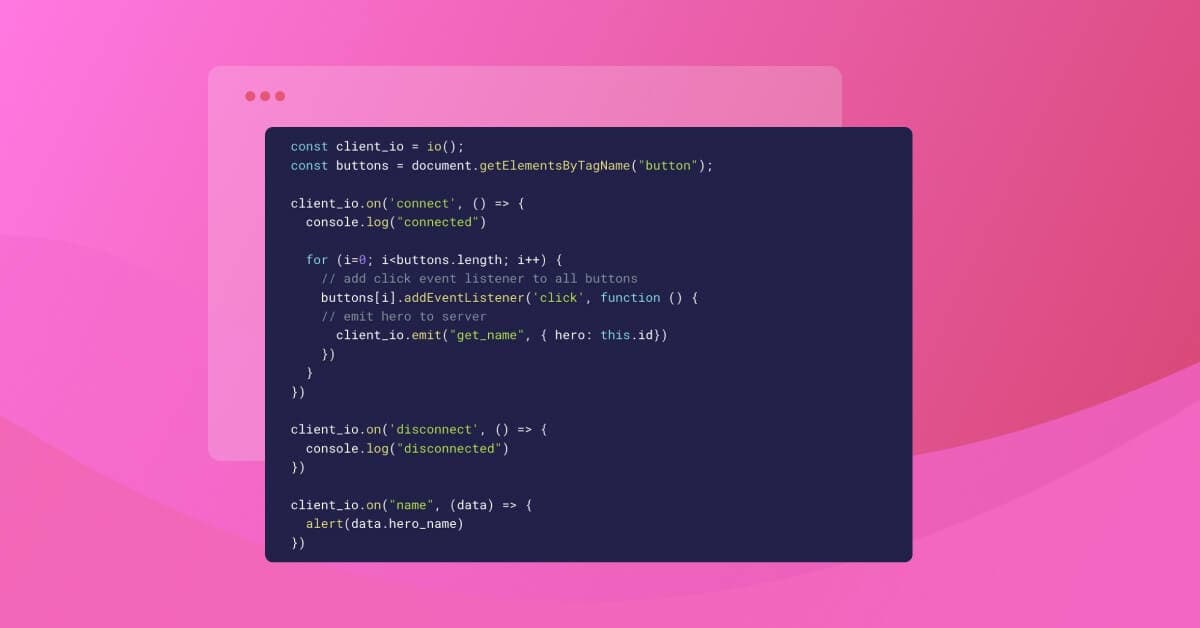
Let’s begin by importing Python’s Socket.IO library and creating an asynchronous socket server instance inside app.py. We’ll make it an ASGI server by setting async_mode to asgi. Following that, set up event listeners on the instance:
The first event will fire when a socket connects to our server. The corresponding connect function takes two arguments:
sidorsession idis a unique id representing a connected client.socketis a dictionary containing all the information that pertains to the client. Pass this toconnect()to check for identifying information (for example, a username) when authenticating the client.
The last event is triggered when a button is clicked on the client app. The payload message (hero) is used to access a corresponding name from the dictionary defined at the top of the file.
You need to run a web server that exposes the server-based socket application to the client. For this, we’ll use ASGI. Luckily, the python-socket.io library comes with ASGIApp to help us transform app.py into an ASGI application that you can connect to a WSGI server (like Gunicorn).
You’ll want to instantiate an instance of this class on the line below server_io = socketio.AsyncServer(), passing the socket server instance and the path to the static files that you created earlier:
Finally, you need to deploy the application. There are various deployment strategies for Socket.IO servers, such as Gunicorn and Eventlet. Check out this documentation and select the deployment strategy that best suits your needs.
Create a WebSocket client using Socket.IO
Now that you’ve created a WebSocket server, it’s time to make a WebSocket client to communicate with it.
First, create a client folder inside your root folder. Then, create two files: index.html and index.js.
Inside index.html, define some simple HTML markup and embed links to the Socket.IO client, Bootstrap CSS, and your local script file, index.js:
You’ll handle all the events the server emits inside index.js, emitting one event when any button on the page is clicked:
The code above grabs the id attribute of the clicked button and emits that value to the server. In response, the server will trigger the name event. In the final callback that runs when the name event is executed, we show the name using the Javascript alert function.
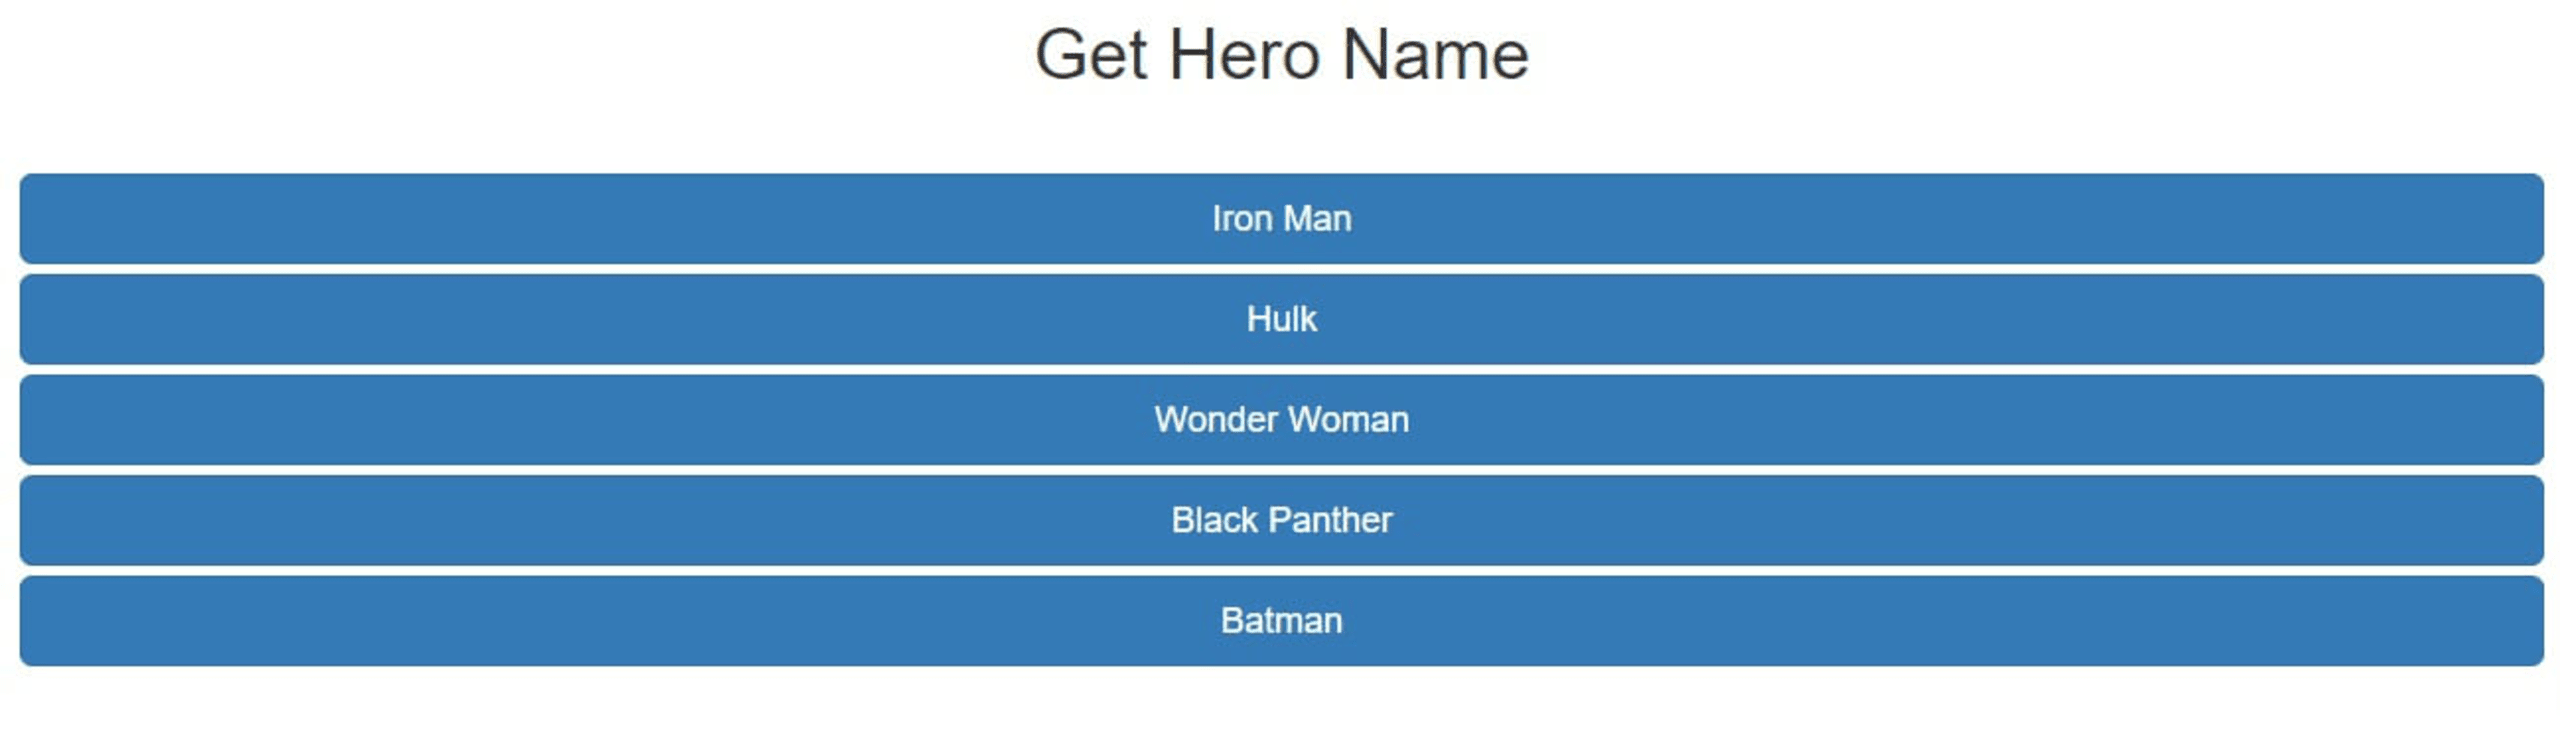
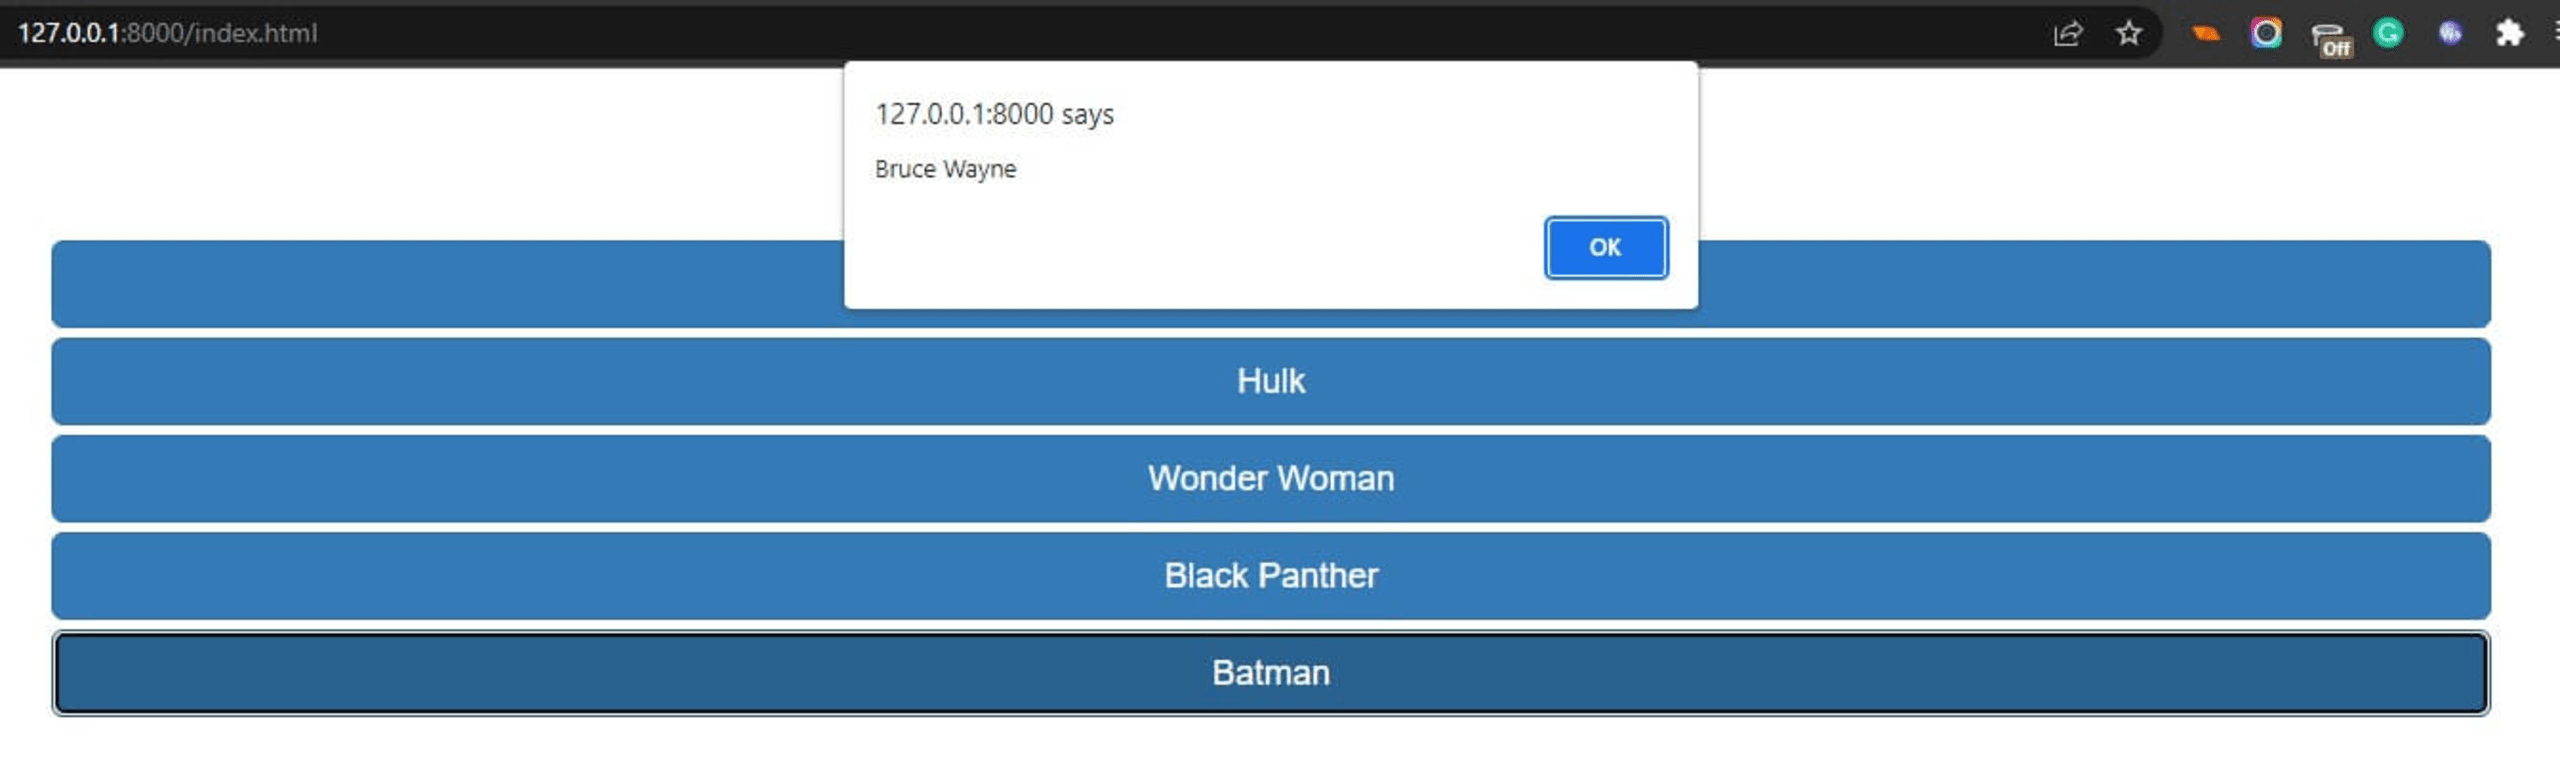
In your browser, navigate to 127.0.0.1:8000/index.html. The page should show a list of buttons, one for each hero.
Click on any button to emit the get_name event. In response, you’ll get an alert showing the hero’s name.
Let’s move on to WebSocket security.
Secure your WebSockets
You’ll need to implement certain features on the server to secure your WebSockets.
Some of these features are enabled in python-socketio by default, as with many other WebSocket server libraries. For example, the library automatically performs HTTP compression in WebSocket connections, which helps to improve transfer speed and bandwidth usage.
You must implement or enable other features when initializing the WebSocket server.
Use CORS to allow or block domains
Cross-origin resource sharing (CORS) is a mechanism that enables web clients to make cross-origin requests. CORS restrictions help protect the server from cross-site request forgery (CSRF) attacks, in which the attacker typically causes the victim to carry out unintended and often detrimental actions, such as transferring personal funds.
However, the protection that CORS offers is limited to HTTP connections. CORS policies don’t apply to WebSockets because WebSocket connections use the WebSocket (WS) or WebSocketSecure (WSS) protocol. In these protocols, the initial handshake occurs via HTTP Upgrade request, the response body is disregarded, and the HTTP/HTTPS protocol upgrades to WS/WSS protocol.
Since CORS doesn’t restrict access to WebSocket protocols, a malicious user can easily make a cross-origin WebSocket connection to send and receive malicious data. The solution is to upgrade the protocol to WS by adding the upgrade header field on the client request.
In response, the server will send a 101 switching protocols message, confirming that subsequent communication can occur over the WebSocket. Fortunately, the Socket.IO client library performs this process automatically. You can view more of its configuration options here.
The server verifies the Origin header on the Upgrade request to prevent unwanted cross-origin WS connections. The python-socket.io library provides a way to do this with cors_allowed_origins. This parameter can take either a single origin or a list of origins (an array of URLs) when initializing the WebSocket on the server-side.
You could also set this argument to '*' to allow all origins or to [] to block all origins:
You also might want to prevent WebSocket connections from origins other than yours to prevent Cross-site WebSocket hijacking (CSWSH) attacks. This type of attack is a variation of CSRF attacks and enables read/write communication via WebSockets.
Here, attackers can make a malicious web page on their domain and establish a connection to the server socket disguised as the user. The malicious application can then read messages the server sends and write directly to the server.
Note that some non-browser clients can easily set the Origin header. Therefore, ensure that you complement this approach with other forms of client authentication.
Authenticate WebSocket clients before connecting
As the web grows in size and complexity, so does the nature of cyber attacks. An authentication system is one of the most effective ways to prevent data theft and ensure privacy in client-server communication.
A user authentication system acts as a barricade between the client and server. Any user wanting to access resources on the server must first provide unique identifying information in the login request — typically a username and password.
The server will verify the user and approve or reject the login request with this information. In cases where the server computer rejects the request, it shows the user what went wrong, for example, “Your login information is incorrect”. This helps ensure that resources do not fall into the wrong hands.
Users can create a strong password and use a password manager tool to improve authentication security. However, these steps all depend upon the user. This is another crucial reason for implementing robust authentication systems on the server-side of the application.
For the server-side, there are many available authentication libraries. Your choice depends on which server-side framework you use to build the application.
For our WebSocket example, you can create a login.html file in the public folder that renders an in-browser HTML form. A user can then supply their username and password.
Then, you'll wait for a submit event inside the client script, public/index.js. When the user submits the login form, you’ll then initialize the WebSocket connection between the client and server, sending the provided username and password as extraHeaders:
The configuration above retrieves the username and password values from the inputs based on their id attributes, encodes them as HTTP headers, and transports them to the WebSocket server once the client connects.
To authenticate the user in the server code, app.py, we’ll retrieve the username and password from the request:
Here, we take the username and password and perform a test check to see whether there is authentication data. If the credentials don’t exist, the user didn’t send them, and we return False. In this case, we can’t authenticate the user.
Otherwise, we proceed to authenticate the user. Typically, you’d check if the username exists in a database and then use it to retrieve user-specific content. Then, you’d create a user session and emit the user_authorized message to the client, using JavaScript in the client code to display this content to the user.
Without authenticating WebSockets, anyone can potentially connect to the server and steal sensitive data. Note that once the user has been authenticated and logged in, subsequent authentication should be done using tokens instead of asking the user to re-input a username and password.
Also, you should be careful when dealing with data sent from the client. Make sure to validate any client input before processing it. An attack like a SQL injection can be carried out over WebSockets, just like in traditional HTTP connections.
Use rate limiting to protect your WebSocket server from attacks
Rate limiting is a technique that protects against denial-of-service (DoS) and distributed denial-of-service (DDoS) attacks. In these attacks, an attacker would attempt to overwhelm — or even crash — a service by making so many repeated calls that the service becomes unavailable to legitimate users.
Rate limiting prevents these attacks by limiting the frequency of API requests each user can make. We can enforce this limitation based on limiting keys like an IP address, API key, or another unique identifier, such as a UniqueId.
Rate and allocation limits, or quotas, specify the number of requests a client can make to an API in a specific time frame. The service provider usually applies this method to ensure fair consumption of API-based services and resources.
Enforcing rate limiting on your server demands that you first know why it’s needed — to protect a service, to set quotas for different plans, etc. Next, you need to identify and choose the limiting key that is most suitable for your case. Then, you employ a limiting implementation to track the API usage based on your chosen key.
While there’s currently no rate-limiting package specific to python-socketio, there is a solution you can implement with a bit of work.
Restrict payload size to protect your WebSocket server
Sending a huge payload in WebSockets will very likely undermine performance — and ultimately crash the socket server.
To avoid slowing down or crashing the WebSocket, you’ll likely want to limit the maximum payload size for messages sent over the WebSocket connection. This will help you avoid crashing the server by sending an oversized message (like zip bombing).
Additionally, regulating message size dramatically reduces latency in the WebSocket connection and can significantly improve transfer speed. The WebSocket protocol limits the size of a frame, and helps determine how much compression the message needs. the message is compressed. Compressing the stream of messages can consume memory and CPU resources, but is often worth doing because it can tremendously reduce network traffic.
Use TLS to create secure socket communication
Using TLS/SSL is essential for deploying a website to the Internet. Without it, sensitive information transported between the client and server can be easily stolen via a man-in-the-middle attack. To secure the transport, you should use a secure protocol like https:// instead of the unsecure http:// protocol.
For WebSockets, you should use the wss:// (TLS-encrypted WebSockets) protocol instead of the unsecure ws:// protocol.. Using the latter method leaves the connection susceptible to third-party interference. In contrast, the wss:// protocol encrypts all data sent within the WebSocket.
With this encryption, no third party can read or modify the messages sent through the WebSocket, thus securing sensitive information. Other types of attacks also become impossible if the connection is secure.
Furthermore, before establishing a WebSocket connection with the server, ensure that the requesting website also uses https:// — without it, malicious actors can easily tamper with the requests.
TLS is necessary for any website with or without WebSockets. Fortunately, many hosting services provide free TLS when deploying applications. Some of the most popular hosting platforms for Python apps are Google Cloud, AWS, Azure, Heroku, and Fly.io.
WebSocket wrap-up
In this tutorial, we created a basic WebSocket server using python-socketio and connected it to a JavaScript client. We also learned how WebSockets work and discussed some security considerations to ensure you’re using them safely.
Like many other web protocols, WebSockets rely on similar measures (TLS, CORS, rate limiting, etc.) to properly secure communications. None of these things are particular to WebSockets, however, understanding them is essential to avoid unnecessary security issues.
Free online code checker tool
Secure your code before your next commit.