Hardening Amazon EKS security with RBAC, secure IMDS, and audit logging

July 7, 2021
0 mins readMisconfigurations in infrastructure as code (IaC) can be just as dangerous as vulnerabilities in code. Small mistakes in configuration can lead to the sensitive data being readable on the internet, or private endpoints and dashboard accessible to the anonymous users and abused as the initial point of compromise. Recent security research findings indicate the rise in malware targeting the Kubernetes platform which showcases the need for secure configuration.
In this series of blog posts, we will look into the default settings used in Amazon Elastic Kubernetes Service (EKS) deployments. We will then demonstrate how small misconfigurations or unwanted side-effects may put our clusters at risk of EKS security issues.
What is Amazon Elastic Kubernetes Service?
Amazon Elastic Kubernetes Service is a managed Kubernetes service. AWS takes responsibility for managing the control plane components of the cluster, and the customer is responsible for managing the worker nodes and cluster resources.
Beyond the benefits of high availability and scalability of the control plane, Amazon EKS provides integration with Identity Access Management to manage Role Based Access Controls, associate kubernetes service accounts with IAM roles, managed node groups for autoscaling worker capacity based on demand, centralized logging and more. For a full list of features see the official Amazon EKS documentation.
Some of the drawbacks of using a managed service, beyond additional costs, are loss of granular control over control plane settings and the data stored in the control plane database will have to reside on AWS owned accounts.
Quick EKS deployment
Amazon EKS can be deployed in a number of ways including a web console, dedicated Amazon EKS command line tool, or IaC tools, such as CloudFormation or Terraform.
We will use Terraform to deploy a cluster with default values. You can find this demo Terraform configuration files in this repo. We are going to use Terraform Cloud to run Terraform commands for us and persist the state changes.
The EKS cluster has to run within a VPC. You can deploy a VPC with terraform using this module.
1module "vpc" {
2  source = "terraform-aws-modules/vpc/aws"
3
4  name = local.cluster_name
5  cidr = var.vpc_cidr
6
7  azs             = var.vpc_azs
8  private_subnets = var.private_subnet_cidrs
9  public_subnets  = var.public_subnet_cidrs
10
11  enable_nat_gateway     = var.enable_nat_gateway
12  single_nat_gateway     = var.single_nat_gateway
13  one_nat_gateway_per_az = var.one_nat_gateway_per_az
14}
For our demo environment we will deploy 3 private and 3 public subnets. Private subnets do not have the default route attached to the internet gateway. A NAT gateway will provide access to the internet for the private subnets. Note: We are only deploying a single NAT gateway for demo purposes. The high-level network architecture of our demo environment is depicted below.
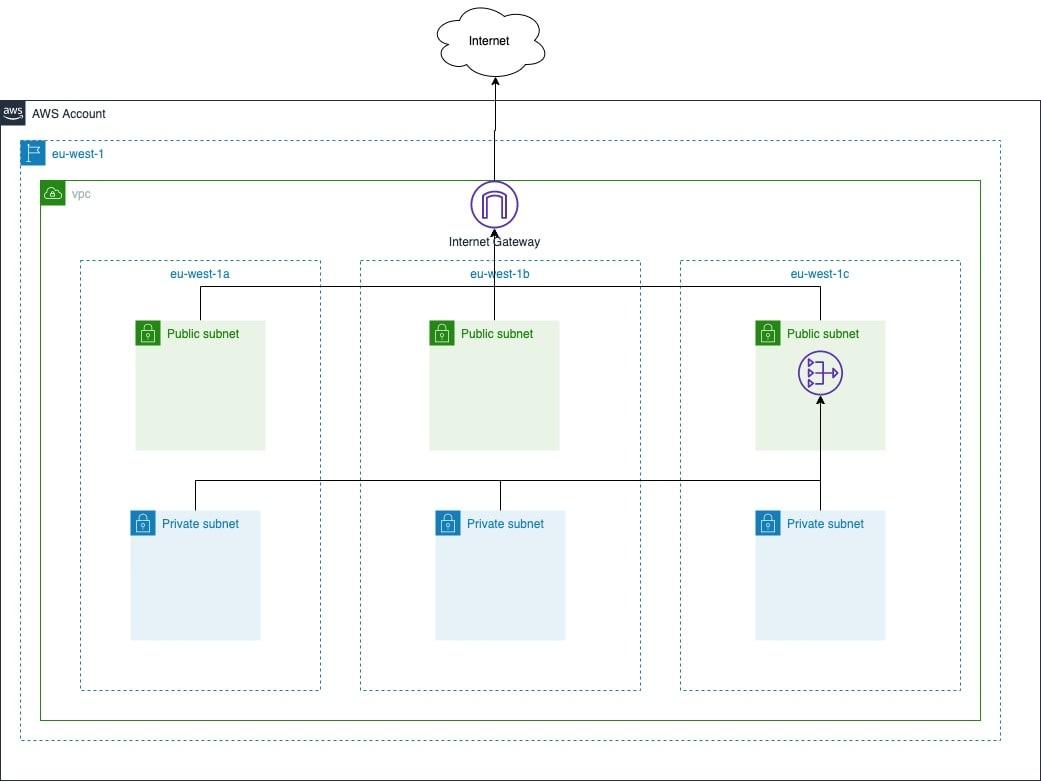
The EKS cluster requires the id of an existing VPC and subnet ids which will be used to communicate with node pools and provision load balancer for services and ingress controllers. As part of our demo environment, we will deploy a self-managed node group with 3 instances.
1module "cluster" {
2  source          = "terraform-aws-modules/eks/aws"
3  cluster_name    = local.cluster_name
4  cluster_version = var.cluster_version
5  subnets         = module.vpc.private_subnets
6  vpc_id          = module.vpc.vpc_id
7
8  worker_groups = [
9    {
10      instance_type = var.wg_instance_type
11      asg_max_size  = var.wg_asg_max_size
12    }
13  ]
14}
Terraform Cloud allows you to run plans either from its UI or via remote operations. In order to trigger actions via the UI, you have to commit the code to the version control system. The remote operations allow you to quickly get quick feedback on the state of local configuration files. Under the hood, Terraform actually uploads an archive of local configuration files to a remote server, runs the command remotely and streams the results back to your terminal. In order to utilize a state file managed by Terraform Cloud, we need to add a backend configuration with the correct workspace and organization.
1terraform {
2  backend "remote" {
3    hostname = "app.terraform.io"
4    # TODO: update with your own organization
5    organization = "your-unique-organization-name"
6
7    workspaces {
8      name = "eks-demo-deployments"
9    }
10  }
11}
This also requires access to Terraform Cloud via API. For details on how to configure that refer to official Terraform Cloud documentation.
The initial plan shows that our configuration files will generate 44 new resources.
1dev@pwnbox:adversarialengineering/eks-demo-deployments/terraform/default$ terraform plan
2Running plan in the remote backend. Output will stream here. Pressing Ctrl-C
3will stop streaming the logs, but will not stop the plan running remotely.
4
5Preparing the remote plan...
6
7The remote workspace is configured to work with configuration at
8terraform/default/ relative to the target repository.
9<OMITTED>
10 + tags = {
11 + "Name" = "eks-threat-modelling-5FZtd82l"
12 }
13 + tags_all = {
14 + "Name" = "eks-threat-modelling-5FZtd82l"
15 }
16 }
17
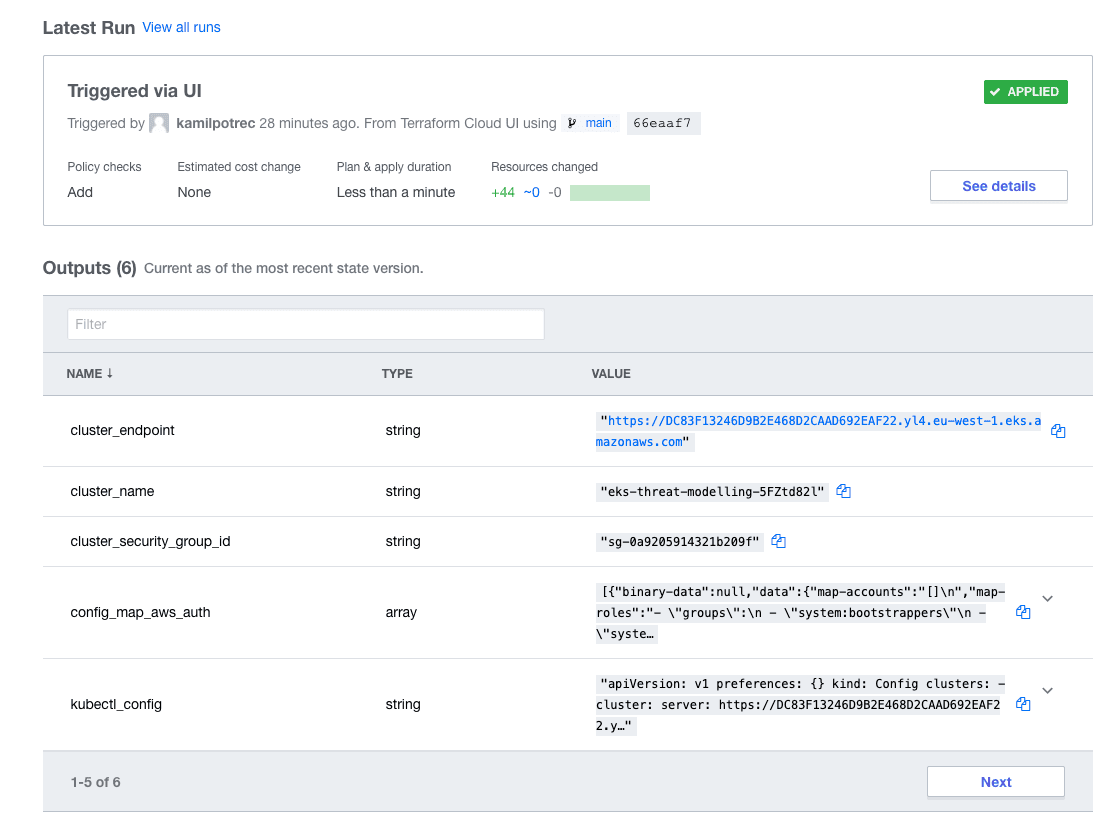
18Plan: 44 to add, 0 to change, 0 to destroy.We can now use Terraform Cloud UI to deploy the environment. Once completed we should be able to get output information about our new cluster in the overview page.
Once the environment is deployed we can use the official AWS documentation to get access to the demo cluster.
1dev@pwnbox:~$ aws eks --region eu-west-1 update-kubeconfig --name eks-threat-modelling-5FZtd82l
2Added new context arn:aws:eks:eu-west-1:123456789012:cluster/eks-threat-modelling-5FZtd82l to /home/dev/.kube/config
3dev@pwnbox:~$ kubectl get svc
4NAME         TYPE        CLUSTER-IP   EXTERNAL-IP   PORT(S)   AGE
5kubernetes   ClusterIP   172.20.0.1   <none>        443/TCP   15m
6dev@pwnbox:~$
"This cluster will be our baseline for evaluation. Let's start with the first observation of how easily we managed to connect the cluster.
Restricting access to Kubernetes API
The EKS service provides access to the Kubernetes API via service endpoints. By default, the endpoint for the cluster is publicly accessible. This means that anyone on the internet may attempt to access it. The Kubernetes API accepts anonymous requests by default, however both ABAC and RBAC authorizers require explicit authorization for anonymous/unauthenticated users. The EKS clusters have RBAC enabled by default, and we can check that by looking at API server flags.
1FLAG: --authentication-token-webhook-cache-ttl="7m0s"
2FLAG: --authentication-token-webhook-config-file="/etc/kubernetes/authenticator/apiserver-webhook-kubeconfig.yaml"
3FLAG: --authentication-token-webhook-version="v1beta1"
4FLAG: --authorization-mode="[Node,RBAC]"
5FLAG: --authorization-policy-file=""
6FLAG: --authorization-webhook-cache-authorized-ttl="5m0s"
7FLAG: --authorization-webhook-cache-unauthorized-ttl="30s"
8FLAG: --authorization-webhook-config-file=""
9FLAG: --authorization-webhook-version="v1beta1"
The logs also show us that the EKS implements a webhook token authentication method. This means that kubernetes users need to obtain the authentication token from the AWS API which is separate from the Kubernetes API endpoint of the cluster. Amazon EKS does not impact the authorization decisions made by the cluster.
In order to gain even more confidence, we can attempt to connect to the cluster without authenticated credentials. In order to simulate anonymous users, we need to send a request to the API without an authorization header. kubectl has a very helpful debug option which prints out all requests as CURL commands which we can reuse.
1dev@pwnbox:$ kubectl get pod -v 9
2<OMITTED>
3I0620 13:50:56.340980      19 round_trippers.go:425] curl -k -v -XGET  -H "Accept: application/json;as=Table;v=v1;g=meta.k8s.io,application/json;as=Table;v=v1beta1;g=meta.k8s.io,application/json" -H "User-Agent: kubectl/v1.20.1 (linux/amd64) kubernetes/c4d7527" 'https://DC83F13246D9B2E468D2CAAD692EAF22.yl4.eu-west-1.eks.amazonaws.com/api/v1/namespaces/default/pods?limit=500'
4I0620 13:50:56.435282      19 round_trippers.go:445] GET https://DC83F13246D9B2E468D2CAAD692EAF22.yl4.eu-west-1.eks.amazonaws.com/api/v1/namespaces/default/pods?limit=500 200 OK in 94 milliseconds
5I0620 13:50:56.435317      19 round_trippers.go:451] Response Headers:
6I0620 13:50:56.435326      19 round_trippers.go:454]     Audit-Id: 4814a650-c35b-4c98-bc0c-ba22fb3d58ce
7I0620 13:50:56.435334      19 round_trippers.go:454]     Cache-Control: no-cache, private
8I0620 13:50:56.435342      19 round_trippers.go:454]     Content-Type: application/json
9I0620 13:50:56.435349      19 round_trippers.go:454]     Content-Length: 2926
10I0620 13:50:56.435356      19 round_trippers.go:454]     Date: Sun, 20 Jun 2021 13:50:56 GMT
11I0620 13:50:56.436467      19 request.go:1107] Response Body: {"kind":"Table","apiVersion":"meta.k8s.io/v1","metadata":{"selfLink":"/api/v1/namespaces/default/pods","resourceVersion":"12794"},"columnDefinitions"
If we send the same request without the correct authorization header we can see that the request was not authorized.
1dev@pwnbox:$ curl -k -v -XGET  https://DC83F13246D9B2E468D2CAAD692EAF22.yl4.eu-west-1.eks.amazonaws.com/api/v1/namespaces/default/pods?limit=500'
2<OMITTED>
3{
4  "kind": "Status",
5  "apiVersion": "v1",
6  "metadata": {
7
8  },
9  "status": "Failure",
10  "message": "pods is forbidden: User \"system:anonymous\" cannot list resource \"pods\" in API group \"\" in the namespace \"default\"",
11  "reason": "Forbidden",
12  "details": {
13    "kind": "pods"
14  },
15  "code": 403
Now that we have validated the access to our resources is somewhat restricted by default it is time to mention defence-in-depth. This concept refers to layering various types of security controls in order to avoid asingle point of failure in our security system. In our current deployment, the RBAC permissions are the only control we have against anyone on the internet accessing our cluster.
This configuration file shows how someone could introduce anonymous access:
1apiVersion: rbac.authorization.k8s.io/v1
2kind: ClusterRoleBinding
3metadata:
4  name: read-only
5subjects:
6- kind: User
7  name: system:anonymous
8roleRef:
9  kind: ClusterRole
10  name: view
11  apiGroup: rbac.authorization.k8s.io
After this configuration is applied we can see how the anonymous request succeeds:
1dev@pwnbox:$ curl -k -v -XGET https://DC83F13246D9B2E468D2CAAD692EAF22.yl4.eu-west-1.eks.amazonaws.com/api/v1/namespaces/default/pods?limit=500'
2<OMITTED>
3{
4  "kind": "PodList",
5  "apiVersion": "v1",
6  "metadata": {
7    "selfLink": "/api/v1/namespaces/default/pods",
8    "resourceVersion": "15018"
9  },
10  "items": []
The Kubernetes developers have introduced some safety measures in making sure this type of configuration is explicit. The system:anonymous user and system:unauthenticated group have to be explicitly listed in the subjects attribute. Use of wildcard characters, such as *, does not grant access to these two subjects. You can test that by changing the name of the subject in our example to the * character.
Having public access to the Kubernetes API server also increases the impact of any credential leak. With a publicly accessible API, the leaked credentials can potentially be used from anywhere in the world. A zero day vulnerability discovered in the authorization flow is another major reason for limiting who can send any packets to the API server. These types of vulnerabilities have been reported in the past for example CVE-2019-11253 and CVE-2020-8559.
We can reduce the impact of public endpoints by limiting which IP addresses have access. In Terraform, this can be expressed by adding cluster_endpoint_public_access_cidrs attribute to the module definition.
The second option is to completely disable the public endpoint and enable a private VPC endpoint. This can be enabled in the terraform module via cluster_endpoint_private_access and cluster_endpoint_public_access attributes. This ensures that only users with access to the VPC network can access the cluster.
However, both of these options have a huge impact on operational costs. Not having a public endpoint can be problematic when using a public continuous deployment system like Terraform Cloud. In our demo environment, disabling the public endpoint failed the deployment with the following access denied error.
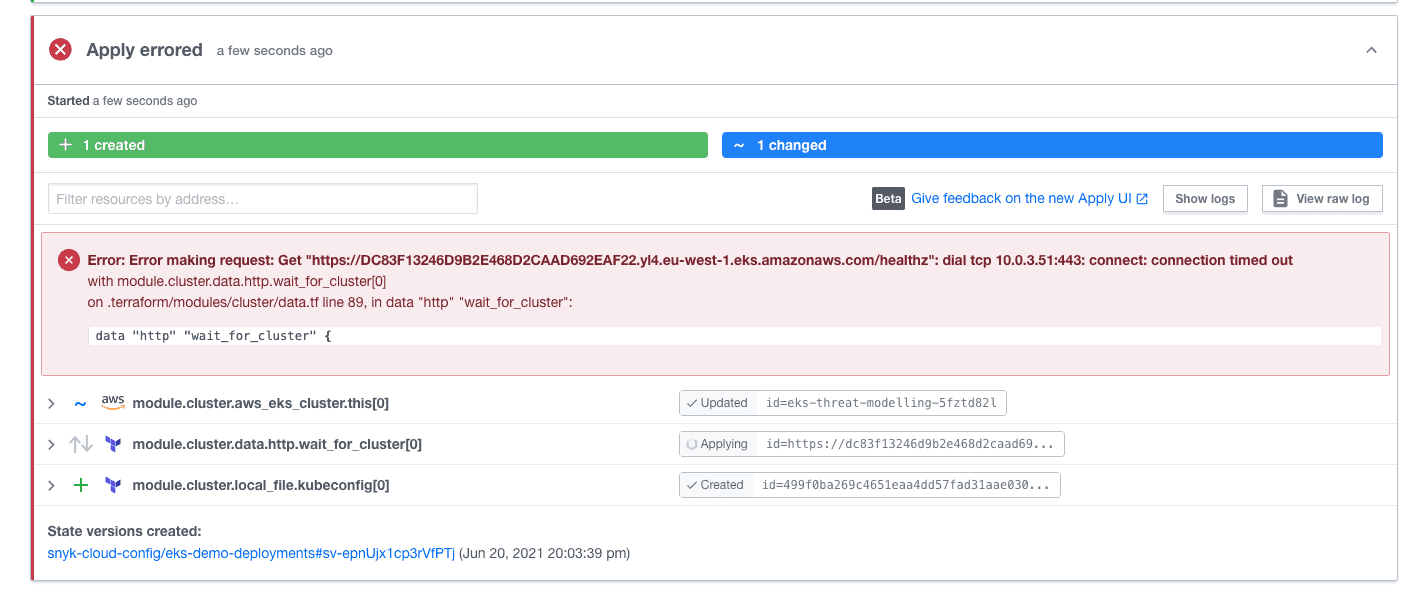
This error is triggered because, internally, the Terraform module attempts to refresh the aws-auth config map which can only be done via the Kubernetes API. As you can see the FQDN of the API server was resolved to a private IP address and cannot be reached by the provider. We can fix this error by disabling the management of the config map from our terraform module. This implies that from that point onwards we will have to manage the authorization config map by some alternative method.
In order to completely disable the public endpoint you will need to implement a CD system that either runs from within the VPC with access to the private endpoint or proxy the connection. This is a great writeup on how this can be achieved with AWS CodePipeline, and this terraform module can be used to run Atlantis within the AWS Fargate service.
Access for developers can also become more complicated because you will need to implement a bastion of VPN service in order to provide access to the private endpoint.
Restrict access to the instance metadata service
EKS utilises the instance profiles to grant AWS permissions to a kubelet running on a node. These credentials can be accessed by the kubelet via the instance metadata service (IMDS). IMDS can be accessed via an HTTP request on a link-local IP address. By default, this metadata service is reachable to all pods on the node. We can test that by running a pod and obtaining an STS token.
1apiVersion: v1
2kind: Pod
3metadata:
4  name: aws
5  namespace: default
6spec:
7  containers:
8  - name: aws
9    image: amazon/aws-cli:latest
10    command:
11      - sleep
12      - "3600"
13    imagePullPolicy: IfNotPresent
14  restartPolicy: Always
15
16dev@pwnbox:$ kubectl exec -it aws -- /bin/bash
17bash-4.2# aws sts get-caller-identity
18{
19    "UserId": "AROAYREY3WYOLQYZ5IGZJ:i-0f52c37fc0a7a4a44",
20    "Account": "123456789012",
21    "Arn": "arn:aws:sts::123456789012:assumed-role/eks-threat-modelling-5FZtd82l20210620220209389400000009/i-0f52c37fc0a7a4a44"
22}
23bash-4.2#
In the above, we can use all permissions assigned to the node. This is a clear escalation of privileges security issue, as the pods should not require any AWS access by default.
The only way we can mitigate this issue is to limit network access to the IMDS service from the pods. IMDS has two versions. Version 1 uses a request/response method and can be queried by any process which can send packets on the link-local address. Version 2 uses a sessions-based method and introduces the ability to set arbitrary time to live (TTL) on the response messages. IMDSv1 will remain available alongside IMDSv2 according to the AWS documentation.
In order to limit the scope of this issue with native AWS configuration, we need to disable IMDSv1 completely. This can be achieved by setting the metadata_http_tokens attribute of worker nodes to required. The second step is to limit the TTL of the response packets to 1, which is actually the default behavior of the service. By setting TTL to 1, the Kubernetes networking layer is unable to forward the packet to the pod network namespace.
1dev@pwnbox:$ kubectl exec -it aws -- aws sts get-caller-identity
2
3Unable to locate credentials. You can configure credentials by running "aws configure".
4command terminated with exit code 253
The Terraform module for Amazon EKS uses autoscaling groups and launch templates to create nodes. This means that if you update the metadata service settings, the instances will have to be refreshed.
The limitation of this solution is that any pod with hostNetworking attribute set to true will still be able to obtain the credentials.
1apiVersion: v1
2kind: Pod
3metadata:
4  name: aws-node
5  namespace: default
6spec:
7  hostNetwork: true
8  containers:
9  - name: aws-node
10    image: amazon/aws-cli:latest
11    command:
12      - sleep
13      - "3600"
14    imagePullPolicy: IfNotPresent
15  restartPolicy: Always
16
17dev@pwnbox:$ kubectl exec -it aws-node -- aws sts get-caller-identity
18{
19    "UserId": "AROAYREY3WYOLQYZ5IGZJ:i-0e0ecce7af113398b",
20    "Account": "123456789012",
21    "Arn": "arn:aws:sts::123456789012:assumed-role/eks-threat-modelling-5FZtd82l20210620220209389400000009/i-0e0ecce7af113398b"
22}
23
The Kubernetes native network policies can also be used to restrict access to link-local IP addresses, thereby preventing access to IMDS. The AWS Calico documentation provides instructions on how to install the Calico CNI plugin. The following network policy should prevent access to the IMDS. The Calico plugin does not isolate pods with hostNetwork set to true, therefore this has the same drawback as the native solution of disabling the IMDSv1 and setting max TTL to 1. Using network policies, however, does not require rollover of nodes and can be applied to specific pods if the IMDS is actually required within the pod.
1apiVersion: crd.projectcalico.org/v1
2kind: GlobalNetworkPolicy
3metadata:
4  name: block-metadata-egress-only
5spec:
6  selector: all()
7  egress:
8  - action: Deny
9    protocol: TCP
10    destination:
11      nets:
12      - 169.254.169.254/32
13  - action: Allow
14    destination:
15      nets:
16      - 0.0.0.0/0
17
18dev@pwnbox:$ kubectl exec -it aws -- aws sts get-caller-identity
19{
20    "UserId": "AROAYREY3WYOLQYZ5IGZJ:i-06a05d6ddfff5b2bd",
21    "Account": "123456789012",
22    "Arn": "arn:aws:sts::123456789012:assumed-role/eks-threat-modelling-5FZtd82l20210620220209389400000009/i-06a05d6ddfff5b2bd"
23}
24dev@pwnbox:$ kubectl apply -f tests/disable-imds-network-access/network-policy.yaml
25globalnetworkpolicy.crd.projectcalico.org/allow-all-egress-except-ec2-metadata created
26dev@pwnbox:$ kubectl exec -it aws -- aws sts get-caller-identity
27
28Unable to locate credentials. You can configure credentials by running "aws configure".
29command terminated with exit code 253
30dev@pwnbox:$
Enable logging
Now that we have seen some misconfiguration which can expose the EKS clusters to external and internal threats, let's see if we can audit these events. Kubernetes provides audit logsto allow the administrators to monitor any actions performed by cluster users and services. Unfortunately, these logs are not enabled by default in EKS or in the default Terraform module configuration. In order to enable the logs, we need to use cluster_enabled_log_types attribute and specify required log types.
EKS allows us to enable multiple types of logs independently. From a security perspective, we are mostly interested in audit and authenticator logs.
Audit logs will allow us to monitor Kubernetes requests and attribute them to entities. Note that audit logs produce events for each action taken on the cluster and therefore will stream large volumes of data to the configured sink, which by default is CloudWatch. By limiting to audit and authenticator, we can keep the volume smaller.
For example, we can search for updates to aws-config map in order to identify if anyone has tampered with it. We can use the following filter to get all patch events related to an object named aws-auth.
1{ ($.verb = "patch") && ($.objectRef.name = "aws-auth") }Audit event has very useful information that can help us identify who changed it, where they connected from, and more.
1{
2    "kind": "Event",
3    "apiVersion": "audit.k8s.io/v1",
4    "level": "RequestResponse",
5    "auditID": "844b26da-3ce9-4062-b7aa-3c0a869d9e45",
6    "stage": "ResponseComplete",
7    "requestURI": "/api/v1/namespaces/kube-system/configmaps/aws-auth?fieldManager=kubectl-edit",
8    "verb": "patch",
9    "user": {
10        "username": "kubernetes-admin",
11        "uid": "heptio-authenticator-aws:123456789012:AROAYREY3WYOBFHU7VIRM",
12        "groups": [
13            "system:masters",
14            "system:authenticated"
15        ],
16        "extra": {
17            "accessKeyId": [
18                "ASIAYREY3WYOETXWXAOG"
19            ]
20        }
21    },
22    "sourceIPs": [
23        "12.34.256.27"
24    ],
25    "userAgent": "kubectl/v1.20.1 (linux/amd64) kubernetes/c4d7527",
26    "objectRef": {
27        "resource": "configmaps",
28        "namespace": "kube-system",
29        "name": "aws-auth",
30        "apiVersion": "v1"
31    },
32    "responseStatus": {
33        "metadata": {},
34        "code": 200
35    },
36    <OMITTED>
These logs can also be very useful in detecting attempts to access resources by unauthorized users. The following query can be used to search for any requests sent by an anonymous user:
1{ ($.user.username = *anonymous) }
2
3{
4    "kind": "Event",
5    "apiVersion": "audit.k8s.io/v1",
6    "level": "Metadata",
7    "auditID": "68f24024-080b-4ae7-a97b-fd5fd9792e31",
8    "stage": "ResponseComplete",
9    "requestURI": "/api/v1/namespaces/kube-system/configmaps/aws-auth",
10    "verb": "get",
11    "user": {
12        "username": "system:anonymous",
13        "groups": [
14            "system:unauthenticated"
15        ]
16    },
17    "sourceIPs": [
18        "12.34.256.27"
19    ],
20    "userAgent": "kubectl/v1.20.1 (linux/amd64) kubernetes/c4d7527",
21    "objectRef": {
22        "resource": "configmaps",
23        "namespace": "kube-system",
24        "name": "aws-auth",
25        "apiVersion": "v1"
26    },
27    "responseStatus": {
28        "metadata": {},
29        "status": "Failure",
30        "reason": "Forbidden",
31        "code": 403
32    },
33    "requestReceivedTimestamp": "2021-06-21T17:08:02.384514Z",
34    "stageTimestamp": "2021-06-21T17:08:02.384693Z",
35    "annotations": {
36        "authorization.k8s.io/decision": "forbid",
37        "authorization.k8s.io/reason": ""
38    }
39}
Authenticator logs on the other hand can help us track who is attempting to login to the cluster and correlate these entities to Kubernetes groups and users. From the previous example, we know that the user with key ID AROAYREY3WYOBFHU7VIRM changed the configmap, however we don’t know what AWS entity this key ID belongs to.
1ime="2021-06-21T16:32:01Z" level=info msg="access granted" arn="arn:aws:iam::123456789012:role/ci" client="127.0.0.1:39092" groups="[system:masters]" method=POST path=/authenticate sts=sts.eu-west-1.amazonaws.com uid="heptio-authenticator-aws:123456789012:AROAYREY3WYOBFHU7VIRM" username=kubernetes-adminUp next: Advanced Amazon EKS hardening
So in this blog post, we have explored some of the security issues which may occur when using the Amazon Elastic Kubernetes Service, including authentication/authorization and access to the instance metadata service. We’ve also seen how we can mitigate these issues in production. In the next part of this series, we will explore multi-account architecture as an essential step in Amazon EKS cluster isolation, how important it is to use dedicated IAM roles when creating Amazon EKS clusters and how to further protect secrets stored in Amazon EKS control planes. Check back for the next post, or follow us at @snkysec on Twitter to be notified when it’s published.
Snyk Infrastructure as Code (Snyk IaC) scanning can also help to mitigate security issues when using Amazon EKS via Cloud Formation or Terraform by identifying security issues in your deployment code before it reaches production. Sign up for a free account and get scanning!
Secure infrastructure from the source
Snyk automates IaC security and compliance in workflows and detects drifted and missing resources.


