AWS vulnerability scanning using the Snyk integration

February 10, 2021
0 mins readIf you’re using the AWS suite of Kubernetes-related tools, you’ll be pleased to know that you use Snyk to scan directly into your workflows there, with integrations into Amazon Elastic Container Registry ( ECR ) and Amazon Elastic Kubernetes Service ( EKS ). Here’s how to get started!
During this post I’m going to use one of our Snyk test applications in order to build and deploy an application—you can find the code for this here. You’ll also need a few dependencies installed :
Let’s dig in
Now that you are all set up, let’s get started!
Firstly, let’s set up ECR so that Snyk can access our repositories. In order to do this, we need to assign a policy and a role in AWS Identity and Access Management which will give the Snyk backend the correct permissions to be able to do things like list images, and pull images from our ECR repositories.
The steps to configure the integration are all covered in the Snyk docs, but we can find all the required configuration to do that directly from the Snyk UI. Navigate to Settings/Integrations/ECR/Edit Settings and the first thing we do is set up a policy, using the JSON shown in the UI:
- oriThis will allow Snyk the permissions defined in the Action section of the JSON for any repositories and images we have defined in our ECR account. This is the minimum set of permissions required to list repositories and images, and to pull images from repositories. Follow the instructions to add that JSON to your IAM policy configuration in AWS.
We then need to add a role and assign the policy to the role, as defined in the instructions:
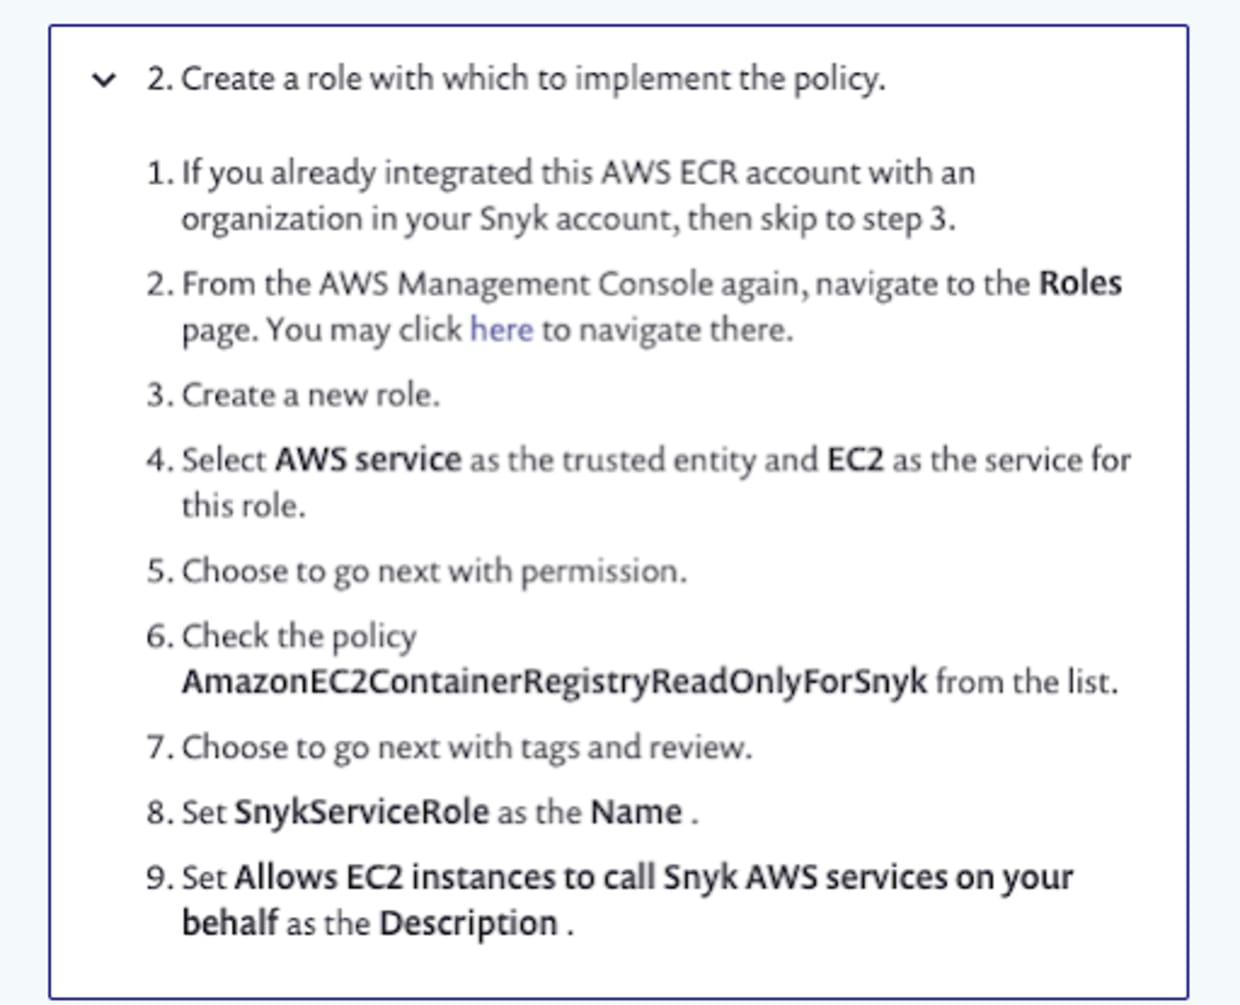
We also need to set the scope which the role has, by specifying the Snyk organization ID’s which can use the role. This is achieved by editing the Trust relationships for the newly created role using the JSON provided in the documentation. The sts:ExternalId string will be your Snyk organization ID. What this JSON snippet does is to allow the role to be assumed by the AWS Principal if the ExternalId provided matches our Snyk organization ID.
As described in the instructions, if you need to add multiple Snyk organizations to this policy, you need to add them in as a JSON array, enclosed in square brackets:
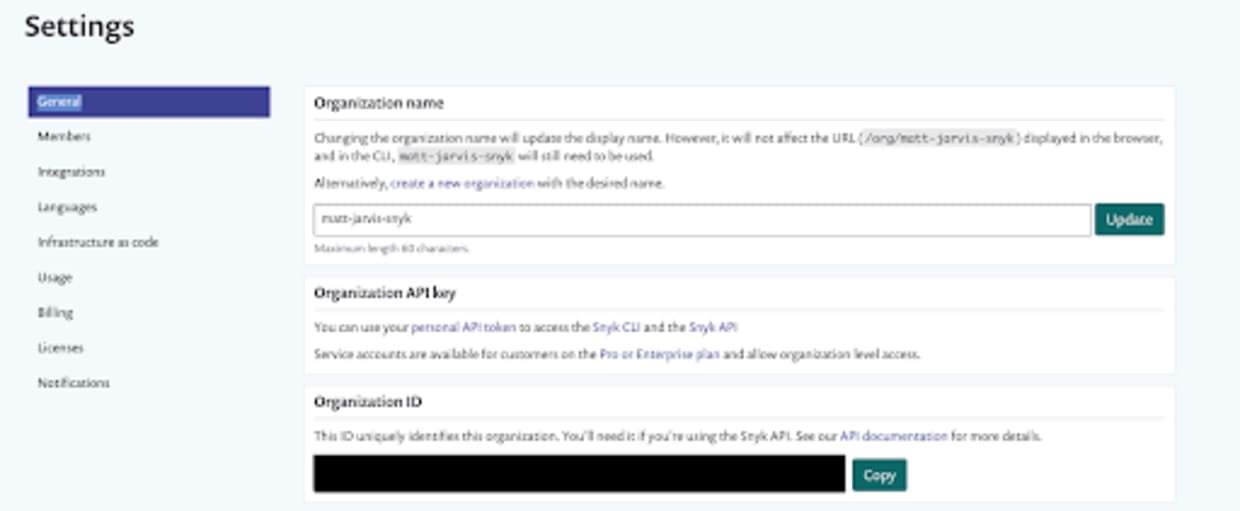
You can find your Snyk organization ID by navigating to Settings > General.
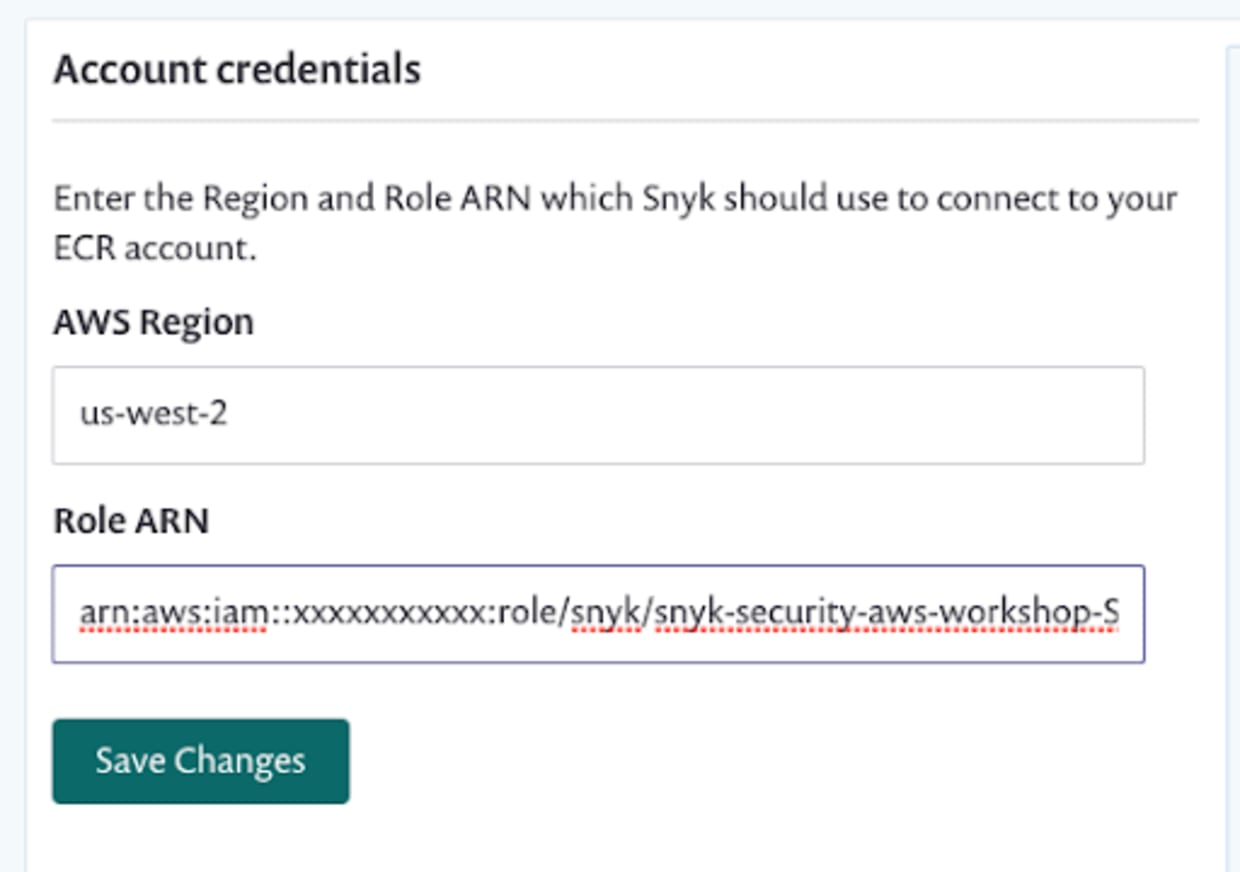
The final step here is to configure the Snyk UI to use that role to connect to ECR. Back in Settings/Integrations/ECR/Edit Settings enter the region which you have ECR configured in, and the role which we created earlier:
At this point, our ECR integration should be fully configured so let’s move on and test things.
First, let’s use the AWS CLI to create a repository in ECR:
Now that we have a repository in ECR, let’s configure Docker so that we can push to it:
This command will output your login password, and then pass it to the Docker CLI to authenticate against your AWS ECR registry. You need to make sure that you set the region correctly for the AWS region that you have ECR enabled in.
Now, let’s check out our test application. This is a simple Node.js application that contains many vulnerabilities, along with configuration to build it in Docker and deploy it to Kubernetes
The first thing we’re going to do is build the application using Docker.
Once our image has built, we should see it in our local Docker repository:
Before we push it to our upstream ECR repository we need to tag it, replacing the repository name with the one you configured earlier in ECR:
And now we can push it to ECR:
Once the push completes, we can check our ECR repository for the image we just pushed:
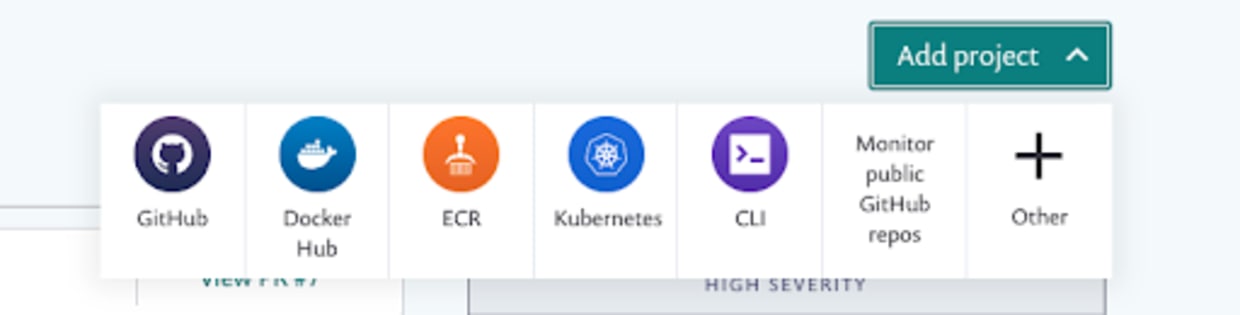
Once our image is in ECR, we can configure Snyk to scan it from there. In the Snyk UI, select Add Project and navigate to the ECR icon:
If our ECR configuration was correct, we should now see a view with all of the repositories and images contained in them that we have available in ECR:
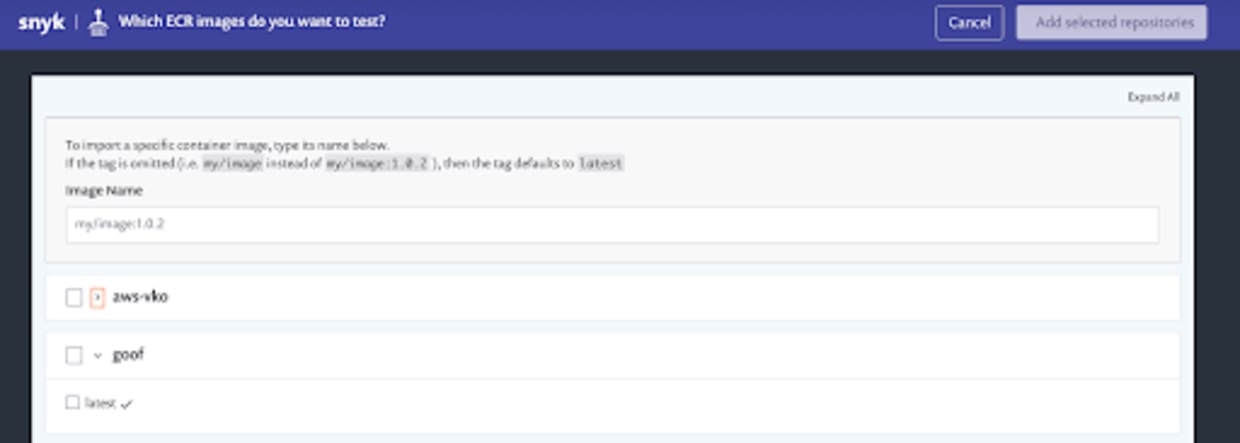
We can see the goof repository we created earlier, with a single image tag contained in it. Select the image, and then click the Add selected repositories button. At this point Snyk will import the repository from ECR, and start scanning and monitoring it.
Once the import has completed, we should see the import on the Snyk Projects page:

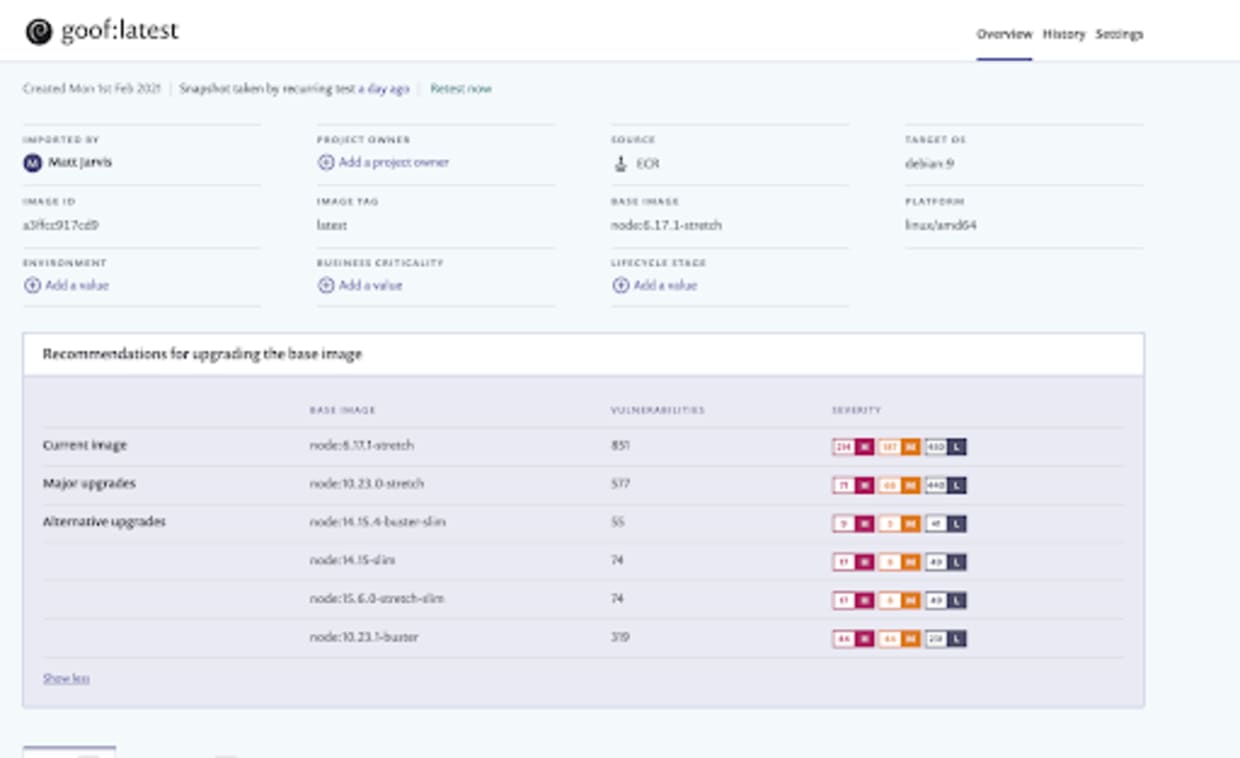
We can see that Snyk has discovered both the image itself, and the package.json which the Node application is using that has been deployed into the image, and created projects for both.
The image itself is using an old and vulnerable base image, and Snyk will have detected a large number of vulnerabilities in it, along with making recommendations for base images which could reduce the overall vulnerability count.
The package.json defines which Node packages have been included in the application itself, both directly through packages specified in the package.json file, and indirectly as dependencies. Snyk will have built a dependency tree of all of these packages and queried the vulnerability database to find vulnerabilities contained within the specific versions used. You will see there are a lot, as this application is designed to use vulnerable versions.
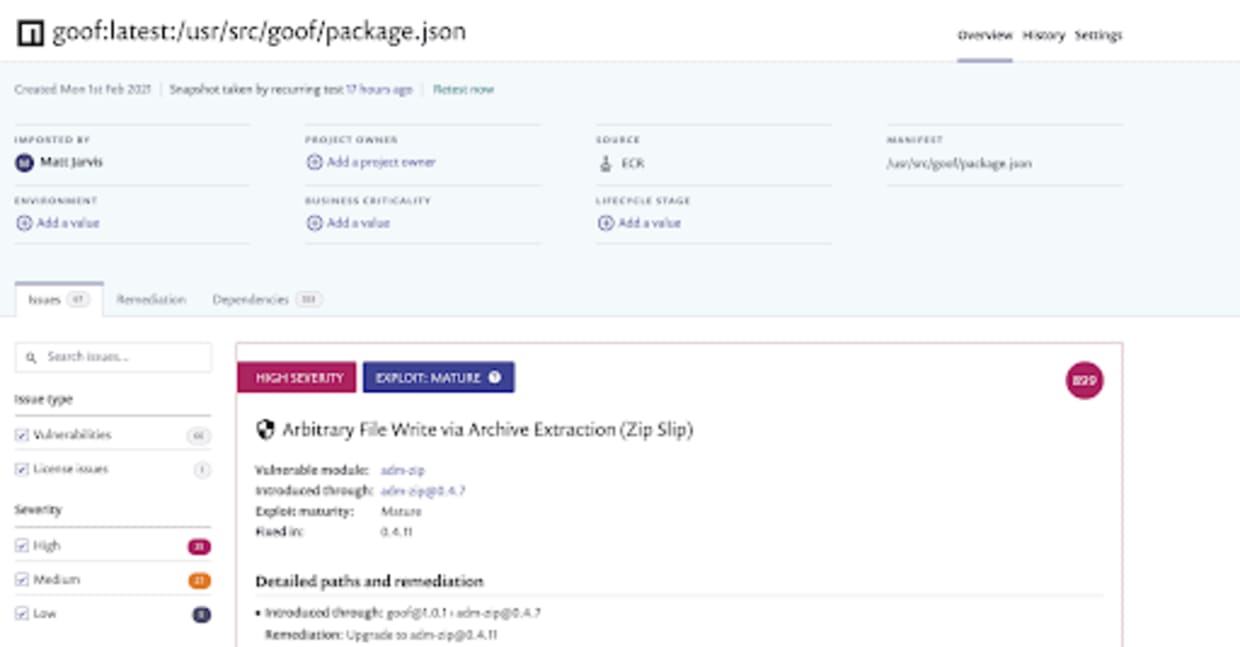
You’ll also be able to find information about all the individual vulnerabilities, and remediation advice about which packages to upgrade in order to fix things, so spend some time exploring all of the information the Snyk UI provides.
Configuring the Snyk integration with EKS
The next thing we want to do is configure the Snyk integration with Elastic Kubernetes Service. You’ll need a free trial for one of the Snyk standard tiers to do this as the Kubernetes integration is part of our paid offering.
In order to do this, let’s create a Kubernetes cluster using EKS. There are several ways to do this, but one of the easiest is to use the eksctl tool.
I first use the AWS CLI to create a keypair that I can use to ssh into my cluster nodes if I need to:
I’m then going to use eksctl to create a cluster, in this case called mattjarvis-sko in the us-west-2 region, using a managed node group of Linux nodes, and adding my keypair to it.
% eksctl create cluster --name mattjarvis-sko --region us-west-2 --with-oidc --ssh-access --ssh-public-key SKO_demo --managed
This command will take some time to complete, but once it does, you will have a fully functioning EKS cluster and kubectl will be configured to communicate with it.
Now that our EKS cluster is up and running, let’s look at the Kubernetes configuration for deploying the application. In the git checkout of the goof application, you will find a manifests directory. This contains two Kubernetes YAML files.
The goof-deployment.yaml defines the goof application, along with a mongodb pod which it needs as a dependency. You’ll need to change the image section to use the ECR repository which you configured earlier:
The goof-service.yaml defines the service for mongodb, providing connectivity to the mongodb pod on port 27017. This is how our goof application connects to the database. It also defines an external LoadBalancer service that will be deployed so we have external connectivity to the running application. The actual LoadBalancer implementation is specific to the platform our cluster is deployed into, and in AWS this will provision an Elastic Load Balancer, on port 80 externally and targeting port 3001 on our goof pod, which is where our Node.js application is.
Let’s go ahead and deploy the application into our cluster:
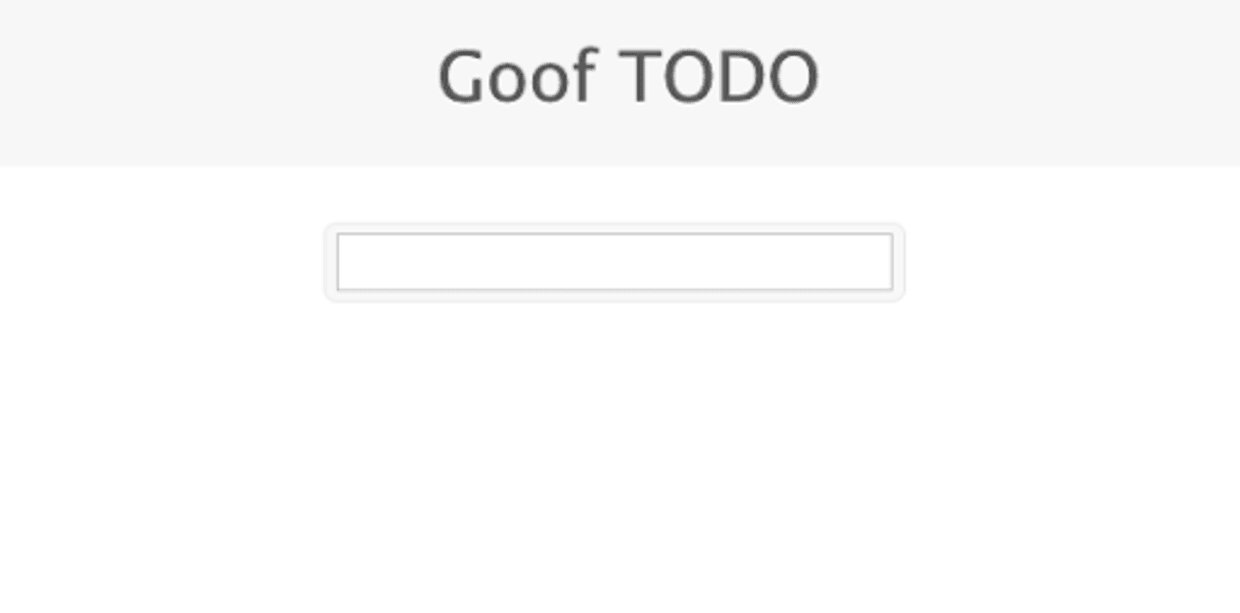
The URL in the EXTERNAL-IP field is provided by the ELB provisioned as part of the LoadBalancer service, and we can use this to view our running application. If we navigate to that in a browser, we should see the goof application running:
So our application is deployed and running in our EKS cluster. The final step in the process is to set up integration between Snyk and our EKS cluster, so we can scan running workloads in production. The Snyk integration with Kubernetes consists of a single pod Kubernetes operator, which queries the Kubernetes API, scans container images inside the cluster and communicates with the Snyk backend.
If we were using CloudFormation to deploy the EKS cluster, there are AWS Quick Startswe’ve built to deploy the Snyk integration, but since we’re using eksctl for this demo let’s step through the install manually.
Our first step is to add the Helm repository which contains the Helm charts to deploy the Snyk Kubernetes monitor:
Now we’ll create a separate namespace for the Snyk monitor to run in. It’s generally good practice to create separate namespaces for your applications in Kubernetes, as it allows for more granular controls over permissions.
The next step is to create a secret in Kubernetes containing our Snyk integrationID. This will be used by the Snyk monitor process to communicate with the upstream Snyk API and give Snyk the information about running pods in the cluster. If we were using private registries which require logins in order to pull images, we would also need to pass that authentication information inside the dockercfg.json section. You can find more details on that in the Snyk monitor documentation.
Once the secret is created, we can use Helm to install Snyk Monitor into the snyk-monitor namespace.
When the Helm chart completes we should see the snyk-monitor pod running in the snyk-monitor namespace in our cluster:
We can also view the logs and confirm that snyk-monitor is sending data back to Snyk:
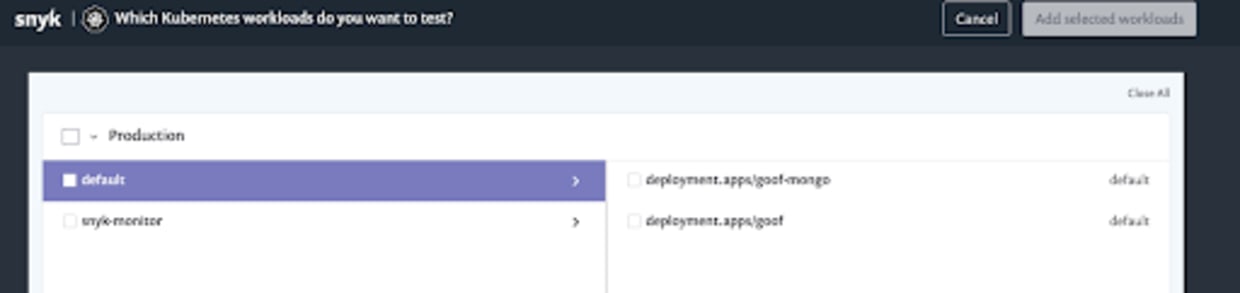
It can take a little while for the workloads to show up in the Snyk UI since the monitor has to send the data back to Snyk, but in a minute or so you should be able to view the running workloads in your cluster by navigating to Add Project/Kubernetes:

We should now see the running workloads; to add them we simply select the checkbox to have Snyk import and test them.
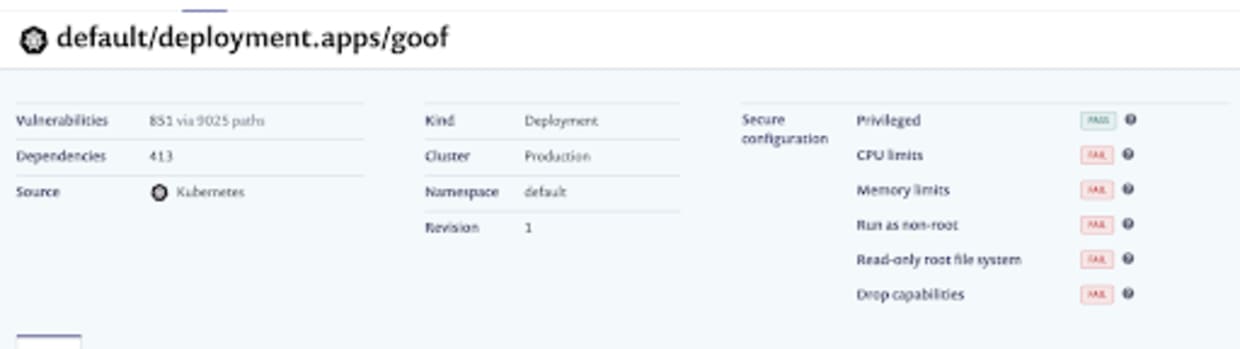
Once the project is imported, we can navigate to the Projects page and drill down into the imported project itself. The first thing to note is that Snyk has detected the running configuration for the workload, and checked for security issues in that configuration. Here, we can see we’ve failed several of the security tests, including running as root and without CPU limits set:
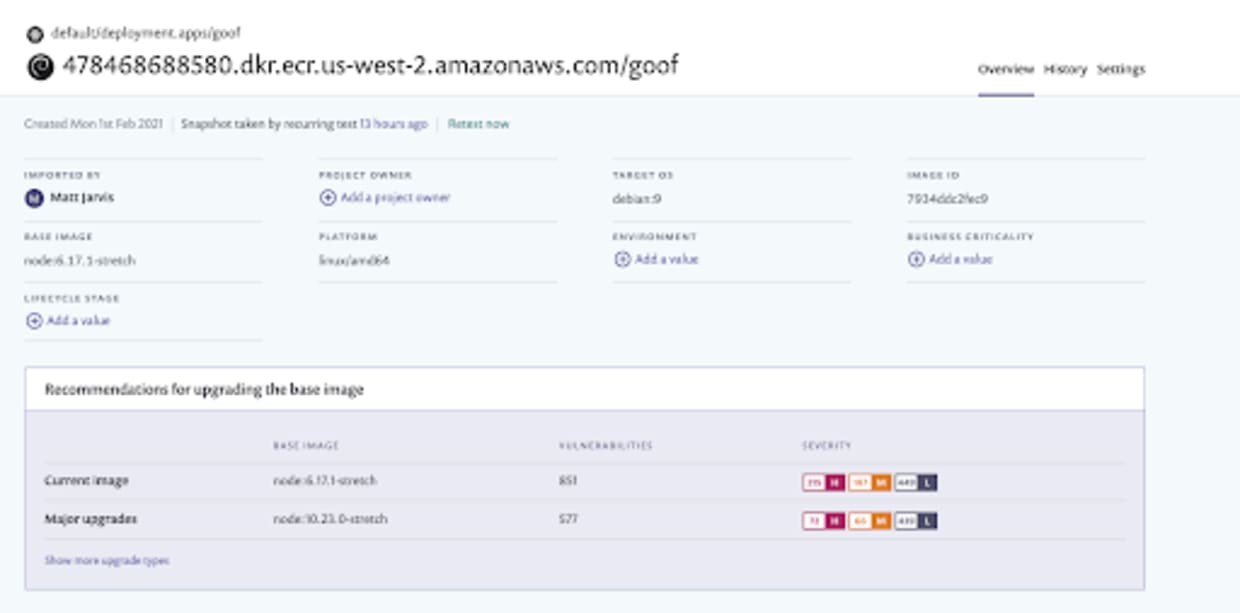
If we now look at the workload itself, we can see that Snyk has detected the base image, all the vulnerabilities in that base image, and made recommendations for alternative base images that have less exposure to vulnerabilities.
Wrapping things up
We’ve seen from this demonstration how we can start to integrate security testing throughout our software development lifecycle, which is a key strategy for maintaining the security of our workloads and infrastructure in cloud native environments.
Snyk also integrates with a wide range of Integrated Development Environments, Source Code Management tools, and CI/CD systems so that you can build coverage through your whole deployment pipeline.
If we’re using Amazon’s container and Kubernetes services, it’s very easy to integrate Snyk into both ECR and EKS, and there are AWS Quick Starts available to deploy all of this using CloudFormation templates. Sign up for a free Snyk account and try this out!
Get started in capture the flag
Learn how to solve capture the flag challenges by watching our virtual 101 workshop on demand.