How to use GitHub Actions environment variables
Lewis Gavin

November 22, 2022
0 mins read
To improve the efficiency of releasing working code into a production environment, implementing a continuous integration and continuous delivery (CI/CD) pipeline is a great practice. These pipelines automate the process of checking that a code change is ready for release and provides tools to automate the release to a production environment.
One popular way to do this is to use your existing version control system. GitHub is one of the most popular version control systems and provides GitHub Actions — which allow developers to build, test, and deploy code automatically, helping to build secure CI/CD pipelines.
It’s common for jobs within GitHub Actions to require access to environment variables. These variables can be defined upfront and accessed only by pipelines running in that particular environment. This allows developers to change the behavior of the CI/CD pipeline based on environment variables, such as switching to building an optimized, production version of the application before the deployment to production.
This hands-on article discusses the environment variables available within GitHub Actions and when we should use them.
Prerequisites
To follow this tutorial, you need the following:
Access to a machine with a code editor (this tutorial uses Visual Studio Code) and a GitHub account.
The sample code. The sample code contains a simple Java application that we use to demonstrate how environmental variables work.
Did you know that we have a Visual Studio Code Snyk plugin so you can scan your project while developing it? Check out the documentation for more information.
What you can do with GitHub Actions environment variables
Once you’ve downloaded the sample code, create a new repository in GitHub and add the sample code to the repository.
The sample code already has an example GitHub Actions workflow file. The code snippet below shows the contents of the file .github/workflows/pipeline.yml:
This file defines a simple workflow to build our Java application using Maven.
We can define environment variables in the workflow YAML configuration file at three levels — workflow, job, and step. These levels determine the scope of the environment variables. The workflow level uses environment variables that apply to the entire workflow. The job level uses environment variables that apply to specific jobs. Step environment variables apply to specific steps.
Let’s explore each of these variables in detail.
Workflow environment variables
To set up a workflow-level environment variable, we must define it at the top level of the YAML file. Let’s add the following underneath the NAME variable at the top of the file:
This code defines an environment variable called NAME that we can now access anywhere within our workflow. To access this variable, we must use a specific syntax similar to that used when accessing UNIX environment variables. To use our NAME variable, we must prefix it with a dollar sign, changing the variable to $NAME.
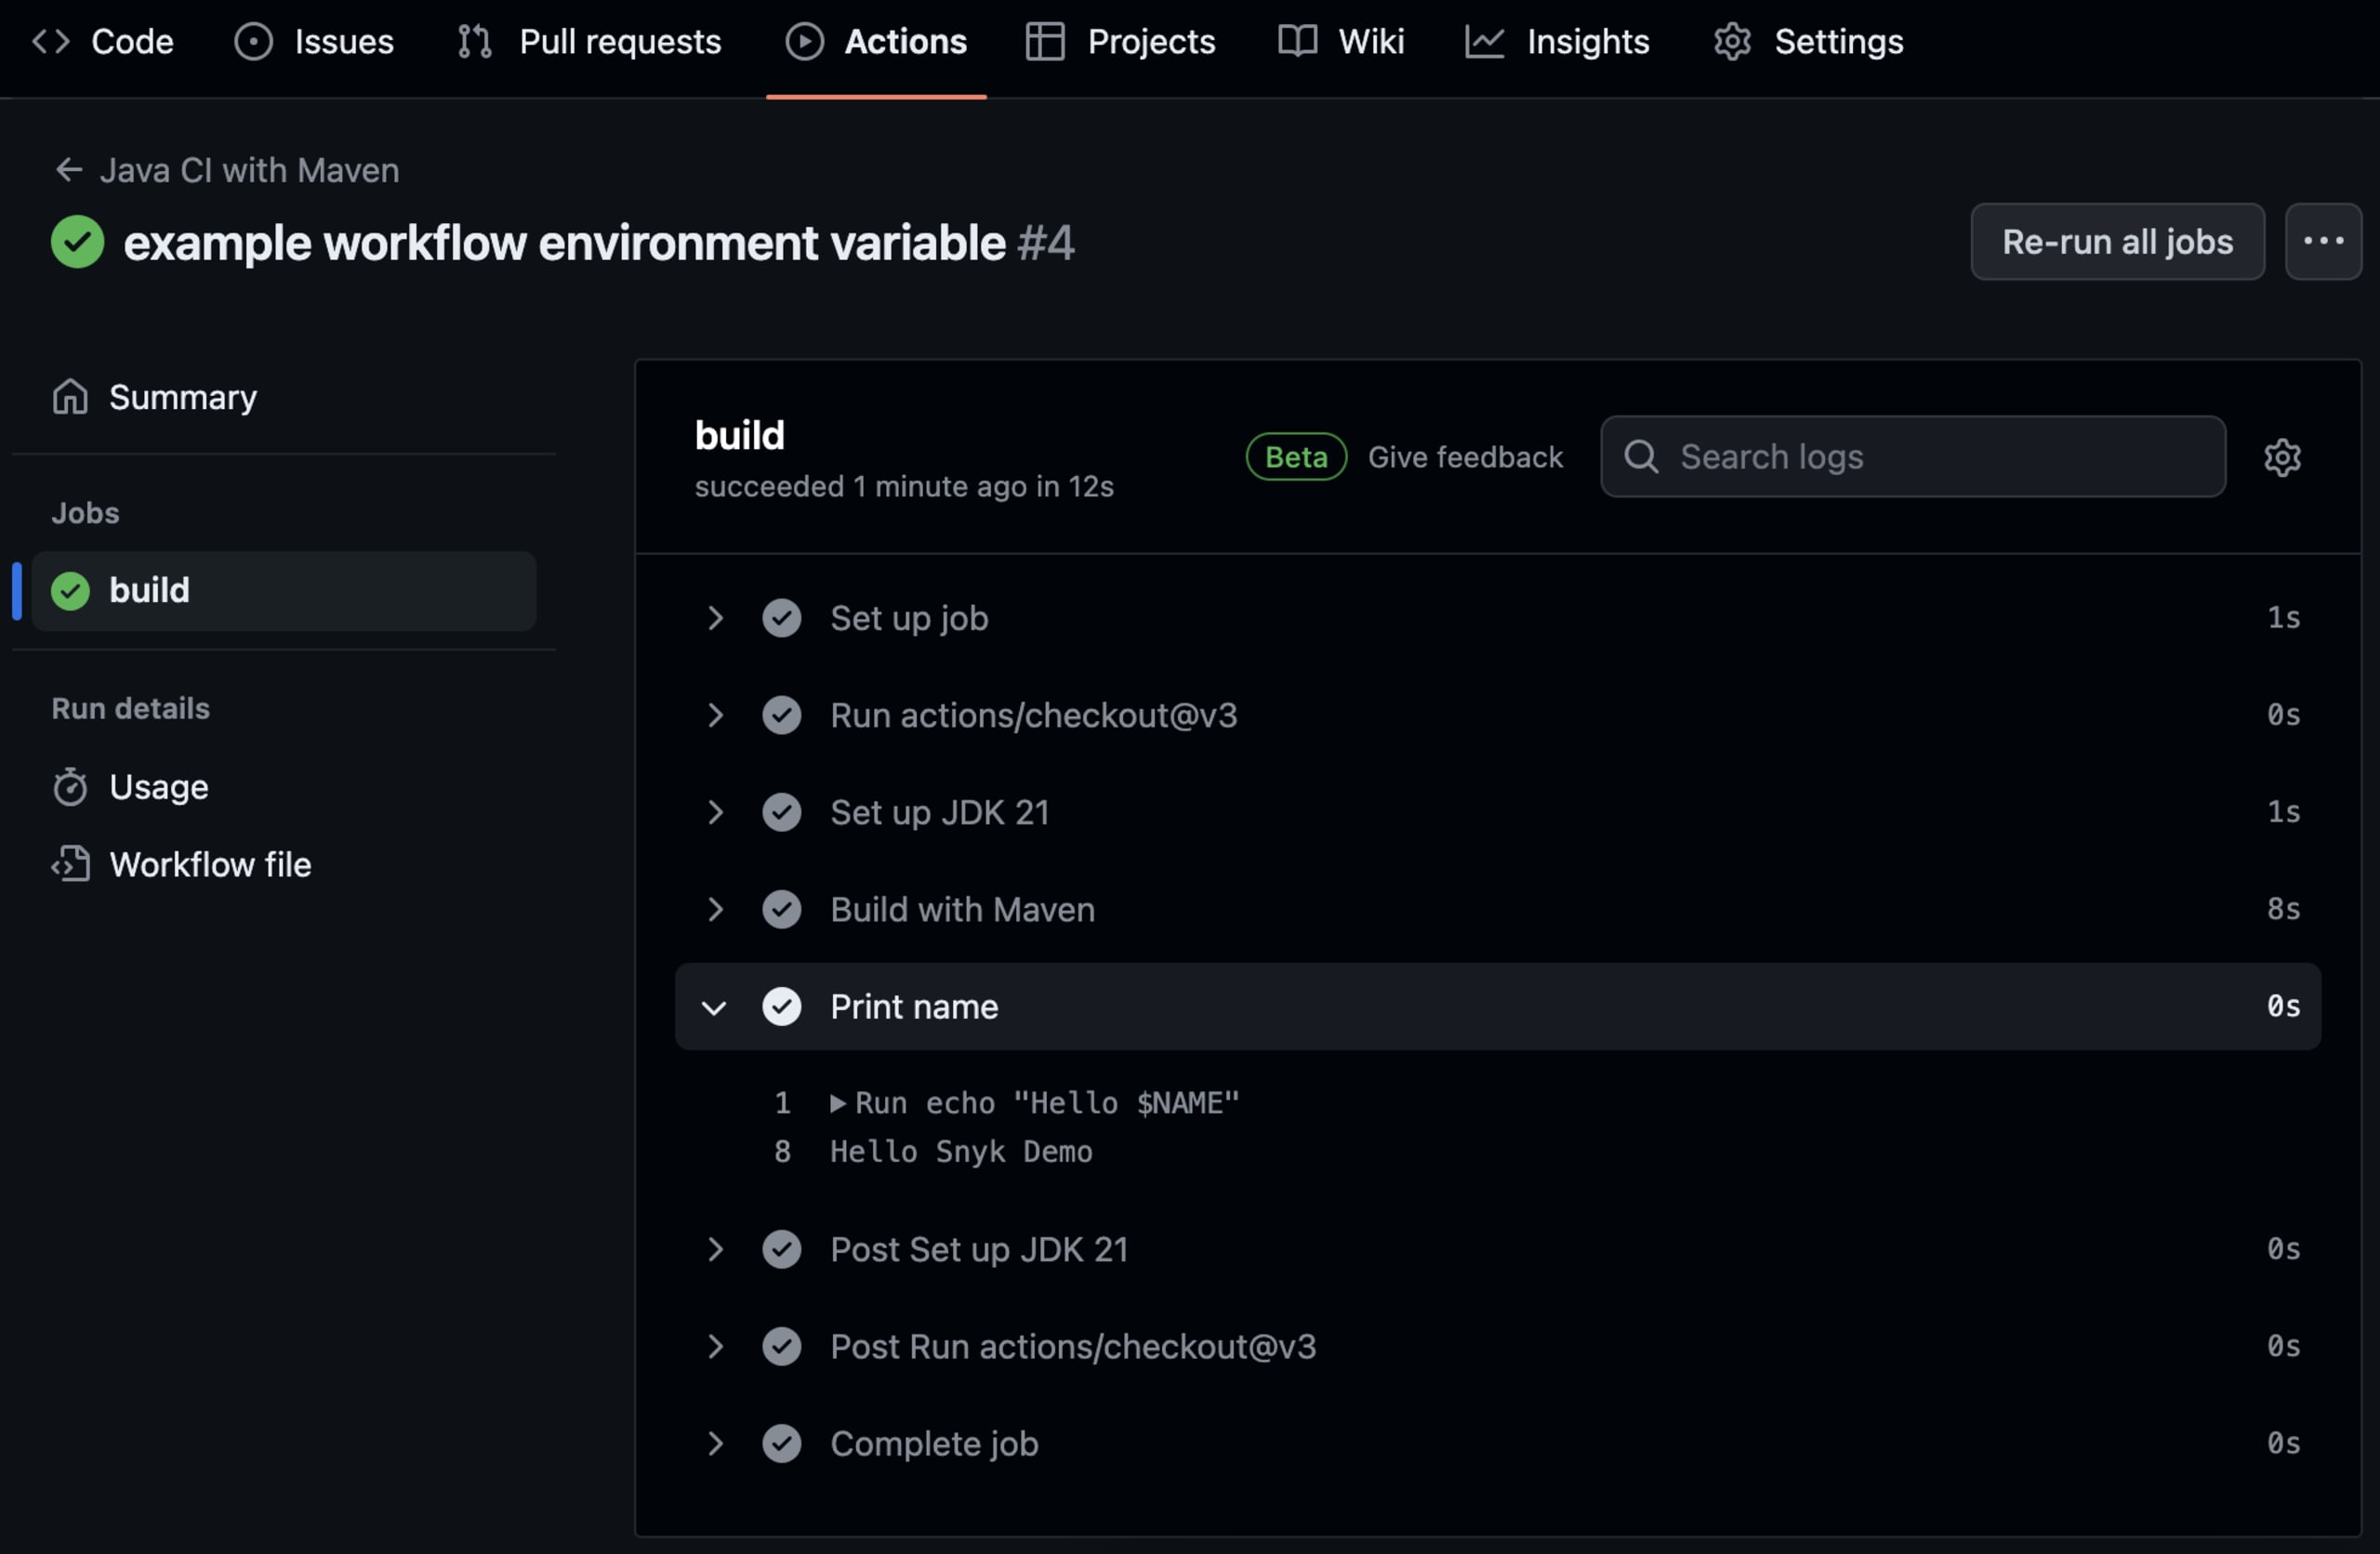
Let’s add a new step to our workflow on line 23 that prints this variable out:
Commit and push this change to the repository.
Then, open GitHub in a browser and navigate to the Actions tab within the repository. Select the latest workflow under Jobs and open the output of our build job. Click Print name. Once expanded, you see that it has successfully printed out the environment variable, as seen in the image below.
Workflow-level environment variables are useful for declaring variables that apply to every job and step. For example, we can use this to set which type of environment the workflow is running in, such as development, testing, or production. This can be useful for Node applications built with npm, as they can use the NODE_ENV variable. By using this variable, each job can act appropriately for that specific environment. You can learn more about securely publishing your npm packages in this article on the Snyk blog.
Job environment variables
Now, let’s look at setting up job and step environment variables. These can be set up the same way as our workflow environment variables, but we define them within the relevant section.
For our job variable, we want to define the Java version as follows:
Within our steps, we can now use this variable as we did before.
However, you may notice that when using our JAVA_VERSION environment variable, the syntax is slightly different. This is an example of using contexts to access an environment variable. Contexts allow GitHub Actions to use our environment variables on any virtual machine, as these tasks aren’t always performed on the same virtual machine as we declare our environment.
You can use job environment variables to override a workflow-level environment if a specific job requires a different value for an already declared workflow variable or limit the variable's scope to one specific job.
As shown in the above example, we can use job environment variables to set the Java version, allowing us to use the variable in each step. If we wish to use a different Java version in the future, we must only change it in one place, and all steps within the job automatically use the new version.
Now that you are already working on a GitHub action, you can easily integrate Snyk into your GitHub Actions and scan your project right away. We have prebuild Snyk GitHub Actions Available for your convenience. So sign up for a Snyk acount if you haven't already and integrate scanning today.
Step environment variables
We can also define variables within a step. The following is an example of a step environment variable. Amend the Print name step in the pipeline.yml file so that it matches the code snippet below:
Step environment variables limit the scope to just a single step. This is useful for tasks such as defining file paths for input or output files specific to a step. In the example code above, we’ve used the step variable to set some text to print out.
Below is an example of the complete GitHub workflow YAML file showing the new job and step environment variable additions:
Check in this new workflow to GitHub and take a look at the output, which should look like the image below.
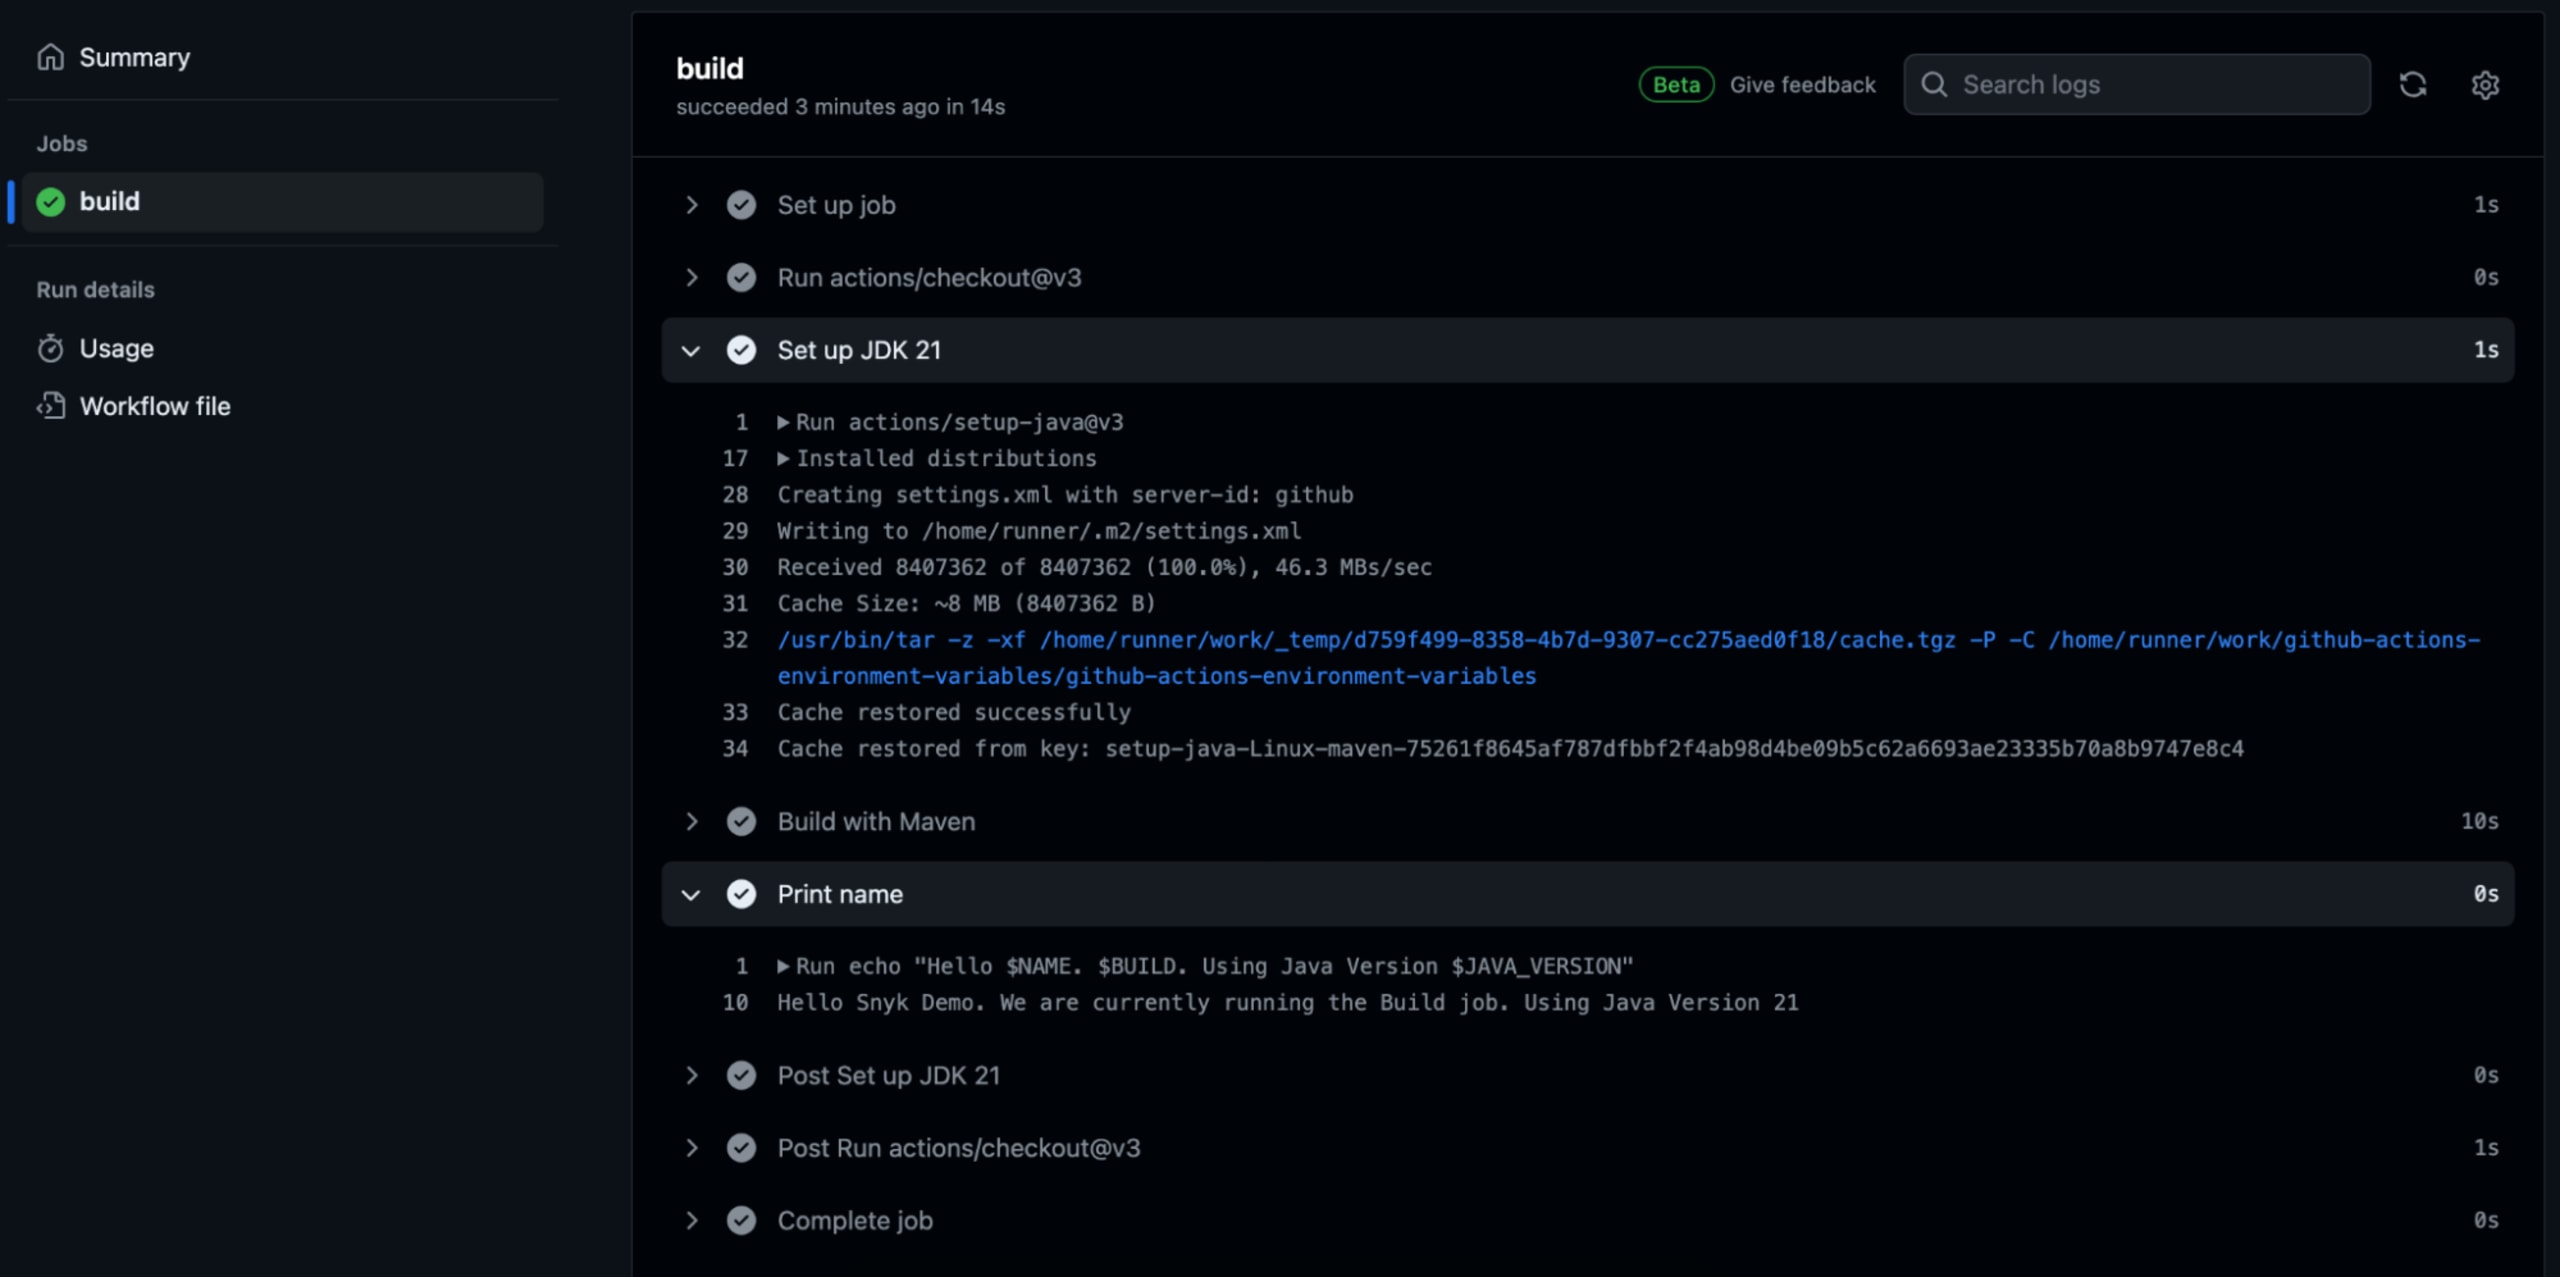
We have set up our environment variable using contexts, and our print step works as expected.
If we tried to use our environment variable without contexts, we would have received the following error:

This is because the setup-java action doesn’t have access to the same environment, so using contexts is required to make the variable available.
Using default variables and GitHub secrets
On top of defining our environment variables, GitHub provides some default variables that you can access within a workflow. These variables give us access to details such as the GitHub repository, the GitHub action, and the runner for the workflow. You can use them in the same way as user-defined environment variables. You must access them using contexts when using GitHub Actions where applicable.
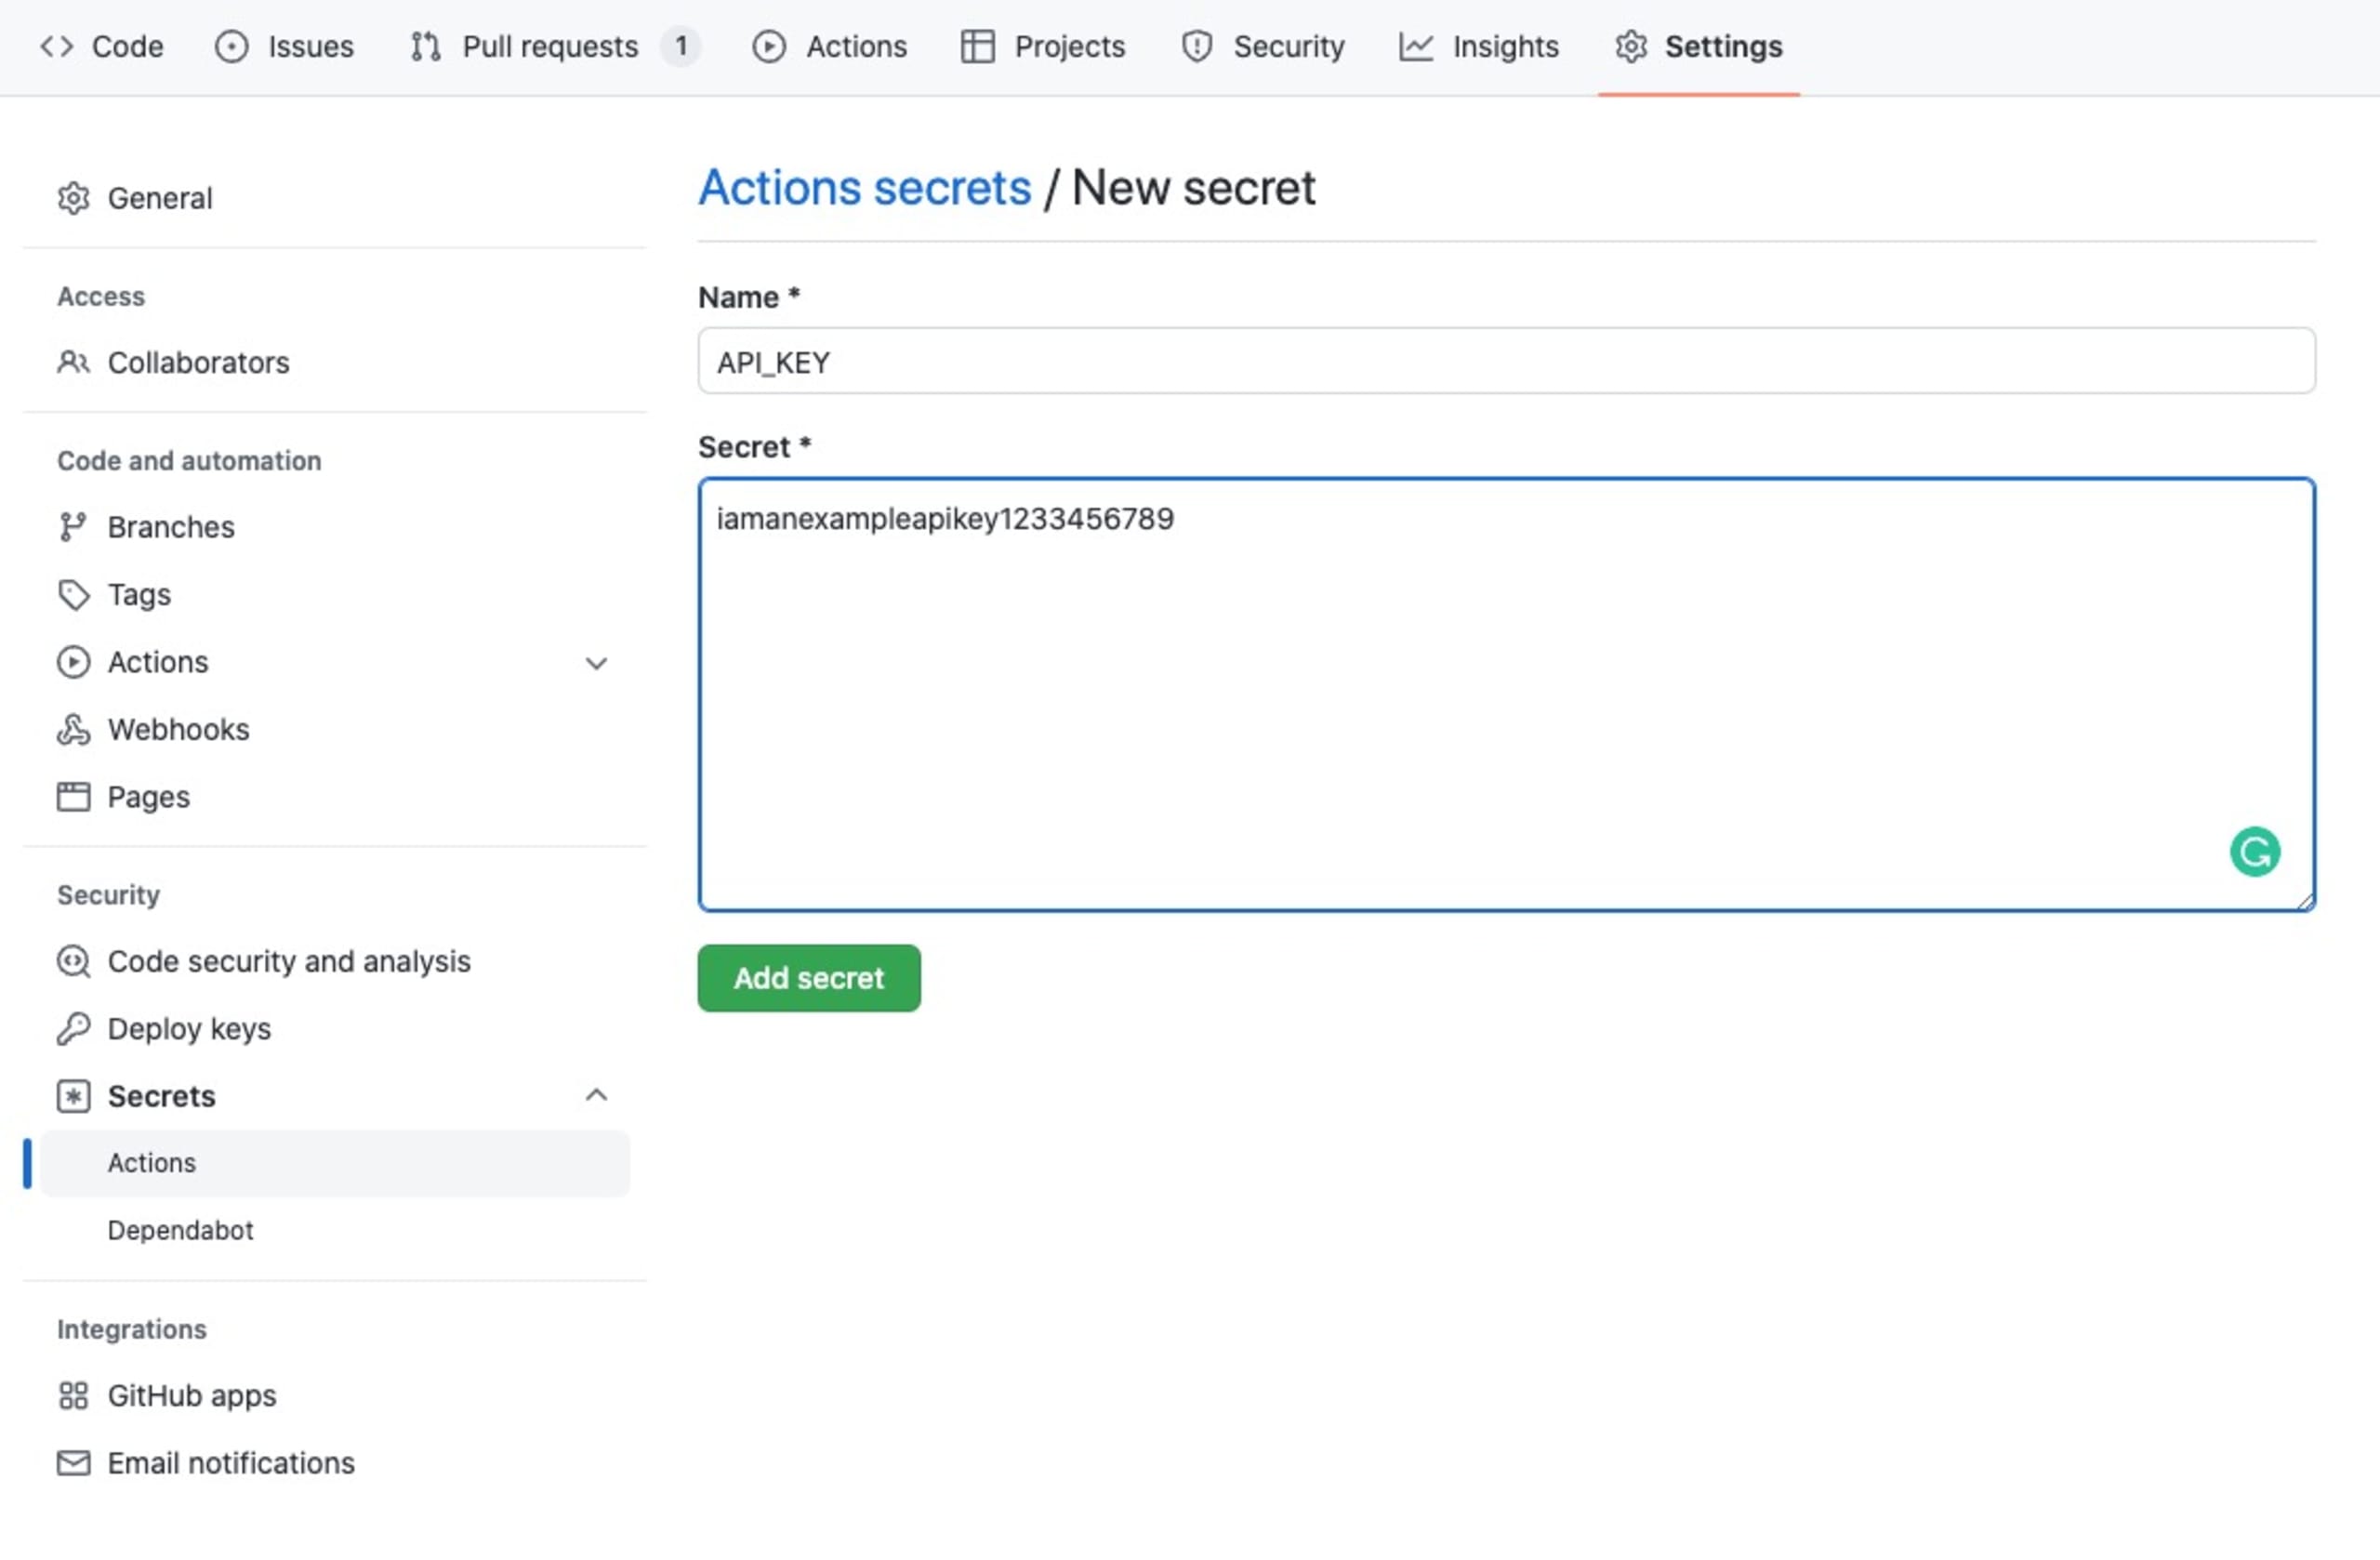
The final type of environment variable is GitHub secrets. You can use them for variables that hold sensitive data, as GitHub encrypts them and makes them available within your workflow.
You can create encrypted environment variables within GitHub by going to the Settings area for the repository, and selecting Secrets and variables, and then Actions from the menu on the left. Then, click New repository secret and enter a name and a value for your secret. Create a secret called API_KEY and give it a random value, as shown below.
To use the secret within the workflow, we use the same syntax as when using contexts to supply environment variables to GitHub Actions. However, instead of prefixing the variable with env., we use secrets. instead.
Add ${{secrets.API_KEY}} to the print statement we’ve already built within the workflow YAML file. It should match the code snippet below:
Commit the changes and push them to the repository. Then go to the Actions page on GitHub to see the output from the latest workflow run.

As we can see, GitHub automatically masks the value of our encrypted secret, so we don’t accidentally expose it.
GitHub secrets help store sensitive data such as passwords or API authorization keys. By using secrets, we don’t need to hardcode these values in our workflow and risk exposing them to external entities. Instead, GitHub encrypts them for us, passes them safely to any actions in our workflow, and ensures they do not appear in plain text in logs.
Conclusion
This article explained GitHub Actions environment variables. We discussed the three scopes available to environment variables (workflow, job, and step), and how to define variables at each of these scopes. We then looked at using contexts to pass environment variables to GitHub Actions, and using secrets to encrypt sensitive variables.
GitHub Actions environment variables allow developers to build dynamic workflows. We can use these variables to change the behavior of the workflow based on either a user-defined variable, or a default GitHub variable. We should use variables whenever we want to dynamically change how the workflow, or a specific job or step, works and also when they should run.
The article also discussed using GitHub secrets as environment variables to protect sensitive information. It’s important to remember to use GitHub secrets for sensitive variables such as passwords and API keys, as GitHub encrypts them and injects them into a workflow without the risk of exposing them.
And remember, security matters! Explore how Snyk can bring an extra layer of security to your GitHub workflows, and learn more about integrating Snyk into your CI/CD pipeline for comprehensive code, container, open source, and IaC security.