A guide to input validation with Spring Boot
Lucien Chemaly
September 12, 2023
0 mins readIf you're a developer working with Java, you likely know Spring Boot, the robust framework that streamlines the development of stand-alone, production-grade, Spring-based applications. One of the many features it offers is Bean Validation, which is a crucial aspect of any application to ensure data integrity and improve user experience.
Bean Validation can be used in Spring Boot applications for input and form validation, data validation prior to saving to a database, and enforcement of various security policies. With Bean Validation, developers can prevent errors, improve the overall quality of the application, and ensure that data is consistent throughout the application.
In this article, you'll learn more about the various applications of Bean Validation, including how to implement it in Spring Boot, enabling you to effectively utilize it for your own projects.
What is Bean Validation
Bean Validation is a feature that allows you to apply constraints to your application's data models to ensure that the data adheres to specific rules before it's processed or stored. This is achieved through the integration of the Jakarta Bean Validation, which provides a set of annotations and interfaces to define and validate constraints.
By applying Bean Validation, developers can save time and resources by catching errors and inconsistencies early on in the development process. In addition, Bean Validation helps improve the overall user experience by reducing the amount of incorrect data that's entered.
Let's take a look at some common use cases of Bean Validation in application development:
Input and form validation
One of the most common use cases of Bean Validation is input and form validation. This helps ensure that users input data in the correct format (i.e. sign-up form validation with email addresses, usernames, and passwords).
Data validation prior to saving to a database
Another application of Bean Validation is data validation before saving it to a database. This technique helps ensure that the data entered is consistent and accurate. In turn, this helps prevent errors and reduces the risk of data corruption.
Enforcement of security policies
Bean Validation can also be used for enforcing security policies by validating user input, or as data mapped from the database, to ensure that it meets specific criteria, such as a password strength requirement. Validation plays a key role in preventing injection attacks and helps prevent security vulnerabilities such as stored cross-site scripting (XSS).
Business logic validation
Bean Validation can be applied to validate business logic and ensure it meets specific requirements or standards. By defining validation constraints, such as password complexity or valid order item quantities and prices, Bean Validation can automatically check data and enforce the required rules. This helps to eliminate manual checking and ensures the application adheres to specific standards or requirements.
Implementing Spring Boot Bean Validation
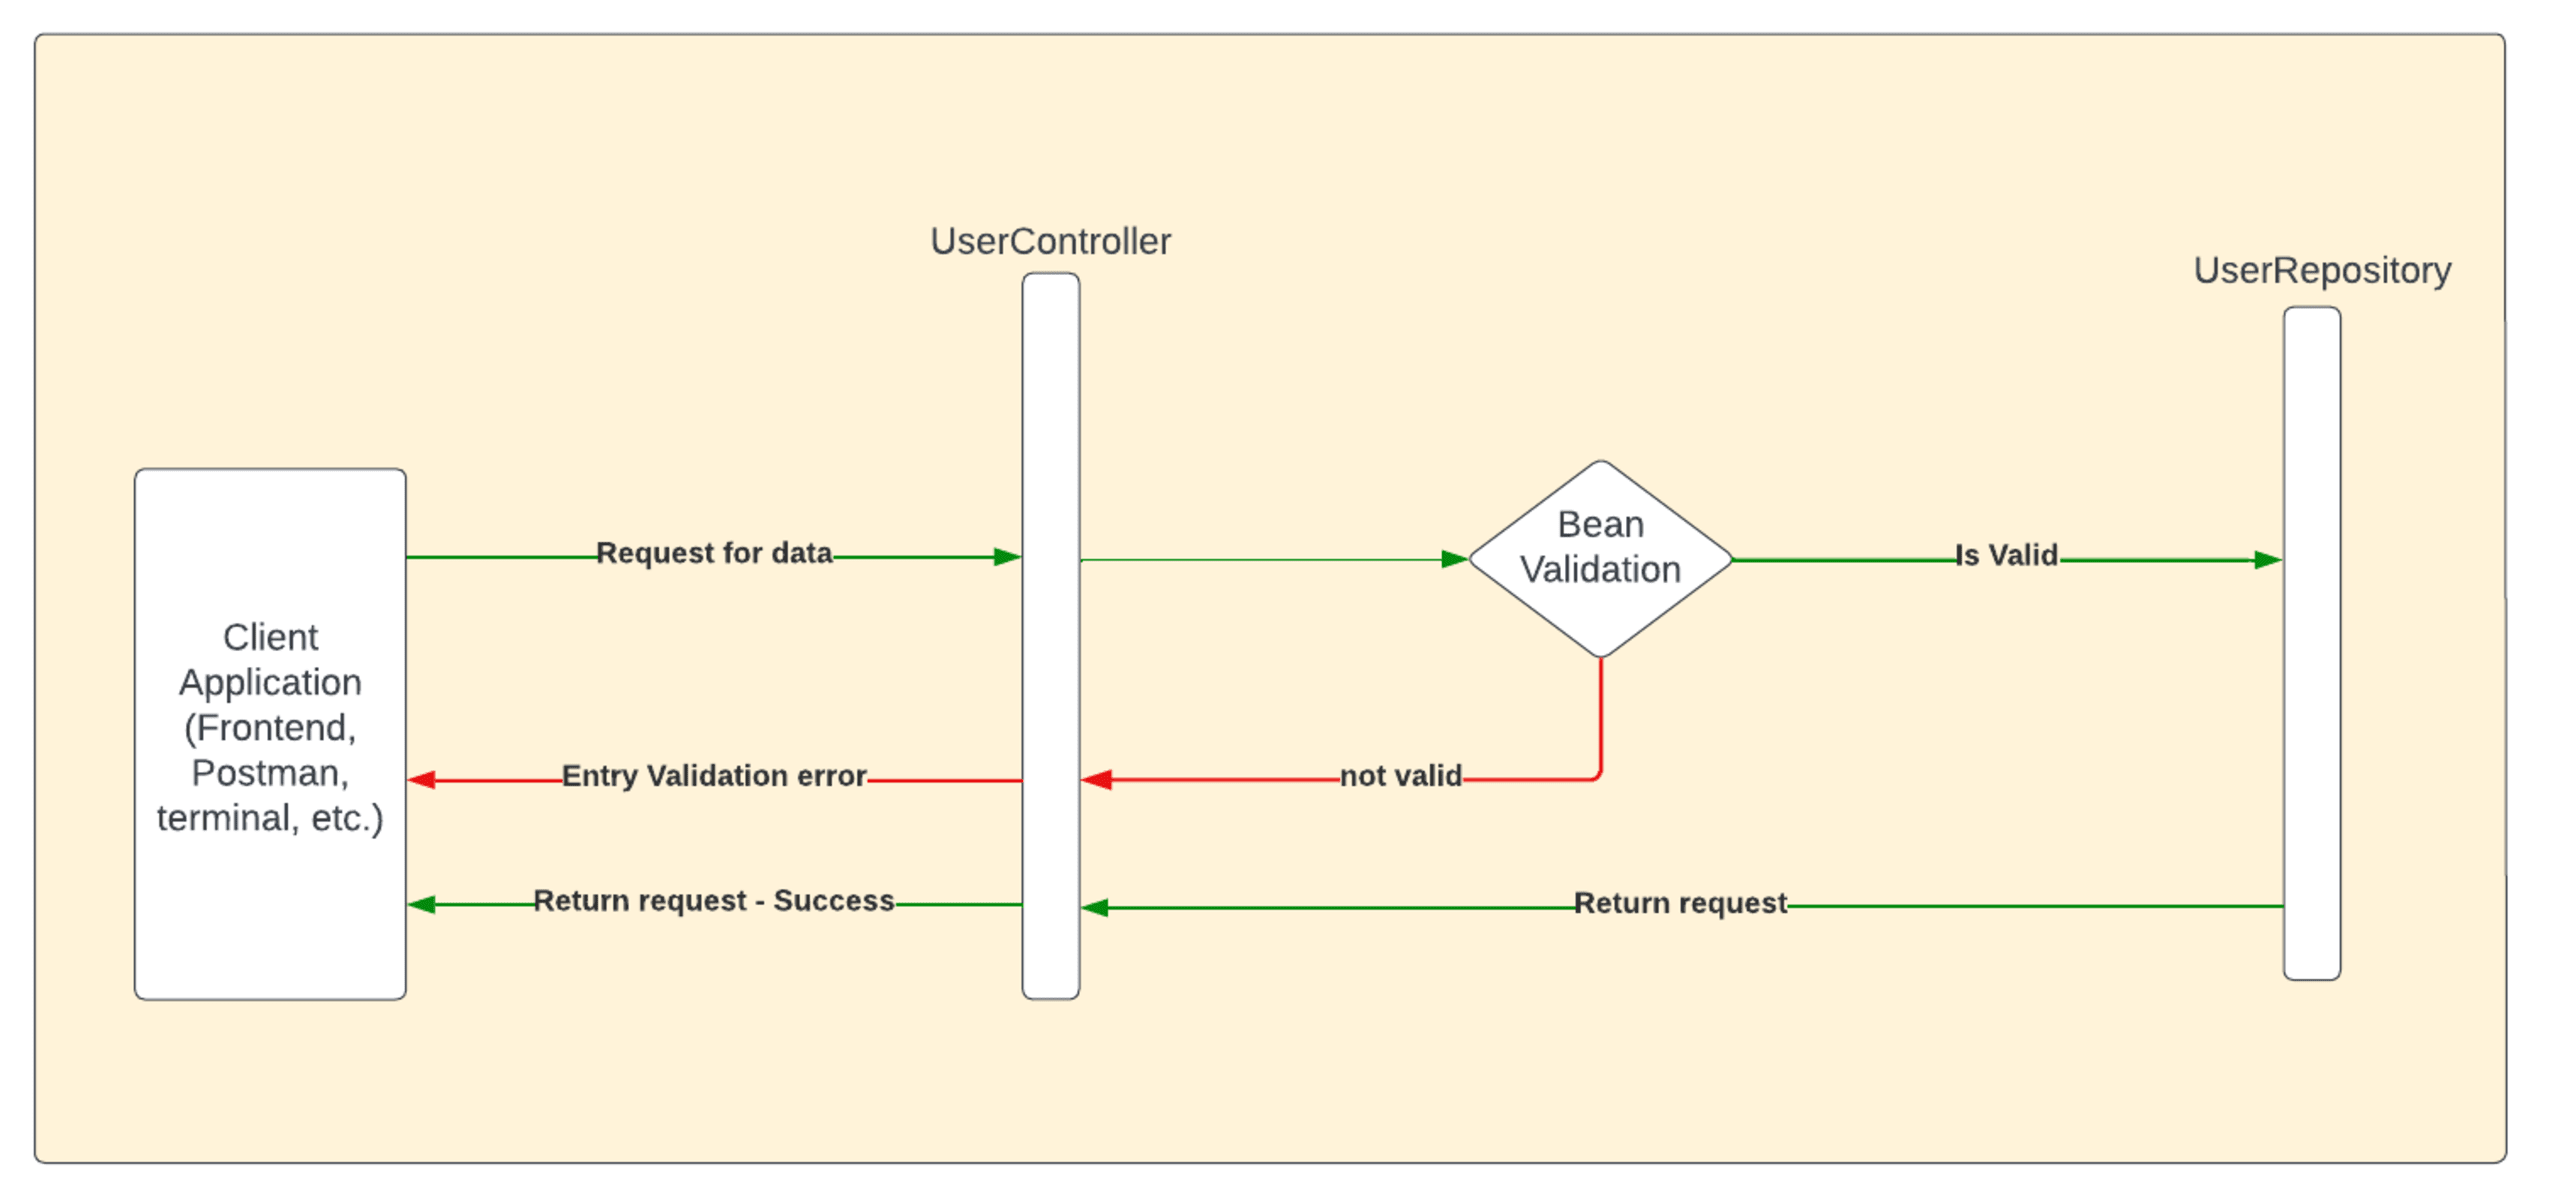
In this tutorial, you will implement Bean Validation for a simple create, read, update, delete (CRUD) application with an in-memory database. Users provide their name, email, and password, which must meet specific criteria to be accepted. The high-level architecture used here consists of a backend server with RESTful APIs and an in-memory H2 database.
When a client application calls the web service (which is the application of this tutorial), the request goes to the UserController. After that, the controller applies data validation to the request. If the data is valid, the request proceeds to the UserRepository to communicate with the in-memory database and return the relevant response. Otherwise, the data is not valid and the request is sent back to the client with an error message:
Prerequisites
Before diving into the implementation, ensure you have the following tools and technologies installed:
Java Development Kit (JDK) version 17 or above.
An IDE, such as IntelliJ IDEA or Eclipse. This tutorial uses IntelliJ IDEA Community Edition.
Maven version 3.8.6 or above.
Create a new Spring Boot project
To create a new Spring Boot project, visit the Spring Initializr and choose the following options:
Project type: Maven Project
Language: Java
Packaging: Jar
Java version: 17
Spring Boot: 3.1.0 (SNAPSHOT)
Enter the following details in the Project Metadata section:
Group: com.example
Artifact: simple-crud-bean-validation
Name: simple-crud-bean-validation
Description: A simple CRUD application with Spring Boot
Package name: com.example.simplecrud
And use the following dependencies:
Web: Spring Web
Validation: Bean Validation
H2 Database: H2 Database
Spring Data JPA: Spring Data and Hibernate
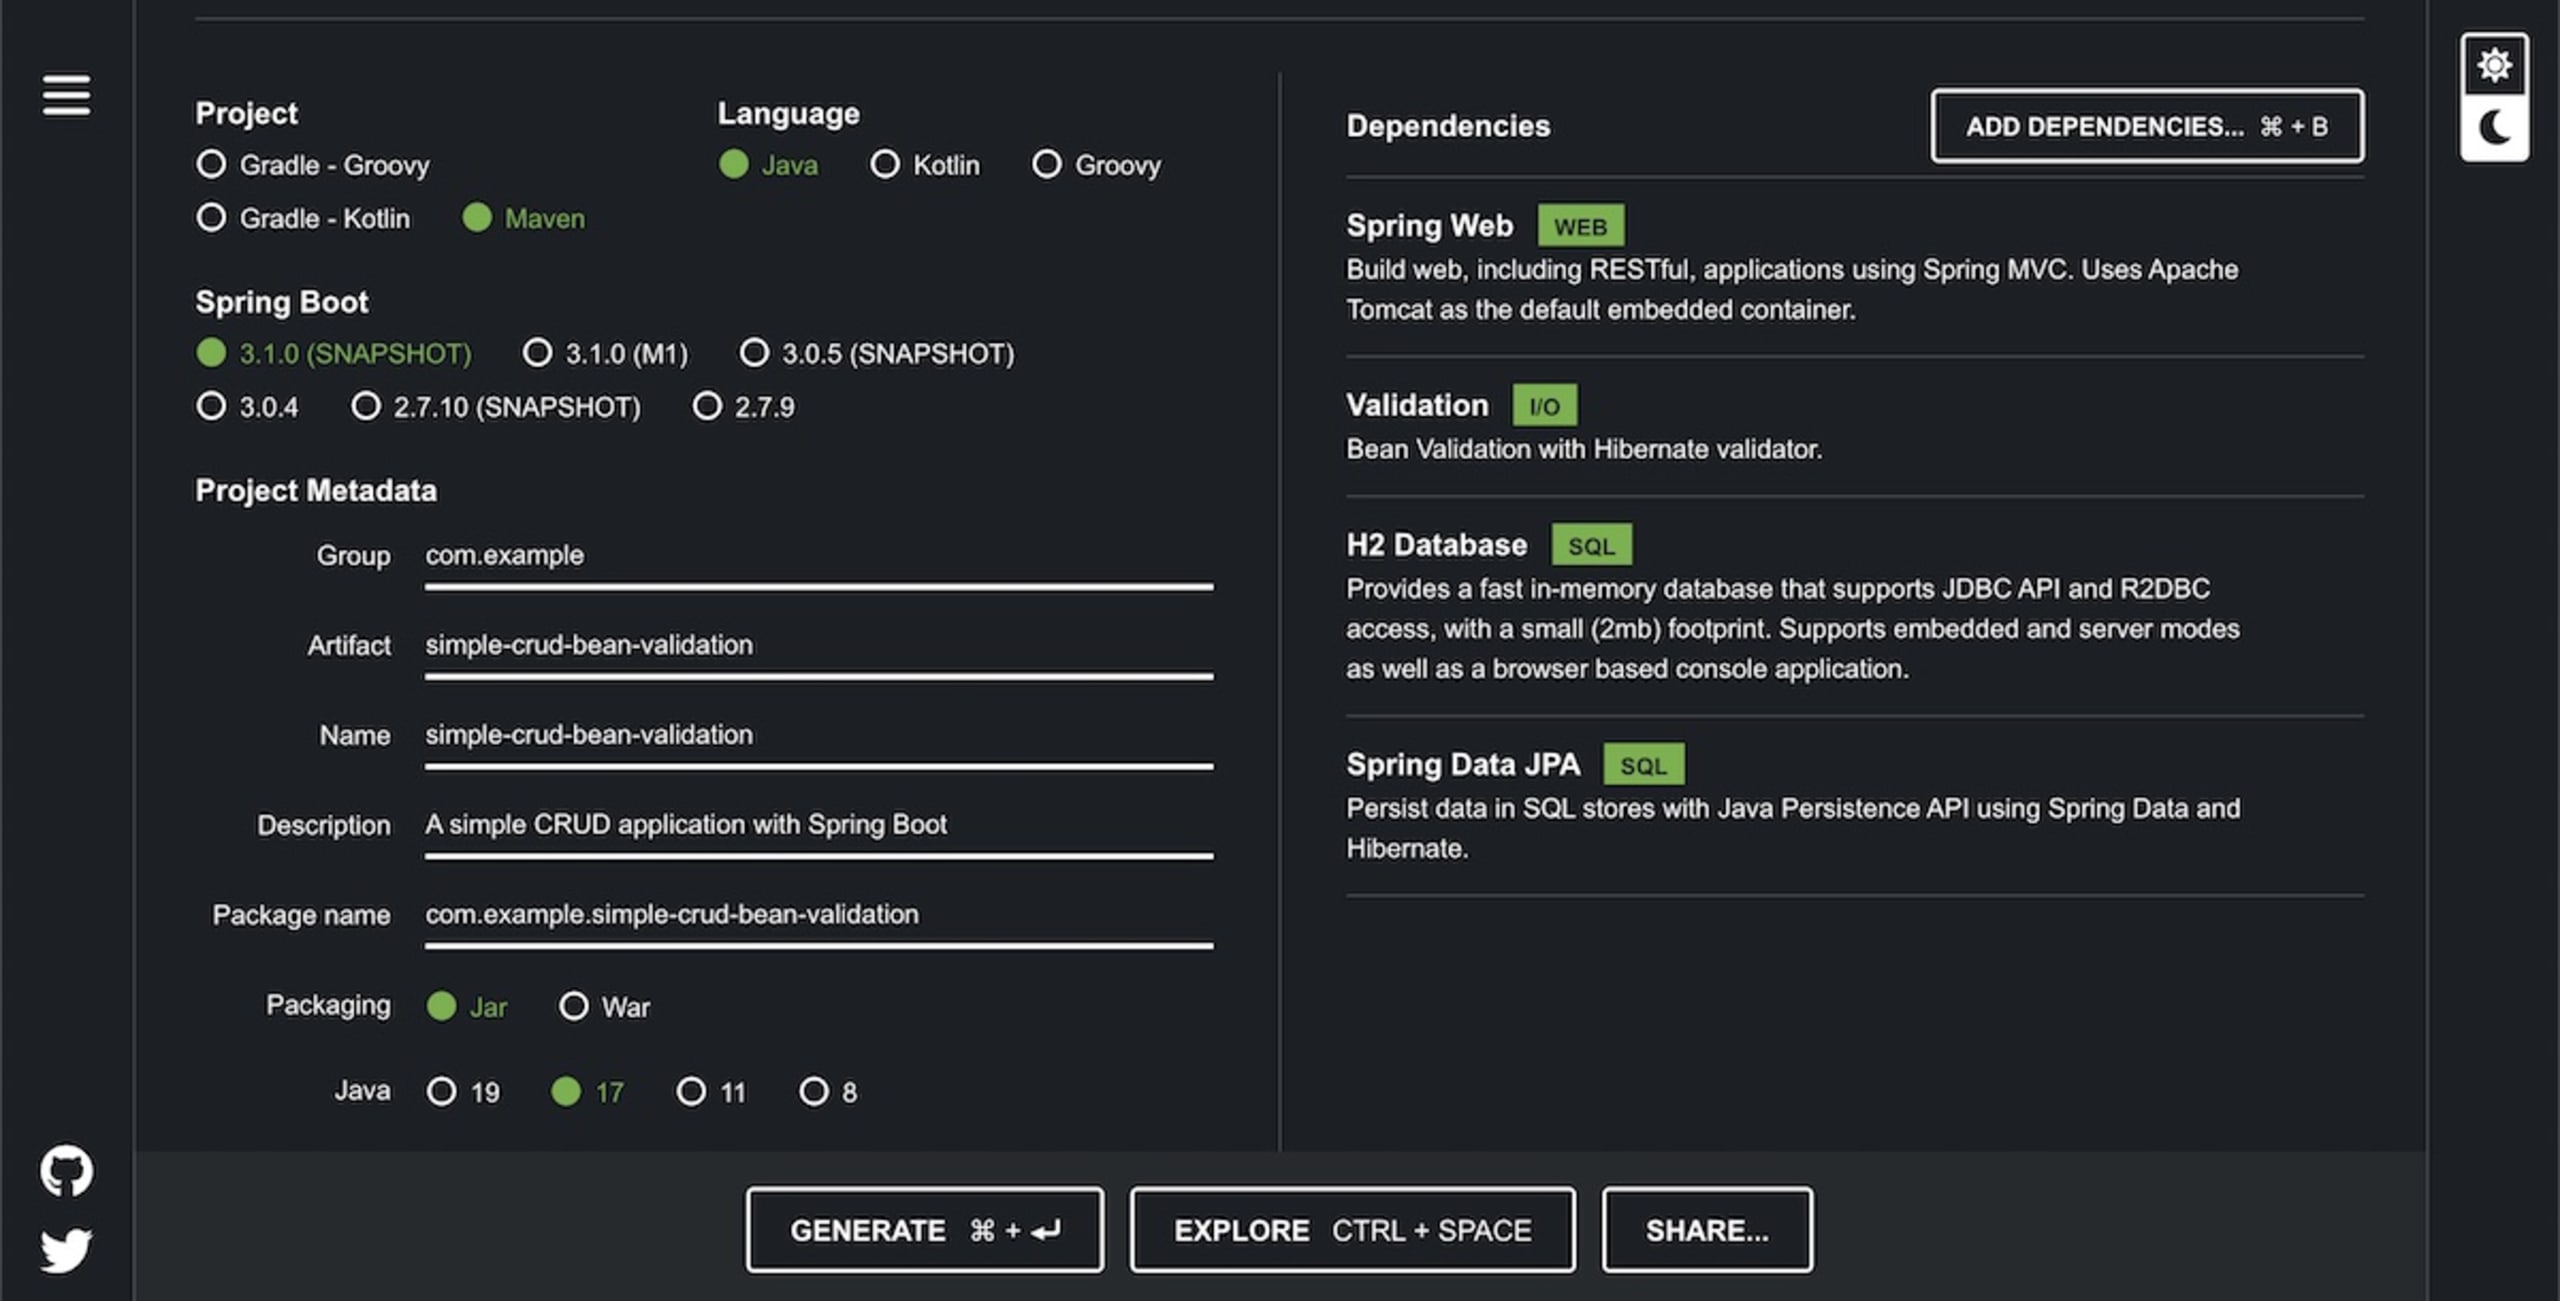
Click Generate to download the project as a ZIP file. Then, extract the ZIP file and import the project into your preferred IDE.
Implement the application
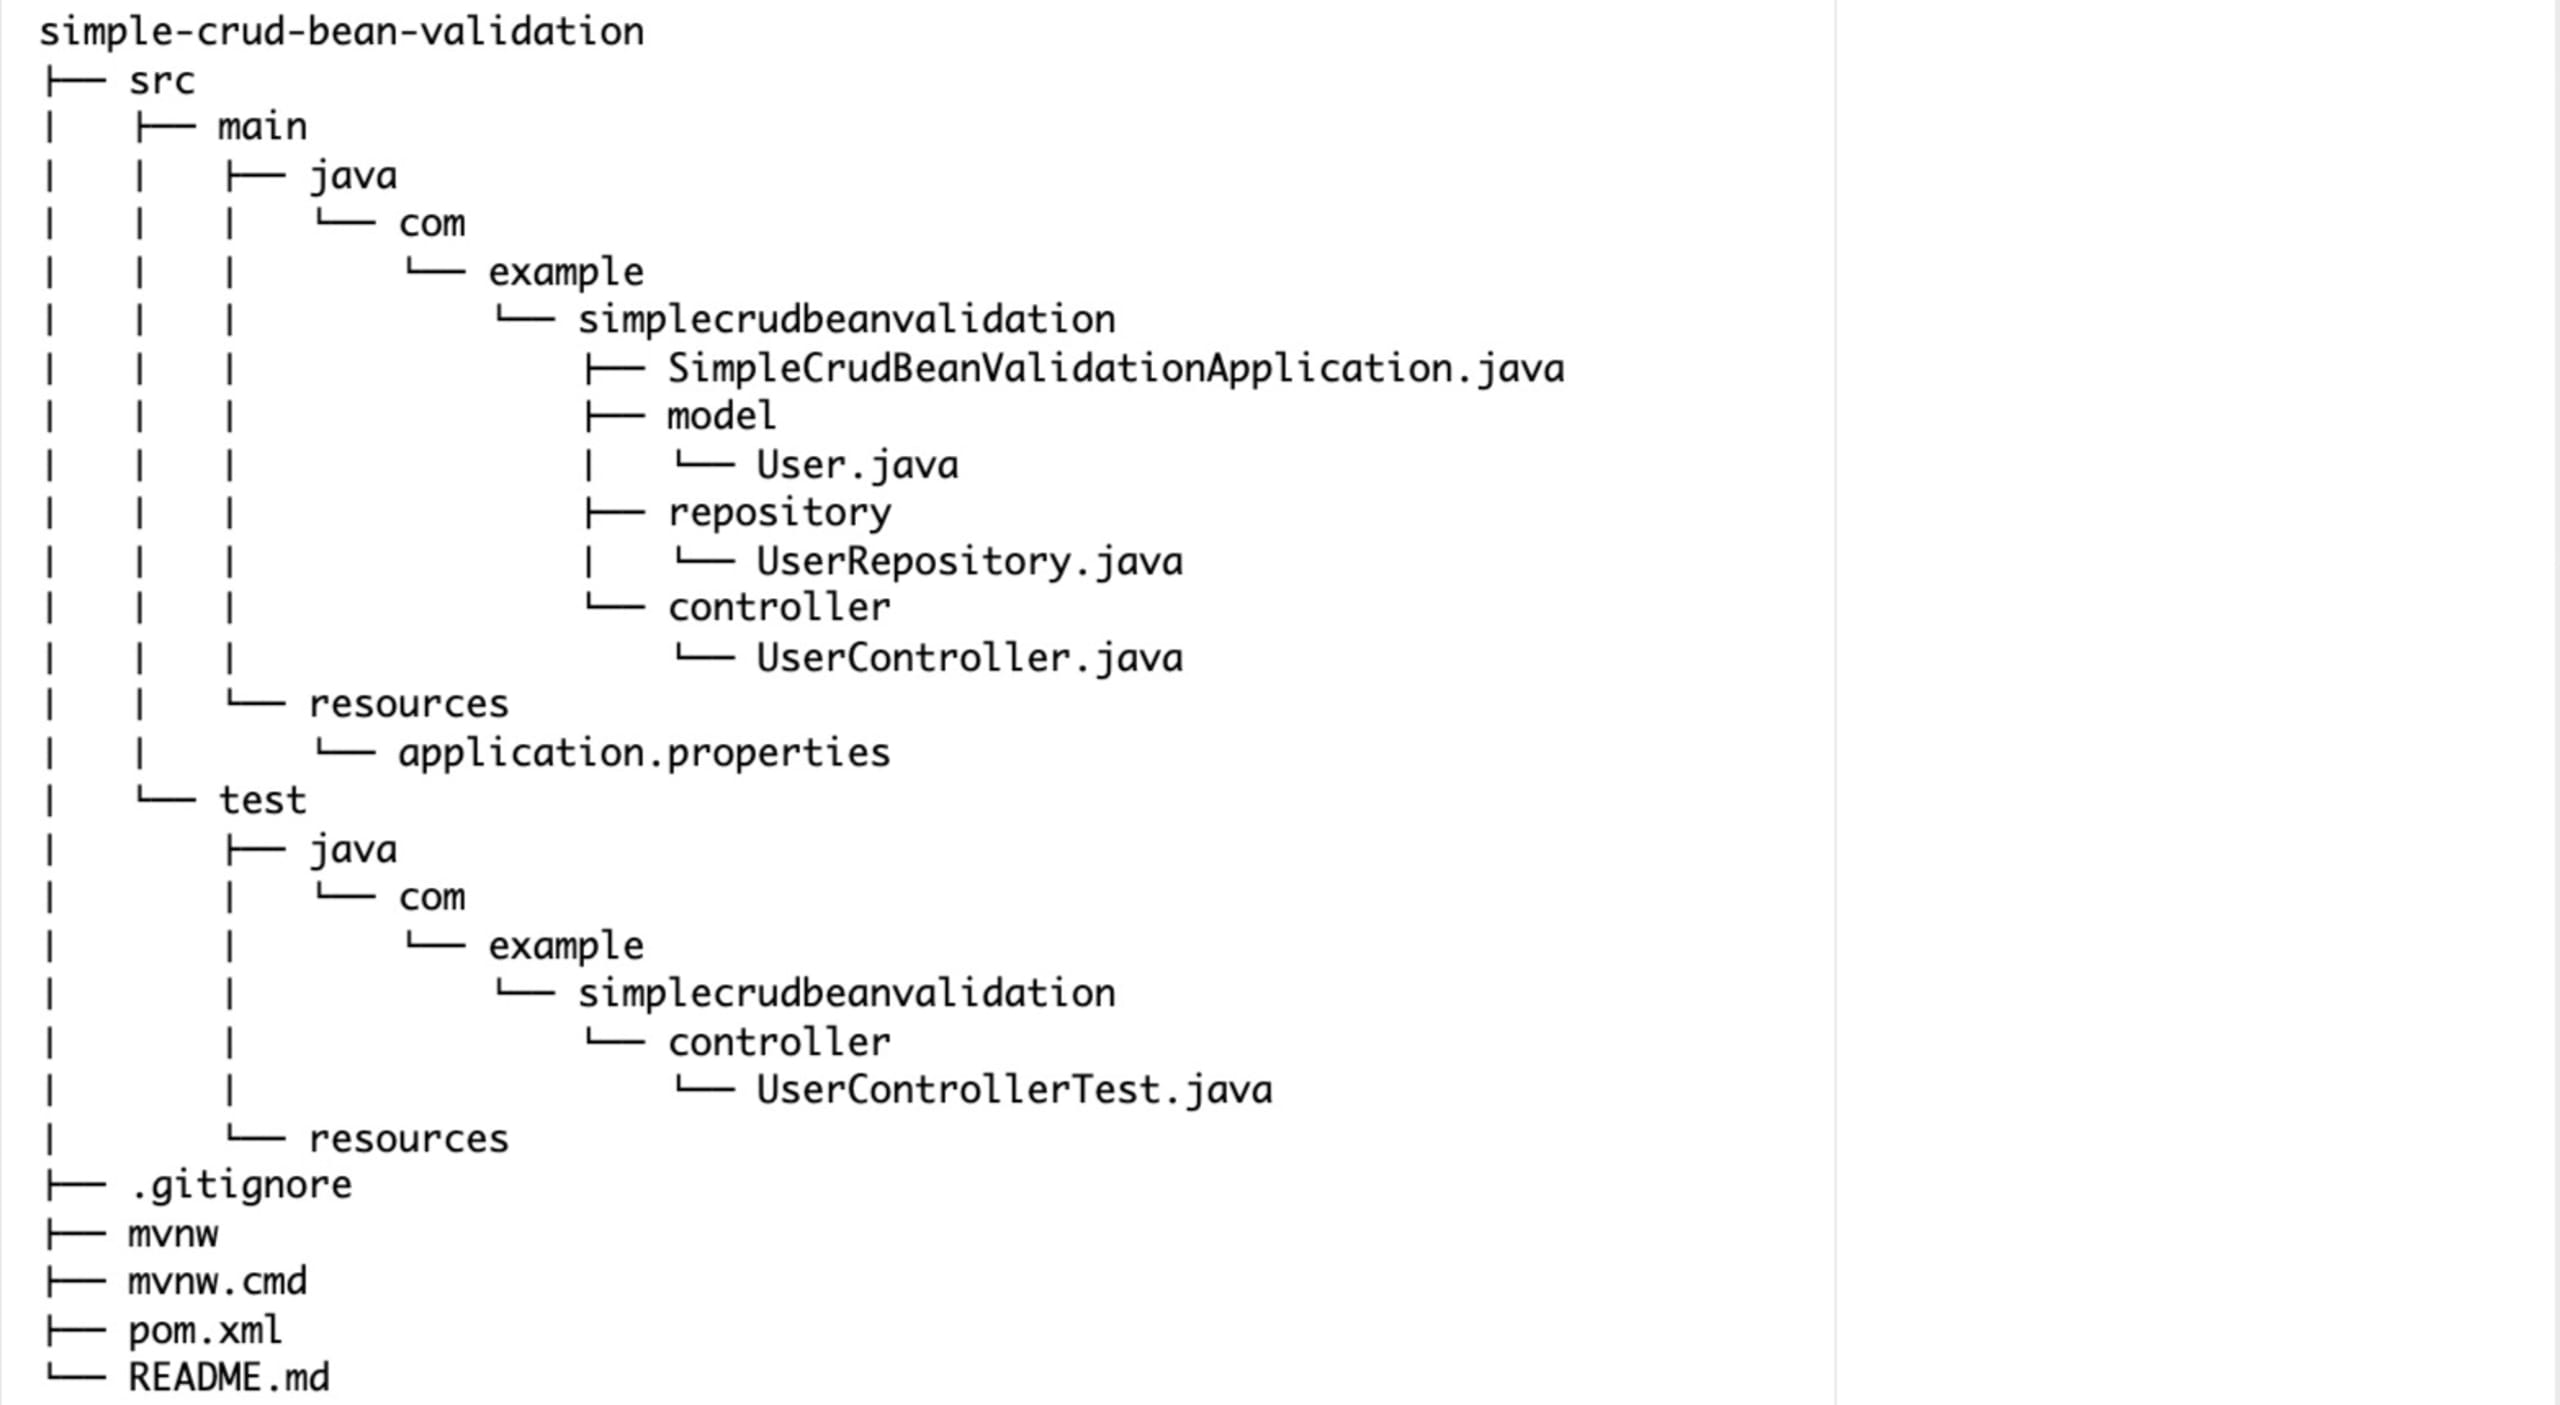
We'll be following the standard project structure for Spring Boot applications. Here's the complete project structure:
User model
To implement the application, you need to start by creating the model directory inside src/main/java/com/example/simplecrudbeanvalidation. Then, inside the model directory, create a file named User.java and add the following fields and Bean Validation annotations to the User class:
This code defines a Java class named User that represents a table in a database called users using Jakarta Persistence API (JPA) annotations. It has four instance variables — id, name, email, and password — with corresponding getters and setters. Each of these fields has certain validation constraints, such as @NotNull, @NotEmpty, @Email, @Size, and @Pattern. @Pattern is used to indicate that the password must have eight to sixty-four characters and contain at least one digit, one lowercase letter, one uppercase letter, and one special character. Additionally, the @Pattern is also used for the name property to prevent any script injections. The class can be used as a model class to store and retrieve user data from a database.
User repository
To handle CRUD operations using an in-memory database, create the repository directory inside src/main/java/com/example/simplecrudbeanvalidation. Then, inside the repository directory, create a file named UserRepository.java to define the UserRepository interface, as follows:
This code defines a Java interface called UserRepository that extends the CrudRepository interface provided by the Spring Data JPA. The UserRepository interface specifies two generic parameters for the CrudRepository: User, which is the entity type this repository manages, and Long, which is the entity's primary key type.
By extending CrudRepository, UserRepository inherits several methods for performing CRUD operations on the User entity. These methods can be used to interact with an in-memory database to manage User objects without the need for complex configuration or a full-fledged database server.
User controller
To create the UserController class that defines the RESTful API endpoints and validation logic, start by creating a directory named controller inside the src/main/java/com/example/simplecrudbeanvalidation directory. Inside the controller directory, create a file named UserController.java with the following content:
This code defines a Spring Boot RestController class called UserController that handles HTTP requests for managing User objects. The class contains five methods that handle different HTTP requests: retrieving all users, retrieving a single user by ID, creating a new user, updating an existing user, and deleting a user.
The @Autowired annotation is used to inject the UserRepository dependency into the UserController class. The UserController class is associated with the /api/users endpoint through the @RequestMapping annotation, which maps incoming HTTP requests to this controller. In addition, the @Validated annotation is used to enable the validation of request parameters. Overall, this code provides a RESTful API for CRUD operations on User objects using Spring Data and an in-memory database.
Configure the In-Memory Database
To configure the in-memory database, go to the application.properties under the src/main/resources/ and add the following configurations:
This Spring Boot configuration sets up an H2 in-memory database named testdb and configures its driver, username, and password. It also specifies the H2 dialect that should be used for Hibernate-based database operations.
H2 not recommended for production
The use of H2 as a production database is not recommended, and the default username and password should not be used in a production environment. While this setup is suitable for demo purposes, it should not be used in production.
Unit Test for Bean Validation
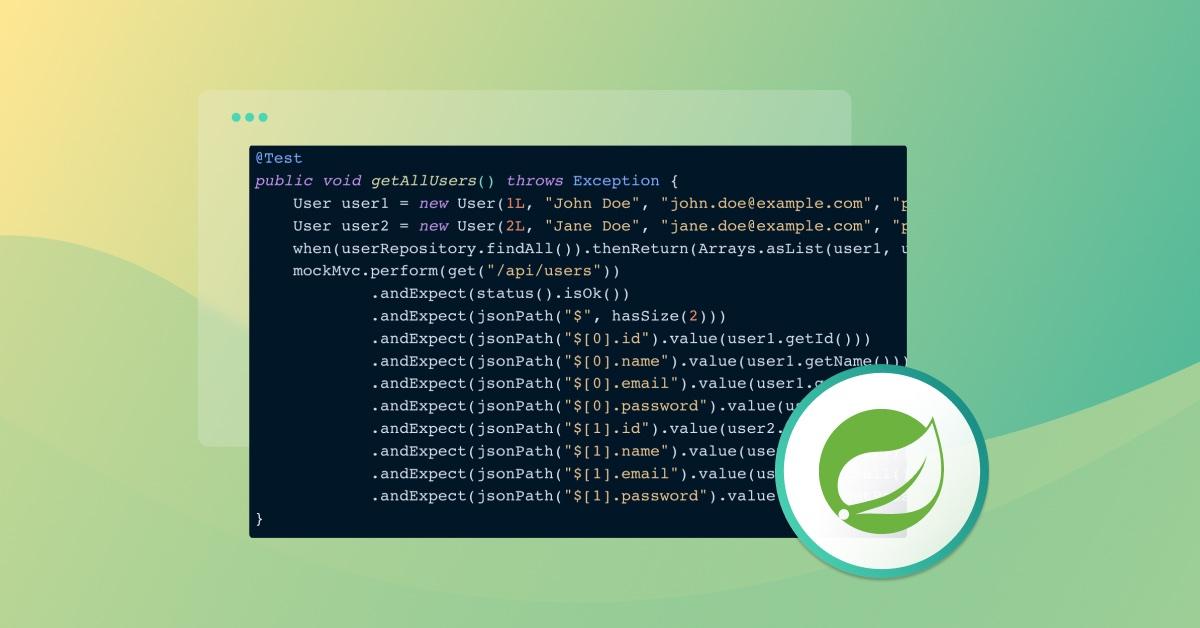
Once you've configured the in-memory database, you can begin unit testing for Bean Validation. To do so, create the controller directory inside src/test/java/com/example/simplecrudbeanvalidation. Then, inside the controller directory, create a file named UserControllerTest.java and write tests to verify that the Bean Validation constraints are working as expected.
In the UserControllerTest class, add the following code:
This code is a set of JUnit tests for the UserController class. The tests use the MockMvc class to simulate HTTP requests to the /api/users endpoint and verify that the corresponding methods in the UserController class handle them correctly. The tests cover scenarios such as creating a new user with valid and invalid data, retrieving all users, and retrieving a user by ID when the user exists and when it does not.
The @SpringBootTest annotation is used to load the application context, and the @MockBean annotation is used to mock the UserRepository dependency of the UserController class. Overall, these tests ensure that the UserController class functions correctly and responds appropriately to various HTTP requests.
To run the tests, open a terminal or shell, navigate to the root directory of your project, and run the following command:
You should see that all your tests have passed:
Run and test your APIs
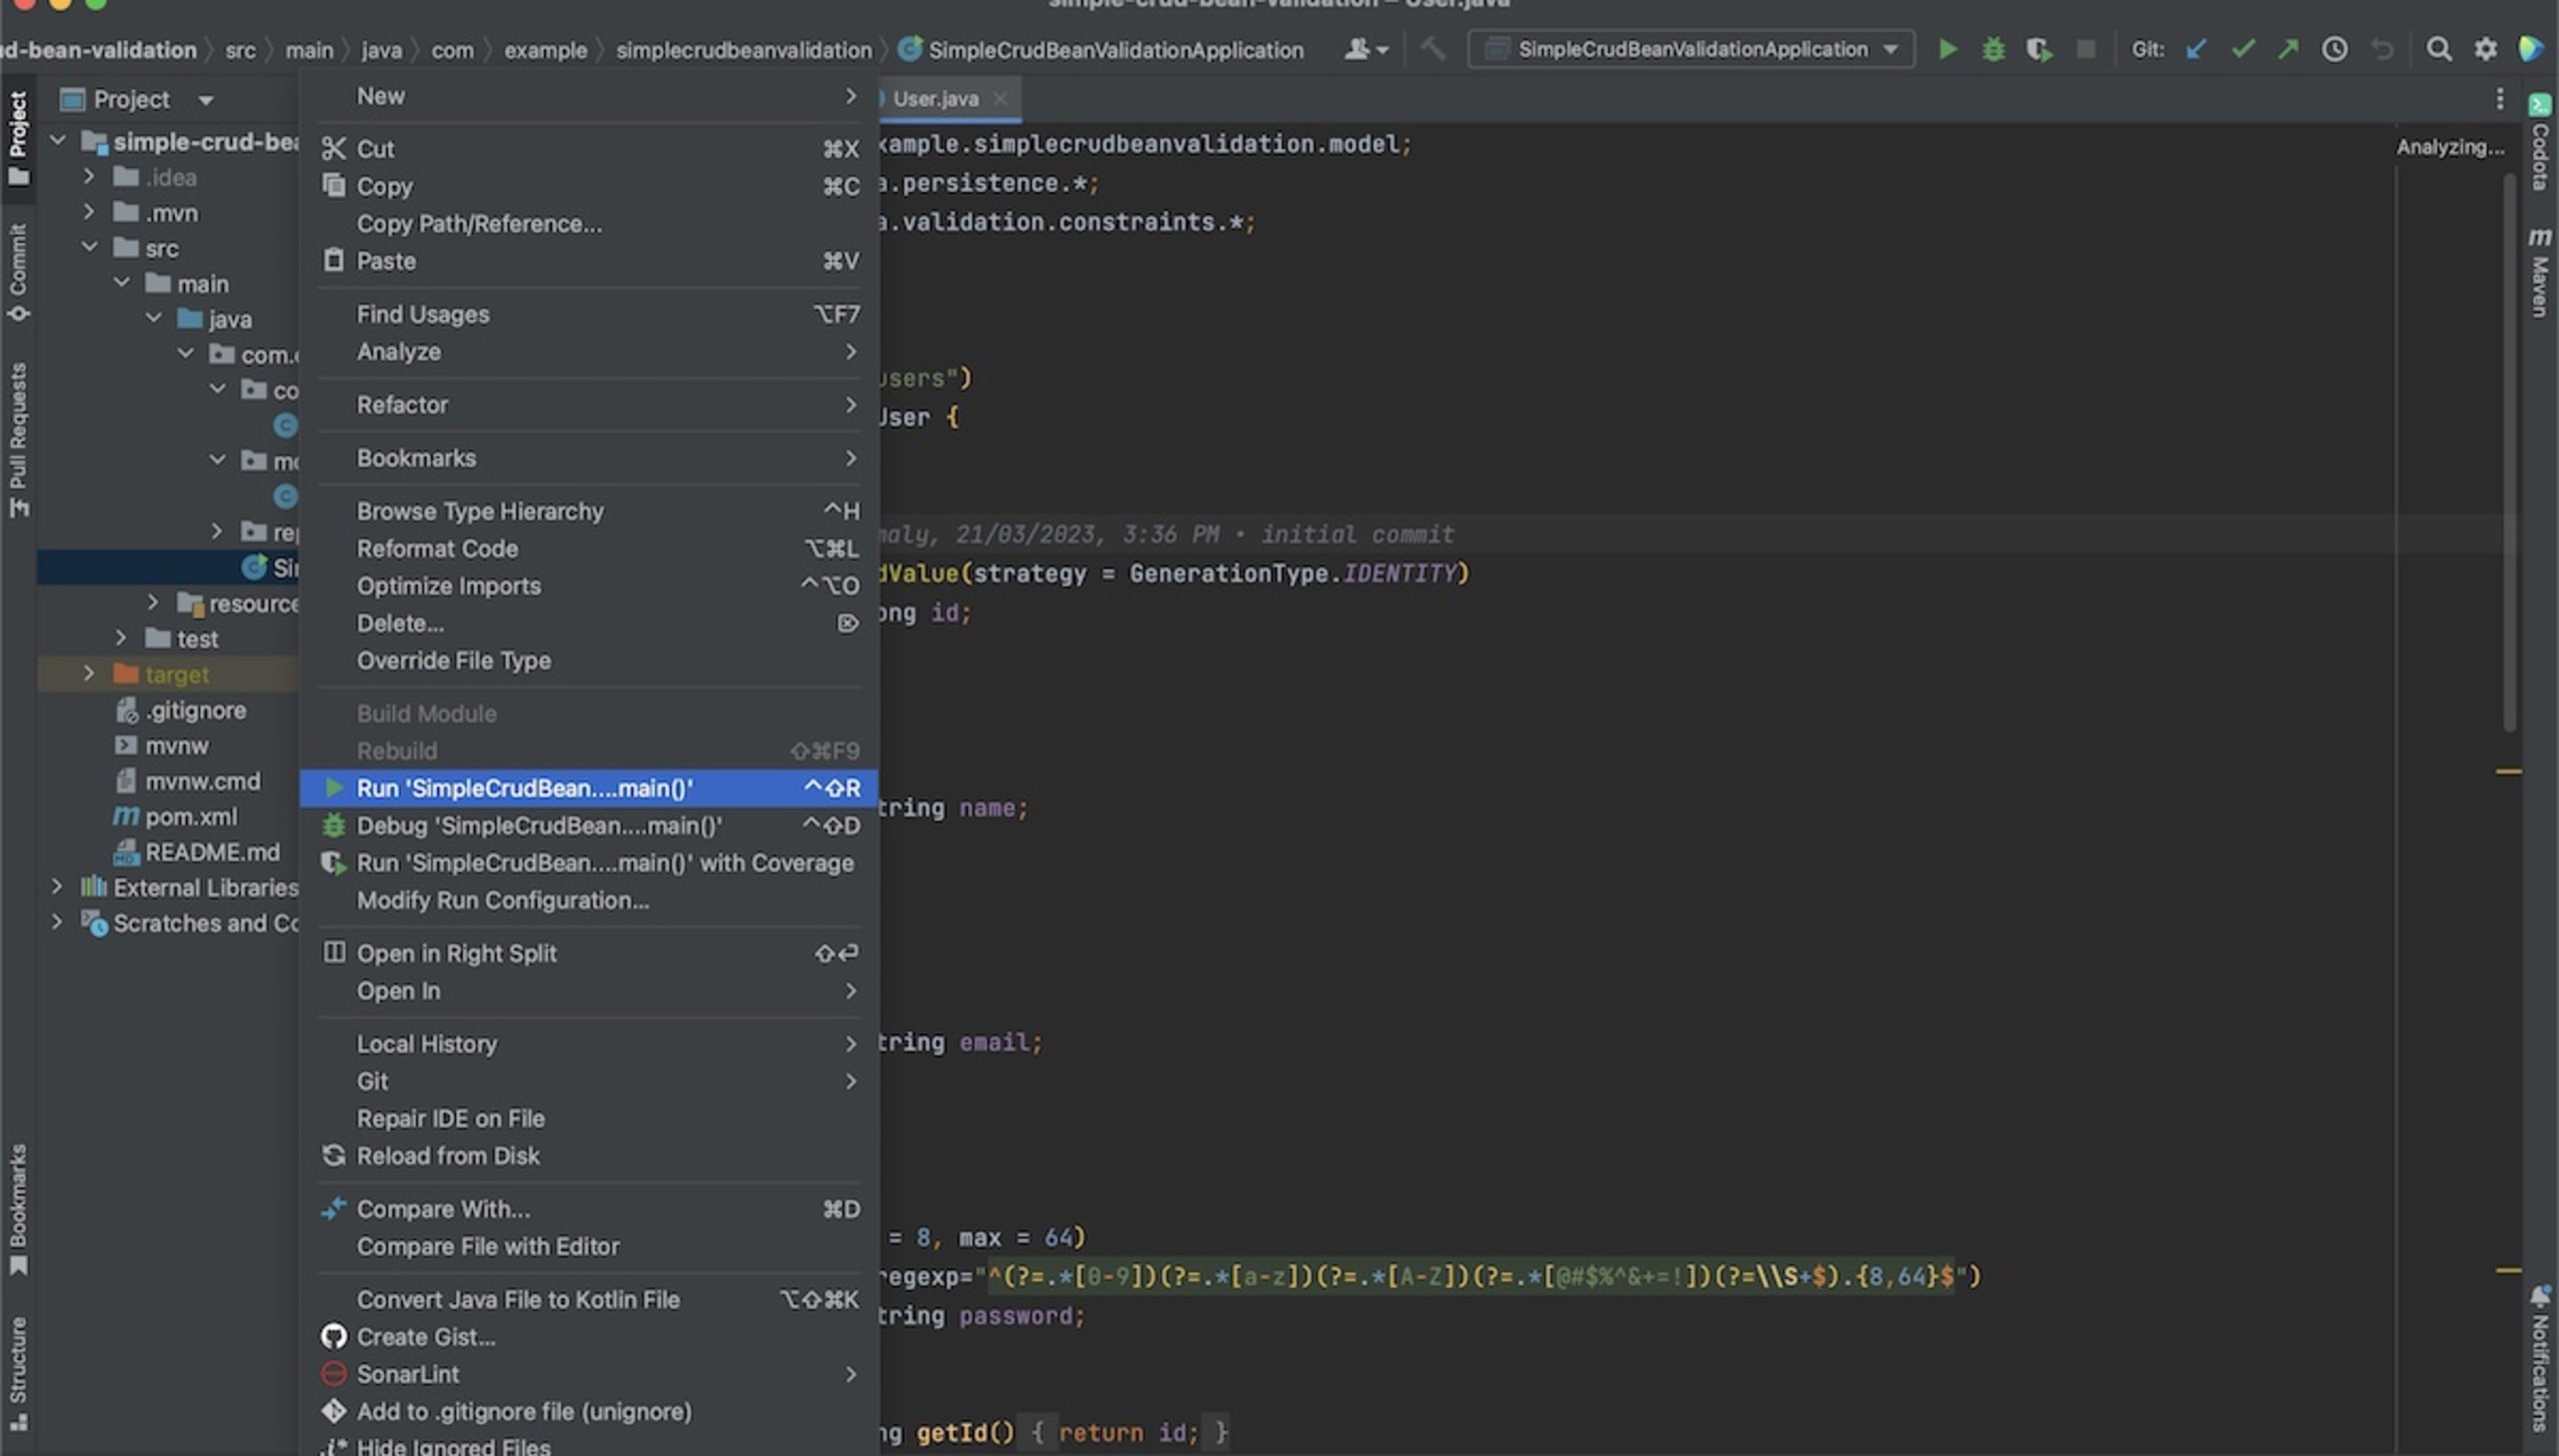
In IntelliJ, right-click your SimpleCrudBeanValidationApplication.java file and select Run 'SimpleCrudBeanValidationApplication.main()':
Alternatively, you can run your application in the terminal or shell by using the following commands:
After starting the Spring Boot application, the CRUD operations can be tested using curl commands from the terminal or shell, which is similar to how a frontend application or Postman would call these APIs.
To test the CRUD operations, begin by creating a user:
Your output looks like this:
Then get all your users:
Your output looks like this:
Next, get your user by ID. Replace <id> with the ID of the user you want to retrieve:
The following is the output:
Update the user by replacing <id> with the ID of the user you want to update:
Your output looks like this:
Then, delete a user by replacing <id> with the ID of the user you want to delete:
The output of this command is empty.
Using these curl commands, you can test the CRUD operations of your User RESTful API. Remember to replace <id> with the appropriate user ID in each command. By following these steps, you can interact with your Spring Boot application and verify that the Bean Validation constraints are functioning as expected during runtime.
If you attempt to run these curl requests again with incorrect entries, such as an invalid email, password, or empty values, you will find that the API returns a bad request error. This error message indicates that the validation performed on the controller level, also known as Bean Validation, did not pass.
Let's look at some examples of bad requests. Here, you create a user with an invalid email address:
Your output looks like this:
And here, you create a user with an invalid password:
The following is the output:
Concluding our validation
In this article, you learned how to implement Spring Boot Bean Validation in a simple CRUD application. You created a project using Spring Initializr, added necessary dependencies, and implemented a user model with Bean Validation annotations. You also implemented a UserRepository and a UserController with RESTful API endpoints that utilize Bean Validation and wrote tests to verify that the Bean Validation constraints are working as expected.
To further improve the security of your application, use Snyk Code, a SAST that detects insecure code patterns that can lead to injection attacks. You can use the Snyk Security plugin for IntelliJ IDE extension to integrate this analysis into your development workflow.
Now that you understand how Spring Boot Bean Validation works, you can implement it in your own projects, ensuring data integrity and improving user experience. To explore the completed code, please visit the following GitHub repository.
Get started in capture the flag
Learn how to solve capture the flag challenges by watching our virtual 101 workshop on demand.