10 best practices to build a Java container with Docker

August 24, 2022
0 mins readEditor's note
This blog was originally published on February 18, 2021, but has been updated for currency.
So, you want to build a Java application and run it inside a Docker image? Let me help you out with this one!
This cheat sheet provides you with best practices for building a production-grade Java container. In the example Java container we’ll build using these guidelines, and we will focus on creating an optimized, secure Java container for your application. This cheat sheet is a guide you can use when creating a Java container with Docker, but also when reviewing other people’s code. In both instances, it is important to focus on optimizing and securing the Docker image you want to put in production.
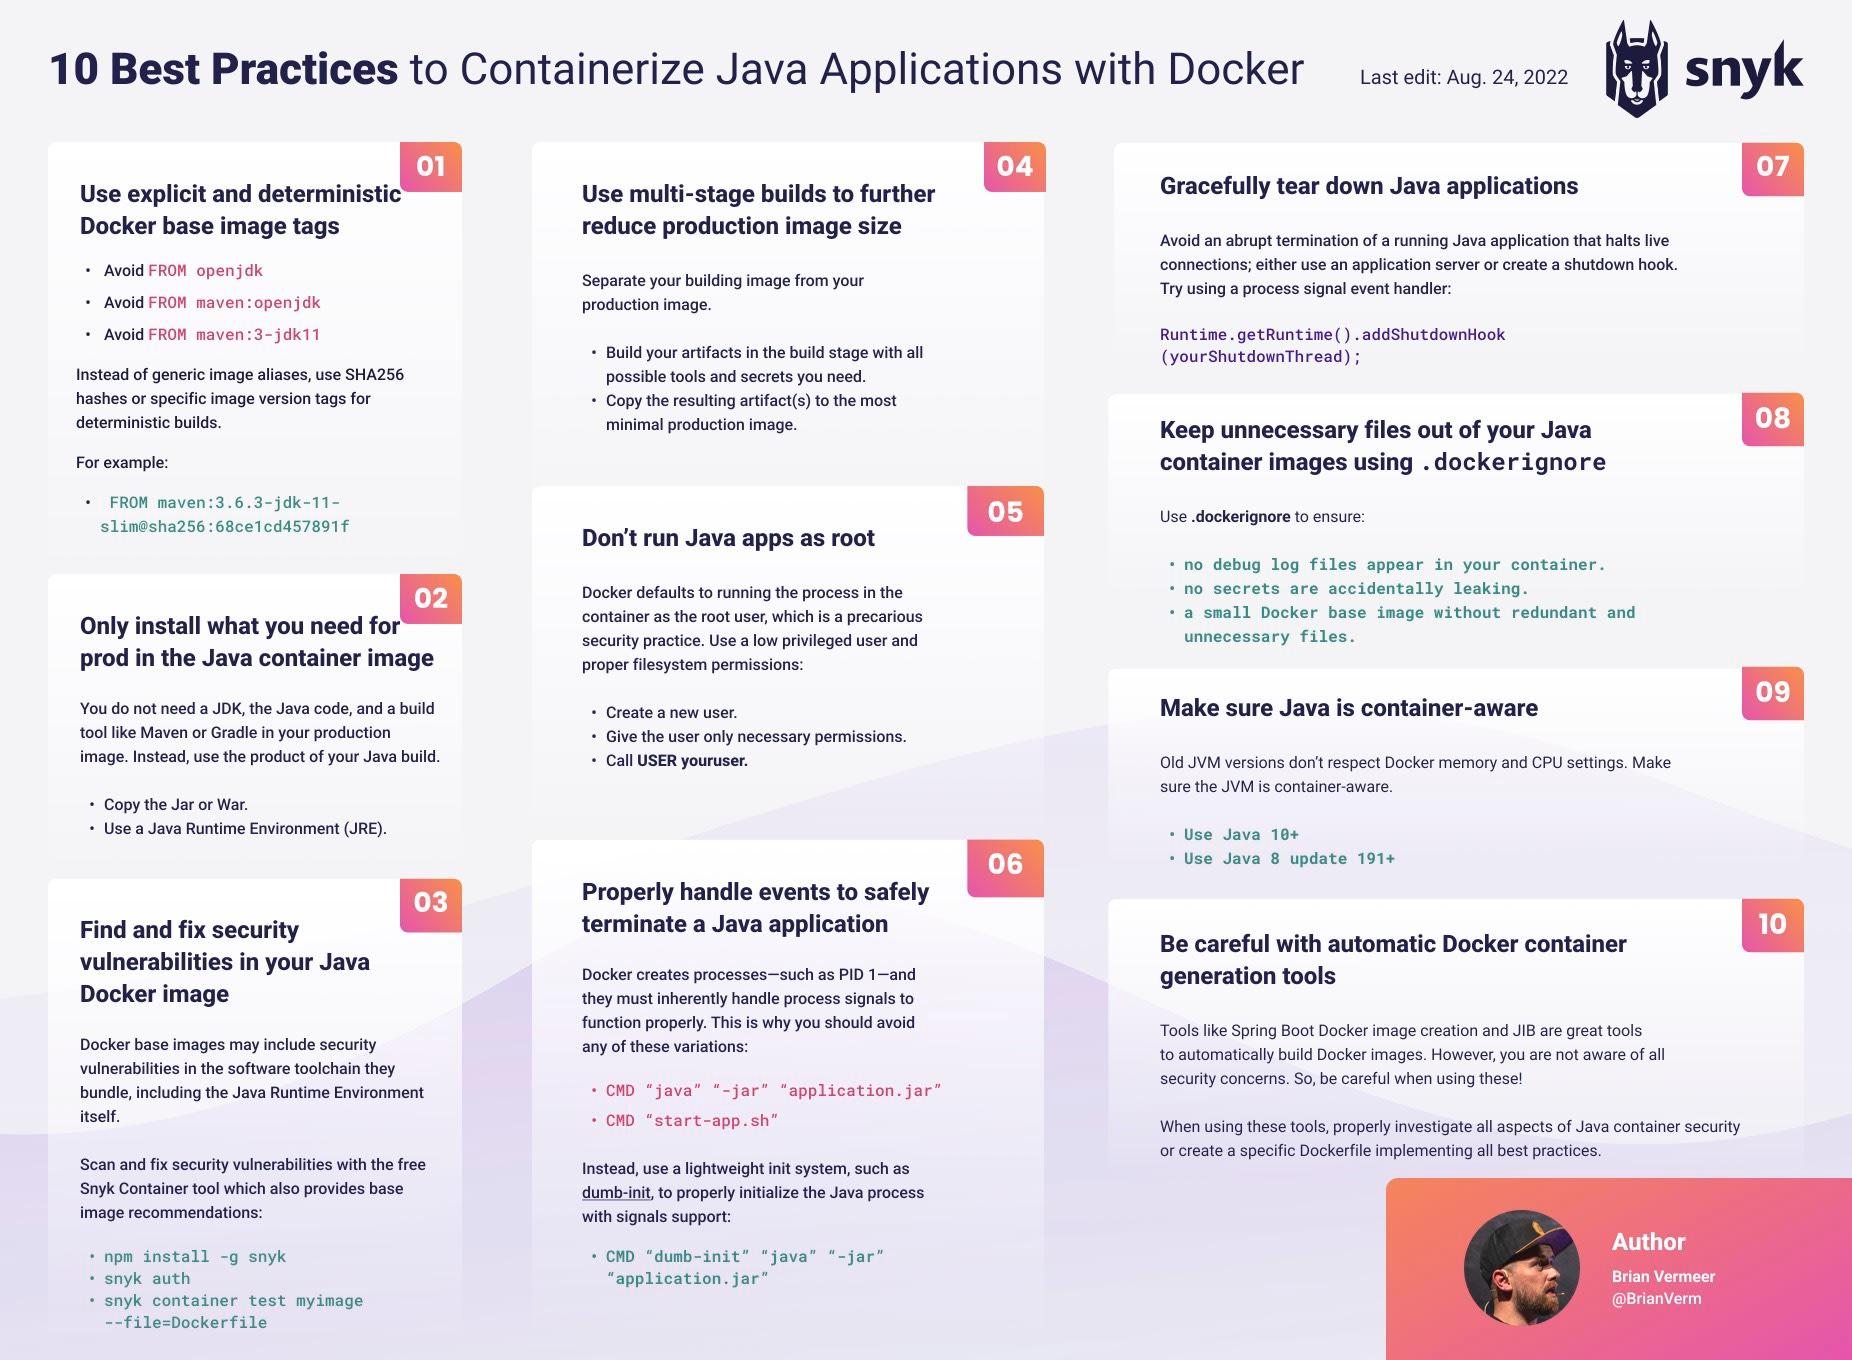
Ten best practices
Use explicit and deterministic Docker base image tags ("latest" is not a version!)
Only install what you need for production in the Java container image
Find and fix security vulnerabilities in your Java Docker image
Use multi-stage builds to further reduce production image size
Don’t run Java apps as root
Properly handle events to safely terminate a Java application
Gracefully tear down Java applications
Keep unnecessary files out of your Java container images using
.dockerignoreMake sure Java is container-aware
Be careful with automatic Docker container generation tools
Developer-first container security
Snyk finds and automatically fixes vulnerabilities in container images and Kubernetes workloads.
How NOT to build a Java container image
Let’s start with a simple Dockerfile for a Java application created with Maven. In many articles, we see something similar when building a Java container, like the example below:
Most blog articles start and finish along the lines of the following basic Dockerfile instructions for building Java Docker images:
FROM maven
RUN mkdir /app
WORKDIR /app
COPY . /app
RUN mvn clean install
CMD "mvn" "exec:java"
Copy that to a file named Dockerfile, then build and run it.
$ docker build . -t java-application
$ docker run -p 8080:8080 java-application
It’s simple and it works. However, this image is full of mistakes! Not only should we be aware of how to use Maven properly, but we should avoid building Java containers like the example above, by all means.
Let’s improve this Dockerfile and optimize it step by step to have an efficient and secure Docker image for your Java application.
1. Use explicit and deterministic Docker base image tags
When building a Java container image with Maven, it seems obvious that you base your image on the Maven image — you can easily pull this from Dockerhub and get started. However, are you fully aware of what you are actually pulling in when using this base image? You can reference a Docker image by its tag, but by not giving any tag you will get referred to the implied latest tag.
This might seems like an interesting feature, but there are some potential problems with this strategy of taking the default Maven image:
FROM mavenThis might seems like an interesting feature, but there are some potential problems with this strategy of taking the default Maven image:
Your Docker builds are not idempotent
This means that when you rebuild the result can be totally different. The latest images today can be different from the latest image tomorrow or next week. Looking at this the versions of Maven and the JDK you are building your image upon can be upgraded. This means that the bytecode of your application is different and might cause unexpected results. When rebuilding an image we would like to have reproducible deterministic behavior.
The Maven Docker image is based on a full operating system image
This results in many additional binaries ending up in your eventual production image. A lot of these binaries are not needed to run your application. But having them as part of the Java container image has some downsides:
A larger image size results in longer download and rebuild times.
The extra binaries can introduce security vulnerabilities. Every binary that contains a vulnerability is a potential security risk you do not want to add to your system.
The maven:latest image is quite large and is routinely based on versions of Maven and OpenJDK that will change in a matter of months, weeks, or even days.
Here’s how to mitigate this:
Use the smallest possible base image that fits your needs. Think about it — do you need a full operating system including all the extra binary to run your program? If not, maybe a smaller image like a
debian-slimor even analpineimage works just as well as a full Debian image.Be very specific about the images. If you use a specific image version, you can already control and predict certain behavior. If you use the image
maven:3.6.3-jdk-11-slimyou can be sure that you are using JDK 11 and Maven 3.6.3. The 6 months JDK update cycle will no longer impact the behavior of the Java container. To be even more precise, you can use theSHA256hash of the image. Specifying the hash will ensure you have the exact same base image every time you rebuild your image.
Let’s update our Dockerfile with that knowledge:
FROM maven:3.6.3-jdk-11-slim@sha256:68ce1cd457891f48d1e137c7d6a4493f60843e84c9e2634e3df1d3d5b381d36c
RUN mkdir /app
WORKDIR /app
COPY . /app
RUN mvn clean package -DskipTests
For more information about choosing secure container images, check out our container security guide.
2. Only install what you need for production in the Java container image
The following command builds your Java program — including all its dependencies — in the container. This means that both the source code and your build system are part of the production Java container.
RUN mvn clean package -DskipTestsJava is a compiled language. This means that we only need the artifact that is created by your build environment, not the code itself. This also means that the build environment should not be part of your production container.
To run a Java image we also don’t need a full JDK, a JRE is enough. So, essentially, we need to build an image with a JRE and the compiled Java artifact if it is a runnable JAR.
Build your program in your CI pipeline using Maven (or Gradle) and copy the JAR to your production image, like in the updated Dockerfile below:
FROM openjdk:11-jre-slim@sha256:31a5d3fa2942eea891cf954f7d07359e09cf1b1f3d35fb32fedebb1e3399fc9e
RUN mkdir /app
COPY ./target/java-application.jar /app/java-application.jar
WORKDIR /app
CMD "java" "-jar" "java-application.jar"
3. Find and fix security vulnerabilities in your Java container Docker image
We are already using a small image for my Docker Java container. However, I do not know if the binaries in this base image contain problems. Let’s use the Snyk CLI to test our Docker image. You can sign up for a free Snyk account to follow along.
You can install the CLI using npm, brew, scoop, or download the latest binary from GitHub. In this example, we’ll use npm to install, and authenticate with our free account:
$ npm install -g snyk
$ snyk auth
$ snyk container test openjdk:11-jre-slim@sha256:31a5d3fa2942eea891cf954f7d07359e09cf1b1f3d35fb32fedebb1e3399fc9e --file=Dockerfile`
With the snyk container test, we can test any Docker image we want. Additionally, we can also add the Dockerfile for better remediation advice.
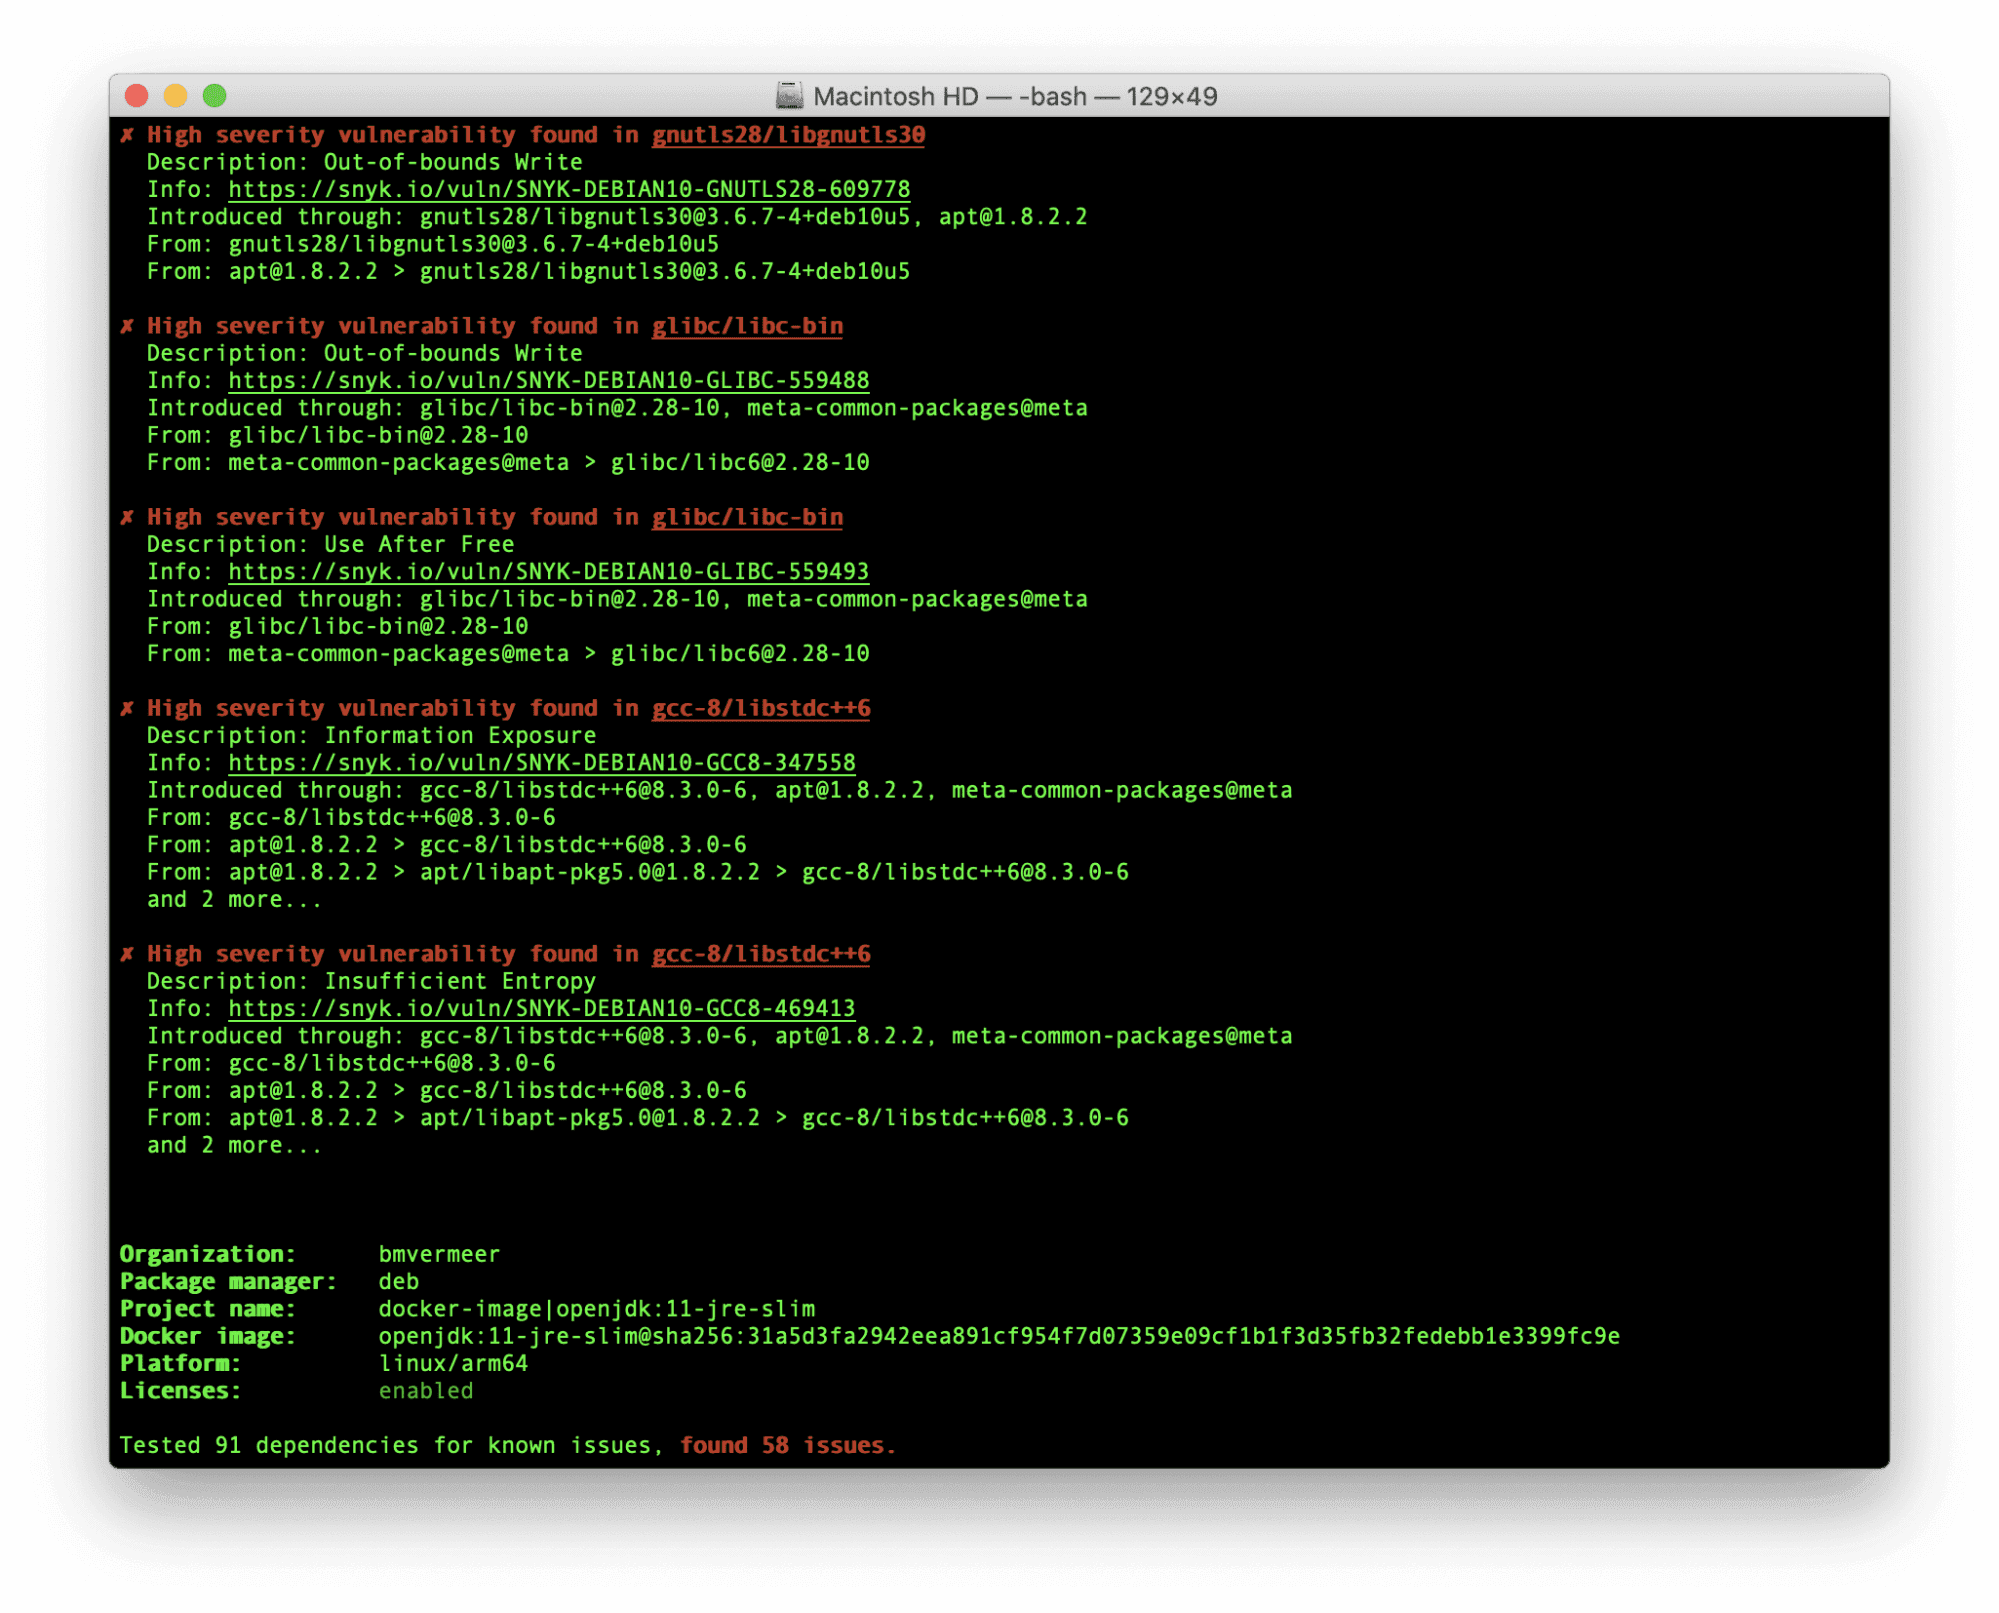
Snyk found 58 security issues in this base image. Most of them are related to binaries that ship with the Debian Linux distribution.
Based on this information, we will switch the base image to an alpine-based openjdk11:JRE image provided by adoptopenjdk, specifying the specific SHA to be more concrete.
FROM adoptopenjdk/openjdk11:jre-11.0.9.1_1-alpine@sha256:b6ab039066382d39cfc843914ef1fc624aa60e2a16ede433509ccadd6d995b1fWhen testing this version with snyk container, it shows no known vulnerabilities for this base image.
In a similar way, you can test your Java application by executing snyk test at the root of your project. I advise you to test both your application and the created Java container image while developing on your local machine. Next to that, automate the same test for both the image and your application in your CI pipeline.
Also, remember that new vulnerabilities will be discovered over time. Once a new vulnerability is identified you probably want to get notified.
Using snyk monitor for your application and snyk container monitor for your Docker images will help you with that. By monitoring the version that is currently in production, you will be able to act appropriately when new security issues are found.
Alternatively, you can also connect your Git repository to Snyk, so we can help find and remediate vulnerabilities in that part of your SDLC.
Let’s update our current Dockerfile:
FROM adoptopenjdk/openjdk11:jre-11.0.9.1_1-alpine@sha256:b6ab039066382d39cfc843914ef1fc624aa60e2a16ede433509ccadd6d995b1f
RUN mkdir /app
COPY ./target/java-application.jar /app/java-application.jar
WORKDIR /app
CMD "java" "-jar" "java-application.jar"
Check out our guide for more information about scanning Docker containers for vulnerabilities.
4. Use multi-stage builds for your Java container
Earlier in this article, we explained that we do not need to build our Java application in a container — we only need the product of that build. However, in some cases, it is convenient to build our application as a part of the Docker image build process.
Luckily we can separate the creation of your Docker image into multiple stages. We can create a build image using all the tools we need to build our application, and then create a second stage where we create the actual production image, containing only the parts we need to run in production.
FROM maven:3.6.3-jdk-11-slim@sha256:68ce1cd457891f48d1e137c7d6a4493f60843e84c9e2634e3df1d3d5b381d36c AS build
RUN mkdir /project
COPY . /project
WORKDIR /project
RUN mvn clean package -DskipTests

FROM adoptopenjdk/openjdk11:jre-11.0.9.1_1-alpine@sha256:b6ab039066382d39cfc843914ef1fc624aa60e2a16ede433509ccadd6d995b1f
RUN mkdir /app
COPY --from=build /project/target/java-application.jar /app/java-application.jar
WORKDIR /app
CMD "java" "-jar" "java-application.jar"
Prevent sensitive information leaks
When you are creating Java applications and Docker images it is likely that you need to connect to a private maven repository. Normally, these go in your settings.xml on your local machine or build environment. When using multi-stage builds you can safely copy the settings.xml to your building container. The settings with the credentials will not end up in your production image. Also, if you need to use credentials as command line arguments, you can safely do this in the build image. This will not end up in the production image.
With multi-stage builds you can create multiple stages and only copy the result to your final production images. Separating the concerns of code compilation and image construction allows you to focus on only deploying what's necessary to run the application in the final container image and ensures you won't be leaking source code, compilers, or other content into your deployed environments.
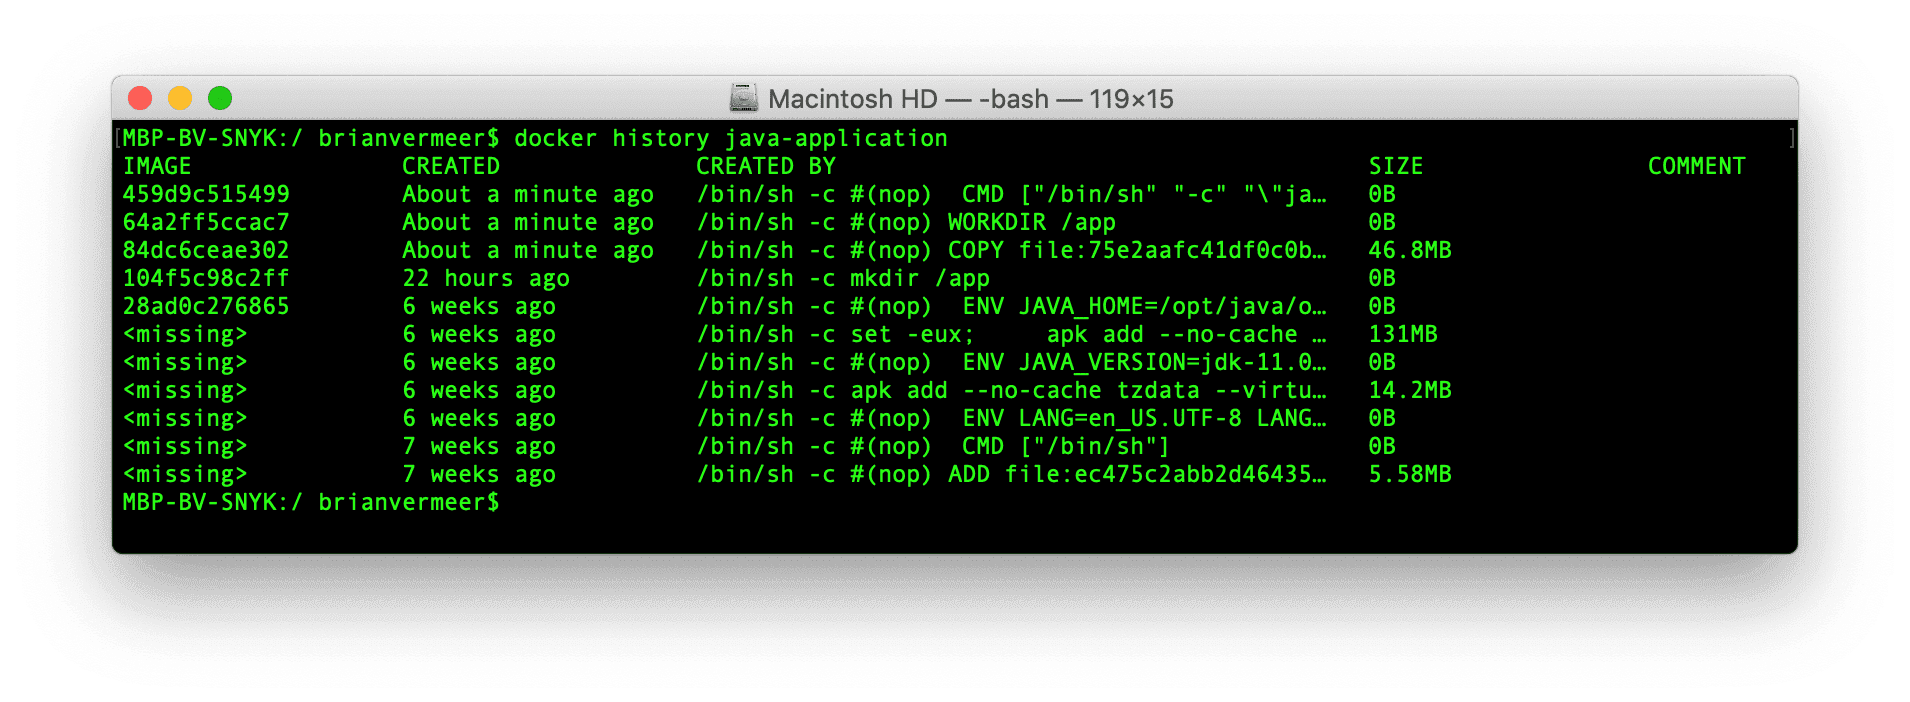
Oh, by the way, take a look at the docker history output for the created Java container image:
$ docker history java-applicationThe output only shows information from the production container image, not the build image.
5. Don’t run containers as root
When creating a Docker container, you should apply the least privilege principle as part of your Java container security (ie. only the privileges they actually need). If for some reason an attacker is able to penetrate your application you don’t want them to be able to access everything.
Having multiple levels of security helps you decrease the potential damage an attacker can cause whenever your system is compromised. Therefore, you must be certain that you do not run your application as the root user.
There is only one issue here. When creating a Docker container, by default, you will run it as root. Although this is convenient for development, you do not want this in your production images. Suppose, for whatever reason, an attacker has access to a terminal or can execute code. In that case, it has significant privileges over that running container, as well as potentially accessing host filesystems via filesystem bind mounts with inappropriately high access rights.
The solution is pretty straightforward. Check the documentation for your base image and, if it already includes a lower-privilege user, simply use it by adding a USER line to your Dockerfile with that user. Otherwise, create a specific user with limited privileges to run your application and use that. Just be sure to test that the user can run the application.
Let’s update our Dockerfile accordingly — notice that we only worry about the user when working in the second part of the multi-stage container build.
FROM maven:3.6.3-jdk-11-slim@sha256:68ce1cd457891f48d1e137c7d6a4493f60843e84c9e2634e3df1d3d5b381d36c AS build
RUN mkdir /project
COPY . /project
WORKDIR /project
RUN mvn clean package -DskipTests

FROM adoptopenjdk/openjdk11:jre-11.0.9.1_1-alpine@sha256:b6ab039066382d39cfc843914ef1fc624aa60e2a16ede433509ccadd6d995b1f
RUN mkdir /app
RUN addgroup --system javauser && adduser -S -s /bin/false -G javauser javauser
COPY --from=build /project/target/java-application.jar /app/java-application.jar
WORKDIR /app
RUN chown -R javauser:javauser /app
USER javauser
CMD "java" "-jar" "java-application.jar"
Note: Another way to run as a different user is to specify that user on the command line or in your orchestrator configuration. For example, the Docker cli run command has a -u parameter for this purpose and Kubernetes Pod specifications offer the same setting via the SecurityContext:runAsUser field, but, specifying it in the build spec makes it repeatable.
6. Properly handle events to safely terminate a Java Docker web application
In many examples, we see the common mistake of using the build environment to startup the containerized Java application.
Although we already discussed why we should be including Maven or Gradle in our Docker Java container, there are other reasons to avoid things like these:
CMD “mvn” “exec:java”CMD [“mvn”, “spring-boot run”]CMD “gradle” “bootRun”CMD “run-app.sh”
When running an application in Docker, the first application will run as process ID 1 (PID 1). The Linux kernel treats PID 1 in a special way. Typically, the process on PID 1 is the init process. If we run our Java application using Maven, how can we be sure that Maven forwards signals like SIGTERM to the Java process? We don’t!
If instead you run your Docker container like in the example below, your Java application will have PID 1, ensuring that signals are passed correctly.
CMD "java" "-jar" "application.jar"Note that docker kill ... and docker stop ... commands only send signals to the container process with PID 1. If you’re running a shell script that runs your Java application, then take note that a shell instance — such as /bin/sh — doesn’t forward signals to child processes, which means your app will never get that SIGTERM.
Important to know is that in Linux, PID 1 also has some additional responsibilities as well. They are described very nicely in the article Docker and the PID 1 zombie reaping problem. There are cases you don’t want to be PID 1 because you don’t know how to deal with these problems. A great solution would be to use dumb-init.
RUN apk add dumb-init
CMD "dumb-init" "java" "-jar" "java-application.jar"
When you run your Docker container like this, dumb-init occupies PID 1 and takes care of all the responsibilities. Your Java process doesn’t have to take care of that anymore.
Our updated Dockerfile now looks something like this:
FROM maven:3.6.3-jdk-11-slim@sha256:68ce1cd457891f48d1e137c7d6a4493f60843e84c9e2634e3df1d3d5b381d36c AS build
RUN mkdir /project
COPY . /project
WORKDIR /project
RUN mvn clean package -DskipTests

FROM adoptopenjdk/openjdk11:jre-11.0.9.1_1-alpine@sha256:b6ab039066382d39cfc843914ef1fc624aa60e2a16ede433509ccadd6d995b1f
RUN apk add dumb-init
RUN mkdir /app
RUN addgroup --system javauser && adduser -S -s /bin/false -G javauser javauser
COPY --from=build /project/target/java-code-workshop-0.0.1-SNAPSHOT.jar /app/java-application.jar
WORKDIR /app
RUN chown -R javauser:javauser /app
USER javauser
CMD "dumb-init" "java" "-jar" "java-application.jar"
7. Graceful tear down for your Java web applications
When your application receives a signal to shut down, we ideally want everything to shut down gracefully. Depending on how you develop your application, an interrupt signal (SIGINT) or CTRL + C may cause an instant process kill.
This might not be something that you want, since things like these can cause unexpected behavior or even loss of data.
When you are running your application as part of a web server like Payara or Apache Tomcat, the web server will most likely take care of a graceful shutdown. The same might hold for certain frameworks that you can use to build a runnable application. Spring Boot, for instance, has an embedded Tomcat version that effectively takes care of the shutdown.
When you create a standalone Java application or manually create a runnable JAR you have to take care of these interrupt signals yourself.
The solution is quite simple. You can add a shutdown hook to runtime, like in the example below. Once a signal like SIGINT is received, a new Thread will be started that can take care of a graceful shutdown.
Runtime.getRuntime().addShutdownHook(new Thread() {
   @Override
   public void run() {
       System.out.println("Inside Add Shutdown Hook");
   }
});
Admittedly, this is more of a generic web application concern than Dockerfile related, but is even more important in orchestrated environments. Learn more about container orchestration with our guide.
8. Keep unnecessary files out of your Java container images using .dockerignore
To prevent certain files in your (public) Git repository, you can use the .gitignore file. It prevents you from polluting Git repository with unnecessary files. In addition, it is a tool that helps prevent leaking sensitive files to a public repo.
For Docker images, we have something similar — the .dockerignore file. Similar to the ignore file for Git, it ignores the files that match patterns specified in it which prevents unwanted files or directories from getting copied into your Docker image.
Technically, how this works is when a docker build command is started, the CLI tool sends the contents of the build context directory, (by default, this is the directory containing the Dockerfile), to the container runtime and that copy is what is used during the steps defined in the Dockerfile. Any file matching the pattern in the .dockerignore will not get copied over and, thus, will not be available to be included by a COPY or ADD command in the build. This has the added benefit of speeding up builds as that context copy can be made much more quickly if you exclude large directory trees, such as .git. This is especially pronounced if you are building on a Docker engine running on another server across a network connection.
The simplified example used in this article assumes we are working with a single executable JAR. This is by no means the only way to deliver a Java application. In standalone Java applications, it can also be possible that we do not create a fat JAR where all dependencies are embedded inside the artifact. Depending on the context, we might need to copy complete directories with JARs our application depends on, or other files. We do not want sensitive information to slip into our Docker images by accident. Especially not if we publish these images publically.
Here’s an example of a .dockerignore:
.dockerignore
**/*.log
Dockerfile
.git
.gitignore
The benefits of using the .dockerignore file are:
Skips dependencies you use for testing purposes only.
Saves you from secrets exposure, such as credentials in the contents of
.envoraws.jsonfiles making their way into the Java Docker image. Note that debug log files might also contain secrets of sensitive information that you don’t want to expose.Keeps your Docker image nice and clean, essentially, making your images smaller. Next to that, it helps prevent unexpected behavior.
Speeds docker build operations by shrinking the size of the build context directory that has to be copied.
9. Make sure Java is container-aware
The Java Virtual Machine (JVM) is an amazing thing. It tunes itself based on the system it runs on. There is behavior-based tuning that dynamically optimizes the sizes of the heap. However, in older versions, like Java 8 and Java 9, the JVM did not recognize CPU limits or memory limits set by the container. The JVM of these older Java versions saw the whole memory and all CPUs available on the host system. Basically, the Docker group settings are ignored.
With the release of Java 10, the JVM now is container-aware and recognizes the constraints set by the containers. The feature UseContainerSupport is a JVM flag and is set to active by default. This container awareness feature released in Java 10 is backported to Java-8u191.
For versions older than Java 8, you can manually try to restrict the heap size with the -Xmx flag but that is a painful exercise. Next to that, the heap size is not equal to the memory Java uses. For Java-8u131 and Java 9, the container awareness feature is experimental and you actively have to activate the experimental JVM options and the memory limit flag.
-XX:+UnlockExperimentalVMOptions
-XX:+UseCGroupMemoryLimitForHeap
Your best choice is to update to a newer version of Java — beyond 10 — in order to have container support activated by default. Unfortunately, many companies are still relying heavily on Java 8. This means you should either update to a more recent version of Java in your Docker images, preferably the latest LTS version, or make sure that you use at least Java 8u191, or higher.
All this doesn’t sound specific to Java container security, does it? However, if you think about it, availability is one of the three attributes in the information security CIA triad.
10. Be careful with automatic Docker container generation tools
When scrolling the internet, you will probably stumble upon great tools and plugins for your build system. Along with these plugins there are some great tools that can help you create Docker Java containers and even automatically publish them, if you like.
From a developer perspective, this looks amazing as you don’t have to focus on maintaining Dockerfiles next to creating the actual application.
An example of such a plugin is JIB. We only have to configure the build plugin, like seen below, and call mvn jib:dockerBuild:
<plugin>
   <groupId>com.google.cloud.tools</groupId>
   <artifactId>jib-maven-plugin</artifactId>
   <version>2.7.1</version>
   <configuration>
       <to>
           <image>myimage</image>
       </to>
   </configuration>
</plugin>
It will build a Docker image with the specified name without any hassle.
Something similar can be done with Spring Boot when using version 2.3 and up, by calling the mvn target:
mvn spring-boot:build-imageIn both cases, the system automatically creates a Docker Java container image for me. I must admit that these containers are also relatively small. That is because they are using eclipse-temurin or buildpacks as a base for images. But regardless of the size of your image, how do you know these containers are safe? You need to do a deeper investigation and even then you are not sure if this status is maintained in the future.
Scanning both images with snyk container exposes a couple of vulnerabilities that are related to the base images these two systems are using. Next to that, we do not know if the user privileges are set correctly, among all the other things we already discussed here.
I am not saying you should not use these tools when creating Java Docker images. However, if you are planning to publish these images you should properly investigate all the Java container security aspects. Scanning the container would be a good start. If you do choose to use an alternative tool, be sure to investigate any default settings such as base images and default user and override these with what makes sense for your application. Being explicit about these settings, just as you would be in a Dockerfile, is always a safer decision.
Summary
That last step wraps up this entire guide on securely containerizing Java Docker applications, taking into consideration performance and security-related optimizations to ensure we’re building production-grade Java Docker images!
Follow-up resources that I highly encourage you to review:
Docker for Java Developers: 5 things you need to know not to fail your security
Building Java container images using Jib
Developer-first container security
Snyk finds and automatically fixes vulnerabilities in container images and Kubernetes workloads.
FAQ
How do I check my Java version in a Docker container?
A definitive way to check which version of Java is installed in a Docker container image would be to run the java -version command in it:
docker run --rm -it eclipse-temurin:11 java -version
openjdk version "11.0.16" 2022-07-19
OpenJDK Runtime Environment Temurin-11.0.16+8 (build 11.0.16+8)
OpenJDK 64-Bit Server VM Temurin-11.0.16+8 (build 11.0.16+8, mixed mode)
If the image has an entrypoint set that precludes this, you can override that with the --entrypoint parameter like as shown in this example:
docker run --rm -it --entrypoint java tomcat:8 -version
opnjdk version "17.0.4" 2022-07-19
OpenJDK Runtime Environment Temurin-17.0.4+8 (build 17.0.4+8)
OpenJDK 64-Bit Server VM Temurin-17.0.4+8 (build 17.0.4+8, mixed mode, shareing)
How do I install Java in a Docker container?
The preferred way to install Java in your container images is to use an official base image that contains the version you need. For example:
FROM eclipse-temurin:11.0.16_8-jdk
COPY myapp.jar /myapp.jar
...
How do I change the Java version in a Docker container?
The best way to change which version of Java you are using in your container image is to update the base image to the version you desire. Simply change the FROM line in your Dockerfile to the correct tag for the version you need and re-build the image with an appropriate tag and push it to your image registry. Finally, update your deployment to use this new tag.


