3 best practices to make the most of Snyk AppRisk Essentials
Daniel Berman
19. September 2024
0 Min. LesezeitThousands of our customers are leveraging Snyk to implement their DevSecOps and shift-left strategies. However, with the increasing speed and complexity of applications, we also know it’s harder to stay in sync with development. It is increasingly difficult to maintain a clear view of all the software assets being developed, identify ownership and their importance to the business, and, most importantly, ensure that these assets are properly secured by Snyk.
This is why we’re so excited about rolling out Snyk AppRisk Essentials capabilities to our customers!
Rolling out Snyk AppRisk Essentials to Snyk Enterprise plan
For those who might have missed the headlines, Snyk AppRisk Essentials was announced in December last year as our inaugural Snyk AppRisk offering, providing customers with asset discovery, coverage management, and risk-based prioritization. On May 1 this year, we also announced Snyk AppRisk Pro, which significantly expands upon Snyk AppRisk Essentials to offer runtime visibility into application risk and more holistic application risk management and analytics capabilities.
To help our customers successfully operationalize their “shift-left” motion with Snyk, we’ve now incorporated Snyk AppRisk Essentials’ application discovery and coverage management capabilities within the Snyk Enterprise plan, free of charge.
So if you're an existing Enterprise plan customer of ours, or looking to become one, and would like to understand a bit more about what these capabilities mean to you and how to make use of them, please read on!
Key Snyk AppRisk Essentials capabilities
So what’s included in the package?
The capabilities now available in every Snyk Enterprise plan are all about helping you gain a clearer view of all the application assets being developed so you can ensure they are properly protected by Snyk.
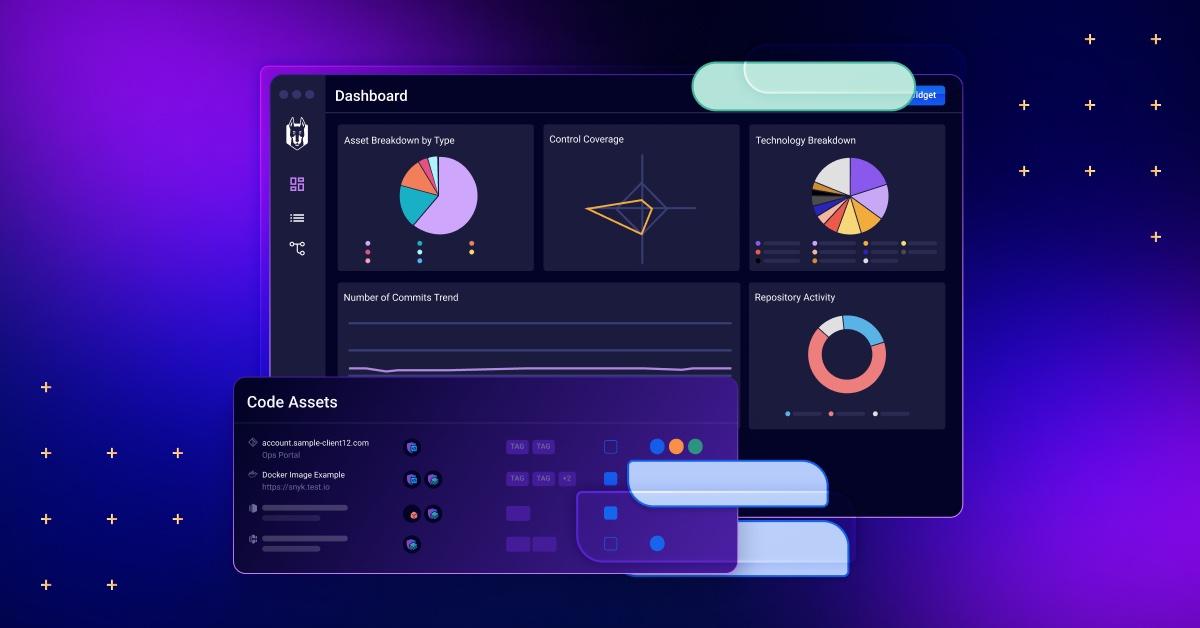
Asset inventory
Snyk customers can now easily gain visibility into the components used to build their apps (we call these “assets”), establish ownership, understand business criticality, and, importantly, determine whether they are being secured or not (we call this “coverage”) by Snyk’s other products — Snyk Open Source, Snyk Code, Snyk Container, and Snyk IaC.
Policies
Snyk customers have access to a brand new category of policies that enable them to automatically manage assets and their coverage by Snyk, as well as trigger additional actions based on various conditions.
Integrations
To improve the visibility of assets and enrich the newly available asset inventory with additional context, Snyk customers have access to a set of new integrations with various tools and platforms used across the SDLC.
To learn more about these new capabilities and familiarize yourself with some of the new concepts they are introducing to the Snyk experience, such as “asset” and “coverage”, please refer to our product documentation.
3 steps to success: rolling out Snyk AppRisk Essentials
Below is our recommended path to success with the new Snyk AppRisk Essentials capabilities.
Every organization is different and so the precise steps might vary depending on your existing setup with Snyk as well as your specific requirements. However, we’ve found that the following basic steps are a common recipe for a successful experience:
Step 1: Connect your SCM(s)
Step 2: Create relevant policies
Step 3: Understand your inventory and coverage
Note: Additional guidance is available in a new and free Snyk AppRisk Essentials product training course in Snyk Learn.
Step 1: Connect your SCM(s)
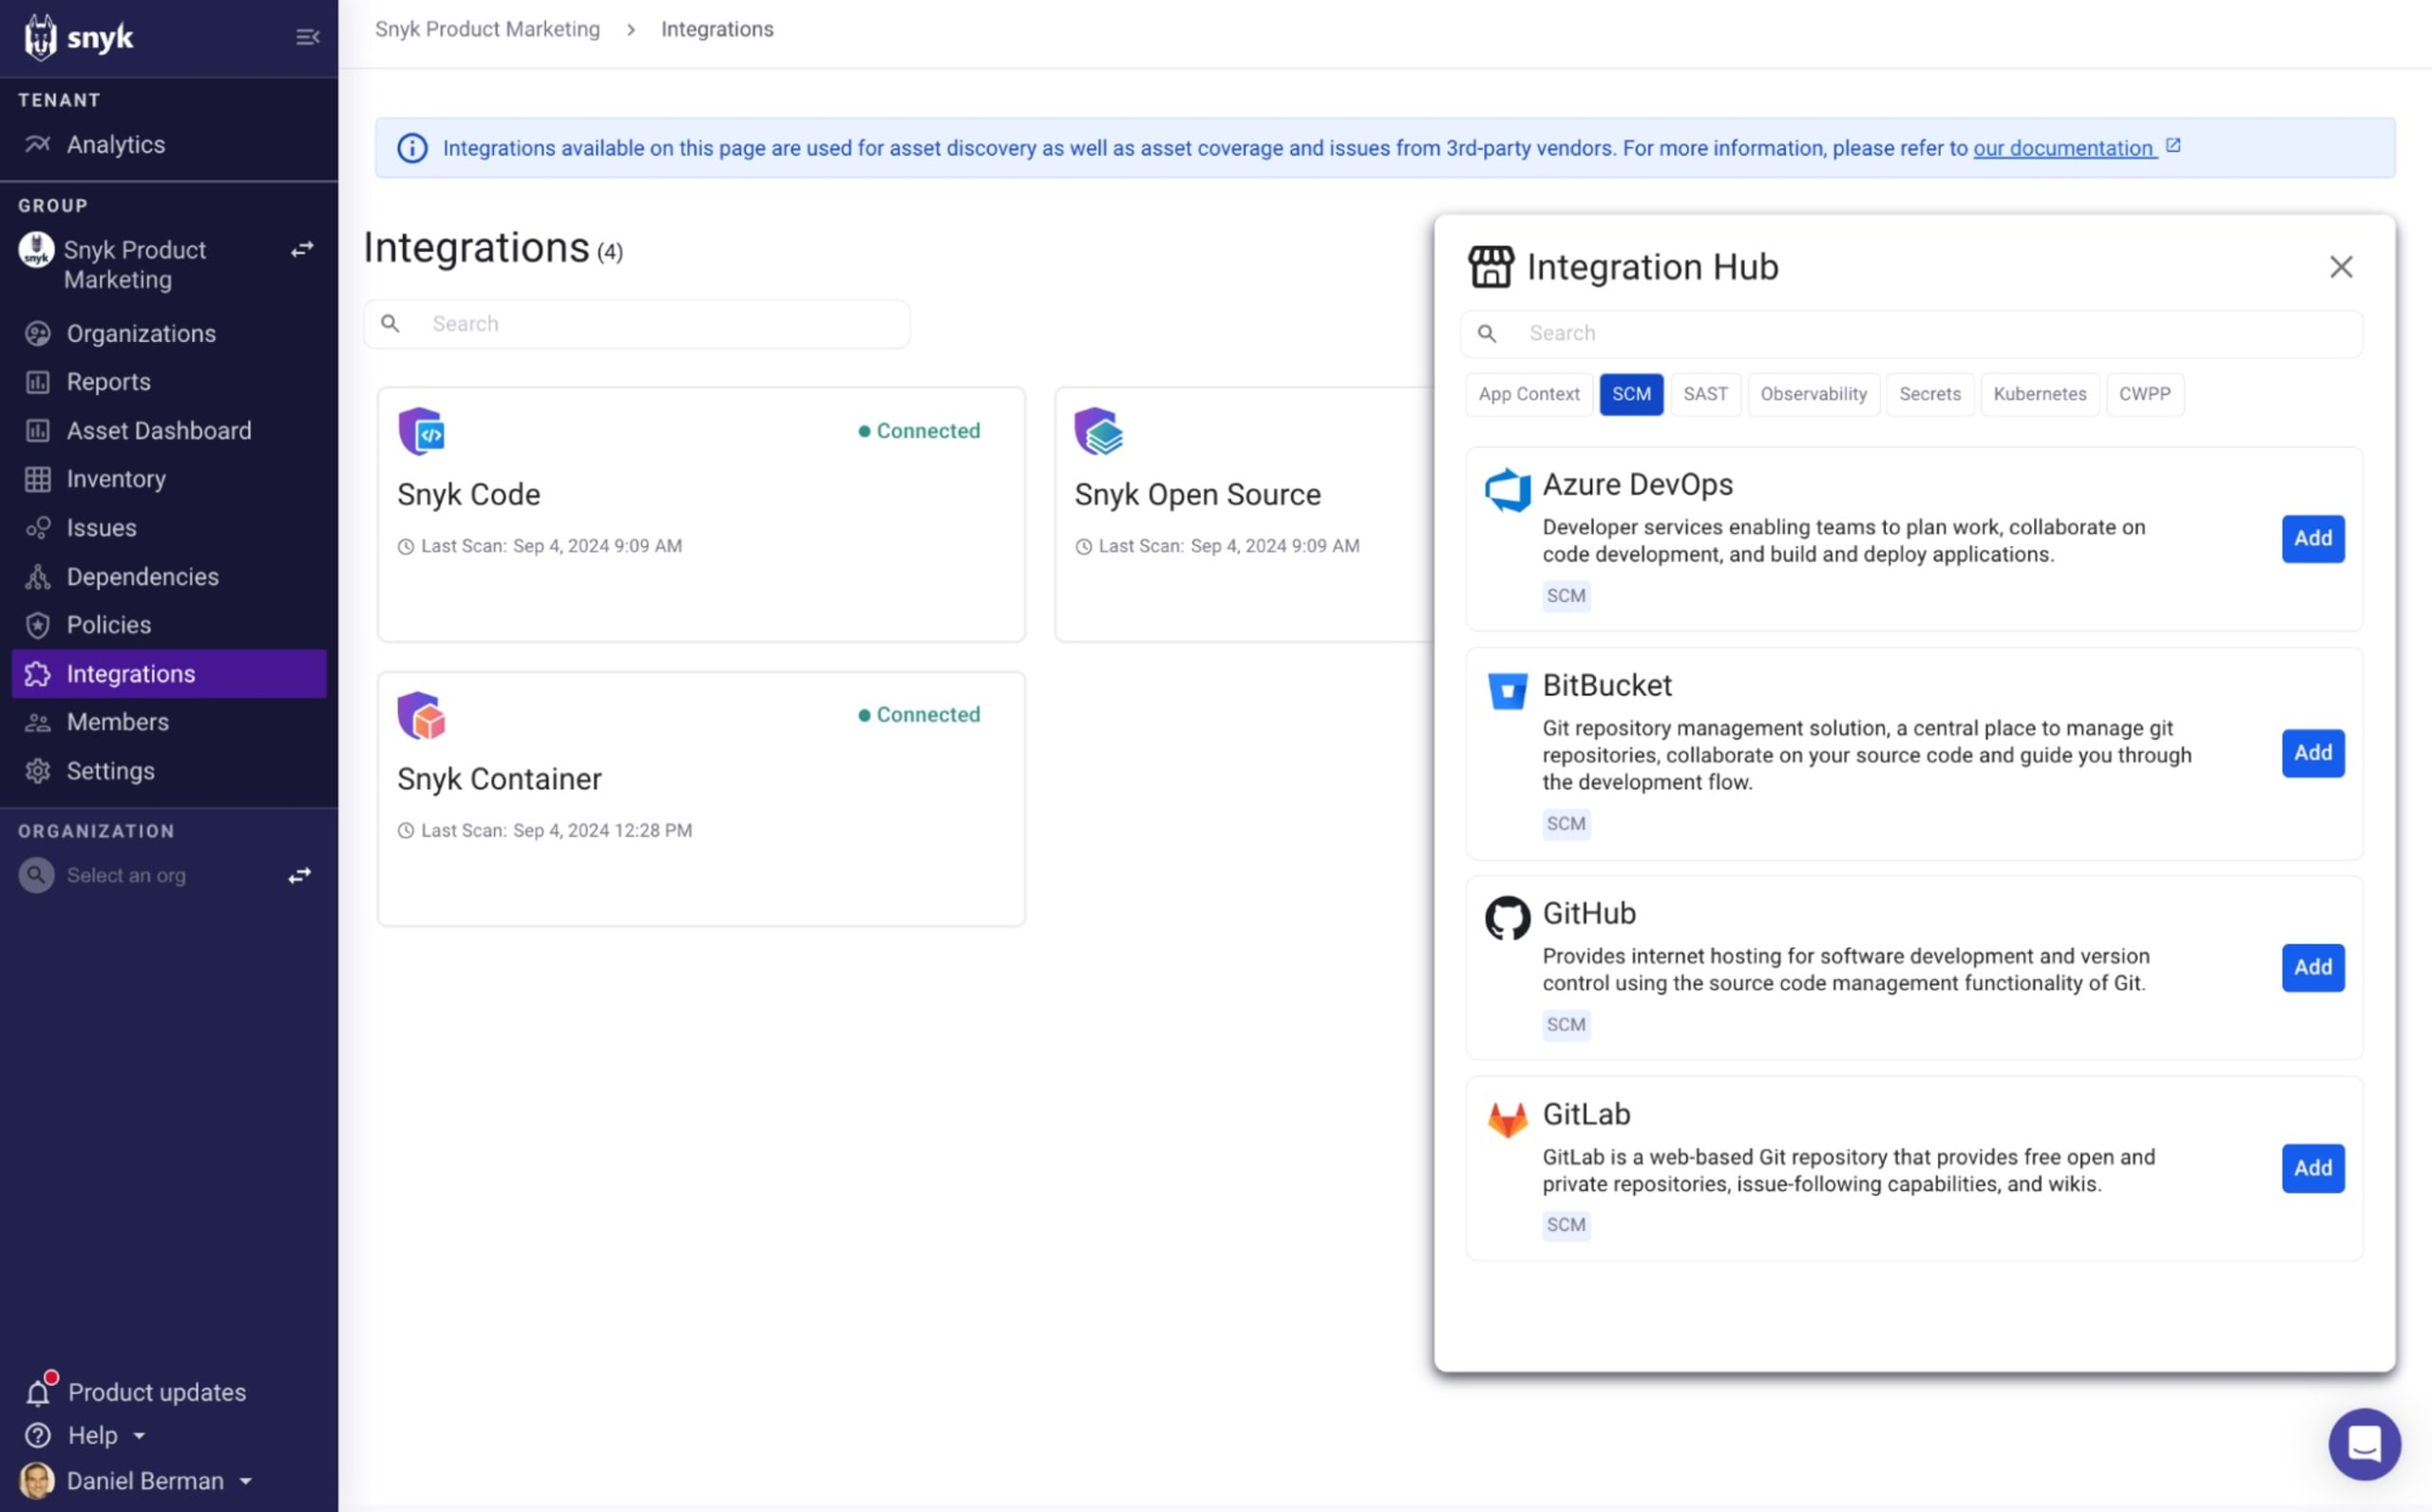
The first step is to set up the Snyk AppRisk SCM integration. Connecting your SCM (Source Code Management) enables Snyk to build the asset inventory.
Why is this important? Put simply, the asset inventory enables you to gain visibility into all the software components in your repositories. What’s being developed, and by whom? Are these assets being scanned by Snyk? Are they being worked on actively, or do they represent dormant parts in your app? Are they important to the business or can they be de-prioritized for the time being? These are some of the questions the asset inventory helps you answer, and connecting Snyk to your SCM — or multiple SCMs if you’re a large organization — is what helps build it.
To connect your SCM, open the Integration Hub on the Integrations page in the Snyk web UI and select the relevant SCM integration. Snyk AppRisk supports GitHub, Bitbucket, GitLab, and Azure DevOps.
Detailed instructions for connecting your SCM with Snyk AppRisk can be found here.
RECOMMENDED: Connect your IDP or Service Catalog
Internal Developer Portals (IDPs) and service catalogs are becoming more and more popular among platform, DevOps, and development teams, streamlining workflows, driving collaboration, and enhancing productivity across the development lifecycle. Acting as a single source of truth about the apps being produced and the development environment, it goes without saying that these tools hold a lot of useful context that can be used to better inventorize apps and understand their significance to the business.
If you are using an IDP or service catalog, we recommend connecting it to Snyk AppRisk as an additional initial step. This further enriches Snyk’s asset inventory and enhances the asset discovery and coverage management experience.
To connect your IDP or service catalog, open the Integration Hub again and select the relevant integration. Snyk AppRisk supports Backstage, ServiceNow CMDB, Atlassian Compass, Datadog Service Catalog, Harness, and OpsLevel.
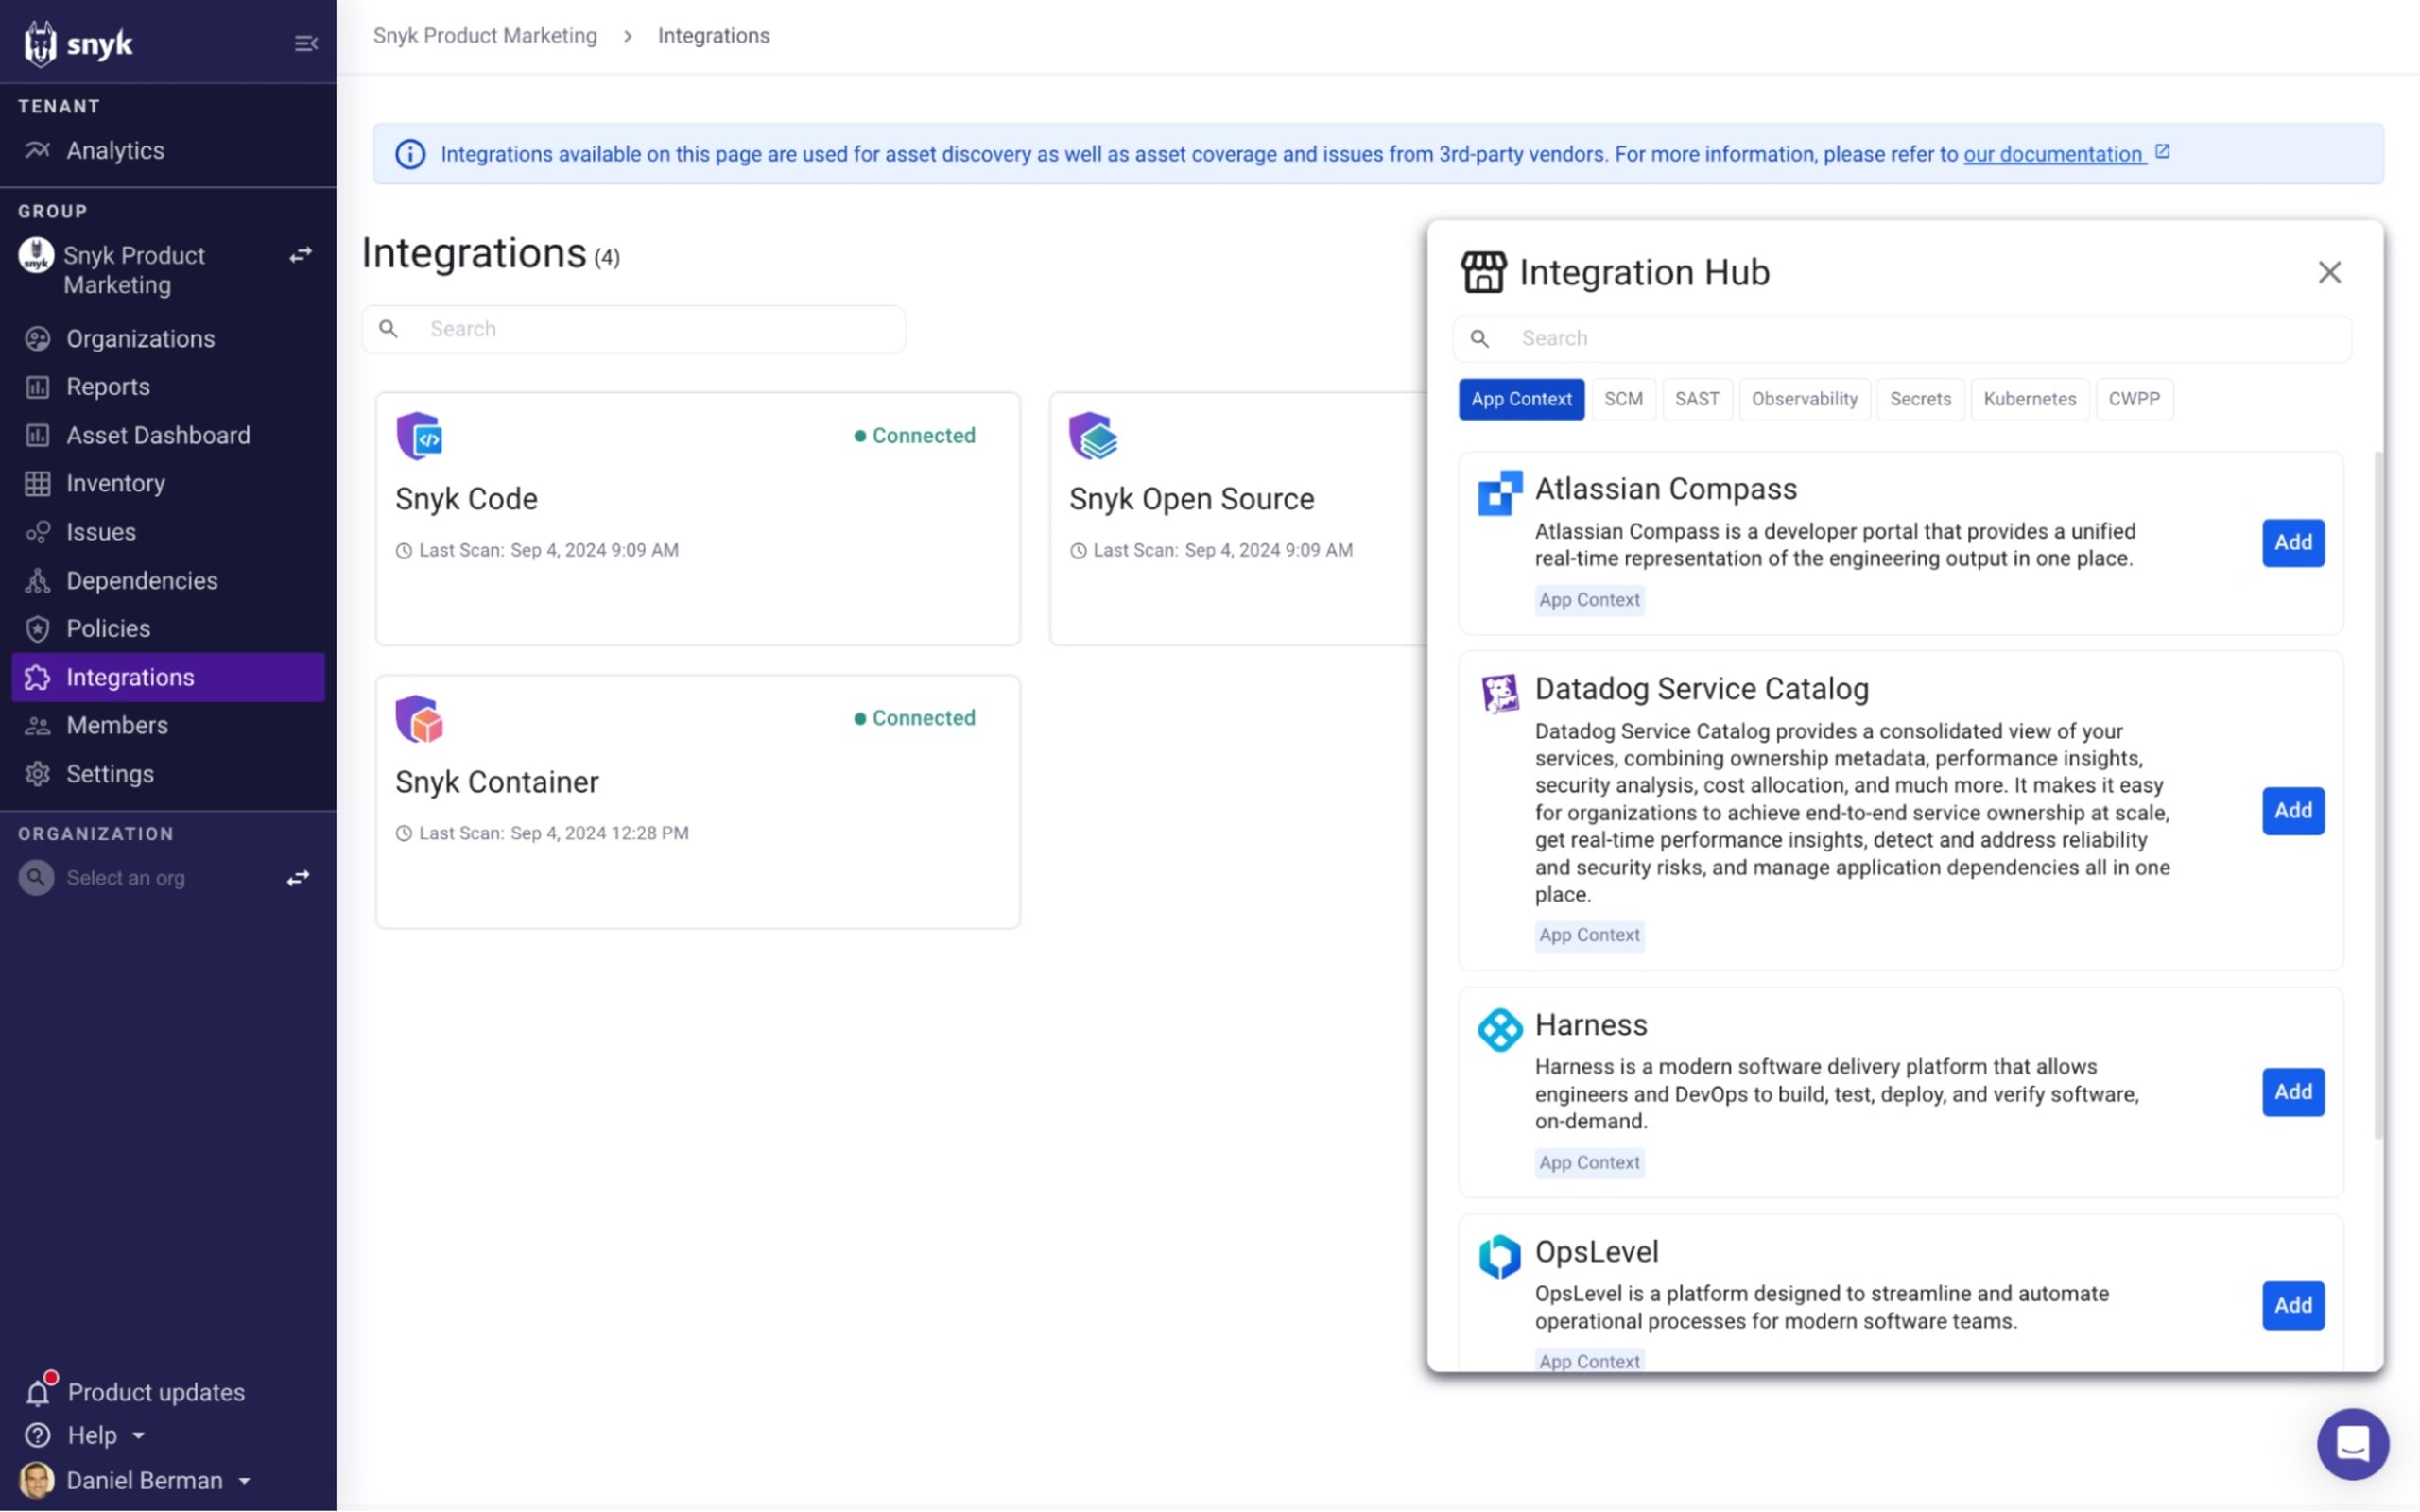
Please note that the process for setting up Backstage is a bit different than the rest of the supported IDPs and service catalogs and is done within each of the relevant SCM integrations.
Please refer to our product documentation for detailed instructions.
Once your SCM(s), and optionally — your IDPs or service catalogs — are successfully set up, these integrations will display on the Integrations page as “Connected”, and the asset inventory will begin to populate with information. You can expect full data to be available within a time frame of up to 24 hours.
Step 2: Create relevant policies
Before you jump into exploring all the exciting data available within the asset inventory, there are some easy ways to optimize this data so you can better understand and use it, specifically with the help of policies.
Classify your assets
While Snyk pulls in a ton of information about your assets via the integrations set up in step 1, policies can add additional important context to assets to help you better manage them within the asset inventory.
As a rule of thumb, we recommend starting out with creating a policy that automatically classifies assets.
In the asset inventory, each asset's 'class' — ranging from 'A' to 'D' — indicates its importance to your business. While you can manually assign these classifications, a more efficient approach is to create a policy that automatically classifies assets based on your specific environment and organizational needs.
Common policy examples include:
Classifying assets containing sensitive customer information or with specific code owners as 'A' assets.
Classifying assets tagged as ‘QA’, 'test' or 'dev' as 'B' or 'C' assets.
Classifying inactive assets based on repo freshness as 'D' assets.
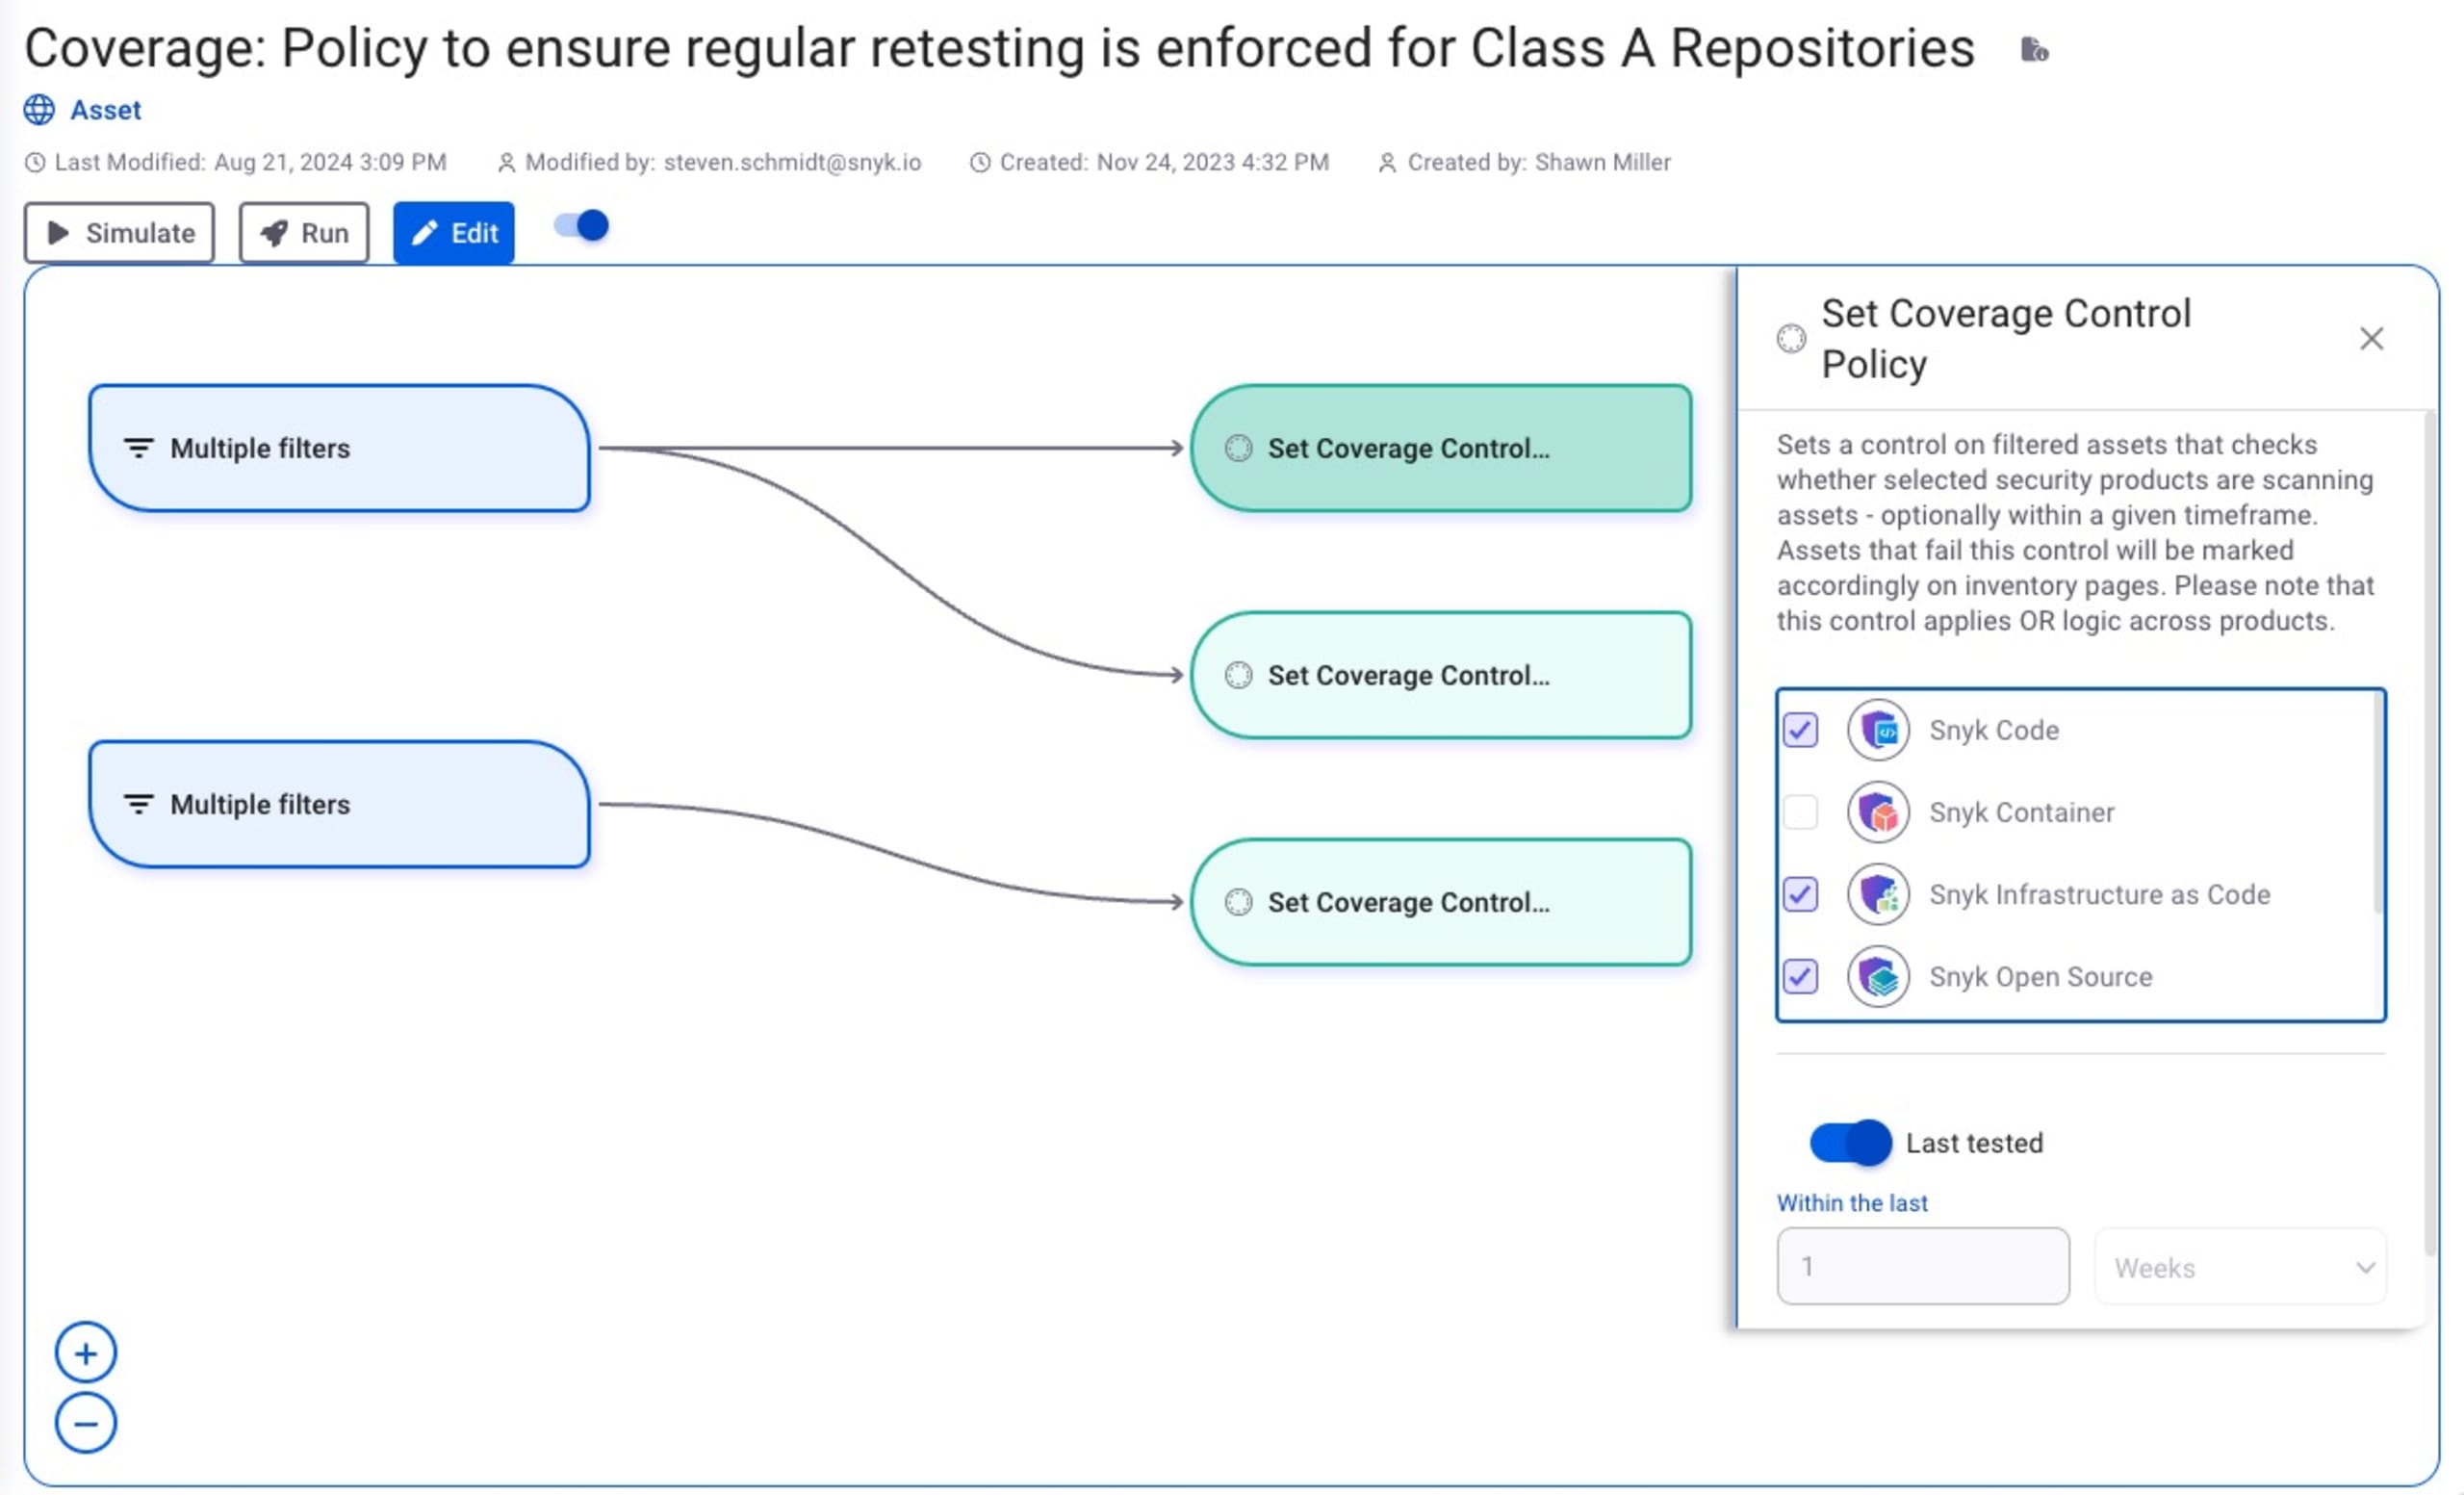
Manage coverage
After identifying your business-critical assets, you can ensure Snyk is effectively deployed. By establishing a coverage policy, you can define the required Snyk controls and respond promptly if any coverage gaps are found.
Common policy examples include:
Mandating daily Snyk Open Source and Snyk Code scans for all 'A' assets while requiring weekly scans for ‘B’ and ‘C’ assets.
Triggering a Slack notification or creating a Jira ticket when a new unscanned 'A' asset is identified.
Policies are easy to create. Within the Snyk web UI, open the Assets tab on the Policies page, and click New Policy.
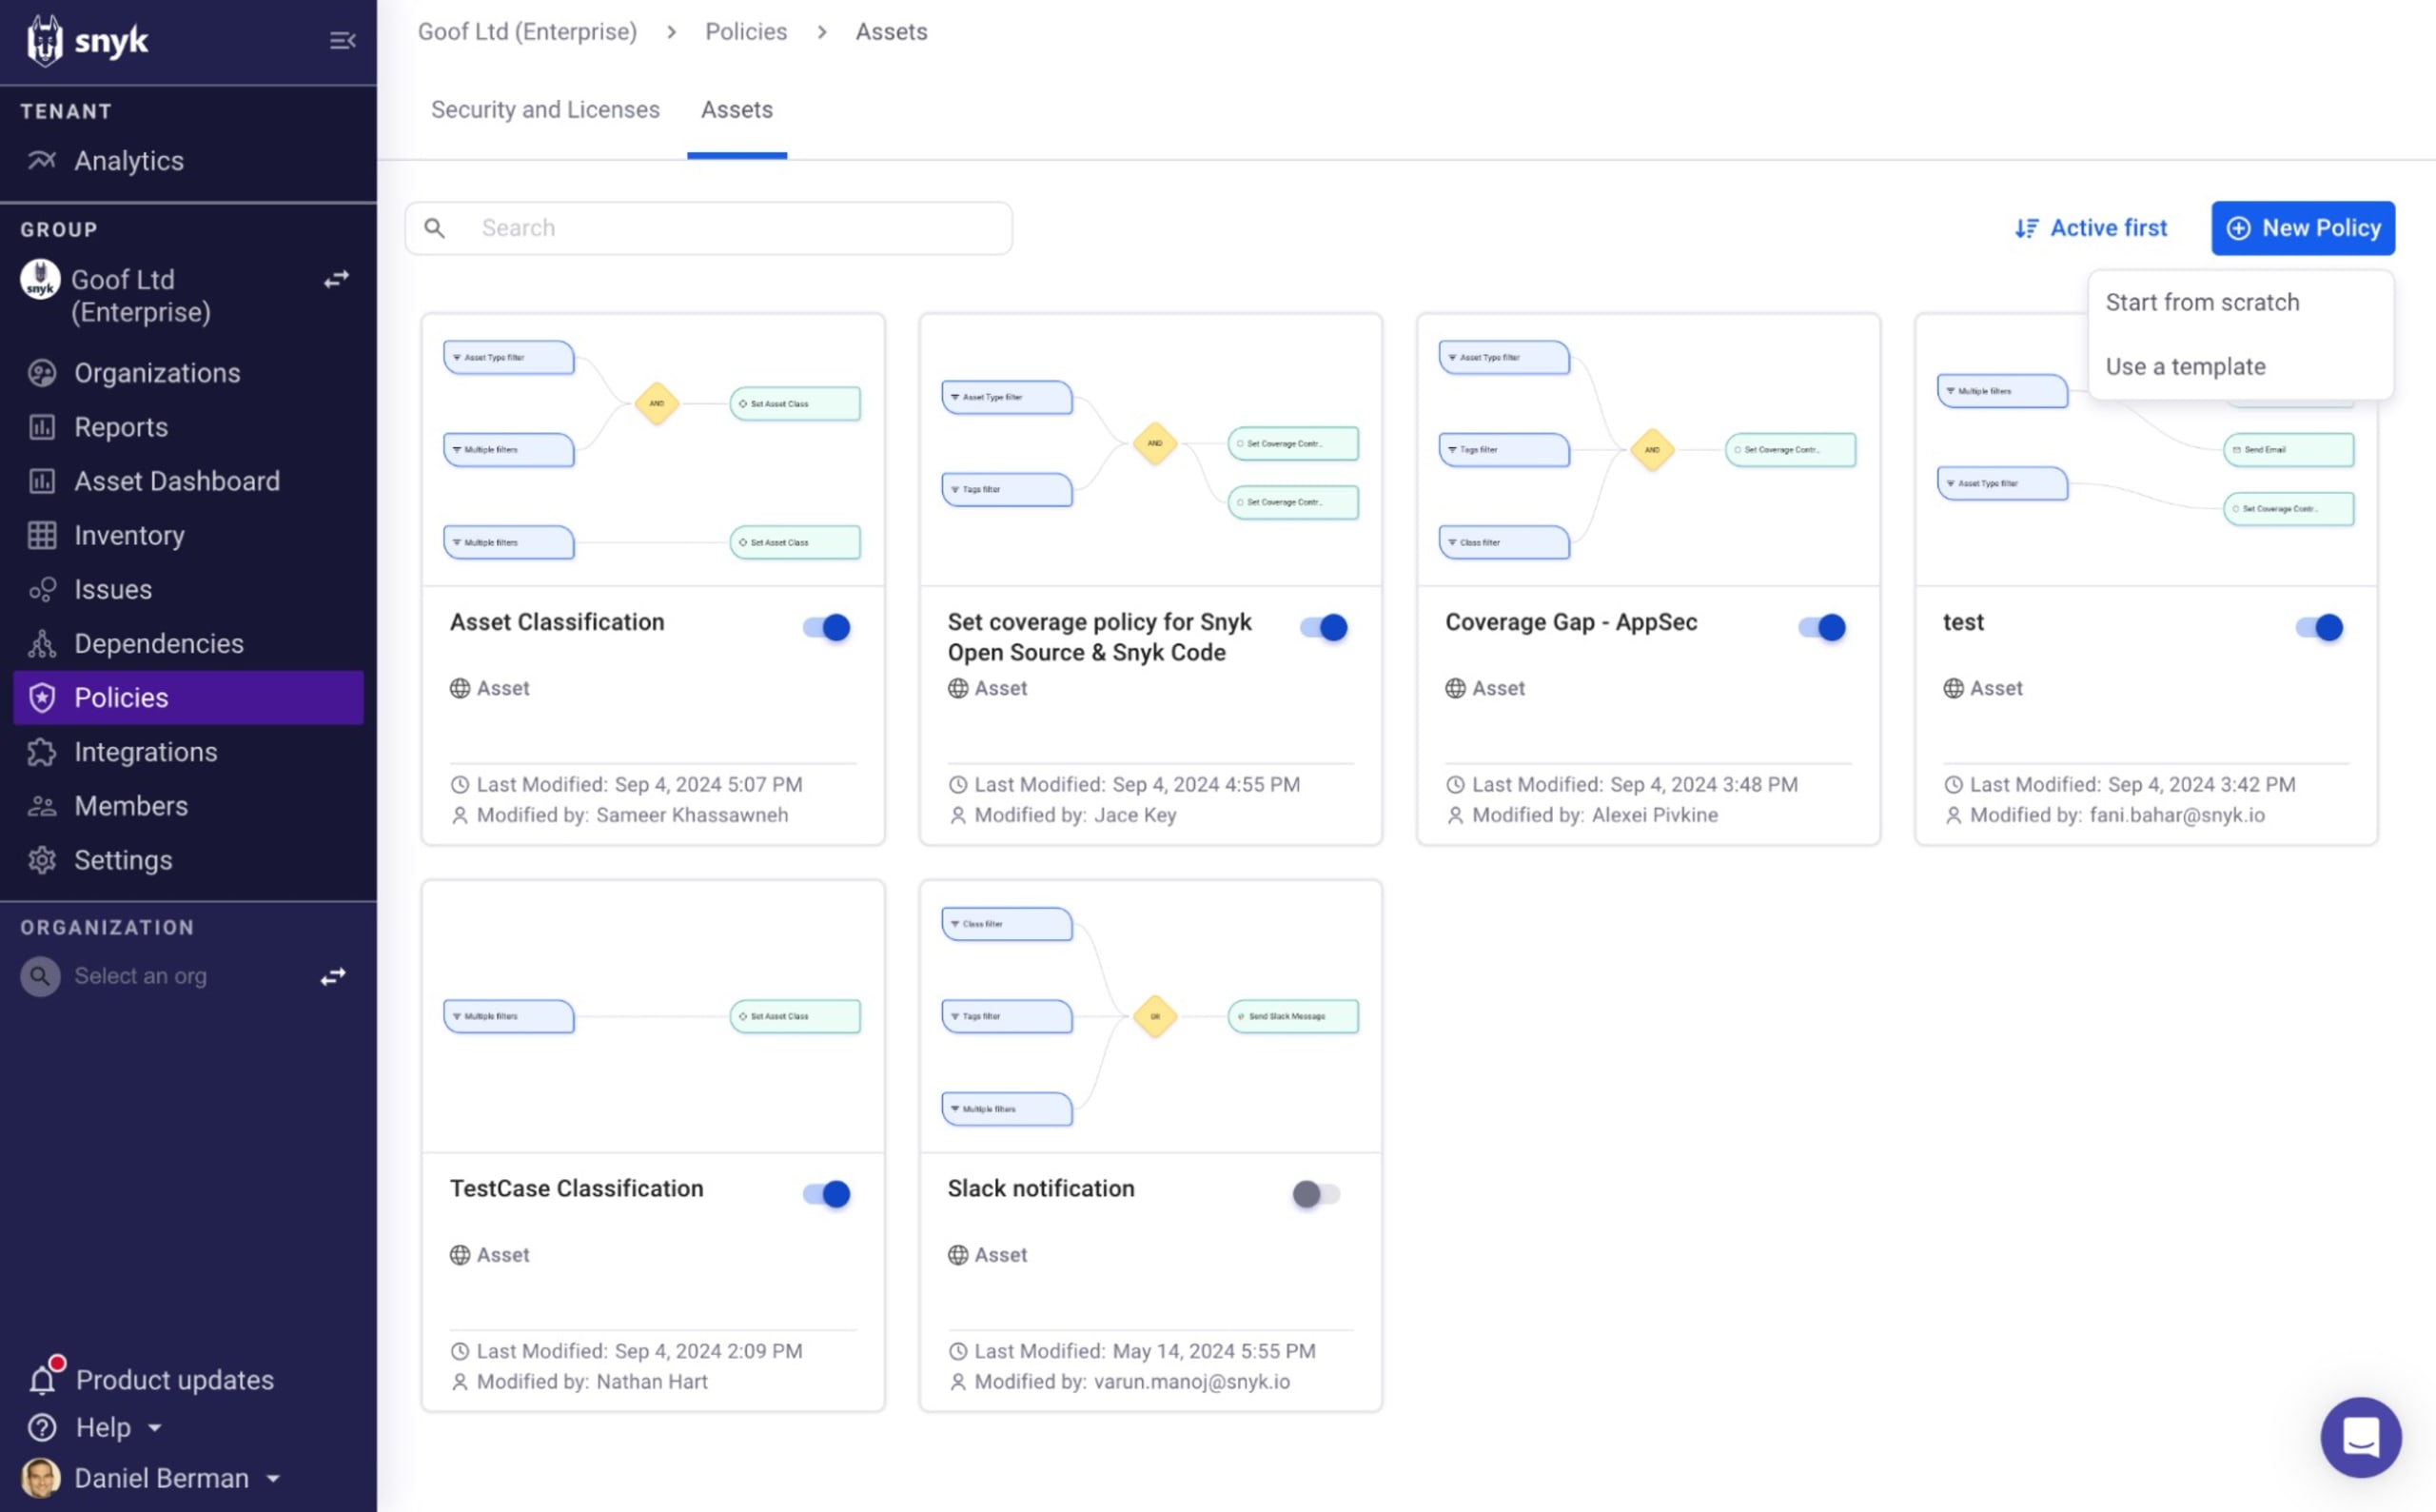
You can use existing policy templates or create a new policy from scratch. Detailed instructions on creating policies are available here.
Step 3: Understand your inventory and coverage
This last step is all about reaping the benefits of the first two steps, which ensure your inventory contains the data you need for gaining visibility into your apps and coverage by Snyk and prioritizing remediation accordingly.
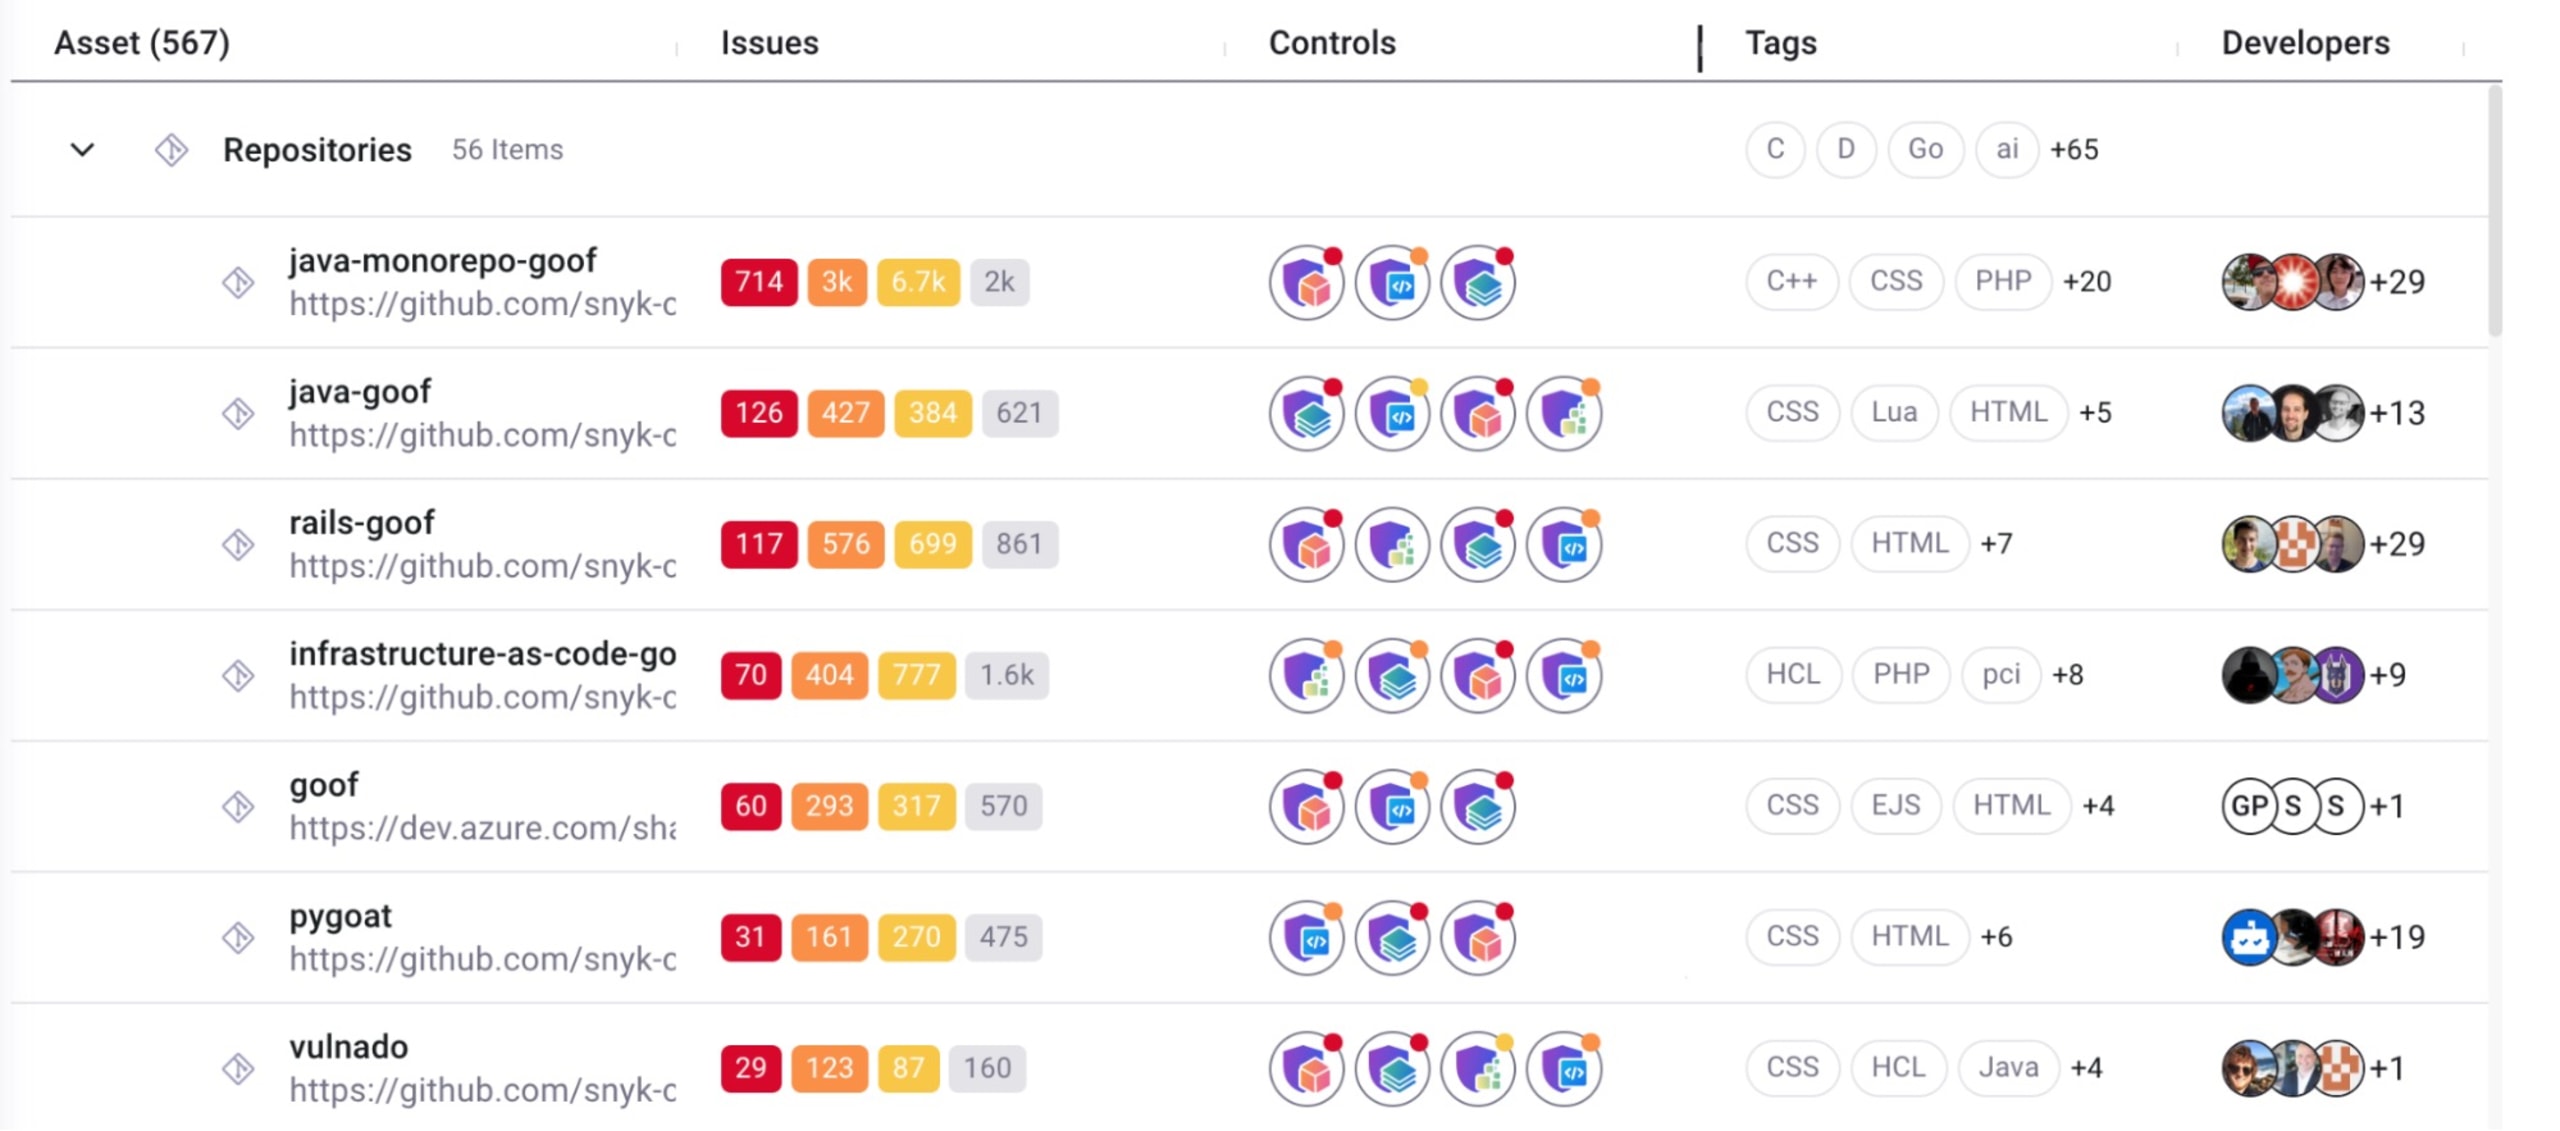
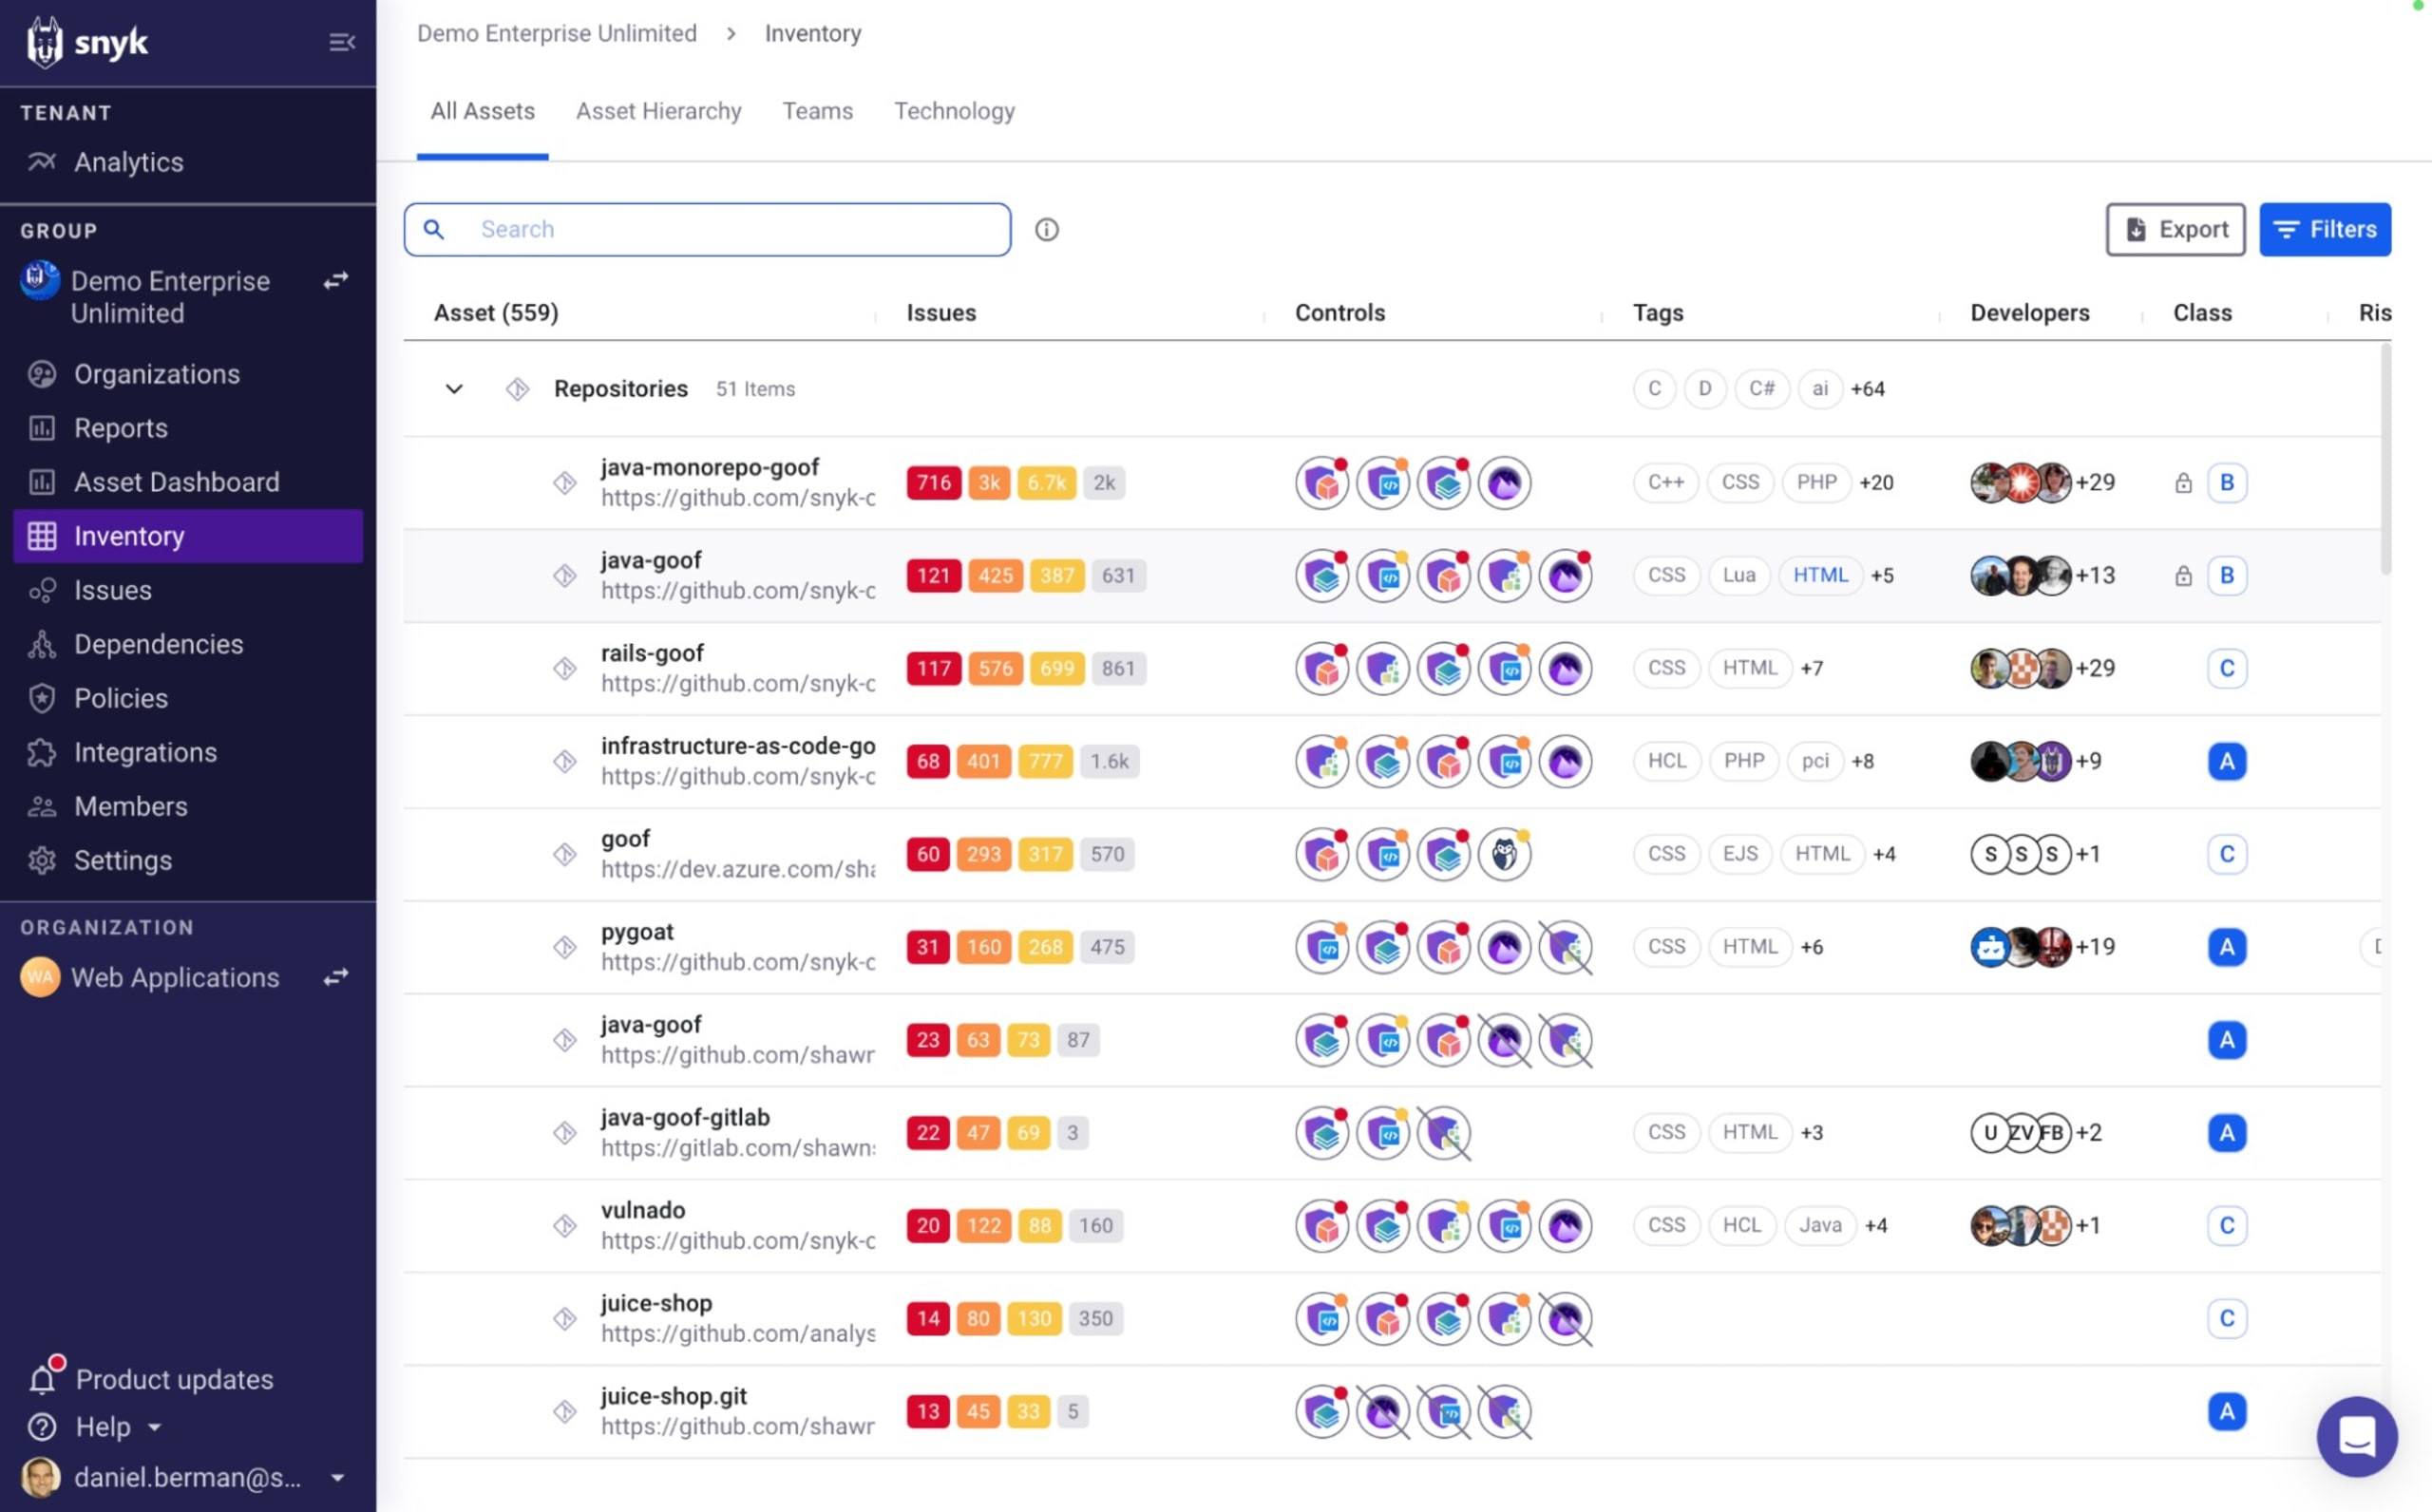
The inventory provides a lot of flexibility in terms of exploring the available data, offering intuitive sorting, searching, and filtering features to help you quickly hone in on areas of risk within your program.
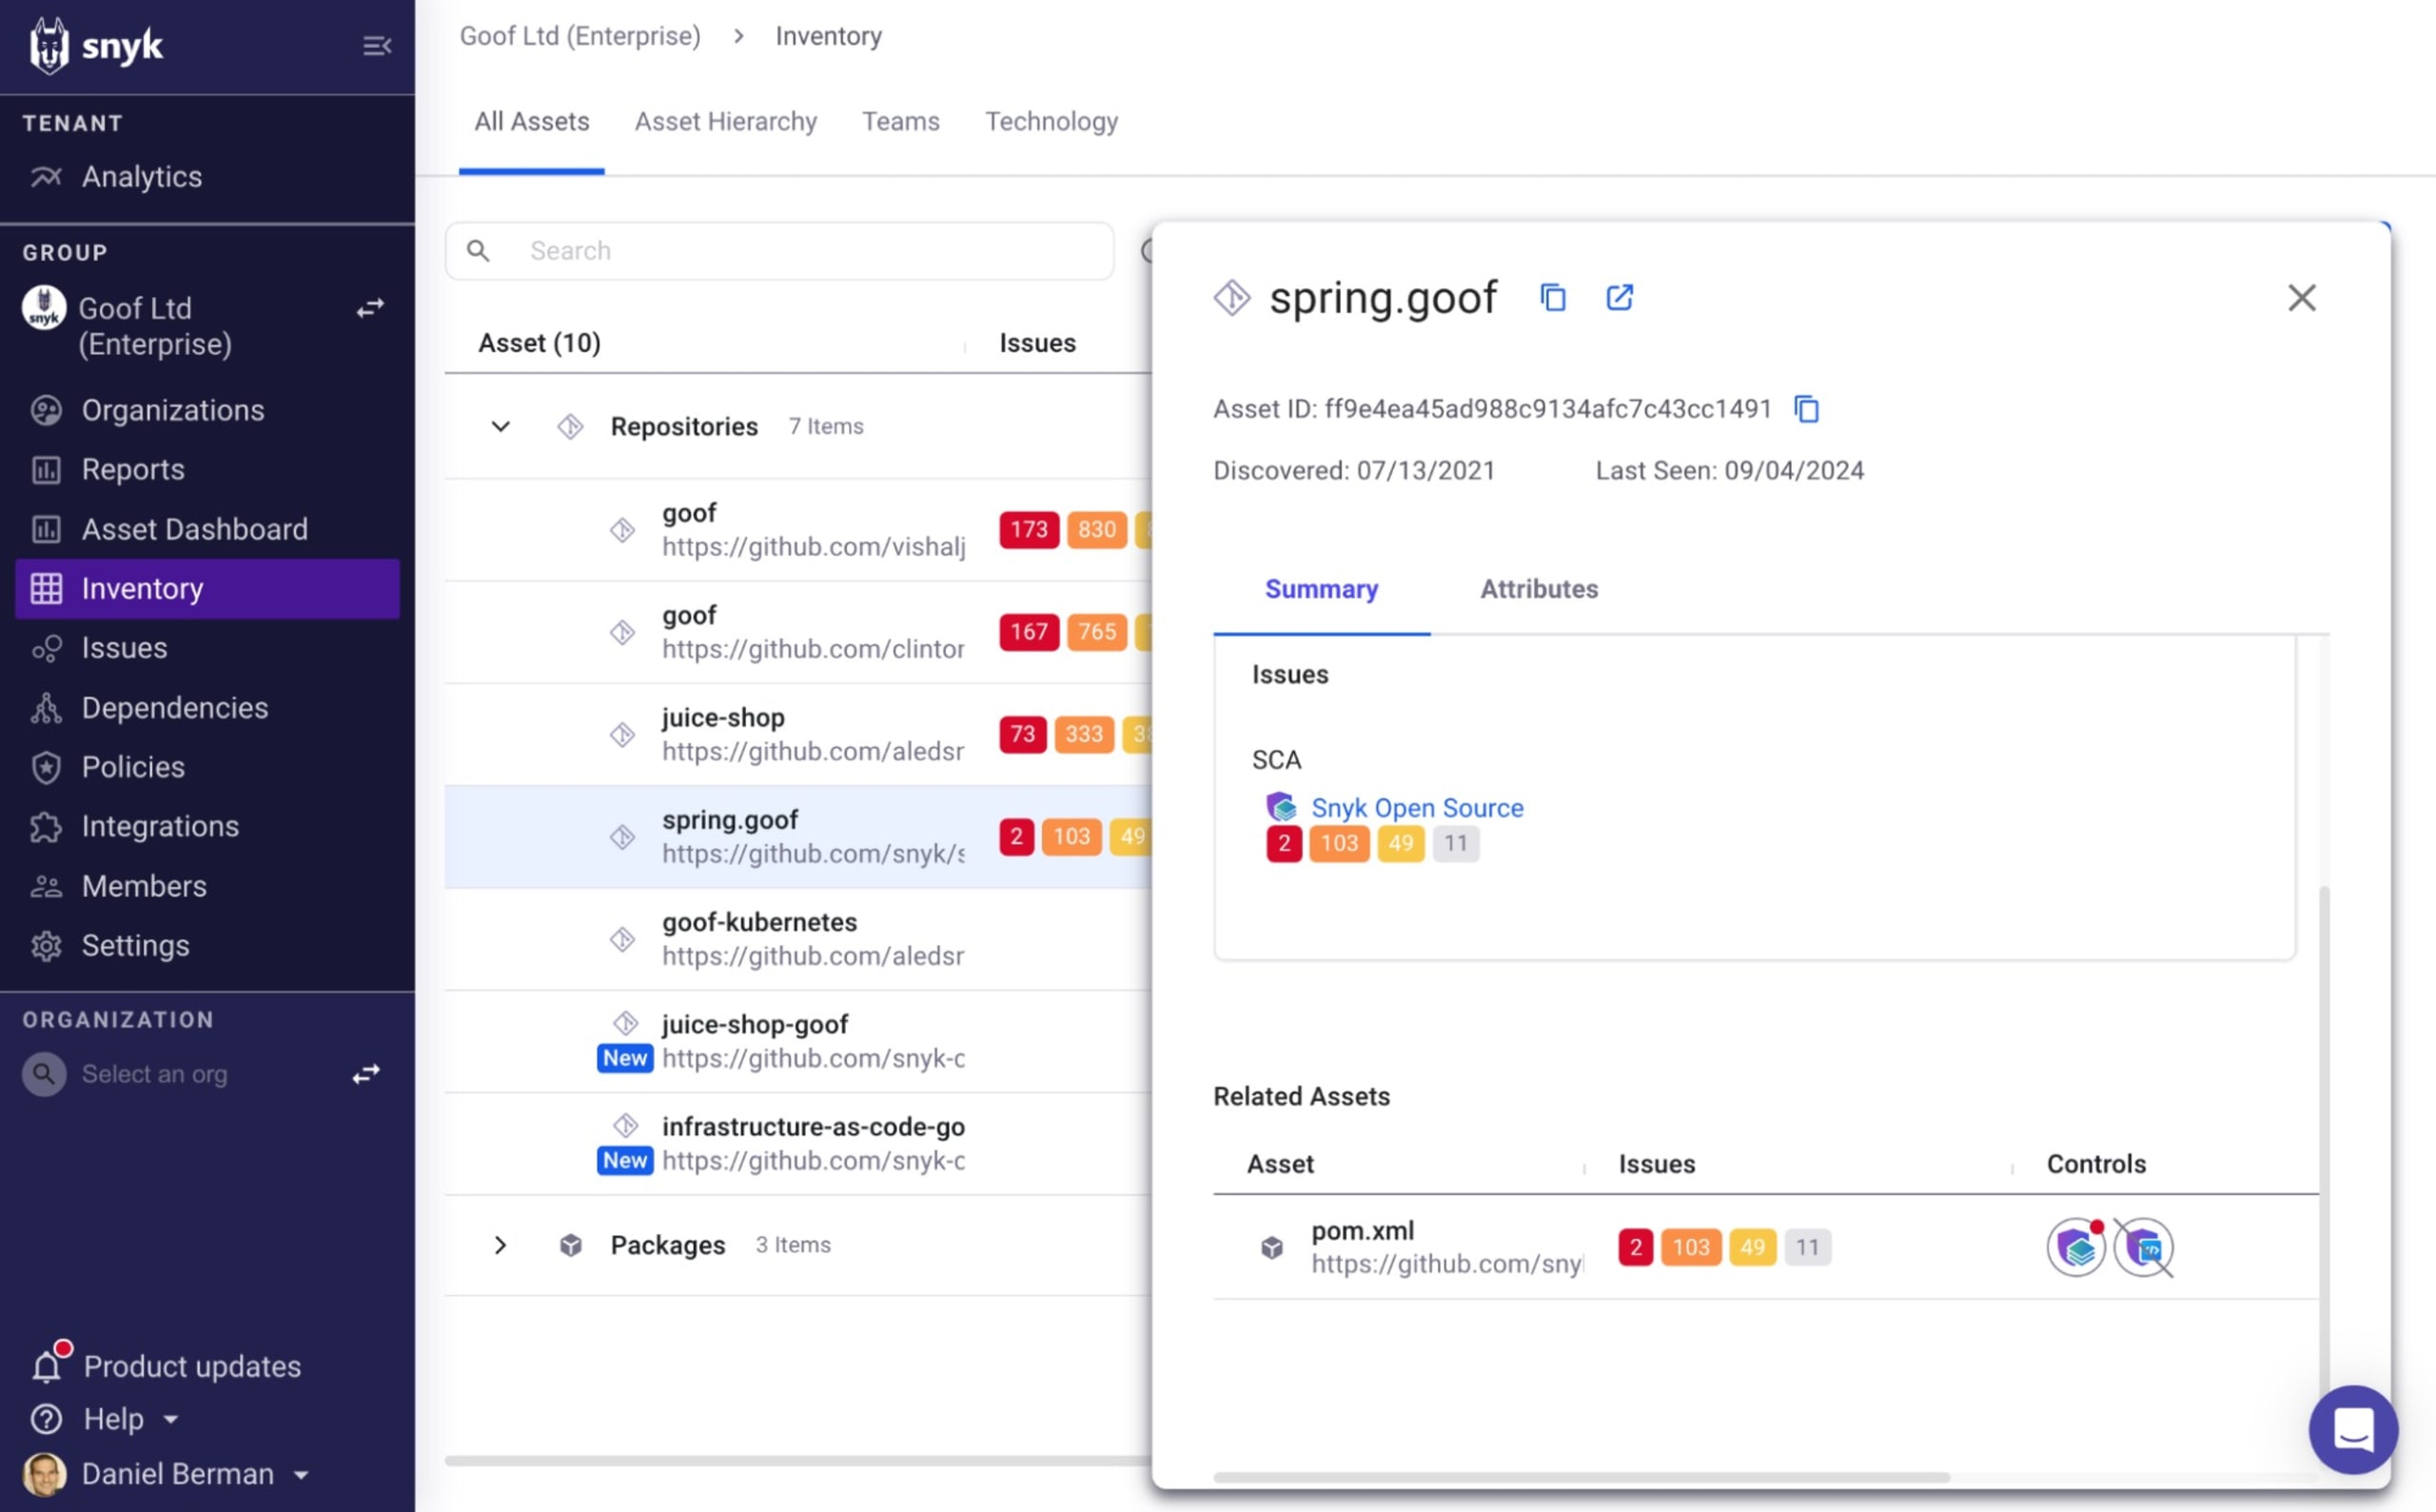
A common starting point is to focus on your 'A' assets. Click the Filters button to narrow down the list of asset on display.
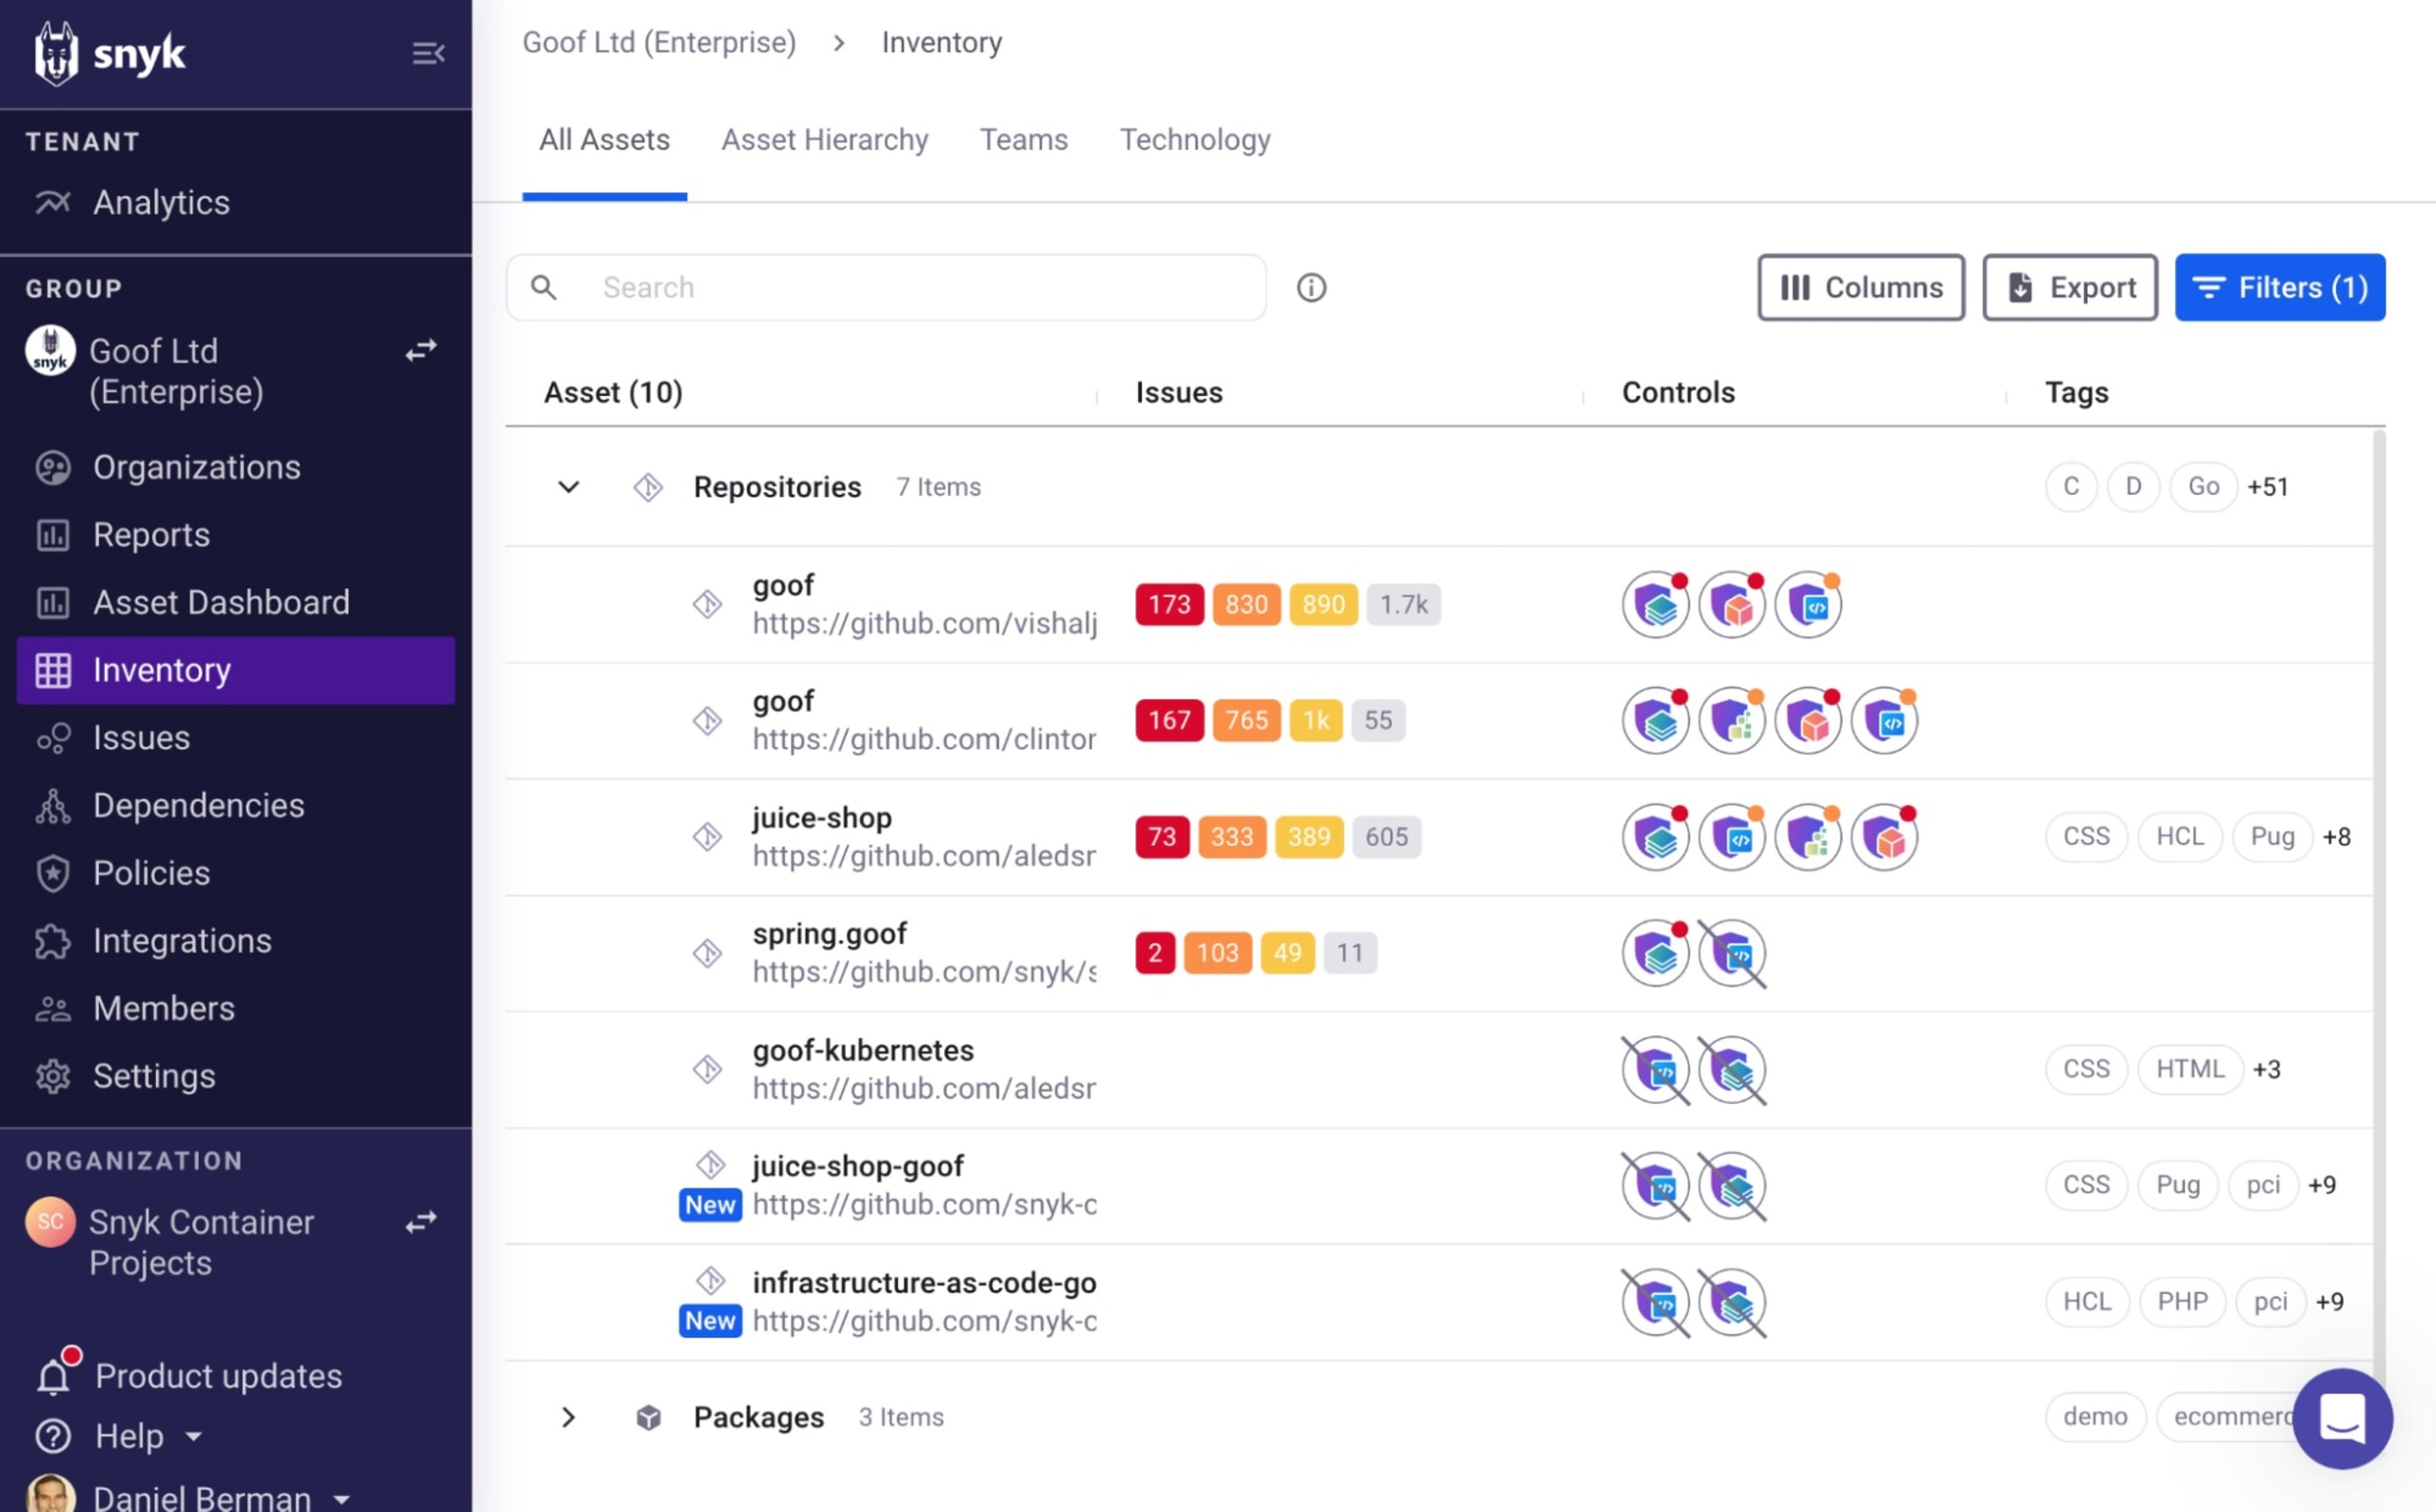
Under the Controls column, you can quickly see whether the required Snyk controls are being used as required and according to your defined policies. In the example of the ‘spring.goof’ repository shown above, we can see that Snyk Open Source has scanned the asset properly and has identified critical vulnerabilities (as indicated by the red dot), but Snyk Code failed to scan the asset as expected. Under the Developers column, you’ll be able to identify who owns that asset to help you quickly address this gap in coverage.
Selecting the asset, you will be able to view additional information about the asset, including a summary of the issues identified and a list of any related assets.
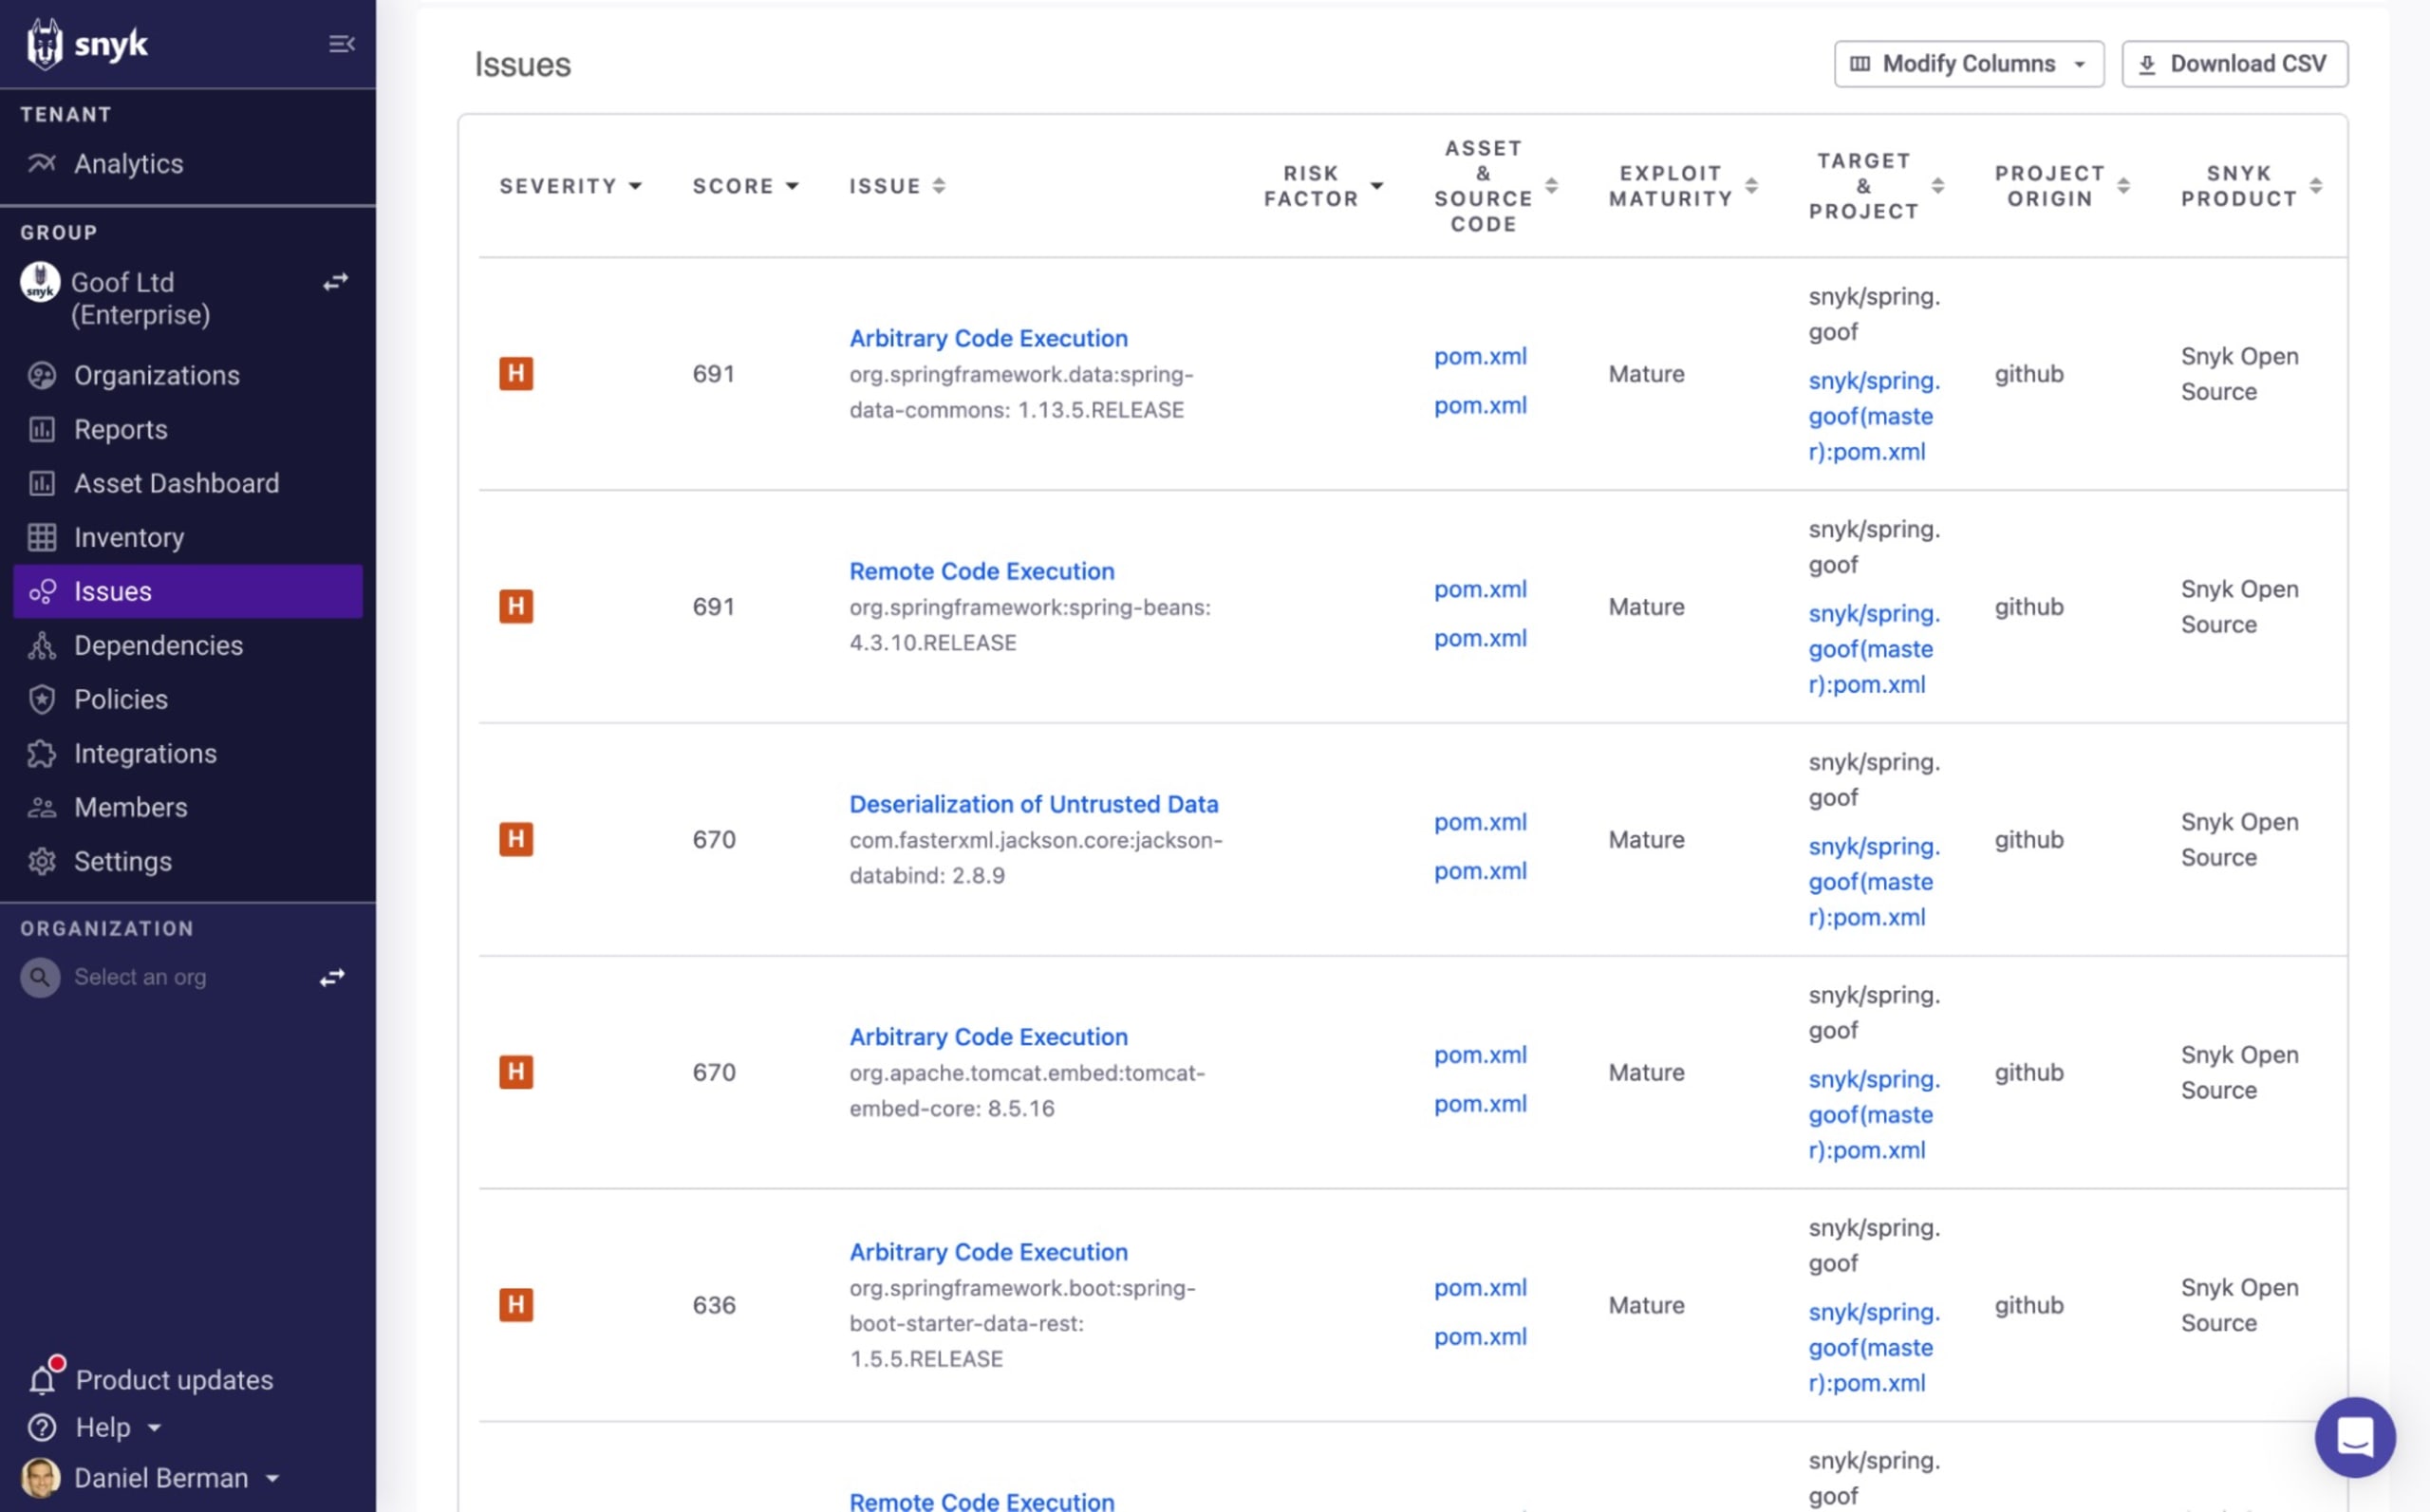
To start triaging issues, click the name of the Snyk control (in this case, Snyk Open Source). This opens up the Issues page, which provides a unified and aggregated view of all the issues identified by Snyk in that specific asset.
You can then use Snyk’s issue-level risk scoring to prioritize issues to focus on those issues posing a greater level of risk.
As mentioned, Snyk AppRisk Pro turns the dial up a notch or two, incorporating risk factors from the application in its running state to support a more holistic and risk-based prioritization experience. With this runtime context, you can, for example, tell whether a vulnerable open source library is deployed or loaded into memory. Read more about these risk factors and runtime context in Snyk AppRisk Pro here.
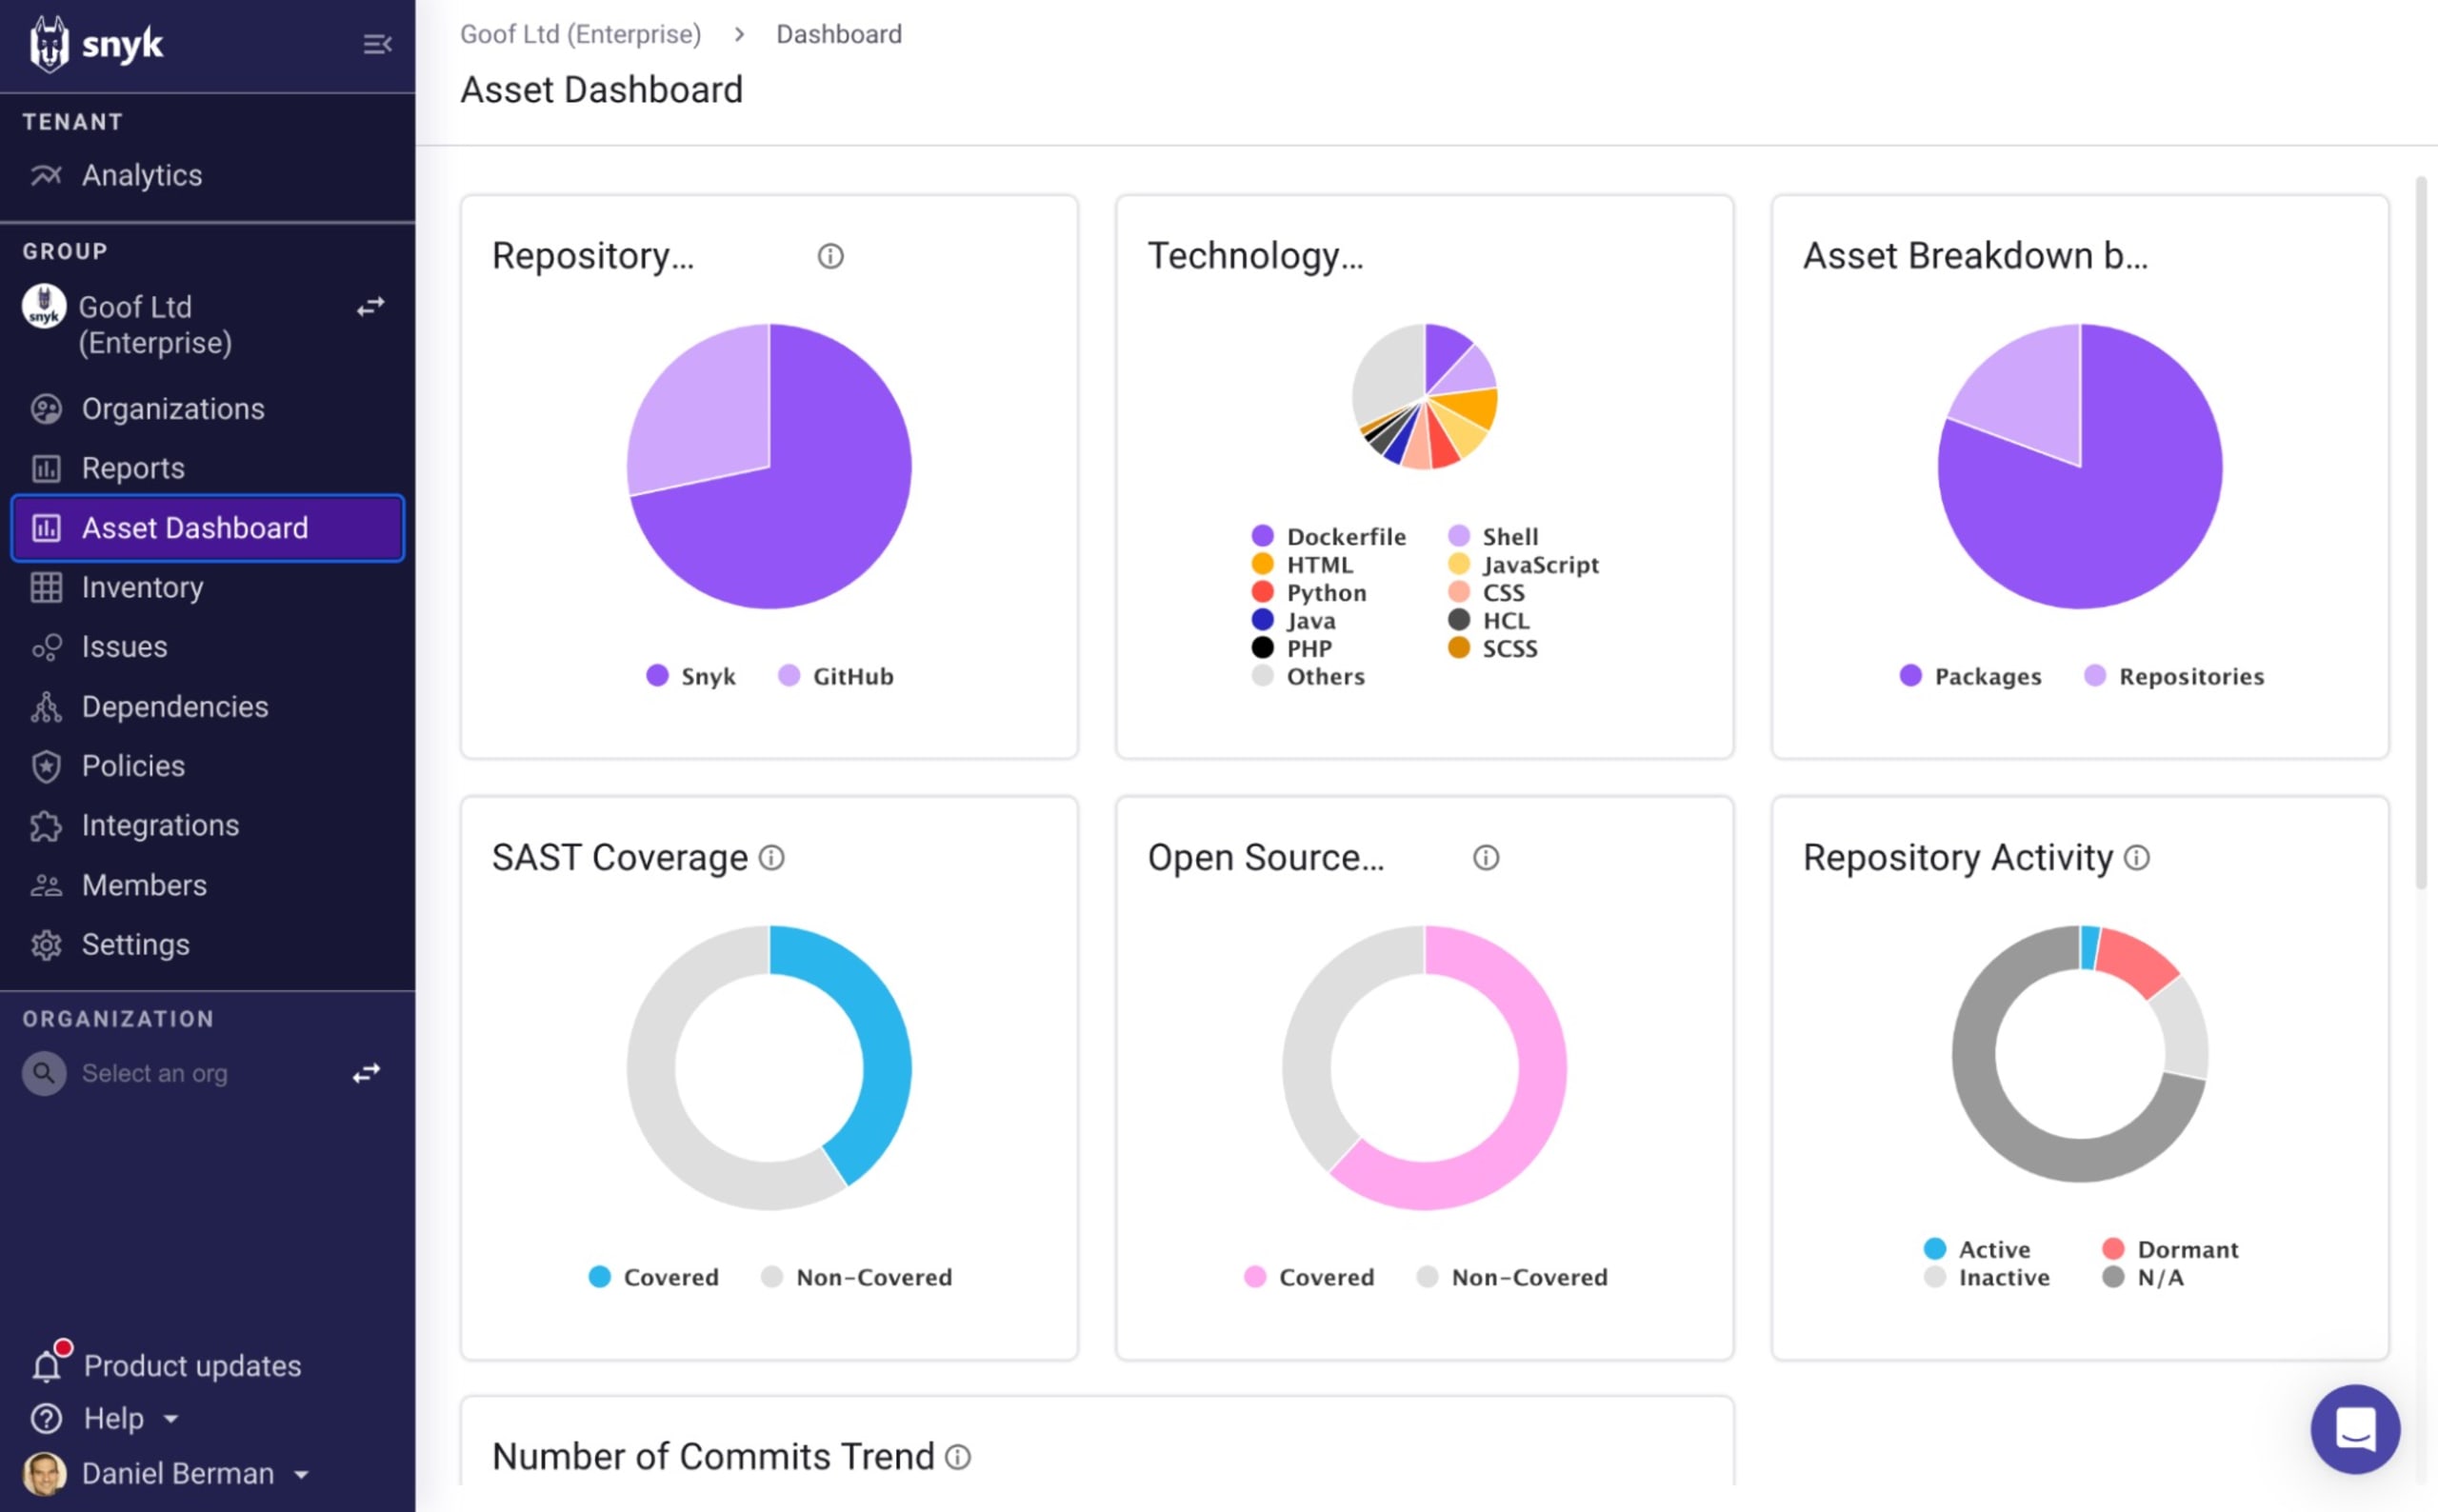
Other than the inventory, you can also gauge the overall status of your Snyk program using the Asset Dashboard page. This page contains a number of widgets that describe the assets identified by Snyk and how well they are being secured.
Maximizing your ROI with Snyk
We believe the availability of Snyk AppRisk Essentials’ application discovery and coverage management capabilities is a significant step forward in helping our customers better operationalize their shift-left application security efforts.
By providing visibility into code-based assets and ensuring consistent security coverage by Snyk, these capabilities enable organizations to increase the efficiency of their program, improve their security posture, and maximize the ROI of their Snyk investment.
So, if you're an existing Enterprise customer or looking to become one, feel free to reach out to your Snyk contact or visit our online documentation for more information on these newly available capabilities and how to use them.
Mit Snyk zu nahtlosen DevSecOps
Schweißen Sie Dev- und Security-Teams zu einem Verbund zusammen, der komplexe Anwendungsstrukturen ebenso bewältigt wie die Problemfaktoren halluzinierender KI. Alle nötigen Insights dazu haben wir gemeinsam mit Accenture für Sie zusammengefasst.