Using Rego as a generic policy language
Dickson Boateng
3 de junho de 2022
0 minutos de leituraPolicies have a vital role in every organization, but can mean a lot of different things depending on the context. For our purposes, a policy refers to the principles or ideas that an organization uses to make decisions.
In this post, we’ll discuss Open Policy Agent (OPA) and its rule language, Rego, highlighting how we can use them to write a simple policy for a payroll microservice.
What is a policy?
For software systems, policies are the rules that control how a system operates. Computers and individuals often use policies to answer questions such as:
Is user A allowed to modify the configuration of service X?
In which domain should we install application X?
Which operations are in the wrong geographical region?
How we define and enforce a policy depends on several factors, such as the technology to which a policy applies and the clarity of the policy. In some cases, policies are unwritten knowledge, so if we want to modify a system or comprehend how it’s supposed to function, we have to consult another person. After a while, we document the answers, but these documents eventually fall out of date.
Another approach is to hard-code policy into software systems. Unfortunately, policy changes with time. In addition to near constant updates and re-education, modifying hard-coded policies requires a holistic and thorough read of the code to understand what must be changed. Hard coding makes policy less accessible and more time-consuming to change.
Introducing Open Policy Agent
Traditional approaches to policy management provide little guarantee of enforcement and are costly to maintain. A modern solution to this issue is the Open Policy Agent (OPA, pronounced “OH-pa”).
OPA is an open source, general policy engine used to define policies in various systems, including microservices, API gateways, CI/CD pipelines, and Kubernetes. It provides a way to write policies as code and then use those policies as part of the decision-making process.
With OPA, we define rules that control how a system behaves. These rules exist to answer questions, such as:
Can user A perform a
GETrequest on this service?Which records is user B allowed to view?
To which server should we deploy application X?
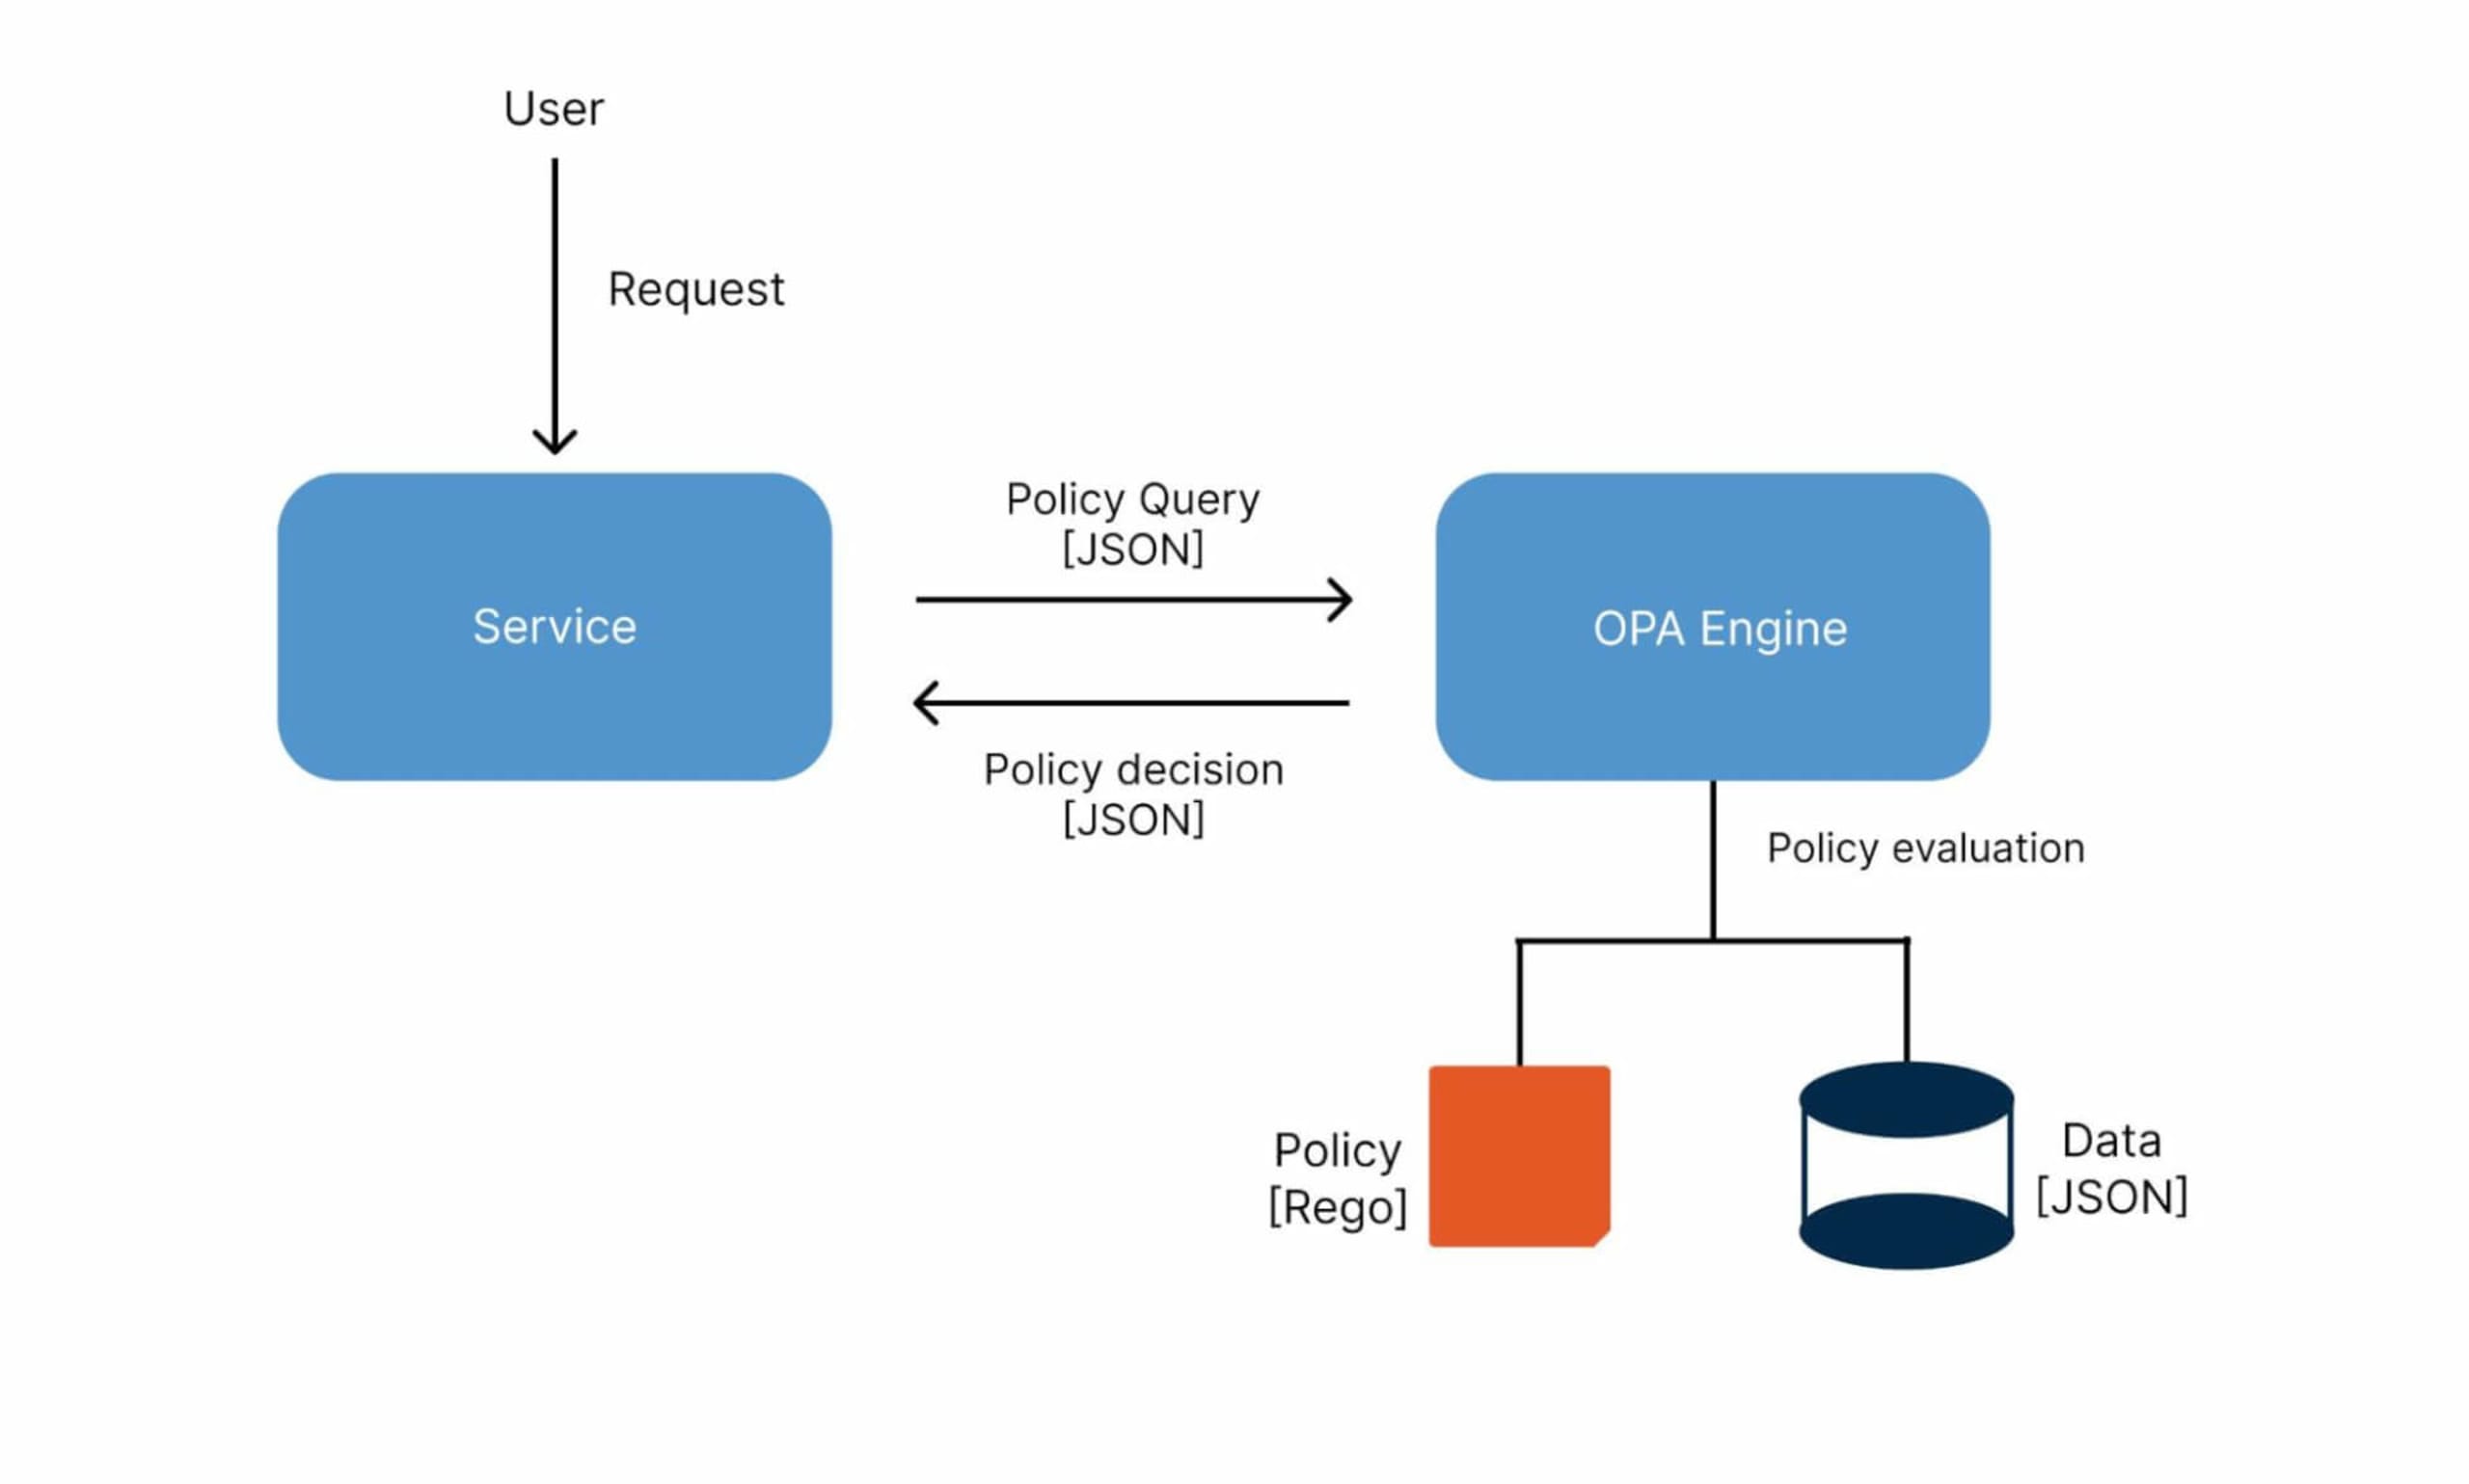
When we request a policy decision, OPA analyzes the rules and data we supply to generate a response, which is enforced by the service that requested the decision. In other words, OPA is responsible for making a policy decision, while the services integrated with OPA are responsible for implementing that decision. The diagram below represents the general workflow of OPA:

To understand the entire OPA workflow, let’s look at how it handles requests in a simple API authorization use case, where we define rules to allow or deny access to certain API services. When a service receives an API request, it sends a query to OPA. OPA then compares the query to existing policies and data to return an “allow” or “deny” decision. Finally, the service enforces OPA's decision by approving or rejecting the API request.
OPA’s policy language: Rego
We write OPA policies in a high-level declarative language called Rego (pronounced “RAY-go”). Rego enables us to write easily scalable policy decisions for different types of services. We use Rego to evaluate the data provided as input and make policy decisions accordingly. Remember that Rego isn’t a programming language for creating software programs — it's a declarative language for writing rules, similar to a query language like SQL.
Rego is a general-purpose policy language, meaning it works with various systems. It only sees JSON data, we can write a policy for any service as long as the data we need is put in JSON format. This enables us to use Rego to write policies that span systems.
Writing your first OPA policy
Now, let’s write a simple policy with Rego and test it in Rego Playground, an online interactive platform. The policy we’re writing determines which users can access salary information in a payroll microservice.
To start, delete all the existing code in the main panel of the Rego playground and replace it with the following:
Now, let’s go through the above code snippet to understand what’s happening:
The first line of our policy is the package name. Every Rego policy has a package name that defines the scope of that policy.
The next line indicates that the
allowvalue isfalseby default.The hash sign (#) represents the start of a comment and provides simple explanatory information about written code.
allow = truemeans thatallowwould betrueif all the expressions inside the brackets aretrue.Finally, we can interpret the expressions inside the brackets to mean that it will enable requests if the input method is
GET, the path is/getSalary/user_id, and the user is theuser_id. Note that theinputvariable represents JSON data that we provide to Rego.
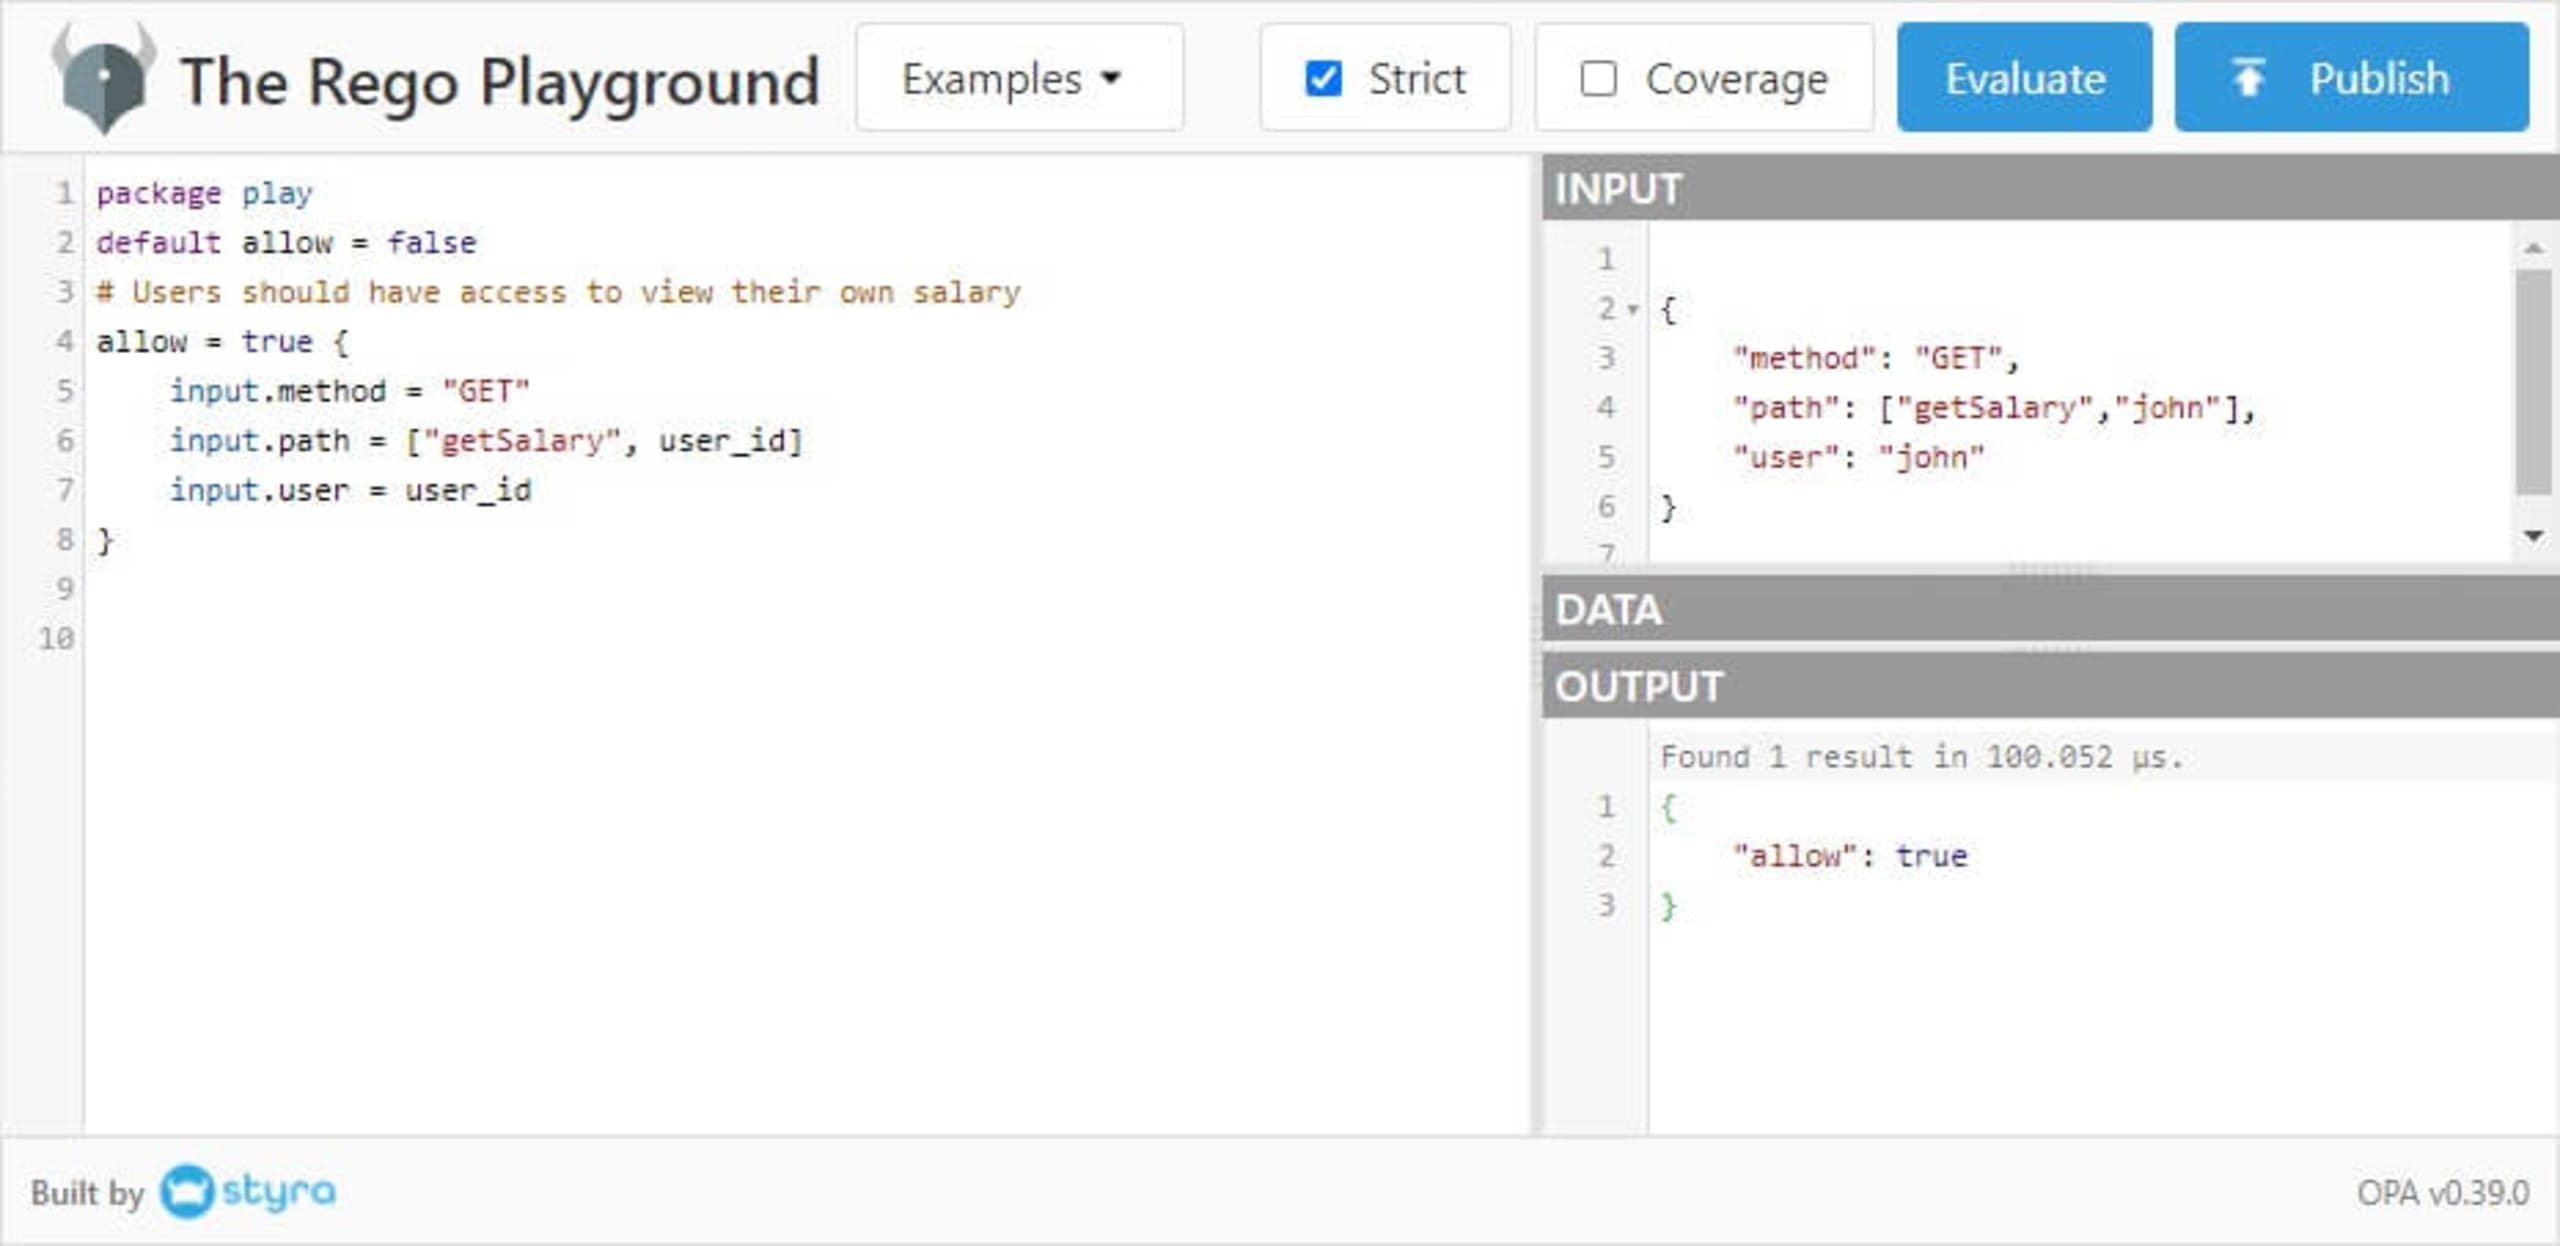
The Rego playground allows us to evaluate code and ensure the policy works as expected. So, in the input panel, we can spoof a request by adding the following code:
Now, let’s see how OPA would respond in reaction to the above request by clicking the Evaluate button. The output panel should display something like the following:
Here’s a snapshot of the playground after completing all procedures:

Let’s test our policy again by changing the user in the request to Jane, which means that a user is trying to view the salary information of another user. When we click Evaluate, we see the following expected outcome:
Next, we’ll update the policy so that workers in the finance department can view the salary information of every user. We do this by appending the following code to our previously defined policy:
In our new policy code, we’ve defined a finance object and added the names of all the employees that work in the finance department.
Let's test the policy by giving user and user_id the same name (e.g. Joe). The policy should return true. Now, change the user to John (a finance department employee) and run the policy. It should, once again, return true. Finally, change the user to any name not listed in the finance object (e.g. Jane). This time, the policy should return false.
Putting it all together
After combining all the code snippets, we have our new policy:
The future of policy customization
Now that you know how to write new policies with OPA and Rego, you have to maintain and scan them to make sure they stay vulnerability free. With Snyk Infrastructure as Code (Snyk IaC), which leverages OPA to do its policy scanning, you can add your new and exising policies to your scans with a few simple commands. Check out the Snyk IaC documentation, as well as our article, Developing custom IaC rules with Snyk, to learn more.
Get started by creating your free Snyk account and start finding and fixing IaC misconfigurations with embedded security checks, policy guardrails, and developer-friendly remediation advice right in your workflow.
Infraestrutura segura desde o código-fonte
A Snyk automatiza a segurança e a conformidade da IaC em fluxos de trabalho e detecta recursos descompassados e ausentes.
