Best practices for containerizing Python applications with Docker

November 11, 2021
0 mins readFrom reading many Python Docker container blogs, we’ve found that the majority of posts provide examples of how to containerize a Python application independent of its framework (Django, Flask, Falcon, etc.). For example, you might see something like this:
1FROM python
2WORKDIR /usr/app
3COPY . .
4RUN pip install -r requirements.txt
5CMD [ "python", "app.py" ]
With this Dockerfile, we can build and run a Python Flask application:
1docker build -t flask-application .
2docker run -p 8080:5000 flask-application
Two simple steps and it works just fine, right?
While this example is simple and useful for demos and getting started tutorials, it leaves many important concerns unattended. So with that in mind, in this post, we’ll attend to those concerns and take a look at some 6 best practices when containerizing Python applications with Docker. We’ll explore why you should:
Use explicit and deterministic Docker base image tags for containerized Python applications.
Separate dependencies from source code.
Use Python WSGI for production.
Run containers with least possible privilege (and never as root).
Handle unhealthy states of your application.
Find and fix security vulnerabilities in your Python Docker application image.
1. Use explicit and deterministic Docker base image tags for containerized Python applications
While it may seem logical to use python as the base image for our Dockerized Python application, it leaves the question of which version of Python is being used.
At the time of this article being written, the aforementioned base image in the Dockerfile refers to a base image with Python 3.10. The reason? Since we didn't add a specific tag, it defaulted to the :latest version of that base image, which happens to be 3.10 if we look on the official image page in Docker Hub
Since we would like to control which versions of Python we are containerizing, we should always provide that version information in the Dockerfile.
So since I want to use the version 3.10 of Python, I'd just have to add the
:3.10tag to my Dockerfile, right?
Well... Not exactly.
The Docker base image tag of :3.10 is a full-fledged operating system with Python 3.10 installed, which contains a large amount of libraries that you will probably never use. Also, the fact that it contains such a large amount of software has a side effect: it will increase your security attack surface due to security vulnerabilities present in those libraries.
If you introduce a large Python Docker image, it will be harder for you to maintain and keep all those library versions up to date.
If we use the Snyk Advisor tool to examine a Python base image, we can see that the Docker base image python:3.10 has 12 high severity issues, 27 medium severity issues, and 132 low severity issues. So, by default, the Python Docker image will start with a minimum of 171 security vulnerabilities — and we haven't even added anything yet!
Also, since we are effectively introducing a complete operating system, the size of the base image is going to be quite large for our Python application server, which will lead to slower builds and that will require a bigger amount of space for it. Normally, there are few rules at the time of selecting the base image, but there are two that are key.
Best practices for selecting a Python Docker image
Choose the minimum base image that meets all your requirements, and then build on top of that. Smaller images contain fewer vulnerabilities, are less resource intensive, and have fewer unnecessary packages..
Using the named tag isn't enough to ensure that you will always use the same base image. The only way of ensuring this is by using the image digest.
With that knowledge, let's revisit Snyk Advisor and check which alternative tags it recommends. This tool offers a great overview of the vulnerabilities and size of the base images, which will greatly help us with our decision.
Since we are interested in using Python 3.10 in our application, we will look for that specific tag.
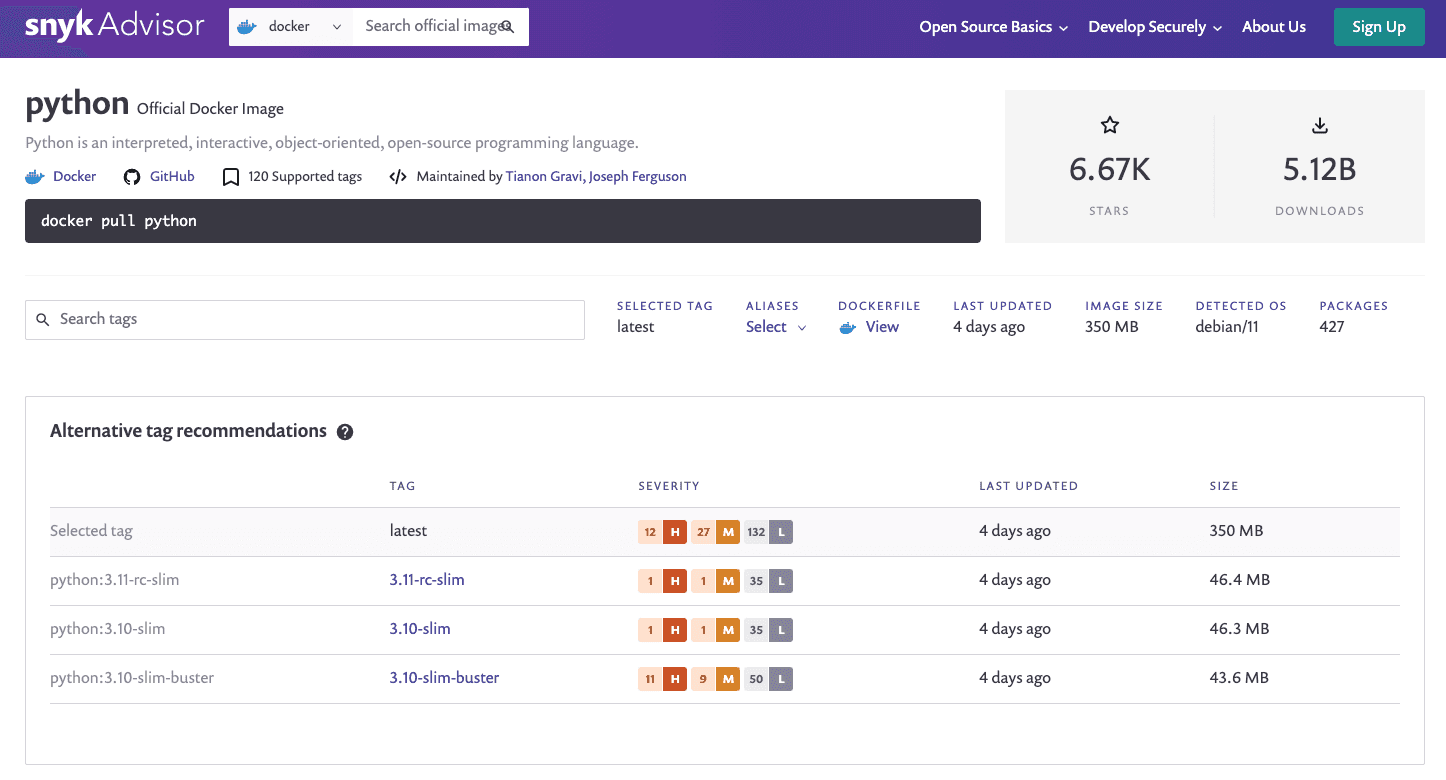
Apart from the aforementioned vulnerabilities, we can see that this image has a base size of about 350 MB, it is based on Debian 11, and it has 427 installed packages. We would consider this image to be a bit too much for o ur little Python application.
On the other hand, there’s also the Docker base image for Python of :3.10-slim with 1 high severity issue, 1 medium severity issue and 35 low severity issues. The Docker base size of 46.2 MB, an operating system that is also based on Debian 11, and with 106 installed packages. Simply selecting this Docker base image for our Python application server over the default one will reduce the amount of security vulnerabilities, the size on disk, and the installed libraries count — as well as satisfy our needs for the Python application version of :3.10.
So that would be it! I just add the tag :3.10-slim and I'm good to go!
Almost! We fulfilled the first rule — we have a small Docker base image for our requirements — but we still need to address the second issue. We need to ensure that we will actually use that exact Docker base image every single time we build our Python application server.
To do that, we have several options:
Grabbing the Docker base image digest from Docker Hub.
Downloading the Docker image onto our computer with
docker pull python:3.10-slim, which reveals the Docker image digest:
13.10-slim: Pulling from library/python
27d63c13d9b9b: Pull complete
36ad2a11ca37b: Pull complete
41d79bc863ed3: Pull complete
5c72b5f03bec8: Pull complete
60c3b0c5ce69b: Pull complete
7Digest: sha256:2bac43769ace90ebd3ad83e5392295e25dfc58e58543d3ab326c3330b505283d
8Status: Downloaded newer image for python:3.10-slim
9docker.io/library/python:3.10-slim
If we already have the Python Docker image on our computer, we can just get the image digest from the current existing image on disk with the command docker images --digests | grep python:
1python 3.10-slim sha256:2bac43769ace90ebd3ad83e5392295e25dfc58e58543d3ab326c3330b505283dOnce we have the base image digest, we can just add it to the aforementioned Dockerfile:
Dockerfile
1FROM python:3.10-slim@sha256:2bac43769ace90ebd3ad83e5392295e25dfc58e58543d3ab326c3330b505283d
2WORKDIR /usr/app
3COPY . .
4RUN pip install -r requirements.txt
5CMD [ "python", "app.py" ]
This practice ensures that every time we rebuild the Docker image for this Python application, the same underlying operating system and library versions are used. This provides a deterministic build.
2. Separate dependencies from source code
This second best practice prevents one of the most common errors in any kind of Docker image that involves projects with dependencies. First, here’s the bad practice:
Copy everything from our project folder into the image context.
Install the dependencies.
Run the application.
Well, it works, but there is a lot to improve on. For starters, when you're developing a project locally, you only install the dependencies when they change, right? So don’t force your Docker image to download and install them every single time that you change the slightest line of code.
This best practice is about optimizing the layers in a Docker image. If we want to take advantage of the caching system during a Docker build, we should always keep one thing in mind when writing a Dockerfile: the layers should be always ordered based on how prone they are to change.
Let's take a look at the Dockerfile that we have been carrying up until now. Each time that we build that Python application image, the Docker software examines the different layers and answers the question: Did something change or can I just use what I did before?
In our current form of the Dockerfile contents, any change to our project folder will retrigger the COPY instruction — and subsequently — the rest of the build layers. That doesn't really make sense and it leaves a lot of room for optimization and speed-up.
Let's improve that with the following Dockerfile:
1FROM python:3.10-slim@sha256:2bac43769ace90ebd3ad83e5392295e25dfc58e58543d3ab326c3330b505283d
2WORKDIR /usr/app
3
4COPY requirements.txt .
5RUN pip install -r requirements.txt
6
7COPY . .
8CMD [ "python", "app.py" ]
With this new Dockerfile, the next time Docker checks if layers can be reused, if it finds that there are no changes to the requirements.txt file, it will “jump” straight to the COPY instruction, which will be resolved in a matter of seconds. With this tiny change, we speed up a lot of the build process — no more waiting for minutes between builds each time that we modify something in our code.
It’s important to note that it’s possible that not all your dependencies are packaged as wheels. In this case, a compiler would need to be installed on your image.
But you told us to use the smallest image as possible to run the application!
You’re right, and that's why we're going to show you another amazing Docker feature: the multi-stage builds.
Multi-stage builds
Multi-stage building means that we use a Docker image with more tools for compiling those required dependencies, and afterwards we just copy the artifacts needed to the actual Python Docker image that gets used.
An example with Node.js based applications would be the following:
1FROM node:latest AS build
2ARG NPM_TOKEN
3WORKDIR /usr/src/app
4COPY package*.json /usr/src/app/
5RUN npm install
6
7FROM node:lts-alpine@sha256:b2da3316acdc2bec442190a1fe10dc094e7ba4121d029cb32075ff59bb27390a
8WORKDIR /usr/src/app
9COPY --from=build /usr/src/app/node_modules /usr/src/app/node_modules
10COPY . .
11CMD ["node", "server.js"]
Note: This is a brief example to merely demonstrate the capabilities of multi-staging. If you want to learn best practices to containerize Node.js applications properly, consult this article from Liran Tal (that name looks familiar…) and Yoni Goldberg.
Multi-staged builds for Node.js are quite easy to handle, as the node_modules folder will lay in the same folder as the actual project, however, this isn't the case when we're dealing with Python applications.
If we just run pip install, we will install many things in many places, making it impossible to perform a multi-stage build. In order to solve this we have two potential solutions:
Use
pip install --userUse a
virtualenv
Using pip install --user could seem like a good option since all the packages will be installed in the ~/.local directory, so copying them from one stage to another is quite easy. But it creates another problem: you'd be adding all the system-level dependencies from the image we used for compiling the dependencies to the final Docker base image — and we don't want that to happen (remember our best practice to achieve as small a Docker base image as possible).
With that first option ruled out, let’s explore the second: using a virtualenv. If we do that, we would end up with the following Dockerfile.
1FROM python:3.10-slim as build
2RUN apt-get update
3RUN apt-get install -y --no-install-recommends \
4	      build-essential gcc
5
6WORKDIR /usr/app
7RUN python -m venv /usr/app/venv
8ENV PATH="/usr/app/venv/bin:$PATH"
9
10COPY requirements.txt .
11RUN pip install -r requirements.txt
12
13FROM python:3.10-slim@sha256:2bac43769ace90ebd3ad83e5392295e25dfc58e58543d3ab326c3330b505283d
14WORKDIR /usr/app/venv
15COPY --from=build /usr/app/venv ./venv
16COPY . .
17
18ENV PATH="/usr/app/venv/bin:$PATH"
19CMD [ "python", "app.py" ]
Now, we have all of our required dependencies, but without the extra packages required to compile them.
Known issues with multi-stage builds for containerized Python applications
Currently, there's a known problem with pre-stages not being cached. The easiest way to solve this is by using BuildKit and adding the argument BUILDKIT_INLINE_CACHE=1 to the build process.
We’ll build normally the first time, but subsequent builds would use the following command:
1export DOCKER_BUILDKIT=1
2docker build -t flask-application --cache-from flask-application --build-arg BUILDKIT_INLINE_CACHE=1 .
You will need the environment variable DOCKER_BUILDKIT=1 so Docker knows to use BuildKit for the build process. It can also be enabled by adding the following settings in the Docker software configuration file at/etc/docker/daemon.json (then the environment variable wouldn't be needed):
1{ "features": { "buildkit": true } }3. Use Python WSGI for production
Python applications built for production that leave debug mode enabled is a big no-no — and a security incident waiting to happen. Unfortunately, it’s a common mistake that we’ve seen across many blog articles about containerized Python Flask applications, and other WSGI Python application frameworks.
The debugger allows executing arbitrary Python code from the browser, which creates a huge security risk. This can be protected up to a point, but it will always be a vulnerability. One more time for the sake of security: Do not run development servers or a debugger in a production environment! And this also applies to your containerized Python applications.
We understand that it’s easier to just deploy your Python Flask applications in debug mode than to set up a WSGI server and the web/proxy, but it’s only easier until you have to explain why your application got hacked.
So how to fix it? First of all, you should decide which WSGI server implementation you would like to use. There are mainly these four that are commonly used for Python applications:
Green Unicorn (Gunicorn) — A pre-fork worker model ported from Ruby's Unicorn project.
uWSGI — A versatile, performant, and low resource-usage WSGI server implementation.
mod_wsgi — An Apache module which can host any Python web application which supports the Python WSGI specification.
CherryPy — A Pythonic, object oriented HTTP framework that also functions as WSGI server.
In this article, we’ll use Gunicorn for our example, but feel free to read the documentation and information of all of them so you can choose the one that best fits your needs. In this post, we won’t look at configuration, as its entirely use case dependent.
For the containerization part, we will only need to:
Include the
gunicorndependency in therequirements.txtChange the entrypoint of the Python application container (see the
CMDinstruction for this change):
1FROM python:3.10-slim as build
2RUN apt-get update
3RUN apt-get install -y --no-install-recommends \
4	build-essential gcc
5
6WORKDIR /usr/app
7RUN python -m venv /usr/app/venv
8ENV PATH="/usr/app/venv/bin:$PATH"
9
10COPY requirements.txt .
11RUN pip install -r requirements.txt
12
13FROM python:3.10-slim@sha256:2bac43769ace90ebd3ad83e5392295e25dfc58e58543d3ab326c3330b505283d
14WORKDIR /usr/app
15COPY --from=build /usr/app/venv ./venv
16COPY . .
17
18ENV PATH="/usr/app/venv/bin:$PATH"
19CMD [ "gunicorn", "--bind", "0.0.0.0:5000", "manage:app" ]
After we rebuild the Python application based on this new Dockerfile, we can run and test that the Flask application is ready to process requests:
1docker run -p 8080:5000 flask-applicationNote: We recommend that for actual production-ready deployments, you shouldn't bind directly the port exposed by Gunicorn to the host. Instead, we recommend that you deploy a reverse proxy server in the same network which handles all HTTP requests and serves static files.
4. Run containerized Python applications with least possible privilege (and never as root)
The principle of least privilege is a long-time security control from the early days of Unix — and we should always follow this when we’re running our containerized Python applications.
The official python Docker image doesn't contain a privileged user by default, so we will need to create it in order to be able to run the process with a least privilege user.
To that end, we'll add the following groupadd commands to the Dockerfile in the final image (the second stage of the multi-staged build) which actually runs the gunicorn process:
1FROM python:3.10-slim@sha256:2bac43769ace90ebd3ad83e5392295e25dfc58e58543d3ab326c3330b505283d
2
3RUN groupadd -g 999 python && \
4    useradd -r -u 999 -g python python
5USER 999
6WORKDIR /usr/app
7
8COPY --from=build /usr/app/venv ./venv
9COPY . .
10
11ENV PATH="/usr/app/venv/bin:$PATH"
12CMD [ "gunicorn", "--bind", "0.0.0.0:5000", "manage:app" ]
The problem, though, is that with the previous modifications the user python owns the system process that gets executed by Docker... What about the file ownership of the copied files or the WORKDIR directory? By default, the Docker compiler will create the WORKDIR directory if it doesn't exist, yet it will create it with the root system user as its owner, so any operation which would include writing to that directory could lead to a fatal error of our application. Also, the copied files will be owned by root by default if we don't change their behavior, even if we already changed the user.
Let’s fix it:
1FROM python:3.10-slim@sha256:2bac43769ace90ebd3ad83e5392295e25dfc58e58543d3ab326c3330b505283d
2
3RUN groupadd -g 999 python && \
4    useradd -r -u 999 -g python python
5
6RUN mkdir /usr/app && chown python:python /usr/app
7WORKDIR /usr/app
8
9COPY --chown=python:python --from=build /usr/app/venv ./venv
10COPY --chown=python:python . .
11
12USER 999
13
14ENV PATH="/usr/app/venv/bin:$PATH"
15CMD [ "gunicorn", "--bind", "0.0.0.0:5000", "manage:app" ]
With the above updated COPY instructions, we prevent unexpected behaviours to the WORKDIR directory in terms of file ownership, and we ensure that all the files are owned by the same user that is going to run the process.
5. Handle unhealthy states of your containerized Python application
When you’re deploying an application, you need to be mindful of possible unhandled events or problems that could set your application to an unhealthy state where: 1) it won't work anymore, but 2) it won't kill the process. If this happens, your container won't be notified and you'll have a running Python application server that doesn't respond to HTTP requests anymore.
To avoid that, we want to implement a health check endpoint. In order to check the health of your containerized Python application, we always recommend to include a monitoring or health HTTP endpoint, to ensure that the application is still able to successfully process user requests. With some web application frameworks for Python, like Flask, this would be an easy task (Flask example below), and in combination with Docker’s HEALTHCHECK instruction, you will ensure that your application is well monitored for health status.
The following is a Python Flask application snippet that adds a /health HTTP endpoint:
1@app.route('/health', methods=['GET'])
2def health():
3	# Handle here any business logic for ensuring you're application is healthy (DB connections, etc...)
4    return "Healthy: OK"
"Once you have that endpoint in your application, you'd only need to include the HEALTHCHECK instruction in your Dockerfile:
1FROM python:3.10-slim@sha256:2bac43769ace90ebd3ad83e5392295e25dfc58e58543d3ab326c3330b505283d
2
3RUN groupadd -g 999 python && \
4    useradd -r -u 999 -g python python
5
6RUN mkdir /usr/app && chown python:python /usr/app
7WORKDIR /usr/app
8
9COPY --chown=python:python --from=build /usr/app/venv ./venv
10COPY --chown=python:python . .
11
12USER 999
13
14ENV PATH="/usr/app/venv/bin:$PATH"
15CMD [ "gunicorn", "--bind", "0.0.0.0:5000", "manage:app" ]
16HEALTHCHECK --interval=30s --timeout=30s --start-period=5s --retries=3 CMD curl -f http://localhost:5000/health
If you’re deploying on Kubernetes, then you should know that Dockerfile HEALTHCHECK directives are ignored. A commensurate Kubernetes liveness, readiness and startup probe is needed in your YAML.
So, to address that for Kubernetes deployments of the above HEALTHCHECK instruction:
1...
2   livenessProbe:
3     httpGet:
4       path: /health
5       port: 5000
6     initialDelaySeconds: 5
7     periodSeconds: 30
8     timeoutSeconds: 30
9     failureThreshold: 3
10...
Note that this configuration would be nested in the container spec part of the pod or deployment YAML file. Now, with a restart policy of always or unless_stopped, our Python application container will always be restarted if it enters an unhealthy state.
6. Find and fix security vulnerabilities in your Python Docker application image
We’ve already established that bigger Docker base images introduce many concerns, such as a large software stack that we would need to maintain, keep up-to-date with security fixes, and so on.
We’ve also explored using Snyk Advisor to determine the size and vulnerability metrics in the different base images. But Advisor is just the tip of the iceberg. Snyk is a free developer security platform that you can use to test anything from your own Python code, to your Python dependencies (such as those in requirements.txt), Python container image running your application, and even the Terraform or Kubernetes configurations that orchestrate it all.
The best thing about Snyk is that it provides recommended fixes for the vulnerabilities it finds. So, instead of just telling you what security vulnerabilities exist, it will automatically create a fix PR or provide remediation advice. And it does it all from within your existing tools (IDE, CLI, Docker, etc.) and workflows (Git, CI/CD, etc.).
Example: Scanning our containerized Python app with Snyk
Let’s see how that works from the Snyk CLI when we use the Python Docker image of python:3.8 to build this sample Python Flask application.
If you install the Snyk CLI, you can use it to scan your Python project dependencies, your Python code, and more. So, first off, we install the Snyk CLI. If you have a Node.js environment, you can do it with the npm package manager as follows:
1npm install -g snykOr if you’re on macOS or Linux, and are using Homebrew, you can get it installed like this:
1brew tap snyk/tap
2brew install snyk
For other installation methods see our guide on how to install the Snyk CLI.
Next up, we need to authenticate from the CLI, to get a valid API token to query the vulnerabilities database:
1snyk authWith the above completed, we can continue to build a local Docker image of the Python application with the python:3.8 base image:
1❯ docker build . -t python-flask-app
2FROM python:3.8 as build
3[+] Building 5.2s (8/13)
4 => [internal] load build definition from Dockerfile
5 => => transferring dockerfile: 513B
6 => [internal] load .dockerignore
7 => => transferring context: 2B
8 => [internal] load metadata for docker.io/library/python:3.8
9 => [auth] library/python:pull token for registry-1.docker.io
10 => [internal] load build context
11...
And now, let’s scan it with Snyk by running:
1snyk container test python-flask-appThe output yields the following results (intentionally shortened, as the output is large):
1Testing python-flask-app...
2
3✗ Low severity vulnerability found in tiff/libtiff5
4  Description: Out-of-bounds Read
5  Info: https://snyk.io/vuln/SNYK-DEBIAN11-TIFF-514595
6  Introduced through: imagemagick@8:6.9.11.60+dfsg-1.3, imagemagick/libmagickcore-dev@8:6.9.11.60+dfsg-1.3
7  From: imagemagick@8:6.9.11.60+dfsg-1.3 > imagemagick/imagemagick-6.q16@8:6.9.11.60+dfsg-1.3 > imagemagick/libmagickcore-6.q16-6@8:6.9.11.60+dfsg-1.3 > tiff/libtiff5@4.2.0-1
8  From: imagemagick/libmagickcore-dev@8:6.9.11.60+dfsg-1.3 > imagemagick/libmagickcore-6.q16-dev@8:6.9.11.60+dfsg-1.3 > tiff/libtiff-dev@4.2.0-1 > tiff/libtiff5@4.2.0-1
9  From: imagemagick/libmagickcore-dev@8:6.9.11.60+dfsg-1.3 > imagemagick/libmagickcore-6.q16-dev@8:6.9.11.60+dfsg-1.3 > tiff/libtiff-dev@4.2.0-1 > tiff/libtiffxx5@4.2.0-1 > tiff/libtiff5@4.2.0-1
10  and 3 more...
11
12✗ High severity vulnerability found in imagemagick/imagemagick-6-common
13  Description: Information Exposure
14  Info: https://snyk.io/vuln/SNYK-DEBIAN11-IMAGEMAGICK-1246513
15  Introduced through: imagemagick/libmagickcore-dev@8:6.9.11.60+dfsg-1.3, imagemagick/libmagickwand-dev@8:6.9.11.60+dfsg-1.3, imagemagick@8:6.9.11.60+dfsg-1.3
16  From: imagemagick/libmagickcore-dev@8:6.9.11.60+dfsg-1.3 > imagemagick/imagemagick-6-common@8:6.9.11.60+dfsg-1.3
17  From: imagemagick/libmagickwand-dev@8:6.9.11.60+dfsg-1.3 > imagemagick/imagemagick-6-common@8:6.9.11.60+dfsg-1.3
18  From: imagemagick@8:6.9.11.60+dfsg-1.3 > imagemagick/imagemagick-6.q16@8:6.9.11.60+dfsg-1.3 > imagemagick/libmagickcore-6.q16-6@8:6.9.11.60+dfsg-1.3 > imagemagick/imagemagick-6-common@8:6.9.11.60+dfsg-1.3
19  and 24 more...
20
21✗ Critical severity vulnerability found in python3.9/libpython3.9-stdlib
22  Description: Improper Input Validation
23  Info: https://snyk.io/vuln/SNYK-DEBIAN11-PYTHON39-1290158
24  Introduced through: mercurial@5.6.1-4
25  From: mercurial@5.6.1-4 > python3-defaults/python3@3.9.2-3 > python3-defaults/libpython3-stdlib@3.9.2-3 > python3.9/libpython3.9-stdlib@3.9.2-1
26  From: mercurial@5.6.1-4 > python3-defaults/python3@3.9.2-3 > python3.9@3.9.2-1 > python3.9/libpython3.9-stdlib@3.9.2-1
27  From: mercurial@5.6.1-4 > python3-defaults/python3@3.9.2-3 > python3-defaults/python3-minimal@3.9.2-3 > python3.9/python3.9-minimal@3.9.2-1
28  and 4 more...
29
30✗ Critical severity vulnerability found in glibc/libc-bin
31  Description: Use After Free
32  Info: https://snyk.io/vuln/SNYK-DEBIAN11-GLIBC-1296898
33  Introduced through: glibc/libc-bin@2.31-13+deb11u2, meta-common-packages@meta
34  From: glibc/libc-bin@2.31-13+deb11u2
35  From: meta-common-packages@meta > glibc/libc-dev-bin@2.31-13+deb11u2
36  From: meta-common-packages@meta > glibc/libc6@2.31-13+deb11u2
37  and 1 more...
38
39Organization:      snyk-demo-567
40Package manager:   deb
41Project name:      docker-image|python-flask-app
42Docker image:      python-flask-app
43Platform:          linux/amd64
44Base image:        python:3.8.12-bullseye
45Licenses:          enabled
46
47Tested 427 dependencies for known issues, found 171 issues.
48
49Base Image              Vulnerabilities  Severity
50python:3.8.12-bullseye  171              6 critical, 6 high, 27 medium, 132 low
51
52Recommendations for base image upgrade:
53
54Alternative image types
55Base Image                   Vulnerabilities  Severity
56python:3.9-slim              37               1 critical, 0 high, 1 medium, 35 low
57python:3.11-rc-slim          37               1 critical, 0 high, 1 medium, 35 low
58python:3.8.12-slim-bullseye  37               1 critical, 0 high, 1 medium, 35 low
59python:3.10-slim-buster      70               2 critical, 9 high, 9 medium, 50 low
So, we have 427 dependencies introduced in the form of open source libraries as part of the Python 3.8 operating system’s contents. They introduce a total of 171 security vulnerabilities for this Python Flask application due to the fact that we have chosen that base image of python:3.8.
At this point, you might be puzzled and ask, "how do I fix it?" Luckily for us, Snyk has some recommendations on which other base images we can upgrade to or switch to entirely, in order to lower the attack surface.
Here’s a clear visual screenshot of this base image recommendation advice:

Now we can make an informed, data-driven decision to secure our Python application. By choosing any of the alternative Docker images that Snyk recommended, we can significantly lower the attack surface of the software bundled in our application.
To take even more control of the security of your application, connect your repositories to the Snyk UI to import your source code and Dockerfile so you can not only find these vulnerabilities, but also continuously monitor them for new security issues. Here’s the same Docker base image report from the Snyk UI:

What’s better than monitoring and finding security vulnerabilities? Fixing them! :-)
If you connect your Git repositories to Snyk, we can then also create pull requests in your repository (automatically!) to offer these Docker base image upgrades like you see here:
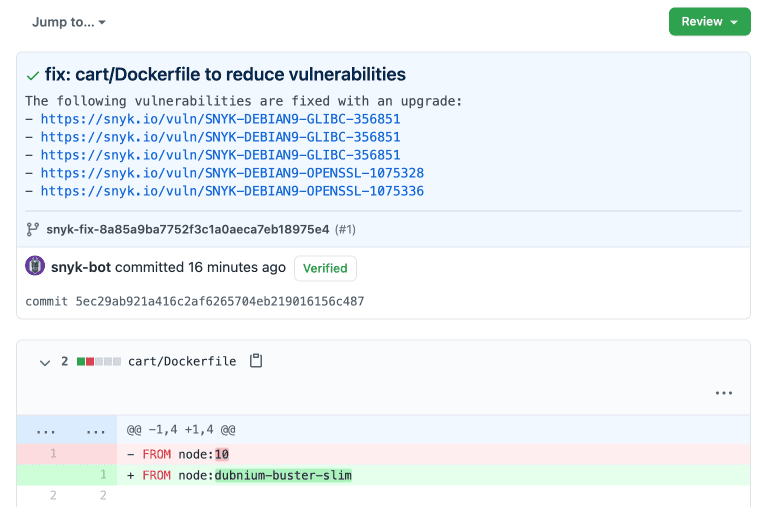
If you like this, check out this follow-up post about automating container security with Dockerfile pull requests.
How are Python applications containerized?
Docker is a software virtualization technology that allows us to build reusable, cross-platform, and fast-to-deploy software in the form of containerized Python applications that are based on Python Docker images. These applications are defined via infrastructure as code with a file called Dockerfile.
To build and use a containerized Python application, run the following:
docker build -t flask-application . docker run -p 8080:5000 flask-application
Python security recommendations for developers
Those best practices should help you better create, manage, and secure your containerized Python apps. If you enjoyed reading up on these best practices and you value application security and championing for security overall, then we’d recommend the following resources as a follow-up reading material:
Daniel Berman’s excellent getting started with Snyk for secure Python development
Brian Vermeer’s secrets of the Snyk CLI with a great cheatsheet
This comprehensive Node.js best practices for Docker base applications by Liran Tal and Yoni Golberg
And finally, for your Java friends this Docker for Java developers: 5 things you need to know not to fail your security by Brian Vermeer.
Frank Fischer’s Python security best practices cheat sheet
A fully featured and insights-rich report on common security issues in Python projects
Developer-first container security
Snyk finds and automatically fixes vulnerabilities in container images and Kubernetes workloads.


